2013 SKODA ROOMSTER tow
[x] Cancel search: towPage 123 of 219
The ball head is released in this position and falls freely into the hand. If it does
not fall freely into the hand, use your other hand to push it upwards.
At the same time, the ball head latches into the ready position and is thus readyto be re-inserted into the mounting recess »
.
›
Fit the cover for the mounting recess
4
» Fig. 103 on page 117 in the opposite
direction to the arrow.
›
Offer up the cap to the rear bumper
2
» Fig. 103 on page 117 aligning it with
“check mark” in the lower bumper area.
›
Push the cap in first on the left and right and then at the top.
WARNINGNever allow the ball head to remain unsecured in the boot. This could cause damage in a sudden braking manoeuvre and put the safety of the occupantsat risk.
CAUTION
■ If the lever is held firm and not pushed downwards as far as it can go, it will go
back up after the ball head is removed and will not latch into the ready position.
The ball head then needs to be brought into this position before the next time it
is fitted.■
Stow the ball head in the ready position with the key inserted in the box. When
doing so, make the side opposite to the inserted key face downwards – there is a
risk of damaging the key.
■
Do not use excessive force when handling the operating lever (e.g. do not step
on it).
Note
■ We recommend that you put the protective cap on the ball before removing the
ball head.■
Clean any dirt from the ball head before stowing it away in the box with the ve-
hicle tool kit.
Use and care
First read and observe the introductory information and safety warn-
ings
on page 117.
Close the mounting recess with the cap to prevent any ingress of dirt.
Always check the ball head before hitching a trailer. Apply a suitable grease where necessary.
Fit the protective cap when stowing away the ball head to protect the luggage
compartment against dirt.
In the event of dirt, clean the surfaces of the mounting recess and treat with a
suitable preservative.
CAUTION
Apply grease to the upper part of the mounting recess. Make sure you do not re-
move any grease.
Trailer
Introduction
This chapter contains information on the following subjects:
Loading a trailer
120
Towing a trailer
121
Anti-theft alarm system
122WARNINGAlways drive particularly carefully with the trailer.
Loading a trailer
First read and observe the introductory information and safety warn-
ings
on page 120.
The vehicle/trailer combination must be balanced, whereby the maximum permis-
sible drawbar load must be utilised. If the drawbar load is too low, it jeopardises the performance of the vehicle/trailer combination.
Distribution of the load
Distribute the load in the trailer in such a way that heavy items are located as close to the axle as possible. Secure the items from slipping.
120Driving
Page 124 of 219

The distribution of the weight is very poor if your vehicle is unladen and the trail-
er is laden. Maintain a particularly low speed if you cannot avoid driving with this
combination.
Tyre pressure
Correct the tyre inflation pressure on your vehicle for a “full load” » page 173,
Service life of tyres .
Trailer load
The permissible trailer load must not be exceeded under any circumstan- ces » page 199 , Technical data .
The trailer loads specified apply only to altitudes up to 1 000 metres above mean
sea level.
The engine output falls as altitude increases, as does the ability to climb. There-
fore, for every additional 1000 m in height (or part), the maximum permissible
towed weight must be reduced by 10 %.
The towed weight comprises the actual weights of the (loaded) towing vehicleand the (loaded) trailer.
The trailer and drawbar load information on the type plate of the towing equip-
ment are merely test data for the towing equipment. The vehicle-specific values
are detailed in the vehicle documents.WARNING■ Do not exceed the maximum permissible axle and drawbar load and the
maximum permissible total or towed weight of the vehicle and the trailer –
there is the risk of an accident and serious injury.■
Slipping loads can significantly affect the stability and safety of the vehicle/
trailer combination – there is the risk of an accident and serious injury.
Towing a trailer
First read and observe the introductory information and safety warn-
ings
on page 120.
Exterior mirrors
You have to have additional exterior mirrors fitted if you are not able to see the
traffic behind the trailer with the standard rear-view mirrors. The national legal requirements must be observed.
Headlights
The front of the vehicle can be lifted when a trailer is being towed and the head- lights can dazzle other road users.
Adjust the headlight setting on the headlight range control » page 42, Headlight
beam adjustment .
Driving speed
For safety reasons, do not drive faster than 80 km/h when towing a trailer.
Immediately reduce your speed as soon as even the slightest swaying of the trail- er is detected. Never attempt to stop the trailer from “swaying” by accelerating.
Brakes
Apply the brakes in good time! If the trailer is fitted with a trailer brake, apply the
brakes gently at first, then brake firmly. This will avoid brake jolts resulting from
the trailer wheels locking.
On downhill sections shift down a gear in good time to also use the engine as a
brake.
Engine overheating
The speed must be reduced immediately if the needle for the coolant tempera-
ture gauge moves into the right-hand area or the red area of the scale.
Stop and switch off the engine if the warning light
in the instrument cluster
starts to flash. Wait a few minutes and check the level of coolant » page 166,
Checking the coolant level .
The following guidelines must be observed » page 22,
Coolant .
The coolant temperature can be reduced by switching on the heating.WARNING■ Adapt your speed to the conditions of the road surface and to the traffic sit-
uation.■
Improper or incorrectly connected electric cables can energise the trailer and
cause functional faults to the vehicle's entire electrical system as well as acci-
dents and severe injuries.
■
Work on the electrical system must only be carried out by specialist garages.
■
Never directly connect the trailer's electrical system with the electrical con-
nections for the tail lights or other current sources.
121Towing a trailer
Page 125 of 219

Note■After coupling the trailer and connecting up the power socket, check the rear
lights on the trailer to ensure they work.■
If there is an error in the trailer lighting system, check the fuses in the fuse box
in the dashboard » page 192.
■
If you tow a trailer frequently, you should also have your car inspected between
service intervals.
■
The handbrake on the towing vehicle must be applied when coupling and un-
coupling the trailer.
Anti-theft alarm system
First read and observe the introductory information and safety warn-
ings
on page 120.
When the vehicle is locked, the alarm is activated as soon as the electrical con- nection to the trailer is interrupted.
Always switch off the anti-theft alarm system before a trailer is coupled or uncou- pled » page 35 .
Conditions for including a trailer in the anti-theft alarm system. The vehicle is factory-fitted with an anti-theft alarm system and towingequipment.
The trailer is electrically connected to the towing vehicle by means of the
trailer socket.
The electrical system of the vehicle and trailer is functional. The vehicle is locked with the vehicle key and the anti-theft alarm system isactivated.
Note
For technical reasons, trailers with rear LED lights cannot be connected to the an-
ti-theft alarm system.
122Driving
Page 130 of 219
Seat belts
Using seat belts
Introduction
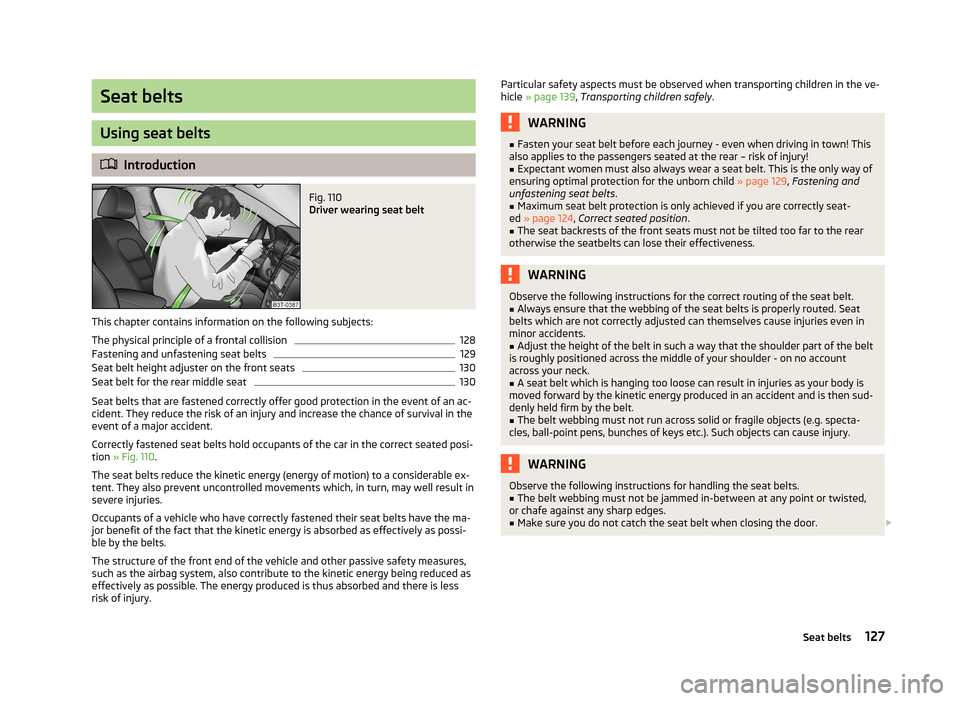
Fig. 110
Driver wearing seat belt
This chapter contains information on the following subjects:
The physical principle of a frontal collision
128
Fastening and unfastening seat belts
129
Seat belt height adjuster on the front seats
130
Seat belt for the rear middle seat
130
Seat belts that are fastened correctly offer good protection in the event of an ac-
cident. They reduce the risk of an injury and increase the chance of survival in the
event of a major accident.
Correctly fastened seat belts hold occupants of the car in the correct seated posi-
tion » Fig. 110 .
The seat belts reduce the kinetic energy (energy of motion) to a considerable ex-
tent. They also prevent uncontrolled movements which, in turn, may well result in
severe injuries.
Occupants of a vehicle who have correctly fastened their seat belts have the ma-
jor benefit of the fact that the kinetic energy is absorbed as effectively as possi-
ble by the belts.
The structure of the front end of the vehicle and other passive safety measures,
such as the airbag system, also contribute to the kinetic energy being reduced as
effectively as possible. The energy produced is thus absorbed and there is less
risk of injury.
Particular safety aspects must be observed when transporting children in the ve-
hicle » page 139 , Transporting children safely .WARNING■
Fasten your seat belt before each journey - even when driving in town! This
also applies to the passengers seated at the rear – risk of injury!■
Expectant women must also always wear a seat belt. This is the only way of
ensuring optimal protection for the unborn child » page 129, Fastening and
unfastening seat belts .
■
Maximum seat belt protection is only achieved if you are correctly seat-
ed » page 124 , Correct seated position .
■
The seat backrests of the front seats must not be tilted too far to the rear
otherwise the seatbelts can lose their effectiveness.
WARNINGObserve the following instructions for the correct routing of the seat belt.■Always ensure that the webbing of the seat belts is properly routed. Seat
belts which are not correctly adjusted can themselves cause injuries even in
minor accidents.■
Adjust the height of the belt in such a way that the shoulder part of the belt
is roughly positioned across the middle of your shoulder - on no account across your neck.
■
A seat belt which is hanging too loose can result in injuries as your body is
moved forward by the kinetic energy produced in an accident and is then sud-
denly held firm by the belt.
■
The belt webbing must not run across solid or fragile objects (e.g. specta-
cles, ball-point pens, bunches of keys etc.). Such objects can cause injury.
WARNINGObserve the following instructions for handling the seat belts.■The belt webbing must not be jammed in-between at any point or twisted,
or chafe against any sharp edges.■
Make sure you do not catch the seat belt when closing the door.
127Seat belts
Page 139 of 219
Head airbagsFig. 118
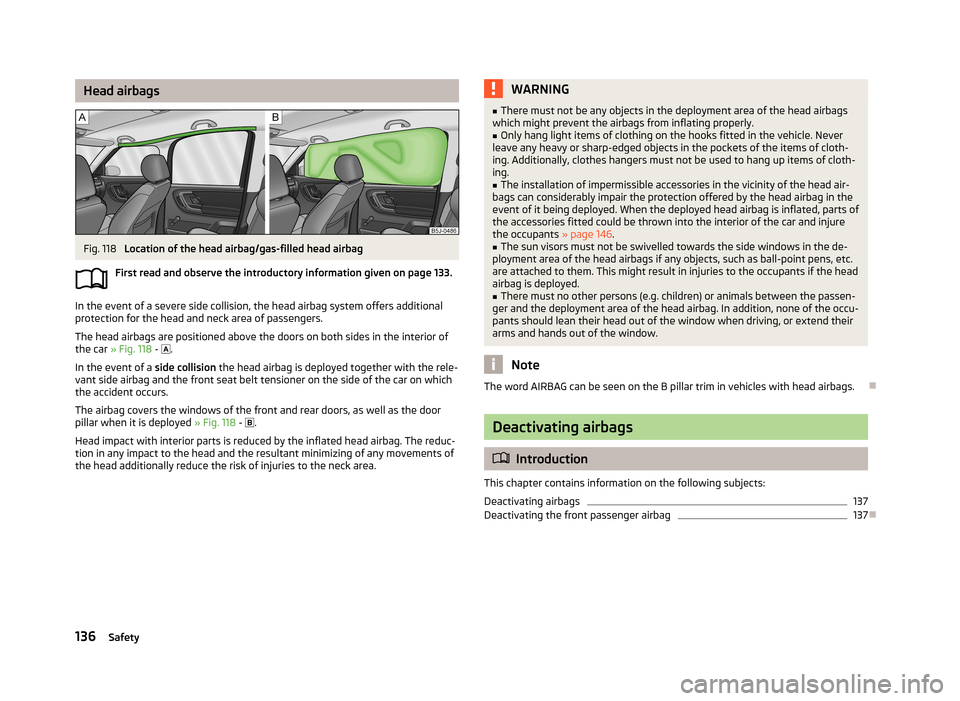
Location of the head airbag/gas-filled head airbag
First read and observe the introductory information given on page 133.
In the event of a severe side collision, the head airbag system offers additional
protection for the head and neck area of passengers.
The head airbags are positioned above the doors on both sides in the interior ofthe car » Fig. 118 -
.
In the event of a side collision the head airbag is deployed together with the rele-
vant side airbag and the front seat belt tensioner on the side of the car on which
the accident occurs.
The airbag covers the windows of the front and rear doors, as well as the door
pillar when it is deployed » Fig. 118 -
.
Head impact with interior parts is reduced by the inflated head airbag. The reduc- tion in any impact to the head and the resultant minimizing of any movements of
the head additionally reduce the risk of injuries to the neck area.
WARNING■ There must not be any objects in the deployment area of the head airbags
which might prevent the airbags from inflating properly.■
Only hang light items of clothing on the hooks fitted in the vehicle. Never
leave any heavy or sharp-edged objects in the pockets of the items of cloth-
ing. Additionally, clothes hangers must not be used to hang up items of cloth-
ing.
■
The installation of impermissible accessories in the vicinity of the head air-
bags can considerably impair the protection offered by the head airbag in the
event of it being deployed. When the deployed head airbag is inflated, parts of
the accessories fitted could be thrown into the interior of the car and injure
the occupants » page 146.
■
The sun visors must not be swivelled towards the side windows in the de-
ployment area of the head airbags if any objects, such as ball-point pens, etc.
are attached to them. This might result in injuries to the occupants if the head
airbag is deployed.
■
There must no other persons (e.g. children) or animals between the passen-
ger and the deployment area of the head airbag. In addition, none of the occu-
pants should lean their head out of the window when driving, or extend their
arms and hands out of the window.
Note
The word AIRBAG can be seen on the B pillar trim in vehicles with head airbags.
Deactivating airbags
Introduction
This chapter contains information on the following subjects:
Deactivating airbags
137
Deactivating the front passenger airbag
137
136Safety
Page 147 of 219
General Maintenance
Car care
Service intervals
Introduction
This chapter contains information on the following subjects:
Overview of service intervals
144
Fixed service intervals QI1 - QI4
145
Variable service interval QI6
145
Information about the ŠKODA service
145
The Service Interval Display in the instrument cluster will remind you to have ev- ery service specified by the manufacturer at the right time so that you never for- get a service.
A timely and adequate performance of servicing works is one of the requirements for the settlement of possible warranty claims.
The completion of services can be verified through the confirmed service certifi-
cation and the corresponding receipts.
The service intervals are appropriate for normal operating conditions.
It will be necessary to have some servicing work performed before the date of the next service or between the service intervals stated if operating conditions are
severe. This applies mainly to the cleaning or the replacement of the air filter in-
sert in regions with heavy dust pollution and to inspection and replacement of
the toothed belt, but also to vehicles with diesel particle filter which can stress
the engine oil more intensely.
These severe conditions are:
› fuel containing sulphur;
› frequent short trips;
› longer idling mode of the engine (e.g. taxi vehicles);
› operation in areas with heavy dust pollution;
› frequent trailer towing;
›
predominantly stop-and-go traffic as tends to occur in city driving, for example;
› operation predominantly during winter.
A service consultant at the specialist garage will tell you whether your vehicle's operating conditions make it necessary for such work to be carried out between
the normal service intervals.
Different service charges may apply, depending on the scope of operations re-
quired as well as the model, features and condition of your vehicle.
Note
■ The customer is responsible for covering the cost of all services including
changing or topping up the operating fluid, even during the warranty period, un- less the ŠKODA AUTO a.s. warranty terms or other agreements state otherwise.■
You will be informed about the scope of the service with regard to a particular
service event by the specialist garage.
Overview of service intervals
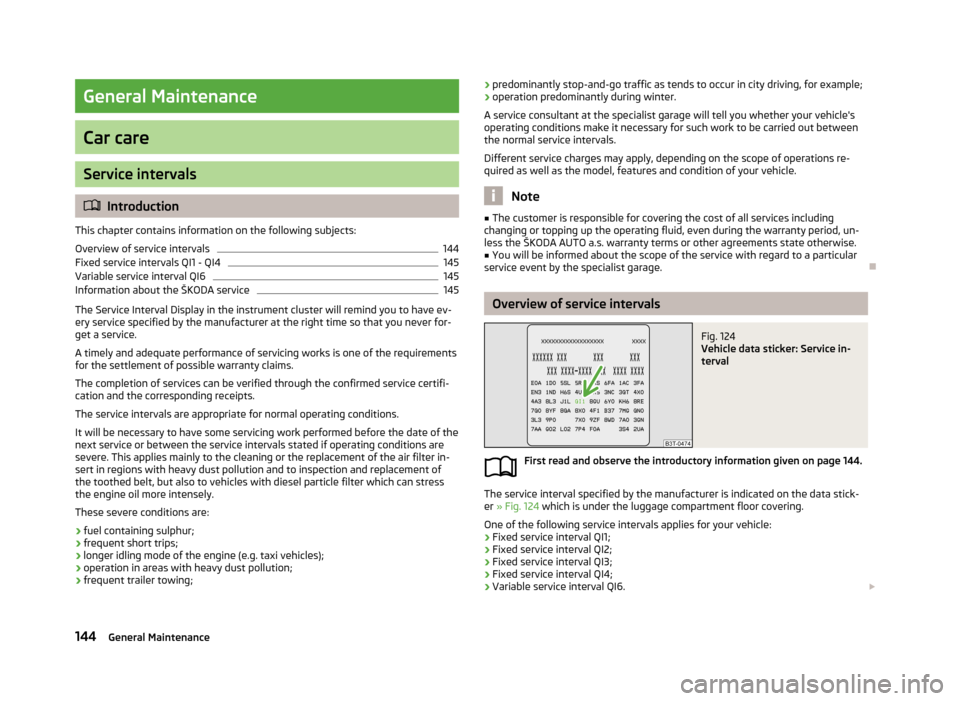
Fig. 124
Vehicle data sticker: Service in-
terval
First read and observe the introductory information given on page 144.
The service interval specified by the manufacturer is indicated on the data stick-
er » Fig. 124 which is under the luggage compartment floor covering.
One of the following service intervals applies for your vehicle: › Fixed service interval QI1;
› Fixed service interval QI2;
› Fixed service interval QI3;
› Fixed service interval QI4;
› Variable service interval QI6.
144General Maintenance
Page 168 of 219

The oil level must be checked at regular intervals. We recommend it be checked
after each time you refuel or prior to making a long journey.
We recommend maintaining the oil level within the range A
, but not above , if
the engine has been operating at high loads, for example, during a lengthy motor-
way trip during the summer months, towing a trailer or negotiating a high moun- tain pass.
The warning light in the instrument cluster will indicate whether the oil level is too low » page 21 , Engine oil . Check the oil level using the dipstick as soon
as possible. Add oil accordingly.
CAUTION
The oil level must on no account be above range A » Fig. 130 . Risk of damaging
the exhaust system!
Note
Engine oil specifications » page 163.
Replenishing
First read and observe the introductory information and safety warn-
ings
on page 163.
›
Check the oil level » page 164.
›
Unscrew the cap of the engine oil filler opening.
›
Replenish the oil in portions of 0.5 litres in accordance with the correct specifi-
cations » page 163 , Specifications and capacity .
›
Check the oil level » page 164.
›
Carefully screw on the oil filler opening cap and push the dipstick in fully.
Changing
First read and observe the introductory information and safety warn-ings
on page 163.
The engine oil must be changed at specified service intervals » page 144 or ac-
cording to the service interval display » page 16, Service Interval Display .
Coolant
Introduction
This chapter contains information on the following subjects:
Capacity
166
Checking the coolant level
166
Replenishing
167
The coolant consists of water with coolant additive. This mixture guarantees anti- freeze protection, protects the cooling/heater system against corrosion and pre-
vents lime formation.
Vehicles exported to countries with a mild climate are already factory-filled with
a coolant which offers antifreeze protection down to about -25 ℃. In these coun-
tries, the concentration of coolant additive should be at least 40%.
Vehicles exported to countries with a cold climate are already factory-filled with a
coolant which offers antifreeze protection down to about -35 °C. In these coun-
tries, the concentration of coolant additive should be at least 50%.
If a higher concentration of antifreeze is required for climatic reasons, the con-centration of coolant additive can be increased up to a maximum of 60% (anti-
freeze protection down to approx. -40 °C).
When refilling, only use the same antifreeze identified on the coolant expansion
vessel » Fig. 131 on page 166.
WARNING■
The engine compartment of your car is a hazardous area. The following
warning instructions must be followed at all times when working in the en-
gine compartment » page 159.■
Do not continue your journey if for some reason it is not possible to top
up the coolant under the prevailing conditions! Switch off the engine and seek
assistance from a specialist garage.
CAUTION
■ The concentration of coolant additive in the coolant must never be under 40%.■Over 60% of coolant additive in the coolant reduces the antifreeze protection
and cooling effect. 165Inspecting and replenishing
Page 178 of 219
545 kg
615 kg
630 kg
650 kg
Speed symbol
This indicates the maximum permissible vehicle speed with fitted tyres in each
category.
170 km/h
180 km/h
190 km/h
200 km/h
210 km/h
240 km/h
270 km/h
CAUTION
The information about the load index and the speed symbol is listed in your vehi-
cle documents.
Unidirectional tyres
First read and observe the introductory information and safety warn-
ings
on page 172.
The direction of rotation of the tyres is marked by arrows on the wall of the tyre.
The indicated direction of rotation must be adhered to in order to ensure the op- timal characteristics of these tyres.
These characteristics mainly relate to the following: › Increased driving stability.
› Reduced risk of aquaplaning.
› Reduced tyre noise and tyre wear.
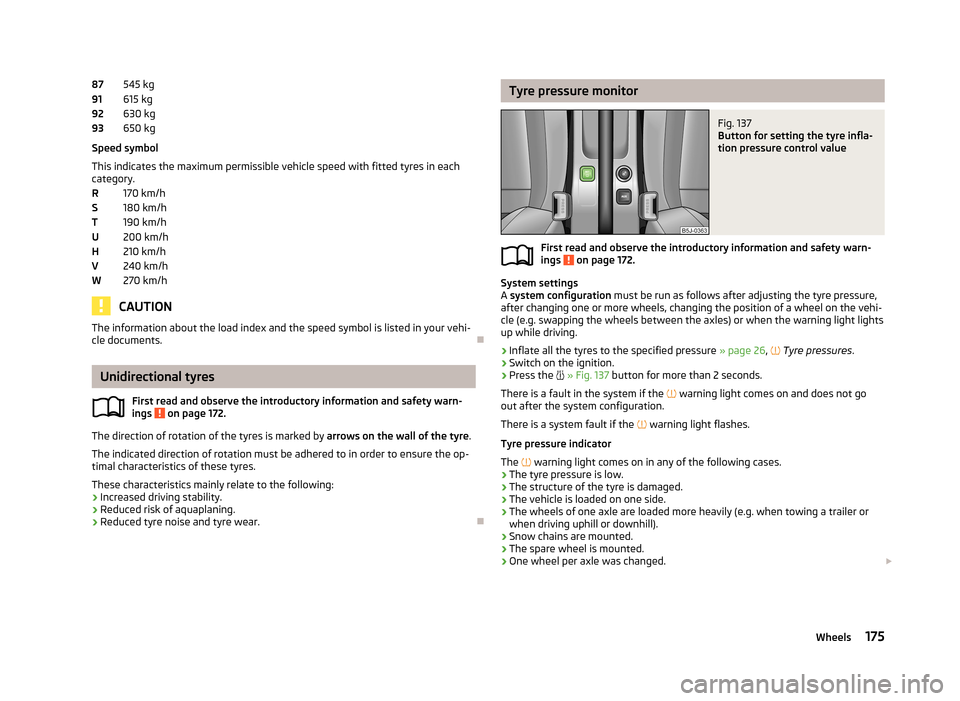
87919293RSTUHVWTyre pressure monitorFig. 137
Button for setting the tyre infla-
tion pressure control value
First read and observe the introductory information and safety warn-
ings on page 172.
System settings
A system configuration must be run as follows after adjusting the tyre pressure,
after changing one or more wheels, changing the position of a wheel on the vehi- cle (e.g. swapping the wheels between the axles) or when the warning light lights
up while driving.
›
Inflate all the tyres to the specified pressure » page 26,
Tyre pressures .
›
Switch on the ignition.
›
Press the
» Fig. 137 button for more than 2 seconds.
There is a fault in the system if the
warning light comes on and does not go
out after the system configuration.
There is a system fault if the
warning light flashes.
Tyre pressure indicator
The
warning light comes on in any of the following cases.
› The tyre pressure is low.
› The structure of the tyre is damaged.
› The vehicle is loaded on one side.
› The wheels of one axle are loaded more heavily (e.g. when towing a trailer or
when driving uphill or downhill).
› Snow chains are mounted.
› The spare wheel is mounted.
› One wheel per axle was changed.
175Wheels