2013 SKODA ROOMSTER stop start
[x] Cancel search: stop startPage 94 of 219

■Media Player
■ Active device
■ Paired devices
■ Search
■ Phone name - option to change the name of the phone (default SKODA_BT)
Settings
The following menu items can be selected from the Settings menu item.
■ Phone book
■ Update 1)
■ List
■ Surname
■ First name
■ Ring tone
Back
Return in the Start menu of the telephone.
Voice control
Introduction
This chapter contains information on the following subjects:
Dialogue
91
Voice commands
92
Dialogue
First read and observe the introductory information given on page 91.
The period of time during which the system is ready to receive voice commands
and to carry them out is called a dialogue. The system gives audible feedback and
guides you if necessary through the relevant functions.
Optimum understanding of the voice commands depends on several factors.
› Speak with a normal tone of voice without intonation and excessive pauses.
› Avoid a bad pronunciation.
› Close the doors, windows and sliding roof, to reduce or stop disturbing exterior
noise.
› It is recommended to speak louder at higher speeds, so that the tone of your
voice is louder than the increased surrounding noise.
› During the dialogue, limit additional noise in the vehicle, e.g. passengers talking
at the same time.
› Do not speak, if the system makes an announcement.
The microphone for voice control is inserted in the moulded headliner and direc- ted to the driver and front passenger. Therefore the driver and the front passen- ger can operate the equipment.
Entering a phone number
The telephone number can be entered as a continuous series of individually spo-
ken digits (the whole number at once) or in the form of digital blocks (separated
by short pauses). After each order of digits (separation through brief voice pause)
all of the digits detected up to now are repeated by the system.
The digits 0 - 9, symbols +,
, # are permitted. The system detects no continuous
digit combinations such as twenty-three, but only individually spoken digits (two,
three).
Switching on voice control › Press the
button on the adapter
» Fig. 86 on page 89 briefly.
› Press the
1
button on the multifunction steering wheel briefly
» page 87, Op-
erating the phone on the multifunction steering wheel .
Switching off voice control
If the system is currently playing a message, the message that is currently being played will have to be stopped as follows:
› Press the
button on the adapter briefly.
› Press the
1
button on the multifunction steering wheel briefly.
If the system is expecting a voice command, you can end the dialogue yourself as
follows.
› with the
CANCEL voice command.
› Press the
button on the adapter.
› Press the
1
button on the multifunction steering wheel briefly.
1)
On vehicles fitted with the Amundsen+ navigation system, this function can be accessed via the navi-
gation system menu; refer to the » Operating instructions for the Amundsen+ navigation system .
91Communication and multimedia
Page 98 of 219
Driving
Starting-off and Driving
Steering
Introduction
This chapter contains information on the following subjects:
Adjusting the steering wheel position
95
Power steering
95WARNING■ When driving, hold the steering wheel with both hands firmly on the outer
edge in the 9 o'clock and 3 o'clock position. Never hold the steering wheel in
the 12 o'clock position or in any other way (e.g. in the middle or inner edge of
the steering wheel). In such cases, you could severely injure the arms, hands
and head when the driver airbag is deployed.■
Never adjust the steering wheel when the vehicle is moving only when the
vehicle is stationary!
■
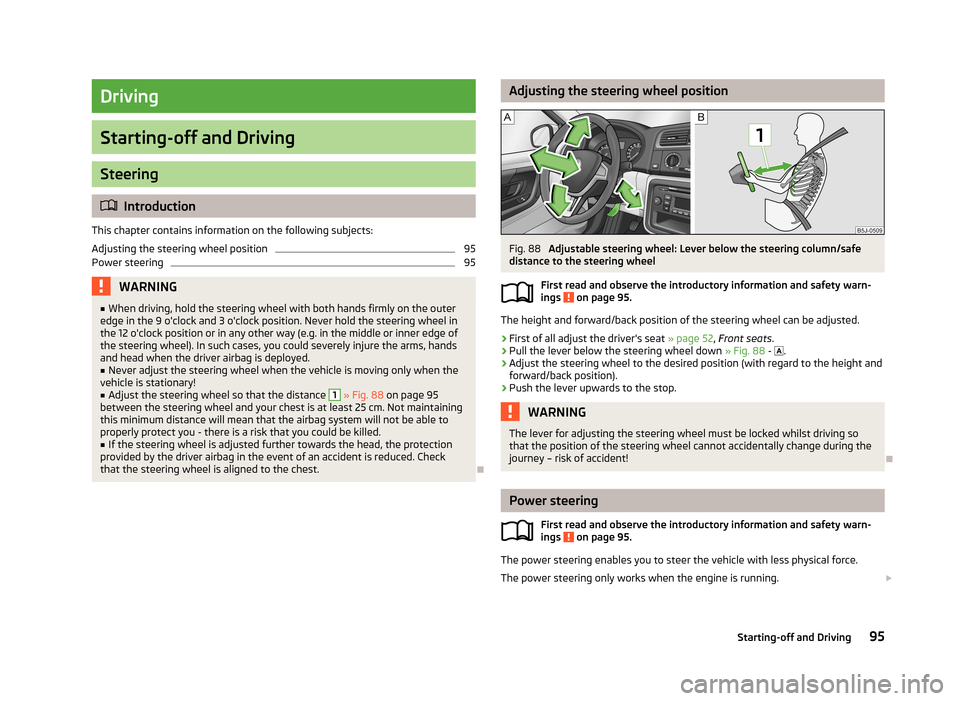
Adjust the steering wheel so that the distance
1
» Fig. 88 on page 95
between the steering wheel and your chest is at least 25 cm. Not maintaining
this minimum distance will mean that the airbag system will not be able to
properly protect you - there is a risk that you could be killed.
■
If the steering wheel is adjusted further towards the head, the protection
provided by the driver airbag in the event of an accident is reduced. Check
that the steering wheel is aligned to the chest.
Adjusting the steering wheel positionFig. 88
Adjustable steering wheel: Lever below the steering column/safe
distance to the steering wheel
First read and observe the introductory information and safety warn-
ings
on page 95.
The height and forward/back position of the steering wheel can be adjusted.
›
First of all adjust the driver's seat » page 52, Front seats .
›
Pull the lever below the steering wheel down » Fig. 88 -
.
›
Adjust the steering wheel to the desired position (with regard to the height and
forward/back position).
›
Push the lever upwards to the stop.
WARNINGThe lever for adjusting the steering wheel must be locked whilst driving so
that the position of the steering wheel cannot accidentally change during the
journey – risk of accident!
Power steering
First read and observe the introductory information and safety warn-ings
on page 95.
The power steering enables you to steer the vehicle with less physical force.
The power steering only works when the engine is running.
95Starting-off and Driving
Page 99 of 219

It is still fully possible to steer the vehicle if the power steering fails or if the en-gine is not running (e.g. when towing). However, greater physical effort is re-
quired to turn the steering wheel.
CAUTION
You will place great stresses on the power steering system if the steering is
turned to full lock when the vehicle is stationary. Turning the steering to full lock
in such a situation will be accompanied by noises. Never leave the steering wheel at full lock for more than 15 seconds when the engine is running - there is a risk of
damaging the power steering.
Starting and stopping the engine
Introduction
This chapter contains information on the following subjects:
Electronic immobilizer
97
Ignition lock
97
Engine
97
Switching off the engine
98
The engine can only be started using a correctly coded original key. The engine running noises may louder at first be louder for a short time afterstarting the cold engine. This is quite normal and is not an operating problem.
WARNING■ When the vehicle is travelling with the engine off, the ignition key must al-
ways be in position 2 » Fig. 89 on page 97 (ignition switched on). This posi-
tion is indicated by the warning lights coming on. If this is not the case, this
could result in unexpected locking of the steering wheel – risk of accident!■
Only pull the ignition key from the ignition lock when the vehicle has come
to a complete stop (by applying the handbrake). Otherwise, the steering could
be blocked – risk of accident!
■
When leaving the vehicle, the ignition must always be removed. This is par-
ticularly important if children are left in the vehicle. Children could otherwise
start the engine for example – risk of accident or injury!
WARNING (Continued)■ Never leave the vehicle unattended with the engine running.■Never switch off the engine before the vehicle is stationary – risk of acci-
dent!WARNING■ Never leave the engine running in unventilated or closed rooms. The ex-
haust gases from the engine contain substances such as odourless and col-
ourless carbon monoxide (a poisonous gas) – risk to life! ■ Carbon monoxide can cause unconsciousness and death.
CAUTION
■The starter must only be operated when the engine is not running and the vehi-
cle is at a standstill. The starter or engine can be damaged if the starter is activa-
ted when the engine is running 3
» Fig. 89 on page 97.
■
If the engine does not start up after a second attempt, the fuse for the fuel
pump may have a fault. Check the fuse and replace if necessary » page 191, or
seek assistance from a specialist garage.
■
Let go of the ignition key as soon as the engine starts otherwise the starter
could be damaged.
■
Do not tow start the engine – there is a risk of damaging the engine and the
catalytic converter. The battery from another vehicle can be used as a jump-start
aid » page 186 , Jump-starting .
CAUTION
■
Avoid high engine revolutions, full throttle and high engine loads before the en-
gine has reached its operating temperature – risk of damaging the engine!■
Do not switch the engine off immediately at the end of your journey after the
engine has been operated over a prolonged period at high loads but leave it to
run at an idling speed for about 1 minute. This prevents any possible accumulation
of heat when the engine is switched off.
For the sake of the environment
Do not warm up the engine while the vehicle is stationary. If possible, start your
journey as soon as the engine has started. Through this the engine reaches its
operating temperature more rapidly and the pollutant emissions are lower. 96Driving
Page 100 of 219
NoteAfter switching off the ignition, the radiator fan can intermittently continue to op-
erate for approx. 10 minutes.
Electronic immobilizer
First read and observe the introductory information and safety warn-ings
on page 96.
An electronic chip is integrated in the head of the key. The immobiliser is deacti-
vated with the aid of this chip when the key is inserted in the ignition lock. The
electronic immobiliser is automatically activated when the ignition key is with-
drawn from the lock.
The engine will not start if a non-authorized ignition key is used.
The MAXI DOT display shows the following: Immobilizer active.
Ignition lock
Fig. 89
Positions of the vehicle key in
the ignition lock
First read and observe the introductory information and safety warn-
ings on page 96.
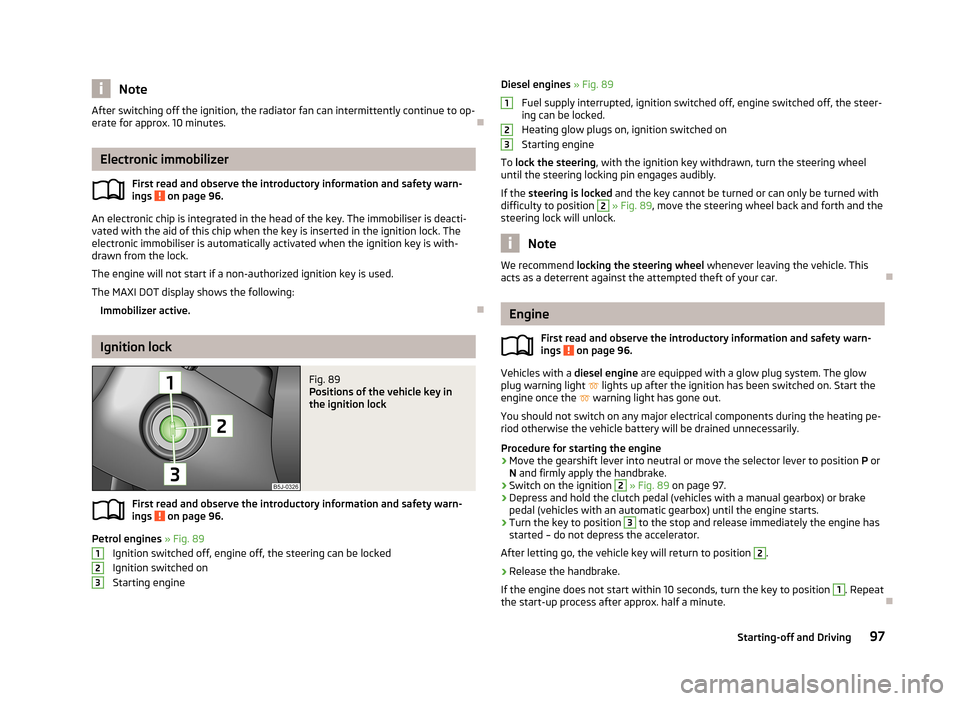
Petrol engines » Fig. 89
Ignition switched off, engine off, the steering can be locked
Ignition switched on Starting engine
123Diesel engines » Fig. 89
Fuel supply interrupted, ignition switched off, engine switched off, the steer-
ing can be locked.
Heating glow plugs on, ignition switched on
Starting engine
To lock the steering , with the ignition key withdrawn, turn the steering wheel
until the steering locking pin engages audibly.
If the steering is locked and the key cannot be turned or can only be turned with
difficulty to position 2
» Fig. 89 , move the steering wheel back and forth and the
steering lock will unlock.
Note
We recommend locking the steering wheel whenever leaving the vehicle. This
acts as a deterrent against the attempted theft of your car.
Engine
First read and observe the introductory information and safety warn-
ings
on page 96.
Vehicles with a diesel engine are equipped with a glow plug system. The glow
plug warning light
lights up after the ignition has been switched on. Start the
engine once the
warning light has gone out.
You should not switch on any major electrical components during the heating pe- riod otherwise the vehicle battery will be drained unnecessarily.
Procedure for starting the engine
›
Move the gearshift lever into neutral or move the selector lever to position P or
N and firmly apply the handbrake.
›
Switch on the ignition
2
» Fig. 89 on page 97.
›
Depress and hold the clutch pedal (vehicles with a manual gearbox) or brake
pedal (vehicles with an automatic gearbox) until the engine starts.
›
Turn the key to position
3
to the stop and release immediately the engine has
started – do not depress the accelerator.
After letting go, the vehicle key will return to position
2
.
›
Release the handbrake.
If the engine does not start within 10 seconds, turn the key to position
1
. Repeat
the start-up process after approx. half a minute.
12397Starting-off and Driving
Page 101 of 219

Switching off the engineFirst read and observe the introductory information and safety warn-ings
on page 96.
Switch off the engine by turning the ignition key to position
1
» Fig. 89 on
page 97.
Brakes
Introduction
This chapter contains information on the following subjects:
Information on braking
98
Handbrake
99WARNING■ Greater physical effort is required for braking when the engine is switched
off – risk of accident!■
The clutch pedal must be depressed when braking on a vehicle with manual
transmission, when the vehicle is in gear and at low revs. Otherwise, the func-
tion of the brake booster may be impaired – risk of accident!
■
If a front spoiler, full wheel trim, etc. is mounted retrospectively, it must be
ensured that the air supply to the front wheel brakes is not reduced. The front
brakes may overheat, which can have a negative impact on the functioning of
the braking system – there is a risk of an accident.
■
Never leave children unattended in the vehicle. The children might, for ex-
ample, release the handbrake or take the vehicle out of gear. The vehicle
could then start to move – risk of accident!
CAUTION
■ Observe the recommendations on the new brake pads » page 104.■Never let the brakes slip with light pressure on the pedal if braking is not neces-
sary. This causes the brakes to overheat and can also result in a longer braking distance and excessive wear.
Information on braking
First read and observe the introductory information and safety warn-
ings
on page 98.
If the brakes are applied in full and the control unit for the braking system consid-
ers the situation to be dangerous for the following traffic, the brake light flashes
automatically.
After the speed was reduced below around 10 km/h or the vehicle was stopped,
the brake light stops flashing and the hazard warning light system switches on.
The hazard warning light system is switched off automatically after accelerating
or driving off again.
Before travelling a long distance down a steep gradient, reduce speed and shift
into the next lowest gear. As a result, the braking effect of the engine will be
used, reducing the load on the brakes. Any additional braking should be comple-
ted intermittently, not continuously.
Wear-and-tear
The wear of the brake pads is dependent on the operating conditions and driving style.
The brake pads wear more quickly if a lot of journeys are completed in towns and
over short distances or if a very sporty style of driving is adopted.
Under these severe conditions , the thickness of the brake pads must also be
checked by a specialist garage between services.
Wet roads or road salt
The performance of the brakes can be delayed as the brake discs and brake pads may be moist or have a coating of ice or layer of salt on them in winter. The
brakes are cleaned and dried by applying the brakes several times.
Corrosion
Corrosion on the brake discs and dirt on the bake pads occur if the vehicle has been parked for a long period and if you do not make much use of the braking
system. The brakes are cleaned and dried by applying the brakes several times.
Faults in the brake surface
If it is found that the braking distance has suddenly become longer and that the brake pedal can be depressed further, the brake system may be faulty.
Visit a specialist garage immediately and adjust your style of driving appropriately as you will not know the exact extent of the damage.
98Driving
Page 103 of 219
CAUTIONIf not in the process of changing gear, do not leave your hand on the gearshiftlever while driving. The pressure from the hand can cause the gearshift mecha-nism to wear excessively.
Pedals
First read and observe the introductory information given on page 99.
The operation of the pedals must not be hindered under any circumstances!
In the driver's footwell, only a footmat, which is attached to the two correspond- ing attachment points, may be used.
Only use footmats from the range of ŠKODA Original Accessories, which are fitted to two attachment points.
WARNINGNo objects are allowed in the driver's footwell – risk of obstruction or limita-
tion in operating the pedals!
Automatic transmission
Introduction
This chapter contains information on the following subjects:
Modes and use of selector lever
101
Manual shifting (Tiptronic)
102
Starting-off and driving
102
Malfunction
103
Selector lever-emergency unlocking
103WARNING■ Do not depress the accelerator if the forward driving mode is changed when
the vehicle is halted and the engine is running – there is a risk of an accident.■
Never shift the selector lever to R or P modes when driving – there is a risk
of an accident.
■
The vehicle must be held on the brake pedal in D, S or R modes if the vehicle
is halted and the engine is running. Even when the engine is idling, power
transmission is never completely interrupted – the vehicle will creep.
CAUTION
■ If the selector lever is shifted to N while the vehicle is being driven you must lift
off the accelerator pedal and you will need to wait until the engine has reached
its idling speed before shifting the selector lever to a forward driving mode again.■
At temperatures below -10 °C, the engine can only be started in selector lever
position P.
■
Never try to hold the vehicle using the accelerator pedal when stopping on a hill
– this may lead to transmission damage.
Note
The ignition key can only be withdrawn once the ignition has been switched off if
the selector lever is in the P position 1)
.1)
Only valid for some countries.
100Driving
Page 105 of 219
Manual shifting (Tiptronic)Fig. 93
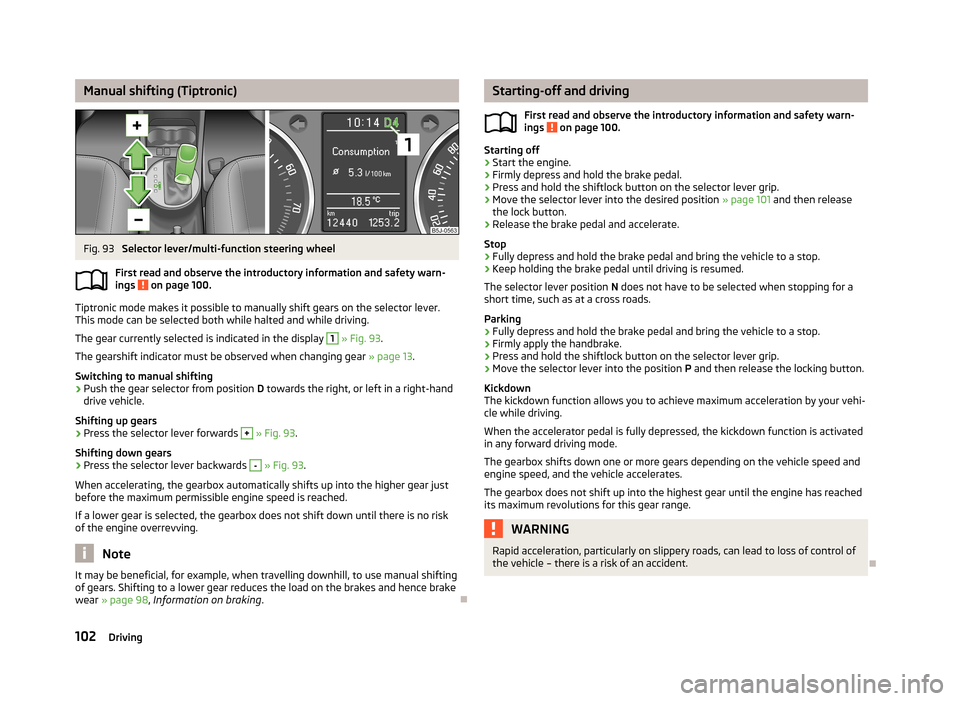
Selector lever/multi-function steering wheel
First read and observe the introductory information and safety warn-
ings
on page 100.
Tiptronic mode makes it possible to manually shift gears on the selector lever.
This mode can be selected both while halted and while driving.
The gear currently selected is indicated in the display
1
» Fig. 93 .
The gearshift indicator must be observed when changing gear » page 13.
Switching to manual shifting
›
Push the gear selector from position D towards the right, or left in a right-hand
drive vehicle.
Shifting up gears
›
Press the selector lever forwards
+
» Fig. 93 .
Shifting down gears
›
Press the selector lever backwards
-
» Fig. 93 .
When accelerating, the gearbox automatically shifts up into the higher gear just
before the maximum permissible engine speed is reached.
If a lower gear is selected, the gearbox does not shift down until there is no riskof the engine overrevving.
Note
It may be beneficial, for example, when travelling downhill, to use manual shifting
of gears. Shifting to a lower gear reduces the load on the brakes and hence brake
wear » page 98 , Information on braking .
Starting-off and driving
First read and observe the introductory information and safety warn-
ings
on page 100.
Starting off
›
Start the engine.
›
Firmly depress and hold the brake pedal.
›
Press and hold the shiftlock button on the selector lever grip.
›
Move the selector lever into the desired position » page 101 and then release
the lock button.
›
Release the brake pedal and accelerate.
Stop
›
Fully depress and hold the brake pedal and bring the vehicle to a stop.
›
Keep holding the brake pedal until driving is resumed.
The selector lever position N does not have to be selected when stopping for a
short time, such as at a cross roads.
Parking
›
Fully depress and hold the brake pedal and bring the vehicle to a stop.
›
Firmly apply the handbrake.
›
Press and hold the shiftlock button on the selector lever grip.
›
Move the selector lever into the position P and then release the locking button.
Kickdown
The kickdown function allows you to achieve maximum acceleration by your vehi-
cle while driving.
When the accelerator pedal is fully depressed, the kickdown function is activated
in any forward driving mode.
The gearbox shifts down one or more gears depending on the vehicle speed and engine speed, and the vehicle accelerates.
The gearbox does not shift up into the highest gear until the engine has reached
its maximum revolutions for this gear range.
WARNINGRapid acceleration, particularly on slippery roads, can lead to loss of control of
the vehicle – there is a risk of an accident.
102Driving
Page 106 of 219

MalfunctionFirst read and observe the introductory information and safety warn-
ings
on page 100.
Emergency programme
The transmission switches to the emergency programme if there is a fault in the
automatic gearbox system.
Indications of an activated emergency programme include the following:
› Only certain gears are selected.
› Reverse gear
R cannot be used.
› Shifting gears in Tiptronic mode is not possible.
Gearbox overheating
The gearbox may, for example, become too hot due to frequent repeated starting
or stop-and-go traffic. Overheating is indicated by the warning light » page 19,
Clutches in the automatic gearbox are too hot .
Note
Visit a specialist workshop if the gearbox has switched to the emergency pro-
gramme.
Selector lever-emergency unlocking
Fig. 94
Selector lever-emergency un-
locking
First read and observe the introductory information and safety warn-
ings on page 100.
If the selector lever lock is defective or its power supply is interrupted (e.g. dis-
charged vehicle battery, faulty fuse), the selector lever can no longer be moved
out of position P in the normal manner, and the vehicle can no longer be driven.
The selector lever emergency unlocking procedure is as follows.›
Firmly apply the handbrake.
›
Carefully pull up the front left and right cover.
›
Pull up rear cover.
›
Use a finger to press the yellow plastic part in the direction of the ar-
row » Fig. 94 .
›
At the same time, press the locking button in the selector lever and move the
selector lever to N.
The selector lever will be locked once more if it is moved again to P.
Running in
Introduction
This chapter contains information on the following subjects:
New engine
103
New tyres
104
New brake pads
104
New engine
First read and observe the introductory information given on page 103.
The engine has to be run in during the first 1 500 kilometres.Up to 1 000 kilometres
›
Do not drive faster than 3/4 of the maximum speed of the gear in use, i.e. 3/4 of
the maximum permissible engine speed.
›
No full throttle.
›
Avoid high engine speeds.
›
Do not tow a trailer.
From 1 000 up to 1 500 kilometres
Gradually increase the power output of the engine up to the full speed of the
gear engaged, i.e. up to the maximum permissible engine speed.
The red scale on the rev counter indicates the range in which the system beginsto limit the engine speed.
103Starting-off and Driving