2013 SKODA OCTAVIA belt
[x] Cancel search: beltPage 191 of 287

Driver’s knee airbagFig. 166
Driver's knee airbag below the steering column
First read and observe the introductory information given on page 186.
The driver's knee airbag offers adequate protection for the driver's legs.
The driver's knee airbag
A
is located in the lower part of the dash panel below
the steering column » Fig. 166.
In the event of a severe frontal collision, the driver's knee airbag and front airbags
are deployed.
The forward movement of the body is cushioned when it makes contact with the
fully inflated airbag and the risk of injury to the legs of the driver is thus reduced.
WARNING■ Adjust the driver's seat in a forward/back direction so that there is a gap of
at least 10cm between the legs B and the dash panel in the vicinity of the
knee airbag » Fig. 166. If it is not possible to meet this requirement due to
your body size, visit a specialist garage.■
The surface of the airbag module in the lower part of the dash panel below
the steering column not have stickers attached, be covered or modified in any
other way. This part should only be cleaned with a cloth that is dry or has
been moistened with water. No objects must be attached to the cover of the
airbag module or located within the immediate vicinity.
■
Do not attach any bulky and heavy objects (bunch of keys etc.) to the igni-
tion key. These can be ejected by the knee airbag when it is deployed and can
cause injuries.
Side airbagsFig. 167
Installation location of the side airbags front/rear
Fig. 168
Inflated side airbags
First read and observe the introductory information given on page 186.
In the event of severe side collisions, the side airbag system provides additional
protection for the upper body (chest, stomach and pelvis) of passengers in the ve- hicle.
The front side airbags are housed in the upholstery of the seat backrests of the front seats » Fig. 167 -
.
The rear side airbags are located between the entrance area and the seat back-
rest » Fig. 167 -
.
When the side airbags » Fig. 168 are deployed, the head airbag and belt tensioner
are also automatically deployed on the relevant side.
188Safety
Page 193 of 287

In the event of a side collision the head airbag is deployed together with the rele-
vant side airbag and the front seat belt tensioner on the side of the car on which
the accident occurs.
When deployed, the airbag covers the window area of the front and rear doors, as well as the area of the door pillar » Fig. 169 - .
Head impact with interior parts is reduced by the inflated head airbag. The reduc- tion in any impact to the head and the resultant minimizing of any movements of
the head additionally reduce the risk of injuries to the neck area.
The head airbag also offers additional protection in the case of an offset impact by covering the front door pillar.WARNINGGeneral■There must not be any objects in the deployment area of the head airbags
which might prevent the airbags from inflating properly.■
Only hang light items of clothing on the hooks fitted in the vehicle. Never
leave any heavy or sharp-edged objects in the pockets of the items of cloth-
ing. Additionally, clothes hangers must not be used to hang up items of cloth-
ing.
■
The installation of impermissible accessories in the vicinity of the head air-
bags can considerably impair the protection offered by the head airbag in the
event of it being deployed. When the deployed head airbag is inflated, parts of
the accessories fitted could, conditions permitting, be thrown into the interior
of the car and injure the occupants » page 200.
■
The sun visors must not be swivelled towards the side windows in the de-
ployment area of the head airbags if any objects, such as ball-point pens, etc.
are attached to them. This might result in injuries to the occupants if the head
airbag is deployed.
■
There must no other persons (e.g. children) or animals between the passen-
ger and the deployment area of the head airbag. In addition, none of the occu-
pants should lean their head out of the window when driving, or extend their
arms and hands out of the window.
WARNINGThe airbag control unit operates using pressure sensors located in the front
doors. For this reason, no adjustments may be carried out to the doors or door
panels (e.g. installation of additional loudspeakers). Resulting damage can have a negative impact on the function of the airbag system. Any work on thefront doors and door panels must be carried out by a specialist garage. The
following guidelines must be observed.■
Never drive with inner door panels removed.
■
Never drive if parts of the inner door panel have been removed and the re-
sulting openings have not been properly sealed.
■
Never drive if the loudspeakers in the doors have been removed, unless the
loudspeaker openings have been properly sealed.
■
Always make sure that the openings are covered or filled if additional loud-
speakers or other equipment parts have been installed in the inner door pan-
els.
■
Always have work carried out by a ŠKODA service partner or a professional
specialist garage.
Note
In vehicles with head airbags, the word AIRBAG can be seen on the B column
cladding.
Deactivating airbags
Introduction
This chapter contains information on the following subjects:
Deactivating airbags
191
Deactivating the front passenger airbag
191
190Safety
Page 196 of 287

Transporting children safely
Child seat
Introduction
This chapter contains information on the following subjects:
Use of a child seat on the front passenger seat
194
Child safety and side airbag
195
Classification of child seats
195
Use of child seats fastened with a seat belt
195
Children are generally safer on the rear seats than on the front passenger seat.
In contrast to adults, the muscles and bone structure of children are not yet fully developed. Thus children are exposed to increased risk of injury.
Children should be transported in accordance with the relevant statutory provi-sions.
Child seats that comply with the ECE-R 44 standard must be used. The ECE-R
standard stands for: Economic Commission for Europe – Regulation.
Child seats that comply with the ECE-R 44 standard have a test seal that cannot
be removed: a large E within a circle with the test number below.
WARNING■ The national legal requirements must be observed when using child seats.■One should never carry children, and also not babies! - on one's lap.■
Never leave children unattended in the vehicle. Certain outside climatic con-
ditions can cause life-threatening temperatures in the vehicle.
■
The child must be secured in the vehicle during the entire travelling time!
Otherwise, in the event of an accident, the child would be thrown through the
vehicle and as a result may suffer fatal injuries, and also injure other occu-
pants.
WARNING (Continued)■ Children are exposed to an increased risk of injury in the event of an acci-
dent if they lean forward or adopt an incorrect seated position when the vehi-
cle is moving. This particularly applies to children who are transported on the
front passenger seat as they can suffer severe, or even fatal injuries if the air-
bag system is deployed!■
Pay particular attention to the information provided by the manufacturer of
the child safety seat regarding the correct routing of the belt. Seat belts which are not correctly adjusted can themselves cause injuries even in minor
accidents.
■
Safety belts must be checked to ensure that they are running properly. One
should also ensure that the belt is not damaged by sharp-edged fittings.
■
It is essential to switch off the front passenger airbag if using a child seat in
which the child is carried with its back facing the direction of travel on the front passenger seat. Further information » page 194, Use of a child seat on
the front passenger seat .
CAUTION
■
When installing a child seat in which the child faces forward, adjust the head re-
straints so that they are as high as possible.■
If the head restraints still prevent the child seat from being installed, even in
the highest position, you will need to remove them » page 73. After removing the
child seat, re-install the head restraints.
Note
We recommend that you use child seats from ŠKODA Original Accessories. These child seats were developed and also tested for use in ŠKODAvehicles. They meetthe ECE-R 44 standard.
193Transporting children safely
Page 197 of 287

Use of a child seat on the front passenger seat
Never use a rearward-facing child restraint system on a seat which is protected by an active airbag installed in front of it. This could cause serious injury to the child, even death.Fig. 171
Sticker on the B column on the
front passenger side.
Fig. 172
Front passenger sun visor / label
First read and observe the introductory information and safety warn-
ings
on page 193.
For safety reasons, we recommend that you install child seats on the rear seats
whenever possible.
The following advice must be heeded when using a child seat in which the child is
carried on the front passenger seat.
› It is essential to switch off the front passenger airbag if using a child seat in
which the child is carried with its back facing the direction of travel »
.
› If possible, adjust the front passenger seat backrest so that it is as vertical, so
as to ensure secure contact between the passenger seat backrest and the back of the child seat.
› If possible, move the front passenger seat backwards so that there is no con-
tact between the front passenger seat and the child seat behind it.
› With child safety seats in groups 2 or 3, make sure that the loop-around fittings
attached to the child seat headrest is positioned in front of or at the same
height as the loop-around fittings on the B pillar on the passenger side.
› Set the height-adjustable front passenger seat as high up as possible.
› Set the front passenger seat belt as high up as possible.
› Place and fasten the child seat on the seat and the child in the child seat ac-
cording to the specifications in the manufacturer's user manual of the child seat.WARNING■ It is essential to switch off the front passenger airbag if using a child seat in
which the child is carried with its back facing the direction of travel on the
front passenger seat » page 190, Deactivating airbags .■
Never use a rear-facing child seat on the front passenger seat if the passen-
ger airbag is activated. This child safety seat is positioned in the deployment
area of the front passenger airbag. The airbag may cause the child severe, or
even fatal injuries, in the event of it being deployed.
■
This fact is also indicated by the label that can be found in one of the follow-
ing locations. ■ On the B-column on the front passenger side » Fig. 171. The sticker is visi-
ble upon opening the front passenger door. ■ On the front passenger's sun visor. In some countries, the sticker is loca-
ted on the front seat passenger's sun visor » Fig. 172.
■
With child safety seats in groups 2 or 3, make sure that the loop-around fit-
tings attached to the child seat headrest is positioned in front of or at the
same height as the loop-around fittings on the B pillar on the passenger side.
■
Once the child seat, in which the child is transported with the back to the
direction of travel, is no longer used in the passenger seat, the front passen-
ger airbag should be switched on again.
194Safety
Page 198 of 287

Child safety and side airbagFig. 173
Incorrect seated position of a child who is not properly secured –
risk from the side airbag/Child properly protected by safety seat
First read and observe the introductory information and safety warn-
ings
on page 193.
The child must not be positioned in the deployment area of the side air- bag » Fig. 173 -
.
There must be sufficient room between the child and the deployment area of the
side airbag to ensure that the airbag can provide as much protection as possi-
ble » Fig. 173 -
.
WARNING■
Children must never be seated with their head in the deployment area of
the side airbag – risk of injury!■
Do not place any objects within the deployment area of the side airbags –
risk of injury!
Classification of child seats
First read and observe the introductory information and safety warn-
ings
on page 193.
Classification of child seats according to the ECE-R 44 standard.
GroupWeight of the childApproximate age0up to 10 kgup to 9 months0+up to 13 kgup to 18 months19-18 kgup to 4 years215-25 kgup to 7 years322-36 kgover 7 years
Use of child seats fastened with a seat belt
First read and observe the introductory information and safety warn-ings
on page 193.
Overview of the usefulness of child seats fastened with a seat belt on each of the
seats in accordance with the ECE-R 16 standard.
GroupFront passenger seatRear seatsexternalRear seat Centre0
up to 10 kgUUU0+
up to 13 kgUUU1
9-18 kgUUU2
15-25 kgUUU3
22-36 kgUUU
Child seat category “Universal” - a child seat designed for fastening on the
seat with the seat belt.
U195Transporting children safely
Page 199 of 287

Fastening elements
Introduction
This chapter contains information on the following subjects:
eyes belonging to the lISOFIX system
196
Use of child seats with the ISOFIX system
196
Locking eyes of the TOP TETHER system
197
eyes belonging to the lISOFIX system
Fig. 174
Rear seat: ISOFIX
First read and observe the introductory information given on page 196.
There are two locking eyes between the seat backrest and the seat cushion of
the outer rear seats and front passenger seat for fixing the ISOFIXsystem child seat in place » Fig. 174.
First remove the caps to access the locking eyes.
After removing the child seat, replace he caps.
WARNING■ Always refer to the instructions from the manufacturer of the child seat
when installing and removing a child seat with the ISOFIX system.■
Never attach other child seats, belts or objects to the locking eyes intended
for the installation of a child seat with the ISOFIX system – risk of death!
Note
■ A child seat fitted with the ISOFIX system can only be mounted in a vehicle with
the help of the ISOFIX system if the child seat in question has been approved for this type of vehicle. Further information is available from a ŠKODA Partner.■
Child seats with the ISOFIX system can be purchased from ŠKODA Original Ac-
cessories.
Use of child seats with the ISOFIX system
First read and observe the introductory information given on page 196.
Overview of the usefulness of child seats fastened with the ISOFIX system on
each of the seats in accordance with the ECE-R 16 standard.
GroupSize class of
the child seat a)Front passenger seat b)Rear seats outsideRear seat middle0
up to 10 kgEXIL-SUX0+
up to 13 kgE
XIL-SUX
DC 196Safety
Page 200 of 287
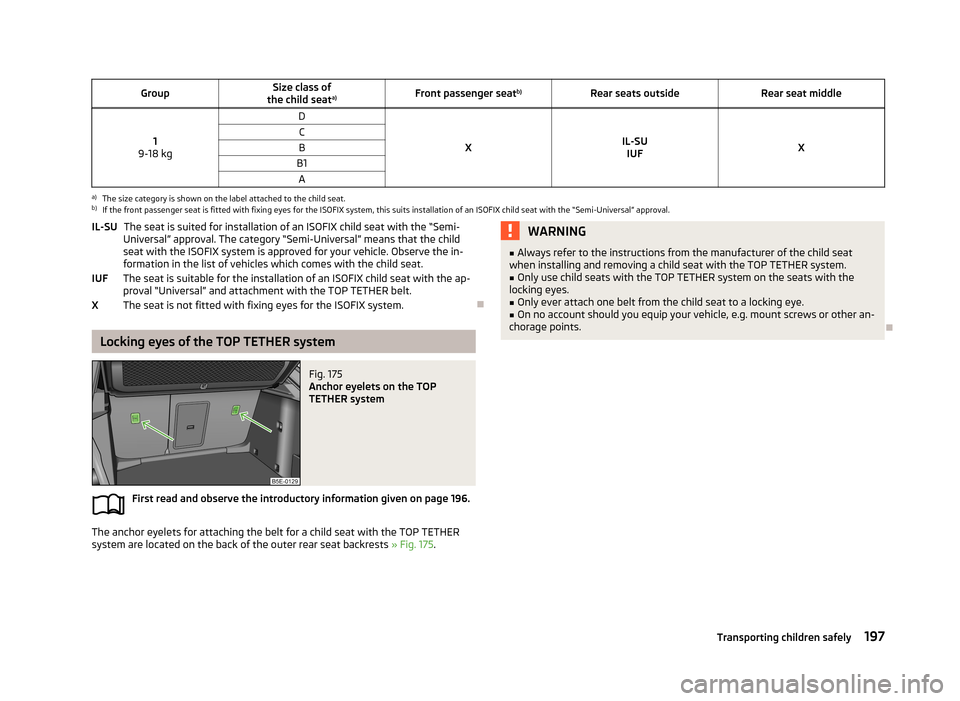
GroupSize class of
the child seat a)Front passenger seat b)Rear seats outsideRear seat middle
1
9-18 kg
D
XIL-SU IUFX
CBB1Aa)
The size category is shown on the label attached to the child seat.
b)
If the front passenger seat is fitted with fixing eyes for the ISOFIX system, this suits installation of an ISOFIX child seat with the “Semi-Universal” approval.
The seat is suited for installation of an ISOFIX child seat with the “Semi-
Universal” approval. The category “Semi-Universal” means that the child
seat with the ISOFIX system is approved for your vehicle. Observe the in-
formation in the list of vehicles which comes with the child seat.
The seat is suitable for the installation of an ISOFIX child seat with the ap- proval “Universal” and attachment with the TOP TETHER belt.
The seat is not fitted with fixing eyes for the ISOFIX system.
Locking eyes of the TOP TETHER system
Fig. 175
Anchor eyelets on the TOP
TETHER system
First read and observe the introductory information given on page 196.
The anchor eyelets for attaching the belt for a child seat with the TOP TETHER
system are located on the back of the outer rear seat backrests » Fig. 175.
IL-SU
IUFXWARNING■
Always refer to the instructions from the manufacturer of the child seat
when installing and removing a child seat with the TOP TETHER system.■
Only use child seats with the TOP TETHER system on the seats with the
locking eyes.
■
Only ever attach one belt from the child seat to a locking eye.
■
On no account should you equip your vehicle, e.g. mount screws or other an-
chorage points.
197Transporting children safely
Page 201 of 287

General Maintenance
Vehicle care
Service intervals
Introduction
This chapter contains information on the following subjects:
Overview of service intervals
198
Fixed service intervals QI1 - QI4
199
Variable service interval QI6
199
Information about the ŠKODA service
199
The service interval display in the instrument cluster will remind you to carry out every service stipulated by the manufacturer at the right time in order to prevent you from forgetting any.
Timely and proper performance of servicing works is one of the requirements for the settlement of potential warranty claims.
The completion of services can be verified by the validated service certificate and the corresponding receipts.
The specified service intervals are tailored to normal operating conditions.
In the case of difficult operating conditions, it is necessary to have some service
work performed before the date of the next service or between the specified
service intervals. This applies mainly to the cleaning or the replacement of the air
filter insert in regions with heavy dust pollution as well as checking and replacing
the toothed belt, but also to vehicles with diesel particle filters, which can put
greater strain on the engine oil.
These difficult conditions are: › Fuel with sulphur content;
› Frequent short trips;
› Longer periods of engine idling (e.g. taxis);
› Operation in areas with heavy dust pollution;
› Frequent trailer operation;
›
Predominantly stop-and-go traffic as is often the case in city driving, for exam-
ple;
› Operation predominantly during winter.
A service consultant at the specialist garage will tell you whether the operating conditions of your vehicle may make it necessary for service work to be carried
out between the normal service intervals.
Different service charges may apply from the particular scope of work required,
depending on the vehicle type and equipment and the status of your vehicle.
Note
■ The customer is responsible for covering the cost of all services including
changing or replenishing the oil, even during the warranty period, unless stated otherwise in the ŠKODA AUTO a.s. warranty terms or other agreements.■
You will be informed about the current service scopes for the particular service
work by the specialist garage.
Overview of service intervals
Fig. 176
Vehicle data sticker: Service in-
terval
First read and observe the introductory information given on page 198.
The service interval specified by the manufacturer is indicated on the vehicle data sticker » Fig. 176 under the floor covering in the boot.
One of the following service intervals applies for your vehicle: › Fixed service interval QI1;
› Fixed service interval QI2;
› Fixed service interval QI3;
› Fixed service interval QI4;
› Variable service interval QI6.
198General Maintenance