2013 SKODA OCTAVIA display
[x] Cancel search: displayPage 15 of 30
If radio stations have already been stored under the preset buttons, then the sta-
tion keys will be overwritten with newly located stations after the automatic sta-
tion search.
Storing stations
Set the desired radio station and press and hold the corresponding button3
» Fig. 1 on page 5 until a beep is heard. The station is stored in the device
memory and its name appears above the corresponding button
3
.
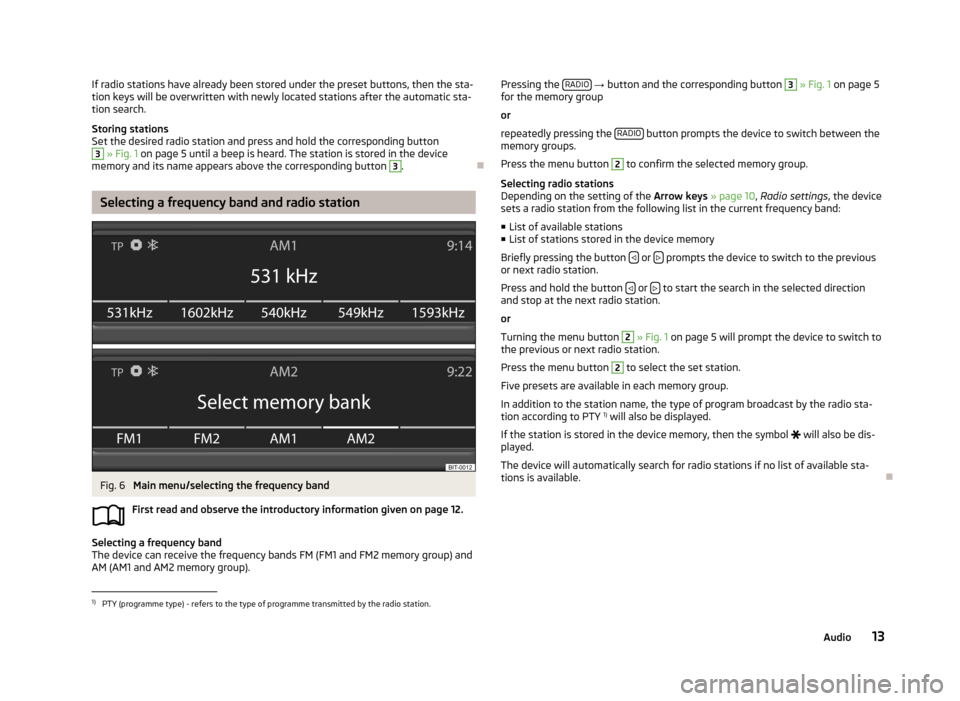
Selecting a frequency band and radio station
Fig. 6
Main menu/selecting the frequency band
First read and observe the introductory information given on page 12.
Selecting a frequency band
The device can receive the frequency bands FM (FM1 and FM2 memory group) and
AM (AM1 and AM2 memory group).
Pressing the RADIO
→ button and the corresponding button 3 » Fig. 1 on page 5
for the memory group
or
repeatedly pressing the RADIO
button prompts the device to switch between the
memory groups.
Press the menu button
2
to confirm the selected memory group.
Selecting radio stations
Depending on the setting of the Arrow keys » page 10 , Radio settings , the device
sets a radio station from the following list in the current frequency band:
■ List of available stations
■ List of stations stored in the device memory
Briefly pressing the button
or prompts the device to switch to the previous
or next radio station.
Press and hold the button
or to start the search in the selected direction
and stop at the next radio station.
or
Turning the menu button
2
» Fig. 1 on page 5 will prompt the device to switch to
the previous or next radio station.
Press the menu button
2
to select the set station.
Five presets are available in each memory group. In addition to the station name, the type of program broadcast by the radio sta-
tion according to PTY 1)
will also be displayed.
If the station is stored in the device memory, then the symbol
will also be dis-
played.
The device will automatically search for radio stations if no list of available sta- tions is available.
1)
PTY (programme type) - refers to the type of programme transmitted by the radio station.
13Audio
Page 16 of 30
Activating/deactivating traffic programme TPFirst read and observe the introductory information given on page 12.
Certain radio stations transmit traffic reports. The device enables playback of
these traffic reports.
›
Press the RADIO button
→ menu button
2
» Fig. 1 on page 5 → TP.
Screen display
The functionality of the traffic monitoring system is displayed in the screen by the
symbol in conjunction with the station name (e.g. in the station list or preset
list).
If the radio station does not broadcast traffic reports, or if no traffic stations can
be found (due to a general radio reception interruption, for example), then the
symbol is displayed on the screen.
If a radio station is tuned in that does not support traffic reports,
then the most
suitable station is automatically set in the background
in order to ensure the
continuous reception of traffic reports.
The device will function in exactly the same way with the selected
frequency
band.
When playing in Media mode, the most recently selected radio station continues
to be received in the background if this station supports traffic reports.
Interrupting/stopping the traffic programme
When the traffic programme is being received, Traffic announcement is displayed
on the device display screen along with the following options:
■ TP off - Switches off the traffic announcement currently being broadcast
■ Cancel - Deactivates the traffic programme function
Media
Introduction
This chapter contains information on the following subjects:
Selecting sources
15
Supported sources and file formats
15
Operation
16Adjusting additional functions17USB and AUX inputs17
First and foremost, pay attention to the safety instructions » page 4 , Important
notes .
The device allows you to play audio files in various formats and to connect differ-
ent source types » page 15.
When the source has been connected, the device starts to automatically play au- dio files in alphabetical order.
WARNING■ Never place external sources on the console panel. They could be thrown in-
to the passenger compartment during sudden driving manoeuvres, thereby in-
juring the occupants.■
Never place external sources close to the airbags. They could be thrown into
the passenger compartment when the airbags are deployed, injuring the oc-
cupants.
■
Never hold external sources in your hand or on your knees while driving.
They could be thrown into the passenger compartment during sudden driving
manoeuvres, thereby injuring the occupants.
■
Always route the connection cable for the external source such that it does
not restrict you when driving.
CAUTION
Do not store any important data on the connected external sources. ŠKODA as-
sumes no responsibility for lost or damaged files or connected devices.
Note
See the owner's manual of the specific manufacturer for instructions on operat-
ing the external source.
14Audio
Page 17 of 30
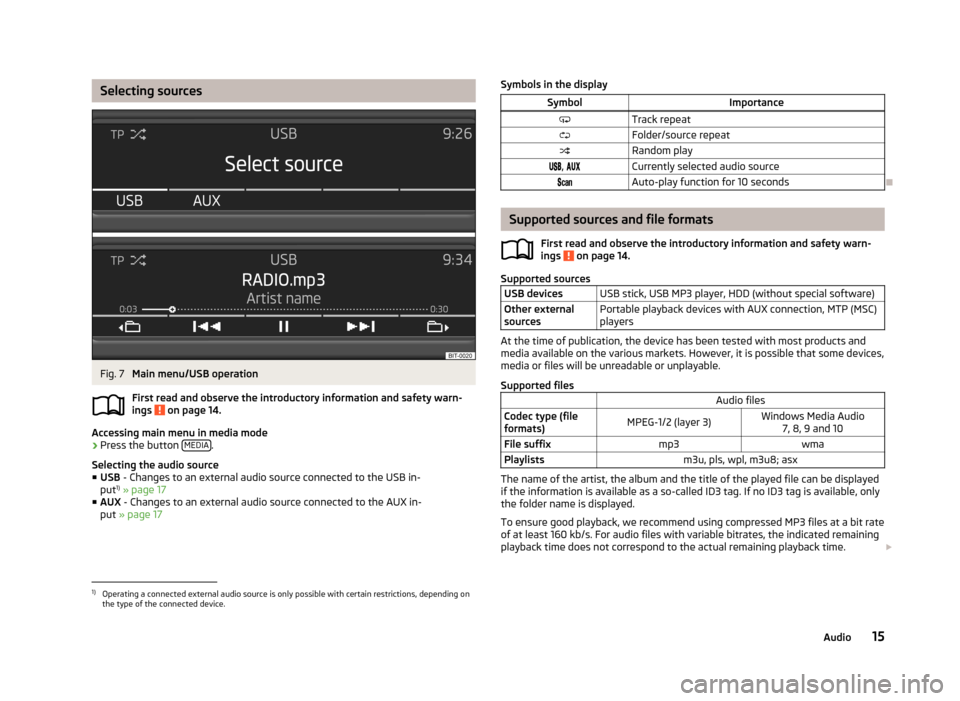
Selecting sourcesFig. 7
Main menu/USB operation
First read and observe the introductory information and safety warn-
ings
on page 14.
Accessing main menu in media mode
›
Press the button MEDIA.
Selecting the audio source ■ USB - Changes to an external audio source connected to the USB in-
put 1)
» page 17
■ AUX - Changes to an external audio source connected to the AUX in-
put » page 17
Symbols in the displaySymbolImportanceTrack repeatFolder/source repeatRandom play, Currently selected audio sourceAuto-play function for 10 seconds
Supported sources and file formats
First read and observe the introductory information and safety warn-
ings
on page 14.
Supported sources
USB devicesUSB stick, USB MP3 player, HDD (without special software)Other external
sourcesPortable playback devices with AUX connection, MTP (MSC)
players
At the time of publication, the device has been tested with most products and
media available on the various markets. However, it is possible that some devices,
media or files will be unreadable or unplayable.
Supported files
Audio filesCodec type (file
formats)MPEG-1/2 (layer 3)Windows Media Audio 7, 8, 9 and 10File suffixmp3wmaPlaylistsm3u, pls, wpl, m3u8; asx
The name of the artist, the album and the title of the played file can be displayed
if the information is available as a so-called ID3 tag. If no ID3 tag is available, only the folder name is displayed.
To ensure good playback, we recommend using compressed MP3 files at a bit rate
of at least 160 kb/s. For audio files with variable bitrates, the indicated remaining
playback time does not correspond to the actual remaining playback time.
1)
Operating a connected external audio source is only possible with certain restrictions, depending on
the type of the connected device.
15Audio
Page 18 of 30
The WMA files can only be played if they are not additionally copyrighted by DRM.
These kinds of WMA files are not supported by the device.
The more files, folders or playlists on one source, the longer it will take to read
the source. It is a good idea to create subfolders with files (e.g. by artist or album
names) in order to save time.
Source propertiesSpecifications for USB
sourcesUSB 1.x and 2.x or higher with USB 2.x support
(the maximum data transfer speed will then corre- spond to the USB 2.x speed)
Speed class of max. 480 Mb/sFile system for the USB
sourceFAT16, VFAT, FAT32
File properties
Bitratemax. 320 kb/sSampling ratemax. 48 kHz
Operation
First read and observe the introductory information and safety warn-
ings
on page 14.
The and buttons always affect the audio source currently being listened to,
regardless of the menu being used.
It is also possible to change tracks using the buttons
3
» Fig. 1 on page 5 from
within the menu of the audio source currently being played.
A list of buttons
3
is displayed in the menu of the audio source currently being
played after the menu button
2
is turned.
■ Play - Plays the current track
■ Up - Returns to a higher level
Press menu button
2
to start playback of the current track or to open the cur-
rent folder.
Button ActionFunction
Press briefly
Go to the start of the track being played if the track
has been playing for more than 3 secondsGo to the start of the previous track if the track has been playing for less than 3 secondsPress and holdFast rewind of the track
Button
ActionFunctionPress brieflyGo to the start of the next trackPress and holdFast forward of the track
Button
/
ActionFunction
Press briefly
Playback/pause: the play function is stopped in the
current position and the symbol changes to - when
pressed again, playback will continue from this posi-
tion.
Button
ActionFunction
Press briefly
Go to the start of the track being played if the track
has been playing for more than 3 secondsGo to the start of the previous track if the track has been playing for less than 3 secondsPress and holdFast rewind of the track
Button
ActionFunctionPress brieflyGo to the start of the next trackPress and holdFast forward of the track
Button
ActionFunctionPress brieflyScrolling down in folders 16Audio
Page 19 of 30
Button ActionFunctionPress brieflyScrolling up in folders
Adjusting additional functions
First read and observe the introductory information and safety warn-
ings
on page 14.
› Press the
MEDIA button
→ menu button
2
» Fig. 1 on page 5.
■ TP - switches traffic programme on/off
■ - Displays the artist, album and track name from ID3 tag 1)
■ Repeat - Sets repeat play
■ Off - Switches repeat function off
■ Track - Repeats the current track
■ Folder - Repeats all tracks in folder
■ Mix - Random playback
■ Off - Switches random playback function off
■ All - Sets random playback of all tracks in the current audio source
■ Folder - Repeats all tracks in folder
■ Scan - Consecutive playback of the tracks for 10 seconds
■ OK - Stops auto-play function at the current track
■ Skip - Selects another track
■ Cancel - Changes to the track played originally
USB and AUX inputsFig. 8
USB and AUX inputs
First read and observe the introductory information and safety warn-
ings on page 14.
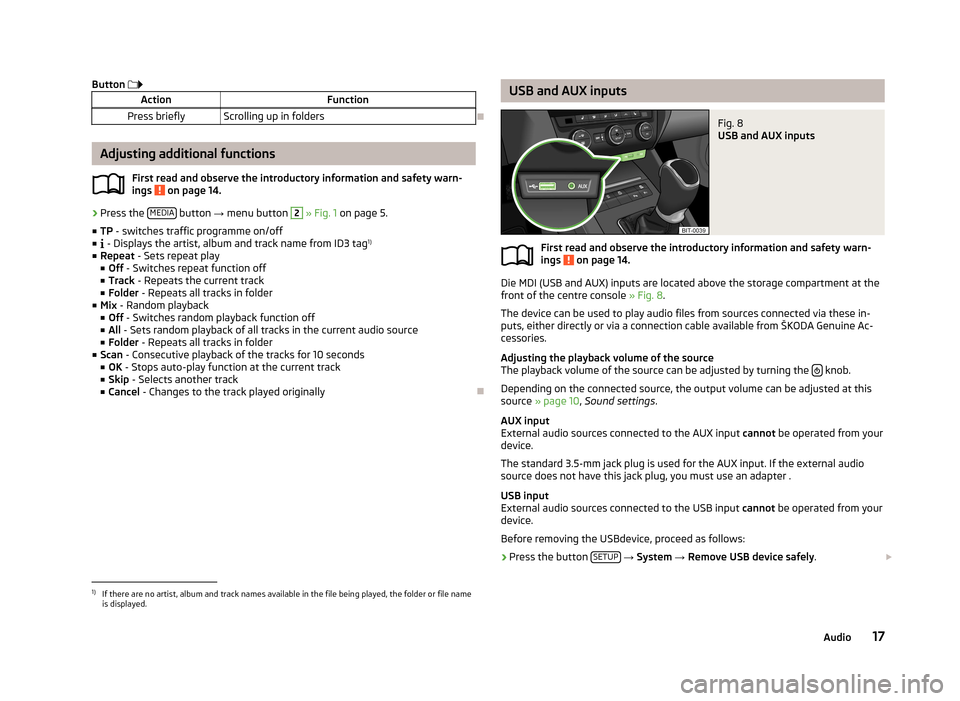
Die MDI (USB and AUX) inputs are located above the storage compartment at the
front of the centre console » Fig. 8.
The device can be used to play audio files from sources connected via these in-
puts, either directly or via a connection cable available from ŠKODA Genuine Ac-
cessories.
Adjusting the playback volume of the source
The playback volume of the source can be adjusted by turning the
knob.
Depending on the connected source, the output volume can be adjusted at this
source » page 10 , Sound settings .
AUX input
External audio sources connected to the AUX input cannot be operated from your
device.
The standard 3.5-mm jack plug is used for the AUX input. If the external audio
source does not have this jack plug, you must use an adapter .
USB input
External audio sources connected to the USB input cannot be operated from your
device.
Before removing the USBdevice, proceed as follows:
›
Press the button SETUP
→ System → Remove USB device safely .
1)
If there are no artist, album and track names available in the file being played, the folder or file name
is displayed.
17Audio
Page 21 of 30
Vehicle systems
Vehicle settings
Introduction
This chapter contains information on the following subjects:
Selecting driving mode
19
Driving assistants
20
Deactivating traction control (ASR)
21
Speed limit for winter tyres
21
Light
21
Visibility
21
Opening and closing
21
Seats
22
Setting Climatronic
22
Auxiliary heating and ventilation
23
Vehicle status
23
Details of the multifunction display
23
Service
24
Resetting to factory settings
24
First and foremost, pay attention to the safety instructions » page 4 , Important
notes .
Settings relating to the vehicle systems can only be made when the ignition is
switched on.
Note
■ The individual systems are described in the » Vehicle Owner's Manual .■For safety reasons, if any system functions are disabled, then some functions,
such as parts of the ESC system, are automatically enabled again after switching
the ignition off and on.
Selecting driving modeFig. 9
Button for selecting the driving
mode
First read and observe the introductory information given on page 19.
The menu for selecting the driving mode allows you to set the vehicle to one of
the three preset driving modes (Normal, Sport and Eco), or to the Individual driv-
ing mode, which allows customised settings to be applied.
If a driving mode other than Normal is selected, then the
» Fig. 9 symbol lights
up in the button.
Open the main menu
›
Press the button
» Fig. 9 .
■ Normal - Activates Normal mode
■ Info - Displays the mode settings
■ Sport - Activates Sport mode
■ Info - Displays the mode settings
■ Eco - Activates the fuel-saving mode
■ Info - Displays the mode settings
■ Individual - Activates the Individual mode
■ Settings - Individual settings
■ Steering action - Sets the power steering characteristics
■ Normal - Normal
■ Sport - Sports
■ Engine - Sets the engine (drive) characteristics
■ Normal - Normal
■ Sport - Sports
■ Eco - Economical
19Vehicle systems
Page 22 of 30
■ACC driving programme - Sets the vehicle acceleration when adaptive cruise
control is activated ■ Normal - Normal
■ Sport - Sports
■ Eco - Economical
■ Advanced FrontLighting System (AFS) - Sets the characteristics of the
adaptive headlights
■ Normal - Normal
■ Sport - Sports
■ Eco - Economical
■ Air conditioning - Sets the Climatronic characteristics
■ Normal - Normal
■ Eco - Economical
■ Reset - Sets the mode to Normal
Note
If the device is not operated for longer than 10 seconds in the "Select driving
mode" main menu, it will switch to the most recently selected menu or switch it-
self off.
Driving assistants
Fig. 10
Parking assistance: Illustrations
First read and observe the introductory information given on page 19.
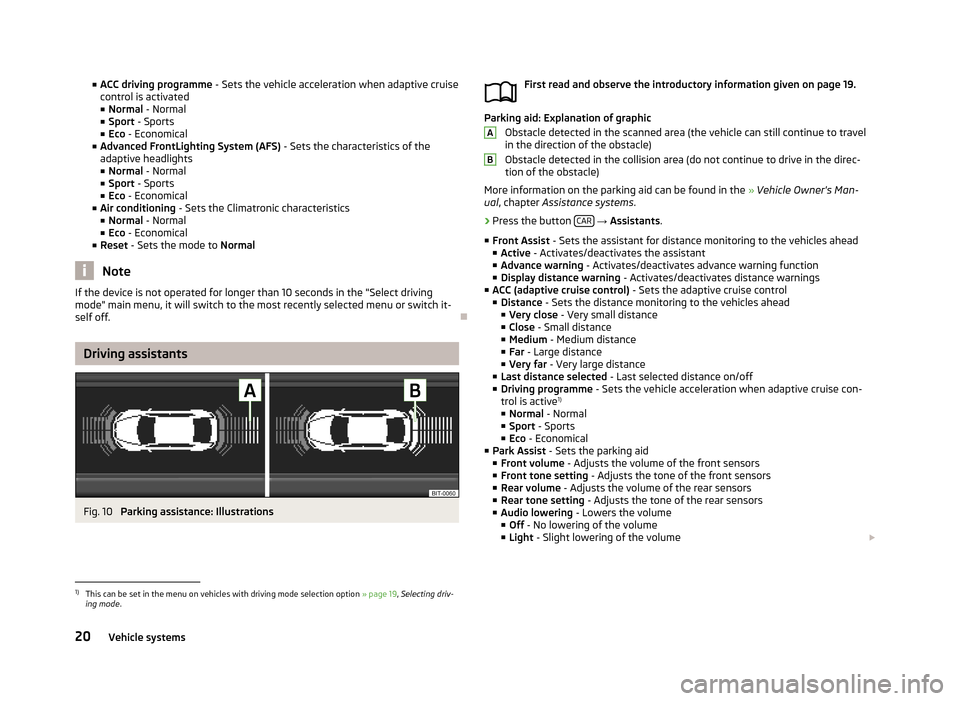
Parking aid: Explanation of graphic
Obstacle detected in the scanned area (the vehicle can still continue to travel
in the direction of the obstacle)
Obstacle detected in the collision area (do not continue to drive in the direc- tion of the obstacle)
More information on the parking aid can be found in the » Vehicle Owner's Man-
ual , chapter Assistance systems .
›
Press the button CAR
→ Assistants .
■ Front Assist - Sets the assistant for distance monitoring to the vehicles ahead
■ Active - Activates/deactivates the assistant
■ Advance warning - Activates/deactivates advance warning function
■ Display distance warning - Activates/deactivates distance warnings
■ ACC (adaptive cruise control) - Sets the adaptive cruise control
■ Distance - Sets the distance monitoring to the vehicles ahead
■ Very close - Very small distance
■ Close - Small distance
■ Medium - Medium distance
■ Far - Large distance
■ Very far - Very large distance
■ Last distance selected - Last selected distance on/off
■ Driving programme - Sets the vehicle acceleration when adaptive cruise con-
trol is active 1)
■ Normal - Normal
■ Sport - Sports
■ Eco - Economical
■ Park Assist - Sets the parking aid
■ Front volume - Adjusts the volume of the front sensors
■ Front tone setting - Adjusts the tone of the front sensors
■ Rear volume - Adjusts the volume of the rear sensors
■ Rear tone setting - Adjusts the tone of the rear sensors
■ Audio lowering - Lowers the volume
■ Off - No lowering of the volume
■ Light - Slight lowering of the volume
AB1)
This can be set in the menu on vehicles with driving mode selection option
» page 19, Selecting driv-
ing mode .
20Vehicle systems
Page 25 of 30
Auxiliary heating and ventilationFig. 12
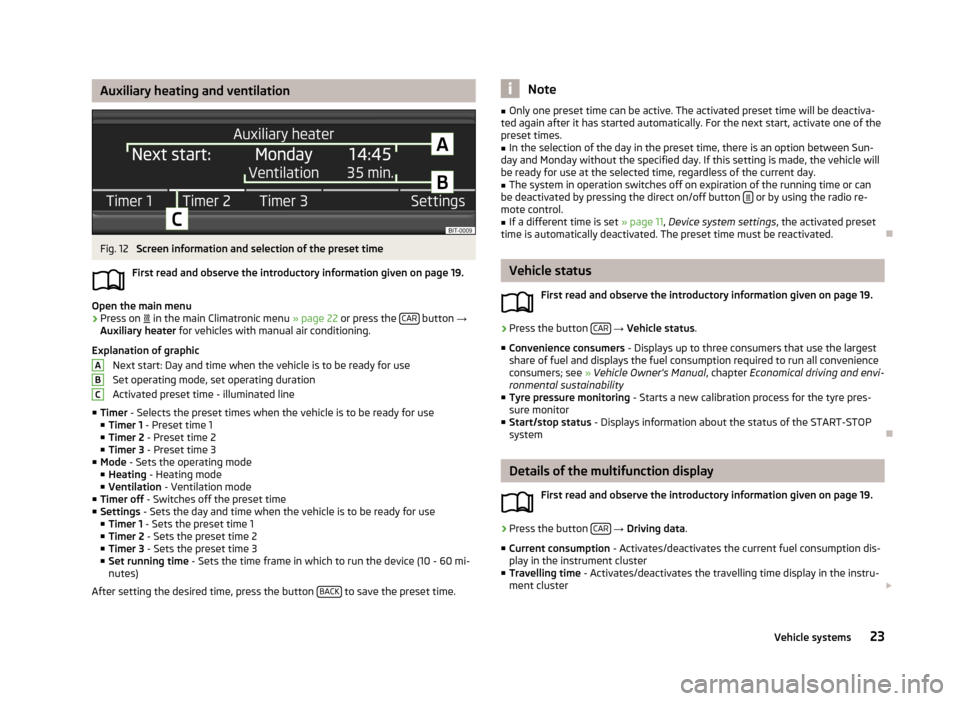
Screen information and selection of the preset time
First read and observe the introductory information given on page 19.
Open the main menu
›
Press on
in the main Climatronic menu » page 22 or press the CAR button
→
Auxiliary heater for vehicles with manual air conditioning.
Explanation of graphic Next start: Day and time when the vehicle is to be ready for use
Set operating mode, set operating duration
Activated preset time - illuminated line
■ Timer - Selects the preset times when the vehicle is to be ready for use
■ Timer 1 - Preset time 1
■ Timer 2 - Preset time 2
■ Timer 3 - Preset time 3
■ Mode - Sets the operating mode
■ Heating - Heating mode
■ Ventilation - Ventilation mode
■ Timer off - Switches off the preset time
■ Settings - Sets the day and time when the vehicle is to be ready for use
■ Timer 1 - Sets the preset time 1
■ Timer 2 - Sets the preset time 2
■ Timer 3 - Sets the preset time 3
■ Set running time - Sets the time frame in which to run the device (10 - 60 mi-
nutes)
After setting the desired time, press the button BACK
to save the preset time.
ABCNote■
Only one preset time can be active. The activated preset time will be deactiva-
ted again after it has started automatically. For the next start, activate one of the preset times.■
In the selection of the day in the preset time, there is an option between Sun-
day and Monday without the specified day. If this setting is made, the vehicle will
be ready for use at the selected time, regardless of the current day.
■
The system in operation switches off on expiration of the running time or can
be deactivated by pressing the direct on/off button or by using the radio re-
mote control.
■
If a different time is set » page 11, Device system settings , the activated preset
time is automatically deactivated. The preset time must be reactivated.
Vehicle status
First read and observe the introductory information given on page 19.
›
Press the button CAR
→ Vehicle status .
■ Convenience consumers - Displays up to three consumers that use the largest
share of fuel and displays the fuel consumption required to run all convenience
consumers; see » Vehicle Owner's Manual , chapter Economical driving and envi-
ronmental sustainability
■ Tyre pressure monitoring - Starts a new calibration process for the tyre pres-
sure monitor
■ Start/stop status - Displays information about the status of the START-STOP
system
Details of the multifunction display
First read and observe the introductory information given on page 19.
›
Press the button CAR
→ Driving data .
■ Current consumption - Activates/deactivates the current fuel consumption dis-
play in the instrument cluster
■ Travelling time - Activates/deactivates the travelling time display in the instru-
ment cluster
23Vehicle systems