2013 SKODA OCTAVIA ignition
[x] Cancel search: ignitionPage 7 of 30

›impairment of factory-fitted control units or control units fitted by a specialist
garage following installation in another vehicle (after a theft, for example);
› impairment of components operated outside of the vehicle;
› the possibility of a legitimate installation or replacement of control units during
repairs at a ŠKODA specialist garage.
When component protection is activated, the following message appears on the
device display screen: Component theft protection - Restricted function. Switch
on ignition.
If the component protection does not deactivate when the ignition is switched
on, please contact a specialist garage.
Description and operation of the device
Introduction
This chapter contains information on the following subjects:
Description of the device
5
Switching the device on/off
6
Adjusting the volume
6
First and foremost, pay attention to the safety instructions » page 4 , Important
notes .
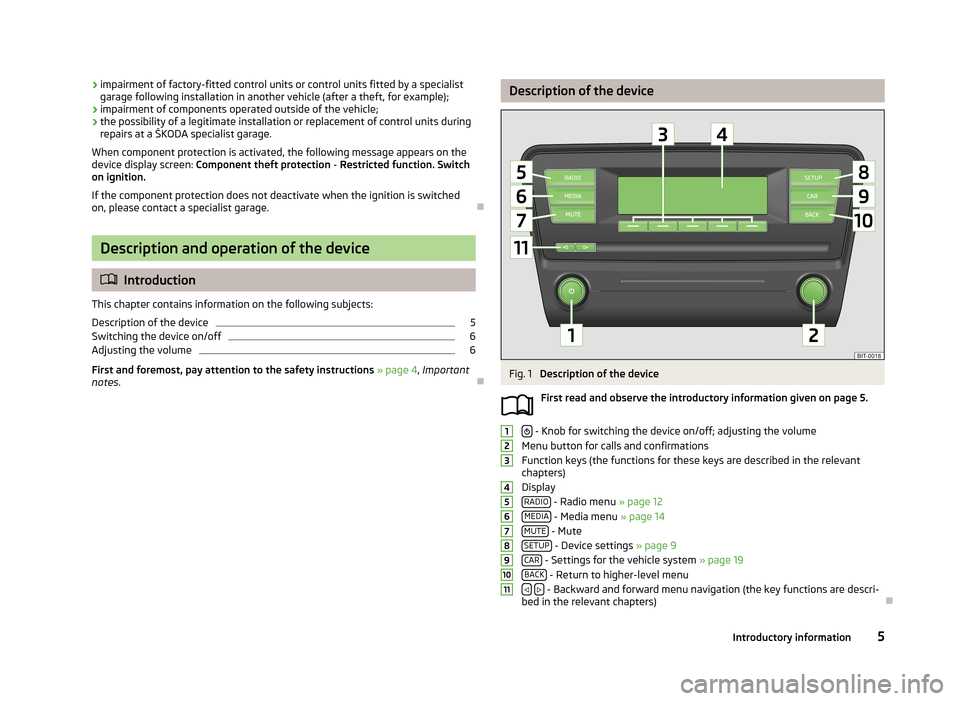
Description of the deviceFig. 1
Description of the device
First read and observe the introductory information given on page 5.
- Knob for switching the device on/off; adjusting the volume
Menu button for calls and confirmations
Function keys (the functions for these keys are described in the relevant
chapters)
Display RADIO
- Radio menu » page 12
MEDIA - Media menu » page 14
MUTE - Mute
SETUP - Device settings » page 9
CAR - Settings for the vehicle system » page 19
BACK - Return to higher-level menu
- Backward and forward menu navigation (the key functions are descri-
bed in the relevant chapters)
12345678910115Introductory information
Page 8 of 30

Switching the device on/offFirst read and observe the introductory information given on page 5.›
Press the knob to switch the device on or off.
When the device is switched on, the audio source and operating mode that were active before switching off the device will be restored.
If the vehicle key is pulled out of the ignition lock while the unit is switched on,the unit will switch off automatically. After switching on the ignition, the unit is
turned on automatically.
If the device was switched off using the
knob, then the device will not switch
on automatically after switching on the ignition.
If your vehicle is fitted with the KESSY system, the device will switch off automat-
ically after the engine has been turned off and the door opened.
When the ignition is switched off, the system switches off automatically after ap-prox. half an hour (discharge protection of the vehicle battery).
Adjusting the volume
First read and observe the introductory information given on page 5.
Increase the volume
›
Turn the knob to the right.
Reduce the volume
›
Turn the knob to the left.
Muting
›
Press the MUTE button
or
›
Set the volume to 0 using the knob.
CAUTION
Car speakers may be damaged if playback is too loud or distorted.Note■
The change in volume is displayed on the device display screen.■The corresponding symbol appears in the display when the sound is muted. .■
Some connected sources allow the volume to be changed directly at the source.
■
Excessively high volumes can cause sound resonance in the vehicle.
■
The loudspeakers in the vehicle are designed for a device power output of 4 x
20 W.
Operating the device
Introduction
This chapter contains information on the following subjects:
Operating via the device screen
7
Operating using the buttons on the control lever
7
Operating using the buttons/dials on the multi-function steering wheel -
Audio menu
8
First and foremost, pay attention to the safety instructions » page 4 , Important
notes .
Some features of the device are also displayed in the Maxi DOT display 1)
. Depend-
ing on the vehicle equipment, these features can be operated as follows.
■ Using the buttons on the operating lever » page 7
■ Using the buttons/dials on the multi-function steering wheel » page 8
Note
If the ignition and the side light are switched on, the buttons and dials on the
multifunction steering wheel will also be illuminated.1)
Description of the display in the Maxi DOT display » Owner's Manual , chapter Information system
6Introductory information
Page 13 of 30

■Activate AUX - Activates/deactivates AUX input
■ Mix/Repeat including subfolders - Activates/deactivates playback of the tracks
in the Mix and Repeat modes, including subfolders
■ Display ID3 tags - Activates/deactivates display of the artist, album and track
name in the device display screen 1)
Device system settings
First read and observe the introductory information given on page 9.
›
Press the button SETUP
→ System .
■ Language - Sets the device language 2)
■ Time/date - Time and date settings
■ Time - Time settings
■ Date - Date settings
■ Summer (DST) - Switches summer time adjustment on/off
■ Time format - Sets the time format
■ 24h
■ 12h
■ Date format - sets the date format
■ DD.MM.YYYY - Day - Month - Year
■ YYYY-MM-DD - Year - Month - Day
■ MM.DD.YYYY - Month - Day - Year
■ Units - Sets the units
■ Distance - Distance units
■ km - Kilometres
■ mi - Miles
■ Temperature - Temperature units
■ °C - Degrees Celsius
■ °F - Degrees Fahrenheit
■ Volume - Volume units
■ l - Litres
■ gall. (UK) - Gallons (UK)
■ gall. (US) - Gallons (US)
■
Speed - Speed units
■ km/h - Kilometres per hour
■ mph - Miles per hour
■ Consumption - Consumption units
■ l/100km - Litres per 100 kilometres
■ km/l - Kilometres per litre
■ mpg (US) - Miles per gallon (US)
■ mpg (UK) - Miles per gallon (UK)
■ Gas consumption - Gas consumption units
■ kg/100km - Kilograms per 100 km
■ km/kg - Kilometres per kilogram
■ Display - screen setting
■ Brightness - Adjusts the brightness of the screen
■ Brightest - brightest level
■ Brighter - brighter level
■ Medium - medium level
■ Darker - darker level
■ Darkest - darkest level
■ Clock in standby mode - Time display on the screen when the ignition is
switched on and the device switched off
■ Remove USB device safely - Safe removal of USB device 3)
■ Factory settings - Restore to factory settings
■ All - All settings
■ Sound - Sound settings
■ Radio setup - Radio settings
■ Vehicle - Vehicle system settings
■ Media - Media settings
■ System - System settings
■ Driving profile - Choice of driving mode
■ Display off - Activates/deactivates the screen in power-saving mode, where the
screen is black (the screen can be switched on again by pressing any button)
■ System information - Displays system information
■ Versions data - Displays version information
■ Device part number: ... - Device part number
■ Hardware: ... - Version of the hardware used
■ Software version: ... - Version of the software used
■ Copyright - Information on licences and copyrights used1)
Regardless of the setting, the ID3 tag is always displayed in the Audio menu in the MAXI DOT display.
2)
The correct display of country-specific characters (e.g. ID3 tag information) can not always be guaran-
teed.
3)
If a sound is currently played from the USB data carrier, this function is not active.
11Introductory information
Page 21 of 30

Vehicle systems
Vehicle settings
Introduction
This chapter contains information on the following subjects:
Selecting driving mode
19
Driving assistants
20
Deactivating traction control (ASR)
21
Speed limit for winter tyres
21
Light
21
Visibility
21
Opening and closing
21
Seats
22
Setting Climatronic
22
Auxiliary heating and ventilation
23
Vehicle status
23
Details of the multifunction display
23
Service
24
Resetting to factory settings
24
First and foremost, pay attention to the safety instructions » page 4 , Important
notes .
Settings relating to the vehicle systems can only be made when the ignition is
switched on.
Note
■ The individual systems are described in the » Vehicle Owner's Manual .■For safety reasons, if any system functions are disabled, then some functions,
such as parts of the ESC system, are automatically enabled again after switching
the ignition off and on.
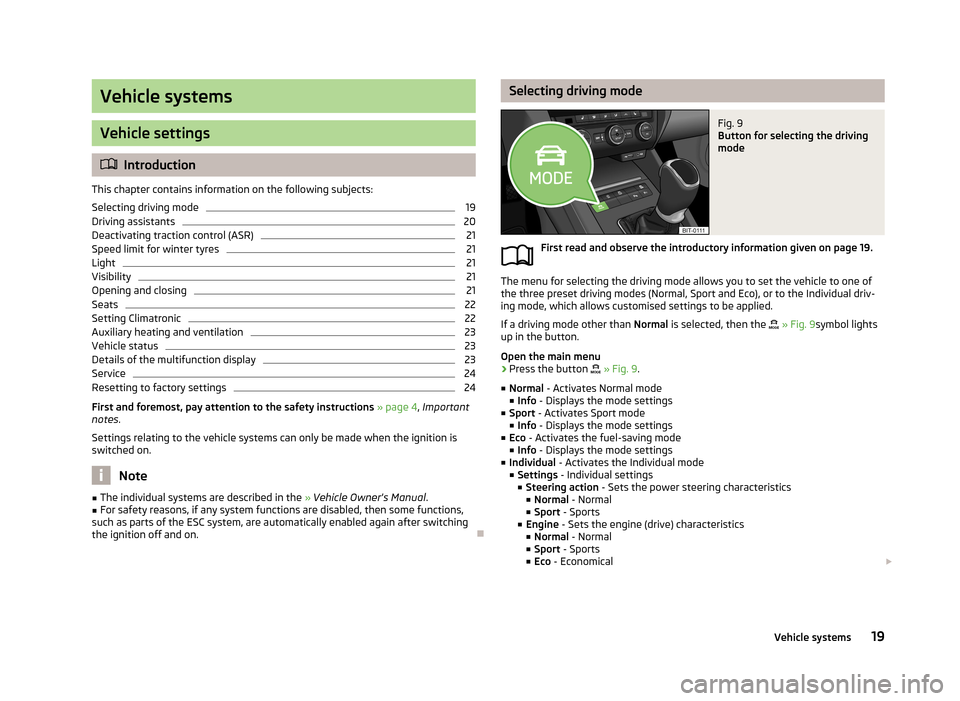
Selecting driving modeFig. 9
Button for selecting the driving
mode
First read and observe the introductory information given on page 19.
The menu for selecting the driving mode allows you to set the vehicle to one of
the three preset driving modes (Normal, Sport and Eco), or to the Individual driv-
ing mode, which allows customised settings to be applied.
If a driving mode other than Normal is selected, then the
» Fig. 9 symbol lights
up in the button.
Open the main menu
›
Press the button
» Fig. 9 .
■ Normal - Activates Normal mode
■ Info - Displays the mode settings
■ Sport - Activates Sport mode
■ Info - Displays the mode settings
■ Eco - Activates the fuel-saving mode
■ Info - Displays the mode settings
■ Individual - Activates the Individual mode
■ Settings - Individual settings
■ Steering action - Sets the power steering characteristics
■ Normal - Normal
■ Sport - Sports
■ Engine - Sets the engine (drive) characteristics
■ Normal - Normal
■ Sport - Sports
■ Eco - Economical
19Vehicle systems
Page 24 of 30

■Windows - Sets the window operation
■ Convenience opening - Sets the convenience opening
■ Off - Deactivates convenience opening
■ All windows - All windows
■ Driver - Driver's window only
■ Central locking - Settings for opening and closing of doors
■ Door unlocking - Sets the door unlocking
■ All - All doors
■ Single door - Driver's door or driver's or passenger door with KESSY system
■ Driver side - Doors on the driver's side or on the driver's or passenger's side
with KESSY system
■ Automatic locking - Activates/deactivates automatic locking when setting off
and unlocking after removing the ignition key
■ Alarm system confirmation - Activates/deactivates acoustic signals when un-
locking/locking a vehicle with an anti-theft alarm system
Seats
First read and observe the introductory information given on page 19.
›
Press the button CAR
→ Seats .
■ Store driver's seat position on key - Activates/deactivates the storage of the
driver's seat position and exterior mirror position in the remote control key
when locking the vehicle
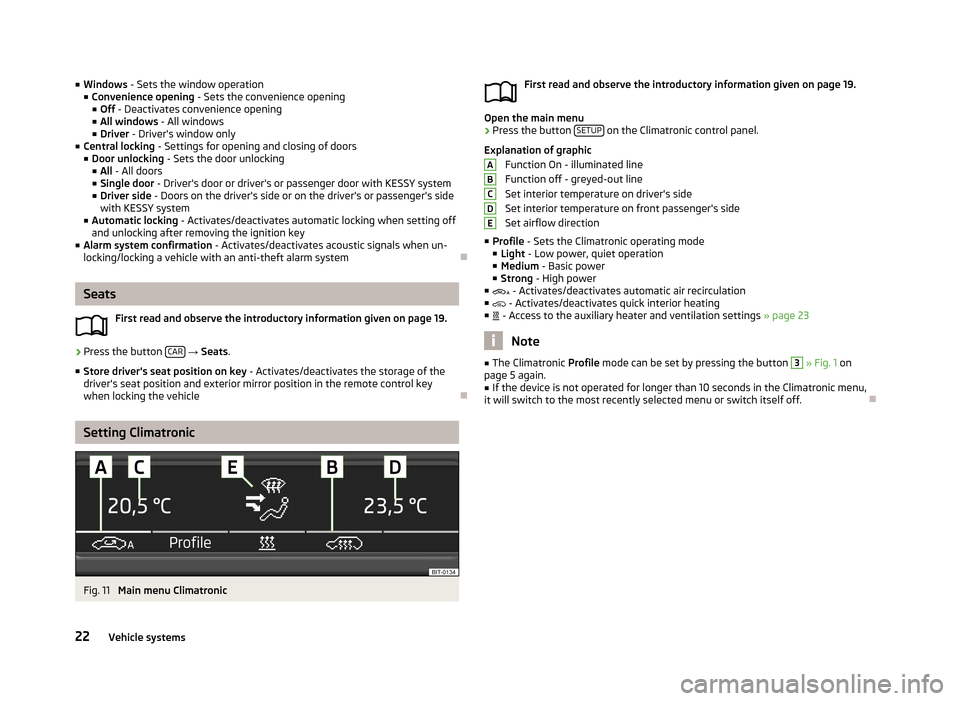
Setting Climatronic
Fig. 11
Main menu Climatronic
First read and observe the introductory information given on page 19.
Open the main menu
›
Press the button SETUP on the Climatronic control panel.
Explanation of graphic Function On - illuminated line
Function off - greyed-out line
Set interior temperature on driver's side
Set interior temperature on front passenger's side Set airflow direction
■ Profile - Sets the Climatronic operating mode
■ Light - Low power, quiet operation
■ Medium - Basic power
■ Strong - High power
■ - Activates/deactivates automatic air recirculation
■ - Activates/deactivates quick interior heating
■ - Access to the auxiliary heater and ventilation settings » page 23
Note
■
The Climatronic Profile mode can be set by pressing the button 3 » Fig. 1 on
page 5 again.■
If the device is not operated for longer than 10 seconds in the Climatronic menu,
it will switch to the most recently selected menu or switch itself off.
ABCDE22Vehicle systems