2013 SKODA OCTAVIA change time
[x] Cancel search: change timePage 5 of 83

AbbreviationsAbbreviationDefinitionA2DPAdvanced Audio Distribution Profile - a software profile for da-ta transfer via Bluetooth ®
, designed for one-way transfer of
audio dataACCAdaptive cruise controlAFThe AF function ensures that the best receivable frequency of
the selected station is automatically and precisely set.AMAmplitude modulation - Identification of the radio frequency
rangeTCSTraction control for the drive wheelsAVRCPA software profile for data transfer via Bluetooth ®
, which sup-
ports multimedia functionsAVAudio / visual source signal - typical for DVD player or TV tunerBTBluetooth ®
- wireless communication for reception and trans-
mission of voice and data informationDABDigital Audio Broadcasting - digital radio receptionDRMDigital Rights Management - technical methods to monitor or restrict the use of digital media contentESCElectronic Stability ControlFMFrequency modulation - Identification of the radio frequency
rangeHFPHands-free profile - a software profile for data transfer via
Bluetooth ®
, which enables communication between a mobile
phone and the hands-free equipment in the vehicleGPSGlobal Positioning System - Satellite system for position de-
tectionGSMGroupe Spécial Mobile - Global system for mobile communica-
tion. The most popular standard for mobile phonesID3 tagAn additional feature of a music file that allows for the display
of artist, title, album name etc.KESSYKey-less unlocking, starting and lockingAbbreviationDefinitionNTSCNational Television System Committee - Audiovisual encoding
standard in North and Central America and in some countries in Southeast AsiaPALPhase Alternating Line - Audiovisual encoding standard in
most European countriesPIProgram identification - Station identification by means of
unique RDS codeRDSRadio Data System - system for the transfer of additional in- formation for FM radio receptionTMCTraffic Message Channel - Way of transferring traffic informa- tion to the driverTPTraffic Program identification - Program identifier for the
transmission of traffic informationvCard. File format - vcf for contact data exchange, especially elec-
tronic business cards, can include first and last names, ad-
dresses, phone numbers, URLs, logos, photos and audio clipsVINVehicle identification numberWMAWindows Media Audio - compressed audio format
3Abbreviations
Page 6 of 83

Familiarization with the unit
Introductory information
Important notes
Introduction
This chapter contains information on the following subjects:
Declaration of conformity
4
Component protection
4
These operating instructions describe all possible equipment variants without
identifying them as special equipment, model variants or market-dependent
equipment.
Consequently, this vehicle does not need to contain all of the equipment compo-
nents described in these operating instructions.
The level of equipment of your vehicle refers to your purchase contract of the ve-
hicle. More information is available from the ŠKODA 1)
Partner from whom you
bought the vehicle.
Please note that these instructions are meant only as a supplement to the infor- mation in the Owner's Manual of your vehicle. Therefore, they can be used only in
conjunction with the latest manual for this vehicle. For a detailed description of
some functions listed in these instructions, see the Vehicle Manual for your vehi-
cle.
The illustrations can differ in minor details from your unit; they are only intended
for general information.
WARNING■ Concentrate fully at all times on your driving! As the driver you are fully re-
sponsible for the operation of your vehicle.■
Only use the unit in a way that leaves you in full control of your vehicle in
every traffic situation – there is the risk of an accident.
■
Adjust the volume to ensure that acoustic signals from outside, e.g. sirens
from vehicles which have the right of way, such as police, ambulance and fire
brigade vehicles, can be heard at all time.
■
High volumes can cause hearing damage!
Declaration of conformity
First read and observe the introductory information and safety warn-
ings
on page 4.
ŠKODA AUTO a.s. hereby declares that the ŠKODA Infotainment systems meet the
basic requirements and additional provisions of Directive 1999/5/EC.
Component protection First read and observe the introductory information and safety warn-
ings
on page 4.
Some electronic control units are factory-equipped with component protection.
The component protection was developed as a protection mechanism for:
› impairment of factory- or garage-fitted control units after installation in another
vehicle (for example, after a theft);
› impairment of components operated outside of the vehicle;
› the possibility of a legitimate installation or change of control units for repairs
at a ŠKODA 1)
Service Partner.
When component protection is enabled, the following message appears on the unit's display Component theft protection: the infotainment system is not fully
available at present. Please switch on the ignition.
1)
Terms used
» manual , chapter Preface.
4Familiarization with the unit
Page 10 of 83

Unit operation
In the unit screen
Introduction
This chapter contains information on the following subjects:
Operation
8
Input screen with keyboard
9
Input screen with numeric keyboard
9
First and foremost, pay attention to the safety instructions » page 4 , Important
notes .
This chapter covers the operation of the unit and working with the touchscreen
and with various types of input keyboard.
Operation
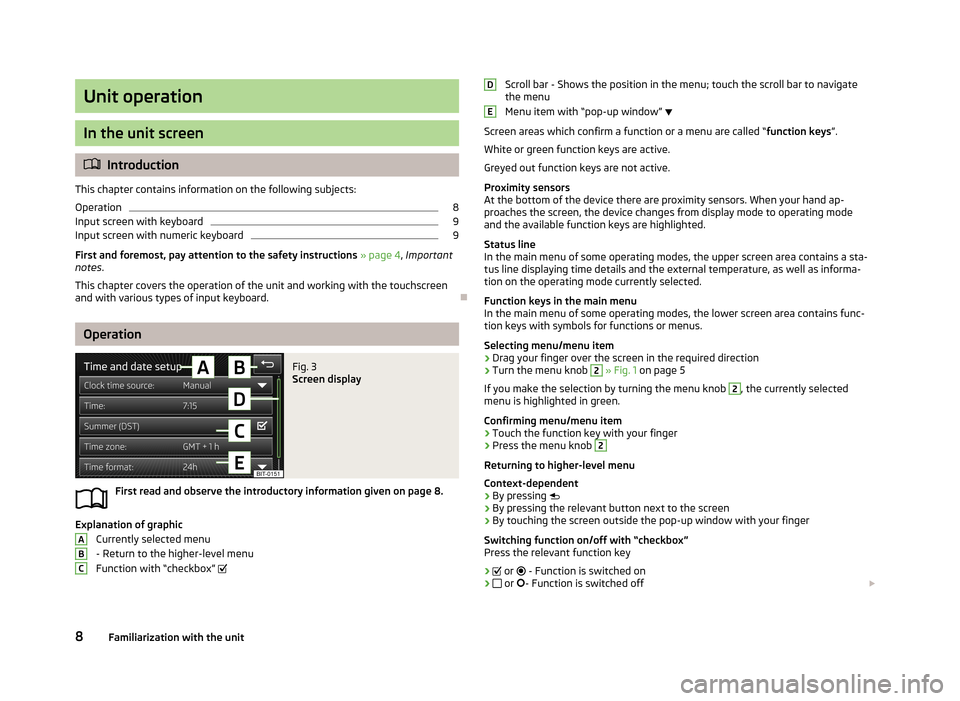
Fig. 3
Screen display
First read and observe the introductory information given on page 8.
Explanation of graphic
Currently selected menu
- Return to the higher-level menu
Function with “checkbox”
ABCScroll bar - Shows the position in the menu; touch the scroll bar to navigate
the menu
Menu item with “pop-up window”
Screen areas which confirm a function or a menu are called “ function keys”.
White or green function keys are active.
Greyed out function keys are not active.
Proximity sensors
At the bottom of the device there are proximity sensors. When your hand ap- proaches the screen, the device changes from display mode to operating mode
and the available function keys are highlighted.
Status line
In the main menu of some operating modes, the upper screen area contains a sta-
tus line displaying time details and the external temperature, as well as informa- tion on the operating mode currently selected.
Function keys in the main menu
In the main menu of some operating modes, the lower screen area contains func-
tion keys with symbols for functions or menus.
Selecting menu/menu item
› Drag your finger over the screen in the required direction
› Turn the menu knob 2
» Fig. 1 on page 5
If you make the selection by turning the menu knob
2
, the currently selected
menu is highlighted in green.
Confirming menu/menu item
› Touch the function key with your finger
› Press the menu knob
2
Returning to higher-level menu
Context-dependent
› By pressing
› By pressing the relevant button next to the screen
› By touching the screen outside the pop-up window with your finger
Switching function on/off with “checkbox” Press the relevant function key
›
or
- Function is switched on
›
or
- Function is switched off
DE8Familiarization with the unit
Page 30 of 83

Media
Operation
Introduction
This chapter contains information on the following subjects:
Main menu
28
Title-/Folder list
29
Playback
29
Media settings
29
First and foremost, pay attention to the safety instructions » page 4 , Important
notes .
The device allows you to play audio files in various formats » page 30 and to
connect different source types.
When the source has been connected, the device starts to automatically play au- dio files in alphabetical order.
Types of device operation » page 8 .
› The device via the controls.
› Via the function keys in the device screen
› Via the Maxi DOT display.
Main menu
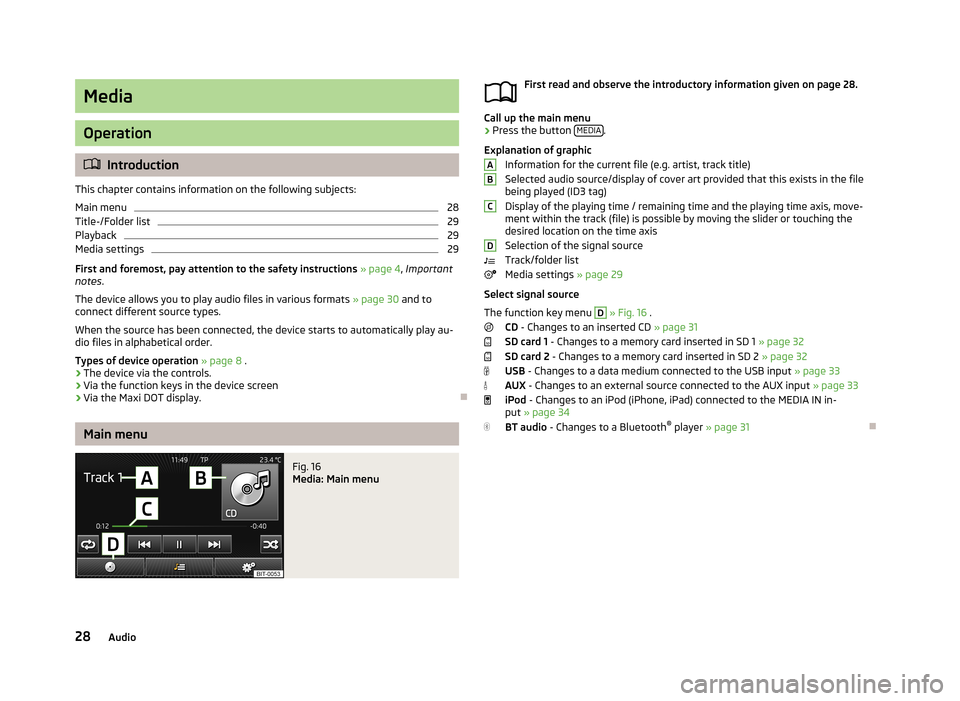
Fig. 16
Media: Main menu
First read and observe the introductory information given on page 28.
Call up the main menu
›
Press the button
MEDIA.
Explanation of graphic Information for the current file (e.g. artist, track title)Selected audio source/display of cover art provided that this exists in the file
being played (ID3 tag)
Display of the playing time / remaining time and the playing time axis, move-
ment within the track (file) is possible by moving the slider or touching the
desired location on the time axis
Selection of the signal source
Track/folder list
Media settings » page 29
Select signal source
The function key menu
D
» Fig. 16 .
CD - Changes to an inserted CD » page 31
SD card 1 - Changes to a memory card inserted in SD 1 » page 32
SD card 2 - Changes to a memory card inserted in SD 2 » page 32
USB - Changes to a data medium connected to the USB input » page 33
AUX - Changes to an external source connected to the AUX input » page 33
iPod - Changes to an iPod (iPhone, iPad) connected to the MEDIA IN in-
put » page 34
BT audio - Changes to a Bluetooth ®
player » page 31
ABCD28Audio
Page 48 of 83

ButtonMeaningEnter/search for a POI » page 57Set up map and split screen display » page 48Setting the navigation menu » page 46
Navigation data
Fig. 27
SD memory card slot
First read and observe the introductory information and safety warn-
ings
on page 45.
Navigation data source
You received the SD memory card with navigation data together with the unit.
For the navigation system to function correctly, the card must be inserted in the
SD2 slot » Fig. 27 for the entire navigation procedure
Insert a memory card » page 32.
Data update
The navigation data should be updated at regular intervals.
Navigation data is subject to constant changes (such as new streets, changes ofstreet names and house numbers), and this can become out of date over time. For this reason, the guidance may be inaccurate or incorrect.
For more information on updating the data, please visit the ŠKODA website or
contact a ŠKODA Partner.
The version of the navigation data for maps can be found in the navigation set-
tings NAV
→
→ Version information .
Card has been damaged or lost
If the SD memory card with the navigation data has been damaged or lost, a new
card can be obtained from ŠKODA original accessories. The navigation data can be
loaded only on the original card.
Navigation settings
Introduction
This chapter contains information on the following subjects:
Main menu settings
46
Route options
47
Map
47
Fuelling options
47
Navigation announcements
47
Advanced settings
48
Sort contacts, enter home address and delete destinations
48
First and foremost, pay attention to the safety instructions » page 4 , Important
notes .
Main menu settings
First read and observe the introductory information given on page 46.
Call up the main menu
›
In the Navigation main menu, press
.
Setting:
■ Route options - Set the parameters for route calculation » page 47
■ Map - Settings for the map display » page 47
■ Fuel options - Select preferred fuel station, switch on/off reminder of low fuel
level warning with the possibility to find the nearest fuel station » page 47
■ Nav. announcement - Set navigation announcements » page 47
■ Advanced setup - Display additional information » page 48
■ Manage memory - Sort contacts, enter your home address, and delete destina-
tions » page 48
46Navigation
Page 49 of 83

■Import destinations - Import previously prepared custom destina-
tions » page 57
■ Version information - View the current version of the navigation data
Route options
First read and observe the introductory information given on page 46.
›
In the Navigation main menu, press → Route options .
■ Suggest 3 alternative routes - Switch on/off manual selection of the route type
(economical, fast, short) » page 62
■ Route: - Automatic selection of the preferred route type (manual route selec-
tion is switched off)
■ Economical - Calculate the most economical route with shortest travelling
time and distance travelled – displayed in green
■ Fast - Calculate the fastest route to the destination, even if a detour is neces-
sary - displayed in red
■ Short - Calculate the shortest route to the destination, even if a longer travel-
ling time is required - displayed in orange
■ Dynamic route - Switch on/off dynamic route calculation using TMC traffic re-
ports » page 64
■ Avoid motorways - Switch on/off the use of motorways in the route calcula-
tion
■ Avoid ferries and motorail trains - Switch on/off avoidance of ferries and
motorail trains
■ Avoid toll roads - Switch on/off the use of toll roads in the route calculation
■ Avoid tunnels - Switch on/off the use of tunnels for which tolls have to paid
in the route calculation
■ Avoid routes requiring toll stickers - Switch on/off the use of roads requiring
road tax disk display (with a valid road tax disk) in the route calculation
■ Available toll stickers - Displays the list of roads requiring road tax disk display
Map
First read and observe the introductory information given on page 46.
›
In the Navigation main menu, press
→ Map .
■
Day/night: -Selection of map display colour
■ Day - coloured
■ Night - in shades of grey
■ Automatic - Map with light or dark coloured background; the background
changes once you turn on the lights (does not apply to daytime running lights)
■ Autozoom - Switch on/off the automatic zoom in/out of the map display while
driving » page 49
■ Show traffic signs - Switch on/off the display of traffic signs
■ Select categories for POIs - Select POIs to be displayed in the map from a list of
available POIs (max. 10 POIs) » page 60
■ Show brands for POIs - Switch on/off the display company logos at the POIs
■ Show favourites - Switch on/off the display of favourites
■ Lane guidance - Switch on/off the display of a window with the recommended
lane for complicated intersections » page 63
Fuelling options
First read and observe the introductory information given on page 46.
›
In the Navigation main menu, press
Fuel options .
■ Select preferred fuel station - Selects your preferred fuel station brand (the se-
lected station brand will be displayed on the first positions of the list of nearest
fuel stations found)
■ Fuel warning - Switch on/off the display of the warning message for low on fuel
Warning: fuel tank almost empty. Would you like to find a fuel station nearby?
If the message appears in the unit screen, the system offers the following fea-
tures:
■ Cancel - Close the window with the warning
■ Find - Search for the nearest fuel station
Navigation announcements
First read and observe the introductory information given on page 46.
›
In the Navigation main menu, press
→ Nav. announcement .
■ Volume - Set the volume of the navigation announcements
■ No voice guidance during call - Switch on/off navigation announcements during
a telephone call (using a phone connected to the hands-free system » page 35)
47Description of the navigation system
Page 53 of 83

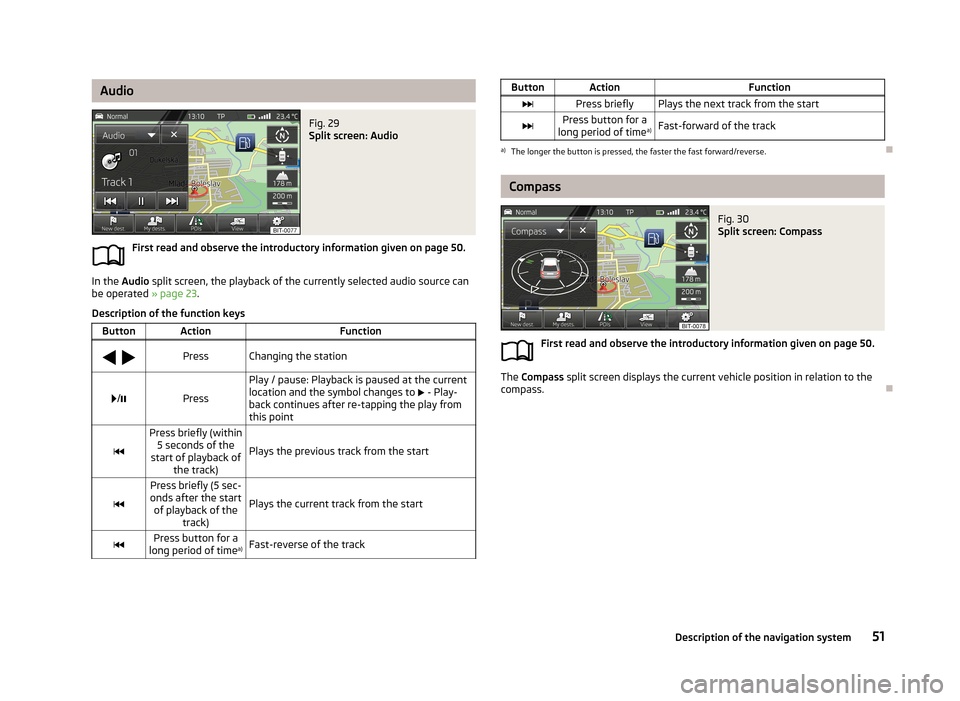
AudioFig. 29
Split screen: Audio
First read and observe the introductory information given on page 50.
In the Audio split screen, the playback of the currently selected audio source can
be operated » page 23.
Description of the function keys
ButtonActionFunction
PressChanging the station/Press
Play / pause: Playback is paused at the current
location and the symbol changes to - Play-
back continues after re-tapping the play from this point
Press briefly (within 5 seconds of the
start of playback of the track)
Plays the previous track from the start
Press briefly (5 sec-
onds after the start of playback of the track)
Plays the current track from the startPress button for a
long period of time a)Fast-reverse of the trackButtonActionFunctionPress brieflyPlays the next track from the startPress button for a
long period of time a)Fast-forward of the tracka)
The longer the button is pressed, the faster the fast forward/reverse.
Compass
Fig. 30
Split screen: Compass
First read and observe the introductory information given on page 50.
The
Compass split screen displays the current vehicle position in relation to the
compass.
51Description of the navigation system
Page 58 of 83

The crosshairs move to the coordinates entered, which allows for checking of thedestination entered.
Crosshairs
The crosshairs show the position of the address which was previously entered.
The desired destination can be set by dragging your finger over the map to the
centre of the crosshairs.
The contact point is moved into the crosshairs through the finger movement and at the same time the degrees of latitude and longitude are adjusted to the point
entered.
The symbol displays the current map scale. This can be changed while the
entry is being made » page 49.
The bottom of the screen displays the address or the longitude and latitude of
the selected item.
Confirm destination
Confirm the destination by touching OK. Then the following items are displayed:
■ Store - Store the destination in the destination memory » page 9
■ Edit - Return to the main menu with the option to input a destination » page 54
■ Option. - Display a menu for setting the route parameters » page 47
■ Start - Route calculation starts with subsequent selection of route type and
route guidance or with guidance according to the preferred route type
Reduce/enlarge map
Press the function key with symbol
to switch map to full screen display.
Press the function key with symbol
to display the map on a split screen with the
menu for the entry using the GPS coordinates.
Entry of saved destinations
Introduction
This chapter contains information on the following subjects:
My destinations
56
Home address
57
Own destination (vCard)
57First and foremost, pay attention to the safety instructions » page 4 , Important
notes .
My destinations
Fig. 37
My destinations menu
First read and observe the introductory information given on page 56.
The menu is used to select the type of destinations stored in the unit memo-
ry » Fig. 37 .
›
In the Navigation main menu, press
→ Dest. and contacts →
Press
or
›
In the Navigation main menu, press .
→ Last destinations →
.
Destinations list Last destinations
Destination memory (stored destinations and flag destinations)
Favourites
List of contacts with stored addresses 1)
(the phone must be connected via
Bluetooth ®
» page 35 )
Confirm one of the menu items of dests. and contacts to display the following: ■ Find - The function key is displayed if more than 5 entries exist. Touch to start
the search for a destination or a contact by the name stored in the destination
menu » page 9
■ - Detailed information on the destination or contact
1)
This function is only supported by some mobile phones.
56Navigation