2013 SKODA OCTAVIA change time
[x] Cancel search: change timePage 64 of 83

Route63Lane guidance63
First and foremost, pay attention to the safety instructions » page 4 , Important
notes .
Route calculation
First read and observe the introductory information given on page 61.
The route is calculated automatically according to the entered destination. The
calculation takes the settings of the route options » page 47 (route type, dynamic
route, etc.) into account.
The route is recalculated each time if you ignore driving recommendations or change the route. This process takes only a few seconds. Navigation announce-
ments can only then be re-transmitted.
If Demo mode is switched on » page 48, a prompt appears asking whether you
want the guidance to start in demo mode or normal mode.
The Demo mode displays a simulated drive to the destination entered. There is
the option of travelling the calculated route “as a simulation” just on the screen.
If an alternative route option is set, function keys are displayed, following the cal- culation, for the route types with information on the route length and the expec-ted travelling time.
Route type
economical
fast
short
Selecting the route type will start route guidance.
If the option for alternative routes is disabled, the route is calculated and route guidance is started according to the preferred route » page 47.
It is possible to select a pre-calculated route before the calculation of the remain-
ing routes is completed.
The unit tries to allow for continued guidance even if the navigation data is in- complete or there is no data at all for the given area (e.g., one-way streets, road
types, etc.).
Interrupt and continue route guidance
If the ignition is switched off and on again and the key was left in the ignition (in
vehicles with the KESSY system, when the ignition was switched off):
› Within 30 min - route guidance is continued taking into account the calculated
route
› Between 30 and 40 min - the screen switches to “standby” mode (energy-sav-
ing mode of the screen); the route guidance continues using the calculated route
› Between 40 min and 120 min - the unit screen displays the message
Continue
route guidance? ; after you confirm the message, the route guidance continues
using the calculated route;
› After 120 min - route guidance is cancelled.
If ignition is switched off and on again and the key removed temporarily (in vehi-
cles with the KESSY system, ignition switched off and the driver's door opened):
› Within 10 min - route guidance is continued taking into account the calculated
route
› Between 10 min and 120 min - the screen switches to “standby mode” (energy-
saving mode of the screen); the unit screen displays the message Continue
route guidance? ; after you confirm the message, the route guidance continues
using the calculated route
› After 120 min - route guidance is cancelled.
Graphic navigation instructions
First read and observe the introductory information given on page 61.
The graphical navigation instructions are displayed:› in the MAXI DOT display
» page 13.
› in the split screen in the unit screen
» page 52.
Navigation announcements
First read and observe the introductory information given on page 61.
The device makes navigation announcements. The navigation announcementsare started as soon as the route calculation is complete or a route type has been
selected.
Before turning, up to 3 recommendations are issued:
62Navigation
Page 67 of 83

■All function key - Display of all traffic reports
■ Function key Route - Display of only the traffic reports on the current route
■ Map showing the traffic obstruction
■ Window with a description of traffic report:
■ Location of event location, accuracy depends on how up-to-date the naviga-
tion data is
■ Description of up to three events related to the respective information
■ Description of the direction with respect to the event
■ Probable duration of the event
■ Additional information, such as probable delay time
■ Information line, which reports on the currency of the message and the pro-
vider;
■ Symbol specifying the type of information
■ - Zoom in window with described traffic obstruction
■ - Zoom out window with described traffic obstruction
■ - See previous traffic report
■ - Show the next traffic report
■ - Display list of all received traffic reports.
Destination management
Introduction
This chapter contains information on the following subjects:
Stopover
65
Destination details
66
First and foremost, pay attention to the safety instructions » page 4 , Important
notes .
Stopover
First read and observe the introductory information given on page 65.
It is possible to add a stopover to the route during route guidance. Route guid-
ance then occurs first to the stopover. After the stopover has been reached, route guidance is continued.
› In the Navigation main menu, press
→ New dest./stopover to open a menu
for entering a new destination » page 54.
If route guidance is available, after entering the stopover the system displays the
message Would you like to add a new stopover destination or start direct route
guidance? and the following items:
■ Cancel - Cancels the stopover destination input and the destination guidance to
the original destination is continued
■ Stopover - the destination entered is added to the route and guidance to this
destination is initially provided
■ Dir. r. guid. - The destination entered is added as the final destination and the
original final destination is replaced by this new destination
If destination guidance is already provided with the stopover, after a new desti- nation has been entered, the device displays the message Would you like to re-
place the current stopover destination or start direct route guidance? and the
following items:
■ Cancel - Cancels the stopover destination input and destination guidance to the
original destinations is continued
■ Replace - The original stopover is replaced with the destination entered and
destination guidance is initially undertaken to this destination while the final
destination remains unchanged
■ Dir. r. guid. - The destination entered is added as the final destination and the
original destinations are replaced by this new destination
If you would like to use the stopover as the final destination and the original final destination as a stopover, then select the Dir. r. guid. input and then input the
original final destination again as a stopover.
65Navigation
Page 73 of 83

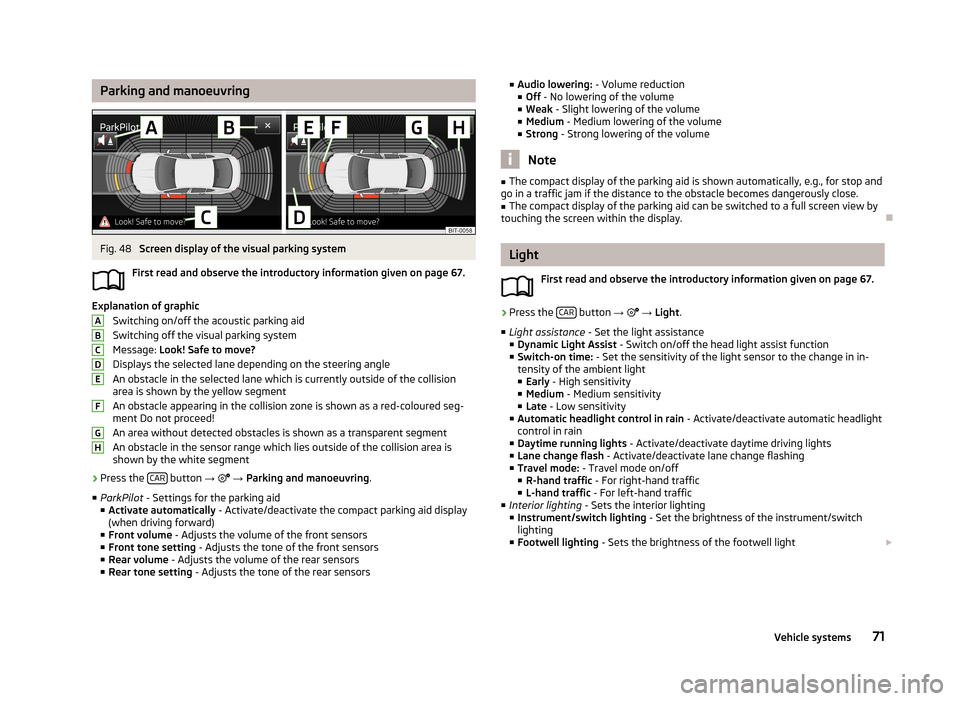
Parking and manoeuvringFig. 48
Screen display of the visual parking system
First read and observe the introductory information given on page 67.
Explanation of graphic Switching on/off the acoustic parking aidSwitching off the visual parking system
Message: Look! Safe to move?
Displays the selected lane depending on the steering angle An obstacle in the selected lane which is currently outside of the collisionarea is shown by the yellow segment
An obstacle appearing in the collision zone is shown as a red-coloured seg- ment Do not proceed!
An area without detected obstacles is shown as a transparent segment An obstacle in the sensor range which lies outside of the collision area isshown by the white segment
›
Press the CAR button
→
→ Parking and manoeuvring .
■ ParkPilot - Settings for the parking aid
■ Activate automatically - Activate/deactivate the compact parking aid display
(when driving forward)
■ Front volume - Adjusts the volume of the front sensors
■ Front tone setting - Adjusts the tone of the front sensors
■ Rear volume - Adjusts the volume of the rear sensors
■ Rear tone setting - Adjusts the tone of the rear sensors
ABCDEFGH■
Audio lowering: - Volume reduction
■ Off - No lowering of the volume
■ Weak - Slight lowering of the volume
■ Medium - Medium lowering of the volume
■ Strong - Strong lowering of the volume
Note
■
The compact display of the parking aid is shown automatically, e.g., for stop and
go in a traffic jam if the distance to the obstacle becomes dangerously close.■
The compact display of the parking aid can be switched to a full screen view by
touching the screen within the display.
Light
First read and observe the introductory information given on page 67.
›
Press the CAR button
→
→ Light .
■ Light assistance - Set the light assistance
■ Dynamic Light Assist - Switch on/off the head light assist function
■ Switch-on time: - Set the sensitivity of the light sensor to the change in in-
tensity of the ambient light ■ Early - High sensitivity
■ Medium - Medium sensitivity
■ Late - Low sensitivity
■ Automatic headlight control in rain - Activate/deactivate automatic headlight
control in rain
■ Daytime running lights - Activate/deactivate daytime driving lights
■ Lane change flash - Activate/deactivate lane change flashing
■ Travel mode: - Travel mode on/off
■ R-hand traffic - For right-hand traffic
■ L-hand traffic - For left-hand traffic
■ Interior lighting - Sets the interior lighting
■ Instrument/switch lighting - Set the brightness of the instrument/switch
lighting
■ Footwell lighting - Sets the brightness of the footwell light
71Vehicle systems
Page 78 of 83

Folding down the exterior mirrors - folding inwhile parking72
Frequency rang See Main Menu
23
Front Assist70
Fuelling options47
Function key8
Function keys8
G
Graphical navigation instructions
52
Graphic navigation instructions62
H
Head Light Assist
71
Home address48, 57
I
important notes touch screen
6
Important notes4
In map55
Input screen Language characters
20
Input screen with keyboard9
Input screen with numeric keyboard9
Instrument lighting71
Intelligent window control72
Introductory information4
iPod34
K
keyboard
9
Keyboard20
L
Lane Assist
70
Lane change flash71
Lane guidance63
LEAVING HOME71
Light sensor - light switch-on time71
List of available stations Radio
24
M
Main menu Media
28
Navigation45
Telephone36
Unit settings18
Manage memory48
Manoeuvre Graphic navigation instructions
62
Navigation announcements62
Map47
Display49
Introductory information49
Lane guidance63
Main menu49
Operation49
Map operation48
MAXI DOT10
MAXI DOT display Media
10
Navigation13
Phone12
Radio10
MAXI DOT Display Operation
10
Media28
AUX33
Bluetooth audio31
CD31
File formats30
Folder List29
Main menu28
MEDIA IN34
Multifunction steering wheel10
Operation28
Playback29
Requirements and restrictions31
Scan29
SD memory card32
Select signal source28
Settings29
Signal source30
Supported media30
USB33
Voice control14
MEDIA IN34
Memory function of the remote control key72
menu Device settings
18
Menu Media
28
Radio23
Setup18
Telephone35
Multifunction display72
Multifunction steering wheel Media
10
Navigation13
Phone12
Radio10
Multimedia AUX
33
USB33
Mute7
My destinations Menu
56
N
navigation
61
76Index
Page 82 of 83

ŠKODA AUTO a.s. pursues a policy of constant product and model development.Please understand that changes to the scope of delivery in terms of form, equip-ment and technology may be introduced at any time. The information about ap-pearance, performances, dimensions, weight, standards and functions of the ve-
hicle is correct at the time of publication. Some equipment might only be intro-
duced at a later date, or might only be offered in certain markets; information is
provided by ŠKODA Partners. It is therefore not possible for legal claims to be
made based on the data, illustrations and descriptions contained in this Owner's
Manual.Reprinting, reproduction, translation, or any other use, either in whole or in part,
is not permitted without the written consent of ŠKODA AUTO a.s.
ŠKODA AUTO a.s. expressly reserves all rights relating to copyright laws.
Subject to change.
Issued by: ŠKODA AUTO a.s.
© ŠKODA AUTO a.s. 2013