Page 33 of 83
 Amundsen Navigation System Manual Codec type
(File formats)MPEG-1/2 (Layer-3)Windows
Media Audio
7, 8, 9 and 10MPEG-2/4FLAC, WAW, OGGFile suffixmp3wmaasfm4a
m4b aacflac
wav oggPlaylistsm3u, pls, wpl, m3u8; asxFile
propertiesBitratemax")
Codec type
(File formats)MPEG-1/2 (Layer-3)Windows
Media Audio
7, 8, 9 and 10MPEG-2/4FLAC, WAW, OGGFile suffixmp3wmaasfm4a
m4b aacflac
wav oggPlaylistsm3u, pls, wpl, m3u8; asxFile
propertiesBitratemax. 320 kb/sSampling ratemax. 48 kHzAlbum covers
(Pictures on the album covers)Image resolution up to 500x500 pixels (200 kb) (jpg, jpeg,png, bmp, gif), depending on the availability of album coversare displayed on the respective media
Note
At the time of publication, the device has been tested with most products and
media available in the various markets. However, it is possible that some devices, media or files will be unreadable or unplayable.
Requirements and restrictions
First read and observe the introductory information and safety warn-
ings
on page 30.
› The name of the artist, the album and the title of the file being played can be
displayed if the information is available as an ID3 tag. If no ID3 tag is available,
only the folder name is displayed.
› To ensure good playback, we recommend you use compressed MP3 files with a
bit rate of at least 160 kb / s.
› For audio files with variable bitrates, the indicated remaining playback time
does not correspond to the actual remaining playback time.
› Files that are protected by Digital Rights Management (DRM) technology cannot
be played back by the device.
Bluetooth ®
player
First read and observe the introductory information and safety warn- ings
on page 30.
The device makes a wireless connection (coupling) to the Bluetooth ®
player pos-
sible.
› Follow the same instructions as for the coupling of the device with a
phone » page 38 .
Note
■
We recommend adjusting the volume on the portable player to the maximum
level.■
The volume can also be adjusted by setting the input sensitivity of the device
for the Bluetooth ®
player » page 19 , Sound settings .
■
The media functions supported depend on the Bluetooth ®
player concerned.
CD
Fig. 18
CD slot
First read and observe the introductory information and safety warn- ings
on page 30.
The CD slot is located in the glove box on the front passenger side.
Inserting/ejecting a CD
›
Insert a CD into the CD slot with the label facing up until it is automatically
drawn in. Playback starts automatically.
›
Press the symbol button
– the CD is ejected.
31Media
Page 34 of 83
 Amundsen Navigation System Manual If the ejected disc is not taken out within 10 seconds, it will be retracted again forsafety reasons. However, the unit will not change to the CD source.WARNING■ The CD/DVD player is a laser product")
If the ejected disc is not taken out within 10 seconds, it will be retracted again forsafety reasons. However, the unit will not change to the CD source.WARNING■ The CD/DVD player is a laser product.■On the manufacturing date, this unit was classified as a class 1 laser product
in accordance with the national/international standards DIN EN 60825-1:
2008-05 and DHHS Rules 21 CFR, sub-chapter J The laser used in this class 1
laser product is so weak that there is no risk of danger when operated cor-
rectly.■
This product is designed so that the laser is restricted to the inside of the
unit. However, the installed laser could be classified in a higher class were the
housing to be removed. For this reason, never remove the housing of the unit.
CAUTION
■ Be sure to wait until the CD has been fully ejected before you try to insert a new
CD. Otherwise you can damage the drive inside the unit.■
Insert into the CD drive only original audio CDs or standard CD-R and CD-RW
discs.
■
Do not stick anything to the CD!
■
Outside temperatures that are either too high or too low might cause the unit
to be temporarily unavailable. The unit switches to the last active menu.
Note
■ After pressing the symbol button it takes a few seconds for the CD to be ejec-
ted.■
Poor or unpaved road surfaces and severe vibrations may cause the CD to jump.
■
The device may be affected by damp (condensation) in cold or humid conditions.
This can lead to playback jumps or impair the play function. Wait until the mois-
ture has evaporated if this happens.
■
If the CD is physically damaged, is not readable or is inserted incorrectly, the fol-
lowing message is displayed: Error: CD. Check the CD and insert properly into the
drive.
■
It is possible under certain circumstances that copyright-protected CDs and
home-burnt CDs will not be played back at all or only in a limited way.
■
The national copyright laws that apply in your country must be observed.
SD memory cardFig. 19
SD memory card slots
First read and observe the introductory information and safety warn-
ings
on page 30.
The device makes it possible to play audio files from the SD memory card.
The SD memory card slots are located in the storage compartment on the front
passenger side.
Insert the SD memory card
›
Push the SD memory card into the SD memory card slot with the cut-off edge to
the front right until it “locks into place”. Playback starts automatically.
Remove the SD memory card
Depending on equipment fitted:
›
Press SETUP
→ Remove SD card 1 safely or Remove SD card 2 safely .
›
Press the inserted SD memory card. The SD memory “card” is ejected to the out-
put position.
SD memory card empty or data not readable
If a SD memory card is inserted on which no data or no readable data is stored,
nothing is played back from the SD memory card.
Due to differing quality requirements from different card manufacturers, it is not
always possible to guarantee the playback from SD memory cards.
Some files on the SD memory card or SD memory cards cannot be reproduced or their reproduction may be limited.
32Audio
Page 35 of 83
 Amundsen Navigation System Manual CAUTION■Only use SD cards in standard size. When using smaller SD card with the adapt-
er the SD memory card can fall out while driving the vehicle due to vibrations
from the adapter.■
We recommen")
CAUTION■Only use SD cards in standard size. When using smaller SD card with the adapt-
er the SD memory card can fall out while driving the vehicle due to vibrations
from the adapter.■
We recommend using class 4 SD memory cards and higher. This guarantees the
fastest possible access to the audio files.
■
Always store the SD cards in suitable cases to protect them from dirt, dust and
other forms of damage.
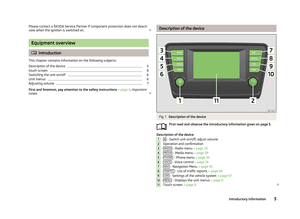
USB-, AUX-inputs
Fig. 20
USB and AUX inputs
First read and observe the introductory information and safety warn-
ings on page 30.
The device allows you to play audio files from USB storage devices, as well as ex-
ternal devices connected to the analogue AUX input.
The USBand AUXinputs are located above the storage compartment at the front
of the centre console » Fig. 20.
A data carrier or system can be connected to the USB or AUX inputs either direct-
ly or through a connection cable from the ŠKODA range of original accessories.
AUX input
External audio sources connected to the AUX input cannot be operated from your
device.
The standard 3.5 mm jack plug is used for the AUXinput. If the external audio source does not have this jack plug, you must use an adapter.
It is also possible to adjust the input sensitivity setting on the AUX input depend-
ing on the source connected » page 19, Sound settings .
USB input
External audio sources connected to the USB input cannot be operated from
your 1)
device.
Proceed as follows before removing the USB device:›
Press the MENU button
→ → Remove USB device safely .
Do not use USB extension cables or adapters. This can impair the functioning of
the connected signal source.
USB hubs are not supported.
CAUTION
The AUX input must only be used for audio sources!
Note
■ If an external audio source is connected to the AUXinput, which is equipped
with an adapter for external power supply, the sound may be impaired. This de-
pends on the quality of the adapter which is used.1)
Some options for the control of an external device may not be supported.
33Media
Page 36 of 83
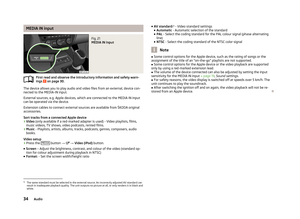
 Amundsen Navigation System Manual MEDIA IN inputFig. 21
MEDIA IN input
First read and observe the introductory information and safety warn-ings on page 30.
The device allows you to play audio and video files from an external, device")
MEDIA IN inputFig. 21
MEDIA IN input
First read and observe the introductory information and safety warn-ings on page 30.
The device allows you to play audio and video files from an external, device con-
nected to the MEDIA-IN input.
External sources, e.g. Apple devices, which are connected to the MEDIA IN input
can be operated via the device.
Extension cables to connect external sources are available from ŠKODA original
accessories.
Sort tracks from a connected Apple device
› Video
(only available if a red-marked adapter is used) - Video playlists, films,
music videos, TV shows, video podcasts, rented films.
› Music
- Playlists, artists, albums, tracks, podcasts, genres, composers, audio
books.
Video setup › Press the
MEDIA
button
→
→ Video (iPod) button.
■ Screen – Adjust the brightness, contrast, and colour of the video (standard op-
tion for colour adjustment during playback in NTSC)
■ Format: - Set the screen width/height ratio
■
AV standard: 1)
- Video standard settings
■ Automatic - Automatic selection of the standard
■ PAL - Select the coding standard for the PAL colour signal (phase alternating
line)
■ NTSC - Select the coding standard of the NTSC color signal
Note
■
Some control options for the Apple device, such as the rating of songs or the
assignment of the title of an “on-the-go” playlists are not supported.■
Some control options for the Apple device or the video playback are supported
only by using a red-marked extension lead.
■
The volume of the device connected can also be adjusted by setting the input
sensitivity for the MEDIA IN input » page 19, Sound settings .
■
For safety reasons, the video display is switched off at speeds over 5 km/h. The
unit continues to play the soundtrack.
■
After switching the ignition off and on again, the video playback will not be re-
stored from an Apple device.
1)
The same standard must be selected in the external source. An incorrectly adjusted AV standard can
result in inadequate playback quality. The unit outputs no picture at all, or only renders it in black and
white.
34Audio
Page 37 of 83
 Amundsen Navigation System Manual Phone
Communication
Telephones and two-way radio systems
Introduction
This chapter contains information on the following subjects:
Introductory information
35
Main menu
36
Problems with the Telepho")
Phone
Communication
Telephones and two-way radio systems
Introduction
This chapter contains information on the following subjects:
Introductory information
35
Main menu
36
Problems with the Telephone function
36
Phonebox
37
Settings
37
The Telephone menu is available when the following conditions are met: The ignition is switched on.
The Bluetooth ®
function on the device is switched on.
After the device is switched on, the system attempts to connect to the most re- cently connected mobile phone 1)
.
If a telephone is connected to the device and the device is turned off, the connec-
tion to the phone is not dropped. The connection is lost after switching off the
ignition (for vehicles with KESSY system after switching off the ignition and open-
ing the driver's door).
WARNING■ The national regulations for using a mobile phone in a vehicle must be ob-
served.■
If a mobile phone or a two-way radio system is operated in a vehicle without
an external aerial or an external aerial which has been installed incorrectly,
this can increase the strength of the electromagnetic field inside the vehicle.
■
Two-way radio systems, mobile phones or mounts must not be installed on
airbag covers or within the immediate deployment range of the airbags.
■
Never leave a mobile phone on a seat, on the dashboard or anywhere, from
which it can be thrown during a sudden braking manoeuvre, an accident or a
collision - risk of injury. Use storage compartments with lid or the multimedia
holder for safe storage » Vehicle Owner's Manual , chapter Practical equip-
ment.
■
Before transport of the vehicle by air, the Bluetooth ®
function must be
switched off by a specialist company.
CAUTION
■ In areas with no signal and possibly in tunnels, garages and subways it is possi-
ble that a phone conversation may be lost and no phone connection is possible -
not even in an emergency!■
The range of the Bluetooth ®
connection to the hands-free system is limited to
the vehicle interior. The range is dependent on local factors, e.g. obstacles be-
tween the devices and mutual interferences with other devices. If your mobile phone is in a jacket pocket, for example, this can lead to difficulties when estab-lishing a connection with the device or transferring data.
Introductory information
First read and observe the introductory information and safety warn-
ings
on page 35.
The device allows for a wireless connection to the mobile phone. Your mobile
phone can be operated from this unit.
1)
With some phones, it is necessary to set the connection to the device as "authorised" in order for the
automatic connection to be successful. If this is not set, the system will prompt you for a confirma-
tion each time you attempt to connect to the mobile phone.
35Communication
Page 38 of 83
 Amundsen Navigation System Manual ŠKODA permits the operation of mobile phones and two-way radio systems with
a professionally installed external aerial and a maximum transmission power of
up to 10 watts.
Please ask at a specialist w")
ŠKODA permits the operation of mobile phones and two-way radio systems with
a professionally installed external aerial and a maximum transmission power of
up to 10 watts.
Please ask at a specialist workshop about installing and operating mobile phones
and two-way radio systems that have a transmission power of more than 10 W.
Operating mobile phones or two-way radio systems may interfere with the func-
tionality of the electronic systems in your vehicle.
The reasons for this are as follows:
› no external aerial;
› external aerial incorrectly installed;
› transmission power greater than 10 watts.
Note
■
We recommend that the installation of mobile phones and two-way radio sys-
tems in a vehicle be carried out by a specialist garage.■
The phone features depend on the mobile network operators and on the phone
being used. Further information is available from the mobile network operator or
refer to your phone manual
■
In signal-free areas reception can be interrupted or the call disconnected.
■
Most modern electronic equipment is shielded from RF signals. In exceptional
cases, electronic equipment may not be shielded against the RF signals and tele-
phone service may be disrupted.
Main menu
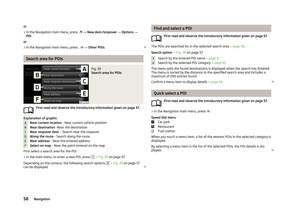
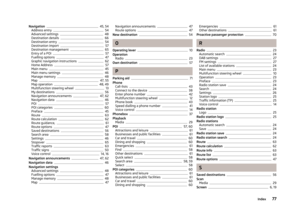
Fig. 22
Phone: Main menu
First read and observe the introductory information and safety warn-
ings on page 35.
Explanation of graphic
Name of the mobile network provider
Click on name of the connected phone, press to open a list of paired phones Speed dial favourite telephone numbers » page 41
Direct entry of a phone number » page 42
Display the phonebook » page 43
Display of call list (if there are new missed calls, the symbol will appear here with information about the number of missed calls) » page 43
Menu Settings Phone » page 37
Call up the main menu
›
Press the button TELEPHONE.
If a mobile phone is connected to the device, the Telephone » Fig. 22 main menu
is displayed.
Symbols in the display
SymbolMeaningCharge status of the phone battery a)Signal strengtha)Roaming (before the name of the mobile network provider) a)Missed callCurrent calla)
This function is only supported by some mobile phones.
Problems with the Telephone function
First read and observe the introductory information and safety warn-
ings
on page 35.
If there are problems with the availability of the network or with the Bluetooth ®
function, the following messages appear on the device display screen.
ABC36Phone
Page 39 of 83
 Amundsen Navigation System Manual MessageDescriptionNetwork search...The mobile phone searches for availa-
ble GSM networks.No networkThe mobile phone is not connected to the GSM network.
Rejected by network.
The mobile phone network")
MessageDescriptionNetwork search...The mobile phone searches for availa-
ble GSM networks.No networkThe mobile phone is not connected to the GSM network.
Rejected by network.
The mobile phone network operator
has rejected the connection (e.g. not
enough mobile phone credit, SIM card
blocked, roaming not available).To use the Bluetooth function, please
switch the ignition on.Switch on the ignition.Please switch on Bluetooth.Switch on the Bluetooth ®
function.No Bluetooth devices paired.Connect the mobile phone with the de-
vice.
Phonebox
Fig. 23
Front centre console: Phonebox
First read and observe the introductory information and safety warn-
ings
on page 35.
At the bottom of the storage compartment in the front centre console there is an induction plate connected to the GSM roof antenna - the Phonebox.
Function
When the mobile phone is inserted into the Phonebox, the phone signal increases in strength by about 20%. This reduces the level of phone battery discharge and
the electromagnetic radiation inside the vehicle.
Inserting the mobile phone into the Phonebox›Press on the edge of the lid A in the direction of the arrow, and open the stor-
age compartment.›
Place the mobile phone in the storage compartment
B
with its back on the in-
duction panel.
›
Pull on the edge of the lid
A
in the opposite direction to the arrow, and close
the storage compartment » .
The Phonebox cannot be used as an alternative to connecting the mobile phone
with the device.
WARNINGFor safety reasons, the storage compartment must always be closed when
driving.
CAUTION
■ Protective cases or cases around the mobile phone placed in the storage com-
partment may interfere with the phone signal strength.■
Metallic objects such as coins or keys under the mobile phone can affect the
phone signal strength.
Settings
First read and observe the introductory information and safety warn-
ings
on page 35.
›
Press the TELEPHONE button
→
.
Menu with the telephone menu settings
■ Select telephone - Search for available telephones/list of paired telephones/se-
lect telephone ■ Find telephone - Search for a mobile phone
■ Bluetooth - Bluetooth ®
settings » page 21
■ User profile - User profile settings
■ Manage favourites - Assign function keys to allow speed dialling of contacts;
you can also add and delete contacts here
■ Enter mailbox number - Enter the phone number of the voicemail
■ Prefix: - Switch on/off the option to assign a prefix to a telephone number.
Once this function is activated, the button for adding a prefix will be displayed
with the symbol in some menus.
37Communication
Page 40 of 83
 Amundsen Navigation System Manual ■Enter here - Enter the prefix of a phone number
■ Sort by: - Phonebook order
■ Name - Sort by contact name
■ Name - Sort by contact first name
■ Import contacts - Starts update of the")
■Enter here - Enter the prefix of a phone number
■ Sort by: - Phonebook order
■ Name - Sort by contact name
■ Name - Sort by contact first name
■ Import contacts - Starts update of the phone book; the number of imported
contacts and number of contacts stored in the phone is displayed
■ Delete other user profiles - Delete up to three recently-connected user pro-
files (contacts, order of calls, call lists, speed dial buttons assigned to con- tacts)
■ Reminder: Remember your mobile - Switch on/off the reminder for a connected
telephone when the ignition is switched off and the ignition key is removed (or
the ignition is turned off and the driver's door opened in the case of vehicles
with the KESSY system)
■ Select ring tone - Select the ring tone if the connected mobile phone does not
support the in-band ringing function 1)
■ Show pictures for contacts - Switch on/off the display of the image assigned to
the contact in the mobile phone 2)
Connect to the mobile phone
Introduction
This chapter contains information on the following subjects:
Conditions for successful pairing
38
Connect device with your mobile phone
39
Pairing mobile phone with device
39
Connection with another paired mobile phone
40
Switch Bluetooth ®
profile on/off
40
Clear mobile phone from the list of paired devices
41
Disconnection
41
First and foremost, pay attention to the safety instructions » page 4 , Important
notes .
The device is displayed in the phone to be connected as SKODA_BT_. ... is replaced with the last four symbols of the VIN code of your vehicle.
You can change the name of the device » page 21
.WARNINGThe unit may require confirmation of certain features in the mobile phone
when pairing. The pairing process therefore does not take place while driving - danger of accident!
Note
■ The maximum number of phones paired is 20 When the maximum number is
reached and a new phone is paired, the least recently used paired phone will be automatically deleted.■
In some countries, the use of phones with the Bluetooth ®
function may be re-
stricted. Further information can be obtained from local authorities.
■
The range of the Bluetooth ®
connection to the hands-free system is restricted
to the vehicle interior. This depends on local conditions and on interference with other devices.
■
When pairing from the mobile phone, follow the instructions in the owner's
manual of the mobile phone.
Conditions for successful pairing
First read and observe the introductory information and safety warn-ings
on page 38.
To connect a mobile phone with the device, the two devices must be paired.
Prerequisites for successful pairing: The ignition is switched on.
The Bluetooth ®
function for the mobile phone » page 21 is switched on.
The visibility of the mobile phone is switched on » page 21.
The visibility of the mobile phone is switched on.
The mobile phone to which the connection is being made must have no ac-
tive connection to another mobile phone.
The pairing can be initiated from the device or from the mobile phone.
1)
The in-band ringing function makes it possible to use the ring tone of your phone as the ring tone.
2)
This function is only supported by some mobile phones.
38Phone