Page 137 of 339

135
Seats and storage
Other storage compartments
You will find more object holders, compartments and supports in other
parts of the vehicle:
● In the top of the glove compartment in vehicles that do not have a CD
reader. The load must not exceed 1.2 kg.
● In the centre console under the centre armrest*.
● In the driver side panel there is a removable box for access to fuses and
relays. The load of the compartment should not exceed 0.2 kg.
● Coat hooks in the pillar B ⇒
.
● Other storage compartments are found in the rear seat, to the left and
the right of the seats.
WARNING
● Please make sure that any items of clothing hanging from the coat
hooks do not obstruct your view to the rear.
● The coat hooks should only be used for lightweight clothing. Do not
leave any heavy or sharp objects in the pockets.
● Do not use clothes hangers to hang up the clothing, as this could in-
terfere with the function of the head-protection airbags.
Power sockets
Electrical equipment can be connected to the 12 volt power
socket.
Fig. 87 Centre console:
front/rear 12-volt power
socket
Fig. 88 Detailed view of
the side trim in the lug-
gage compartment: 12-
volt power sockets (valid
only for the LEON ST
model)
Safety FirstOperating instructionsPractical TipsTechnical specifications
Page 138 of 339

136Seats and storage
In the centre console
–Remove the connector located in the centre console of the pow-
er socket ⇒ Fig. 87.
– Insert the plug of the electrical appliance into the power socket.
In the luggage compartment (valid only for the Leon ST model)
– Lift the power socket cover ⇒ Fig. 88.
– Insert the plug of the electrical appliance into the power socket.
Electrical equipment can be connected to the 12 volt power socket. The ap-
pliances connected to each power socket must not exceed a power rating of
120 Watt.
WARNING
The power socket works only when the ignition is on. Improper use may
cause serious injury or even fire. Children should therefore not be left in
the vehicle, unattended, if the button is also left behind. Otherwise there
is a possibility that they may be injured.
CAUTION
Always use the correct type of plugs to avoid damaging the sockets.
Note
The use of electrical appliances with the engine switched off will cause a
battery discharge. Luggage compartment
General notes
WARNING
The Safe driving chapter contains important information, tips, sugges-
tions and warnings that you should read and observe for your own safety
and the safety of your passengers ⇒ page 7.
Page 139 of 339

137
Seats and storage
Applies to the model: LEON / LEON SC
Increase capacity of luggage compartment
The backrests can be folded forward individually or togeth-
er.
Fig. 89 Clip to support
the seat belt
Fig. 90 Backrest release
lever Folding the backrest forwards
–
Place the side seat belts in the trim clip ⇒ Fig. 89.
– Slide the head restraint(s) downwards ⇒ page 132.
– Press the release lever ⇒ Fig. 90 A
in the direction of the ar-
row.
– Fold the backrest forwards.
Returning the backrest to its upright position
– Move the backrest until it engages properly ⇒
. The red mark-
ing on the tab ⇒ Fig. 90 B should no longer be visible when
the backrest is properly secured.
WARNING
● Make sure that the rear backrest is securely locked in position so that
the seat belt can provide proper protection on the centre rear seat.
● The rear backrest must always be securely latched so that objects
stored in the luggage compartment will not fly forward through the inte-
rior during sudden braking.
CAUTION
● With the backrest inclined there is a danger of damaging the rear head
restraints when adjusting the front seats backwards.
● When folding the backrest forwards, make sure to place the side seat
belts in the trim clip to prevent them from being damaged by becoming
trapped in the backrest lock.
Safety FirstOperating instructionsPractical TipsTechnical specifications
Page 140 of 339

138Seats and storage
Applies to the model: LEON ST
Folding down and lifting the rear seat backrest
Fig. 91 In the rear seat
backrest: release tab 1;
red marking 2
Fig. 92 In the luggage
compartment: distance
unlocking levers of left
part 1 and right part 2 of
the rear backrest
The rear seat backrest is divided and each part can be folded down sepa-
rately to extend the boot. When the rear seat backrest is folded down, nobody is allowed to travel in
the corresponding seats (not even a child).
Folding down the rear seat backrest with the release tab
●
Push the head restraint down as far as it will go.
● Push the release tab ⇒ Fig. 91 1
forwards and at the same time fold
down the backrest.
● The rear backrest is released when the red mark of button 2
can be
seen.
Fold down the rear seat backrest with the distance unlocking lever
● Push the head restraint down as far as it will go.
● Open the rear lid.
● Pull on the distance unlocking lever of the left part ⇒ Fig. 92 1
or right
2 of the backrest in the direction of the arrow. The unlocked part of the
rear backrest is folded down automatically forwards.
● As applicable, close the rear lid.
The rear backrest is released when the red mark on button ⇒ Fig. 91 2
can
be seen.
Folding up the rear seat backrest
● Lift the backrest and press it firmly in the lock until it engages properly
⇒
.
● It should not be possible to see the red mark of the release tab 2.
● The backrest has to be properly engaged.
WARNING
If the rear seat backrest is folded down or lifted carelessly it may cause
serious injury.
● Never fold down or lift the rear seat backrest while driving.
Page 141 of 339

139
Seats and storage
WARNING (Continued)
● On lifting the rear seat backrest, avoid trapping or damaging the seat
belt.
● On folding down or lifting the rear seat backrest, always keep your
hands, fingers, feet and other body parts out of its path.
● For the safety belts to offer the necessary protection, all the parts of
the rear backrest should always be properly engaged. This is particularly
important in the case of the rear centre seat. Anyone sitting in a seat
whose backrest is not properly engaged could fly forward, together with
the backrest in the event of a sudden braking, a brusque manoeuvre or
an accident.
● A red mark on the button 2
warns that the backrest is not engaged.
Always check that the red marking is not visible when the backrest is in
the upright position.
● When the rear seat backrest is folded down or not properly engaged,
nobody is allowed to travel in the corresponding seats (not even a child).
CAUTION
If the rear seat backrest is folded down or lifted carelessly it may cause
damage to the vehicle or other objects.
● Before folding the rear seat backrest, adjust the front seats so that nei-
ther the head restraints nor the padding of the rear backrest hit them. Applies to the model: LEON / LEON SC
Luggage compartment cover
The luggage compartment cover blocks the view into the
luggage compartment.
Fig. 93 Rear lid open
with the luggage com-
partment cover
Removing
– Remove the straps A
and unfasten the cover of the support Bby pressing upwards in the direction of arrow 1.
Fitting
– Insert the cover horizontally so that it coincides with the “plate”
on the axis of the supports B
and press down until it engages.
– Attach the straps to the rear lid A
⇒ .
Safety FirstOperating instructionsPractical TipsTechnical specifications
Page 142 of 339

140Seats and storage
WARNING
● The luggage compartment cover must always be fixed properly (risk
of accident).
● The luggage compartment cover should not be used as a storage
shelf. Articles placed on this cover could cause injury to vehicle occu-
pants in an accident or if the brakes are applied suddenly.
Applies to the model: LEON ST
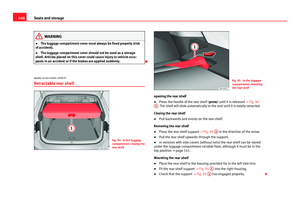
Retractable rear shelf
Fig. 94 In the luggage
compartment: closing the
rear shelf
Fig. 95 In the luggage
compartment: removing
the rear shelf
opening the rear shelf
● Press the handle of the rear shelf ( press) until it is released
⇒ Fig. 94
1
. The shelf will slide automatically to the end until it is totally retracted.
Closing the rear shelf
● Pull backwards and evenly on the rear shelf.
Removing the rear shelf
● Press the rear shelf support
⇒ Fig. 95 1
in the direction of the arrow.
● Pull the rear shelf upwards through the support.
● In versions with side covers (without nets) the rear shelf can be stored
under the luggage compartment variable floor, although it must be in the
top position ⇒ page 141.
Mounting the rear shelf
● Place the rear shelf in the housing provided for in the left side trim.
● Fit the rear shelf support
⇒ Fig. 95 1
into the right housing.
● Check that the support
⇒ Fig. 95 1 has engaged properly.
Page 143 of 339
141
Seats and storage
WARNING
If animals or other vehicles or stationary objects are carried incorrectly
on the rear shelf, they could cause serious injuries in case of sudden
braking or brusque manoeuvre or an accident.
● Do not leave hard, heavy or sharp objects loose on the rear shelf.
● Never transport animals on the rear shelf.
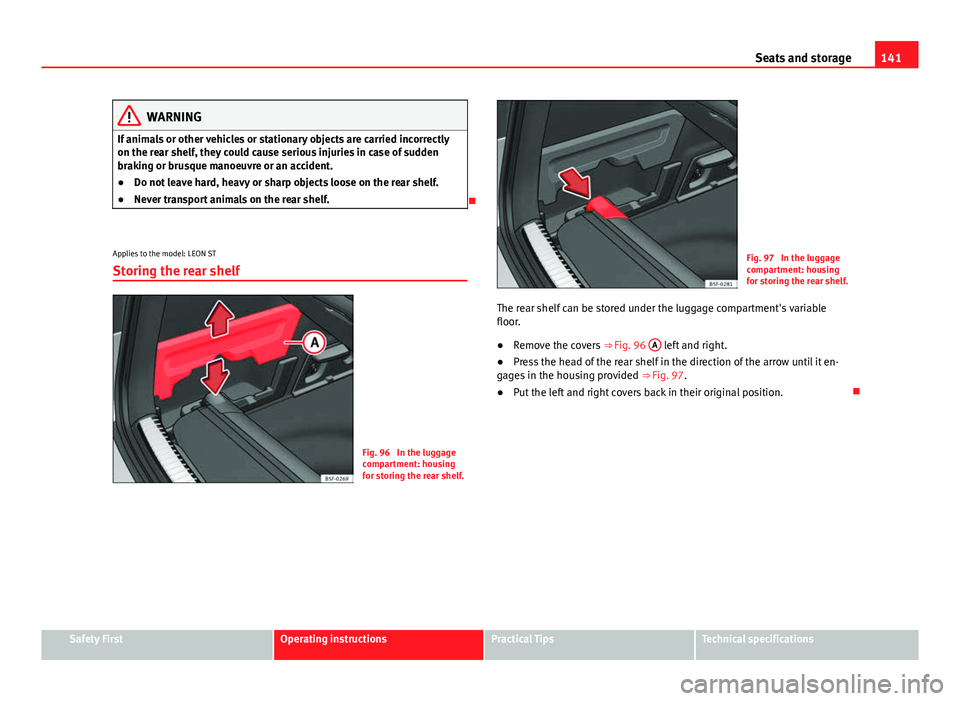
Applies to the model: LEON ST
Storing the rear shelf
Fig. 96 In the luggage
compartment: housing
for storing the rear shelf.
Fig. 97 In the luggage
compartment: housing
for storing the rear shelf.
The rear shelf can be stored under the luggage compartment's variable
floor.
● Remove the covers
⇒ Fig. 96 A
left and right.
● Press the head of the rear shelf in the direction of the arrow until it en-
gages in the housing provided ⇒ Fig. 97.
● Put the left and right covers back in their original position.
Safety FirstOperating instructionsPractical TipsTechnical specifications
Page 144 of 339

142Seats and storage
Applies to the model: LEON ST
Use of the net partition behind the rear seat*
Fig. 98 In the luggage
compartment: pulling out
and securing the net par-
tition
Fig. 99 In the luggage
compartment: removing
the net partition Pulling out and securing the net partition
●
Pull up on the tab ⇒ Fig. 98 2
to remove the net from the casing 4.
● Secure the net partition on the right 3 (magnified image).
● Secure the net partition in the housing of the left side 1 by pulling the
bar.
The net partition is secured properly when the T-shaped ends are securely
fitted into the corresponding housings 3
and 1.
Retracting the net partition
● Remove the bars from the housings 3
and 1.
● Roll away the net in casing 4 by lowering it with your hand.
Removing the net partition
● Fold the rear seat backrests forward.
● Press the left or right release button ⇒ Fig. 99 in the direction of the ar-
row A
.
● Remove the support casing in the direction of arrow B.
Fitting the net partition
● Fold the rear seat backrests forward.
● Place the casing in the left and right supports.
● Press the housing in the left and right supports in the direction of arrow
B
until it engages ⇒ Fig. 99.
The red markings on the release tabs must not be seen.
WARNING
● Always secure objects, even when the net partition is properly fitted.
● When the vehicle is moving, nobody should be allowed to remain be-
hind the fitted net partition.