Page 57 of 112
56Navigation
Selecting a point of interest from the list
● Select a destination in the list by turning the setting knob ⇒ Fig. 1 10
and press to start route guidance
⇒ page 11.
● Alternatively: Browse the list by dragging the scroll marker on the
screen and select a destination to start route guidance ⇒ page 11.
● Press the Details
function button. Press the Start function button in the
detailed view to start route guidance.
● In the list view or detailed view, press the Store
function button to store
the marked or displayed address in the Destination memory ⇒ page 58.
Note
The distances and directions for points of interest refer to the route as the
crow flies ⇒ Fig. 56.
Page 58 of 112

57
Navigation
Destination memory Introduction
The destination memory is used to store navigation destinations manually.
The function buttons for storing a destination are only enabled when the
destination has been sufficiently defined.
Destinations saved in the memory can be edited or used to navigate to the
destination.
Additional Information:
● Safety notes ⇒ page 4
● Unit overview ⇒ page 6
● Introduction to navigation ⇒ page 45
● Entering a destination ⇒ page 51 Automatically stored last destinations
Fig. 57 List of recent
destinations
Up to 50 destinations for which route guidance has been started are auto-
matically stored in the Last destinations list
⇒ Fig. 57.
Old last destinations are automatically overwritten by new destinations
when the list is full. To permanently retain one of the last destinations, it
must be stored in the Destination memory.
● In the list of last destinations, mark the destination you wish to store
⇒ Fig. 57.
● Press the Store
function button and store the destination
⇒ page 58.
Page 59 of 112
58Navigation
Storing destinations manually
Fig. 58 Input window for
assigning your own entry
name.
When the Store
function button is displayed, the destination currently
shown can be stored in the destination memory.
● Pressing the Store
function button opens an input window where you
can assign an entry name ⇒ Fig. 58.
● If you wish to assign a name of your own, first press the Delete
function
button and then enter your own chosen name for the destination
⇒ page 49.
● Press OK
to store the destination under the currently displayed name in
the Destination memory. Editing or deleting destinations in the destination memory
Fig. 59 Destination
memory with manually
stored destinations.
Fig. 60 Destination win-
dow showing a destina-
tion from the destination
memory.
● Open the Navigation main menu.
● Press the
Destination memory function button to open the list of man-
ually stored destinations ⇒ Fig. 59.
Page 60 of 112

59
Navigation
● Select a destination by turning the setting knob ⇒ Fig. 1 10
.
● Press the Details function button.
The destination is opened in the destination window ⇒ Fig. 60.
● Pressing the Start
function button starts route guidance to the displayed
destination.
● Pressing the Delete
function button deletes the destination from the
Destination memory.
● Destination items ( Street, Town/PC etc.) can be opened and edited indi-
vidually in the destination window ⇒ page 52.
● Press the Name
function button to change the displayed entry name
⇒ page 49.
When destination data have been altered, the Delete
function button
changes to Store to allow you to store the changes.
If a flagged destination is displayed in the destination window ⇒ page 60.
Deleting the Destination memory ● Press the SETUP
unit button from any navigation menu to open the
Navi-
gation setup menu.
● Press the Delete destination memory
function button and select the destina-
tions to be deleted in the next menu.
● Press All destinations
to delete all destinations in the
destination memory
and Last destinations .
● OR: press Last destinations
to delete all destinations in the list of
Last des-
tinations .
● Alternatively: press the unit button
to close the window without
making any changes. Displaying the information window and storing a flagged
destination
Fig. 61 Information win-
dow with detailed view of
the current position.
Opening the information window for the current vehicle position
● From any navigation menu (except the Navigation setup menu), press
the
unit button to open the
Details information window
⇒ Fig. 61.
If no route guidance is active, the current vehicle position is displayed in
the information window ⇒ Fig. 61.
During route guidance, the final destination is displayed in the information
window ⇒ page 62.
● Turn the setting knob
⇒ Fig. 1 10
in the Details information window to
display all available information on the current vehicle position:
displayMeaningLocation:Vehicle position determined by means of GPS
data and navigation data
Latitude:LatitudeLongitude:Longitude
Page 61 of 112

60Navigation
displayMeaningAltitude:Height above mean sea level.GPS status:Display of technical GPS informationUseable satellites:The number determines the GPS statusSatellites tracked:The number determines the GPS status
Storing a flagged destination
●Pressing the Flag dest. function button stores the displayed position as a
Flagged destination in the Destination memory ⇒ Fig. 61.
To permanently retain the position stored as a Flagged destination, it must
be renamed in the Destination memory. Otherwise the stored position will be overwritten the next time a flagged destination is stored.
● Select the flagged destination in the Destination memory ⇒ Fig. 59.
● Press the Details
function button.
The flagged destination can be renamed. Storing or editing the home address
Fig. 62 Navigation main
menu
Fig. 63 Destination win-
dow with the home ad-
dress.
Only one address or position can be stored as the home address at any one
time. The stored home address can be edited or overwritten.
To start route guidance to the stored home address, press the Home addr.
function button in the Navigation main menu ⇒
Fig. 62.
Page 62 of 112
61
Navigation
If no home address has been stored yet, a home address can be defined af-
ter confirmation of a prompt.
Entering the home address
● Press the SETUP
unit button from any navigation menu to open the
Navi-
gation setup menu .
● Press the Enter home address
function button.
● Press the Position function button to store your current geographical po-
sition (longitude and latitude) as the home address.
● OR: press Address
to open the destination window Home address
⇒ Fig. 63.
The name Home addr. is already entered by default. You can then enter or
change the address ⇒ page 52, Destination window.
Changing the stored home address
● Press the SETUP
unit button from any navigation menu to open the
Navi-
gation setup menu.
● Select the Enter home address
function button.
● Enter the home address.
Page 63 of 112

62Navigation
Route guidance
Introduction
Once route guidance has started, the route is calculated according to the
data selected in route options.
The unit switches to the map view. You are guided to your chosen destina-
tion by announcements and visual recommendations.
If dynamic route guidance is activated, TMC traffic reports will be taken into
account in the route calculation ⇒ page 69.
The route options can be changed manually while route guidance is in pro-
gress.
All of the unit's audio sources are available during route guidance.
Additional Information:
● Safety notes ⇒ page 4
● Unit overview ⇒ page 6
● Introduction to navigation ⇒ page 45
● Entering a destination ⇒ page 51
WARNING
The recommendations and traffic signs shown by the navigation system
may differ from the true traffic conditions.
● Traffic signs and traffic regulations have priority over the recommen-
dations and displays provided by the navigation system.
● Adjust your speed and driving style to visibility, road, traffic and
weather conditions.
Route options
Fig. 64 Navigation setup
menu.
Fig. 65 Navigation setup
menu: Route options.
It is possible to include TMC traffic reports, exclude certain types of route
and define route criteria for the calculation of the route. The route options
can be changed while route guidance is in progress. The route will then be
recalculated.
Page 64 of 112

63
Navigation
● Press the SETUP
unit button in one of the navigation menus.
● In the Navigation setup menu, press the Route options function button
⇒ Fig. 64.
● Select or deselect an option by ticking or clearing the appropriate check-
box ⇒ Fig. 65.
Defining route criteria
● In the Route options setup menu, press the Route criteria
function button.
● Press the desired settings to select them in the pop-up window.
Route criteriaMeaningFastFastest route to the destination, even if it means driv-
ing further.
EconomicalThis function aims to find an equilibrium between the
shortest time and the shortest route.
Shortshortest route to the destination, even if it results in a
longer travelling time. The navigation route may in-
clude unusual route sections, e.g. dirt roads.
Dynamic route
If dynamic route guidance is activated, TMC traffic reports will be taken into
account in the route calculation ⇒ page 69.
Excluding types of route in the calculation
The function buttons Avoid motorways
, etc. define whether or not these
types of road may be included in the route calculation.
Even when excluded, these types of route will still be included in the route
calculation if no practical alternative route exists. For example, if it is impos-
sible to reach an island without using the ferry. For the calculation of very
long routes, it is not possible to avoid motorways. Navigation announcements
When the route has been calculated, the first announcement is given. Up to
three navigation announcements are given before a turn, e.g. within a town
“Prepare to turn left”, “Turn left after 300 metres” and “Now turn left”.
●
Press the setting knob ⇒ Fig. 1 10
to repeat the last navigation an-
nouncement.
The distances that are announced depend on the type of road and the
speed at which you are driving. On motorways, the first announcement is
given roughly 2,000 m before an exit.
For example, the following announcements may be heard on multi-lane
highways or roads that divide, and at roundabouts: “Take the second exit at
the roundabout!”. More than one instruction may be necessary when navi-
gating very large roundabouts. In any case, the exit to be taken is always
displayed in relation to the position of the vehicle at the time the instruction
is given.
When you arrive at your destination, the following announcement is heard:
“You have reached the destination”.
During dynamic route guidance, you receive information about reported
traffic congestion on the route. If the route is recalculated due to traffic con-
gestion, you will be advised accordingly ⇒ page 69.
Announcement settings.
Navigation announcements are played at the preset volume.
The volume of an announcement can be changed with the volume control
. All following announcements will then be made at this volume.
The volume of navigation announcements can be preset or switched off in
the Navigation setup menu ⇒ page 72 or in the volume settings
⇒ page 100.
 1
1 2
2 3
3 4
4 5
5 6
6 7
7 8
8 9
9 10
10 11
11 12
12 13
13 14
14 15
15 16
16 17
17 18
18 19
19 20
20 21
21 22
22 23
23 24
24 25
25 26
26 27
27 28
28 29
29 30
30 31
31 32
32 33
33 34
34 35
35 36
36 37
37 38
38 39
39 40
40 41
41 42
42 43
43 44
44 45
45 46
46 47
47 48
48 49
49 50
50 51
51 52
52 53
53 54
54 55
55 56
56 57
57 58
58 59
59 60
60 61
61 62
62 63
63 64
64 65
65 66
66 67
67 68
68 69
69 70
70 71
71 72
72 73
73 74
74 75
75 76
76 77
77 78
78 79
79 80
80 81
81 82
82 83
83 84
84 85
85 86
86 87
87 88
88 89
89 90
90 91
91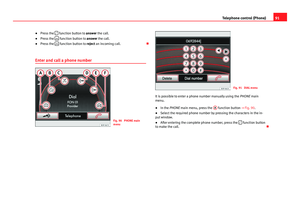 92
92 93
93 94
94 95
95 96
96 97
97 98
98 99
99 100
100 101
101 102
102 103
103 104
104 105
105 106
106 107
107 108
108 109
109 110
110 111
111

