Page 25 of 112

in
the pop-up window.
● Alternatively: switch on the additional stations from the list of DAB sta-
tions")
24Audio mode
● Alternatively: press the function button Extras
and Additional stations1)
in
the pop-up window.
● Alternatively: switch on the additional stations from the list of DAB sta-
tions ⇒ page 24.
Note
The stations are stored to the station buttons in the same way as that de-
scribed for the conventional radio mode ⇒ page 12.
Note
The scan function stops and starts in the same way as that described for the
conventional Radio mode ⇒ page 12.
DAB station list
Fig. 21 DAB station list:
select a station.
Fig. 22 DAB station list:
select an ensemble.
The DAB station list gives all the DAB ensembles which can be played with
the corresponding DAB station.
Opening and closing the DAB station list
● In DAB radio mode, press the Band
function button and press the
DAB/List function button in the pop-up window ⇒ Fig. 19.
● Alternatively: if the station button display is not on in DAB radio mode
⇒ page 16, turn the setting knob
⇒ Fig. 1 10
to open the DAB station list.
● To close the station list, press the function button.
If the list is not used, it will close automatically after one minute.
Select a DAB station and change the DAB ensemble
When the DAB station list is opened, the currently playing station is dis-
played highlighted. The ensemble for the currently playing station is shown
as open ⇒ Fig. 21.
1)
The unit only displays whether there are additional stations available for the currently play-
ing station.
Page 26 of 112

25
Audio mode
● Turn and press the setting knob ⇒ Fig. 1 10
to select and switch on a
station in an open ensemble.
● Turn the setting knob to the left until the open ensemble has been selec-
ted, for example, Ensemble B
.
● Press the setting knob to close the ensemble display.
● Turn the setting button to select another ensemble ⇒ Fig. 22.
● Turn the setting button to open the selected ensemble.
● Switch on the station by touching the screen, or by turning and pressing
the setting knob.
Switching on additional stations on the DAB station list
If there are additional stations for a DAB station, an arrow is displayed be-
fore the name of the station .
If one of these stations is switched on from the list, first another list is
opened for you to select whether you wish to listen to the main station o
one of the additional stations.
Updating the DAB station list
While the stations are being updated, the unit searches the dial for availa-
ble ensembles in the region.
Even though the unit is not operating in DAB mode, the list of DAB stations
will be automatically updated.
The list of digital stations can also be updated manually.
● Press the Update
function button in the DAB station list
⇒ Fig. 21.
● Wait until the update has completed.
● Alternatively: press the Cancel
function button.
While the stations are being updated, a pop-up window opens and the vol-
ume of the DAB radio is muted.
The pop-up window closes once the update is complete.
The currently playing DAB station is not modified with the update. Displays and function buttons in the DAB station list
Display: Meaning Ensemble: ensemble closed.
Ensemble: ensemble open. DAB radio A-x: DAB station in an open ensemble. Radio DAB A-x: the DAB station offers other additional stations. DAB radio A-x: temporarily without reception of the DAB station. DAB radio A-x (FM): station received on FM band. Temporarily unable to
receive DAB.
Save: to save a selected station to a station button ⇒ page 12.Update: to update the DAB station list.
DAB settings
● In Radio mode, press the SETUP button.
● In the Radio setup menu, press the DAB settings button.
Function button: Effect DAB announcements: the incoming DAB messages are played with the DAB
radio mode on. If there is no FM station temporarily available and the TP
function is on, the DAB traffic reports are played in any operating mode as
TP reports ⇒ page 19.
DAB tracking: tracking of activated programmes. To switch off, untick the
check box.
Automatic switch DAB-FM: switching to FM frequency band is allowed for au-
tomatic station tracking.
DAB programme tracking and switching from DAB to FM
The DAB and FM station should broadcast the corresponding station identi-
fier in order to run programme tracking in several frequencies.
Page 27 of 112
26Audio mode
When the DAB reception is poor, the unit tries to find and tune into the cor-
responding DAB station in the FM band.
As long as the station is broadcast through the FM band, (FM) is displayed
behind the station name. When the station can be found again in DAB, the
(FM) display disappears.
If the reception of a DAB station is poor and it cannot be found on FM either,
the radio volume is muted.
The DAB programme tracking function can be switched off if you do not wish
to change stations automatically, as the loss of signal is for a short time on-
ly, for example, when driving through a tunnel.
Page 28 of 112
. These audio
files can")
27
Audio mode
Media mode Introduction
“Media sources” are audio sources containing audio files on various differ-
ent data media (e.g. CD, memory card, external MP3 player). These audio
files can be played by the radio and navigation system from its correspond-
ing drives or audio input sockets (internal CD player, memory card slot, ME-
DIA-IN interface, AUX-IN, etc.).
The supported file formats listed are collectively referred to below as “audio
files”. A CD containing audio files of these types is referred to as an “audio
data CD”.
Additional Information:
● Safety notes ⇒ page 4
● Unit overview ⇒ page 6
● Multimedia interface ⇒ page 40
WARNING
● Inserting a data medium while you are driving could distract you from
the road and result in accident.
● The functions described below depend on the device used. There may
be differences with certain devices.
Media source and audio file requirements
Factory-fitted CD players conform to safety class 1 according to
DIN IEC 76 (CO) 6/ VDE 0837.
The unit only accepts standard 12 cm CDs and memory cards with the di-
mensions 32 mm x 24 mm x 2.1 mm or 1.4 mm.
Media sourcesRequirements for playing in the unit Audio CDs with CD Digital
Audio logo .- CD Digital Audio specification.
CD-ROM, CD-R and CD-RW
audio data CDs up to max.
700 MB (megabytes) compli-
ant with ISO 9660 or in the
Joliet file system.
SD and MMC memory
cards up to max. 2 GB (giga-
bytes) and SDHC memory
cards up to max. 32 GB.- MP3 files (.mp3) with bit rates of between
48 and 320 kbit/s or with variable bit rate.
- WMA files (.wma) up to 9.2 mono/stereo
without copy protection.
- Playlists in the formats PLS, M3U and WPL.
- File names and paths no longer than 256
characters.
- Folder structures with a maximum of eight
levels.
- Audio data CDs with max. 50 folders and
max. 500 files.
- Memory cards with max. 5000 folders and
max. 15000 files with max. 6000 files per
folder.
Audio file playback via
Bluetooth ®a)
.- The external audio source must be com-
patible with the Bluetooth A2DP profile.
AUX. External audio source.– Audio output is possible with a 3.5 mm
jack connector ⇒ Fig. 1 9.MDI. External data medium.- Compatible with MEDIA-IN multimedia in-
terface ⇒ page 40.
AUX2. Additional external
source- Depending on the vehicle equipment, this
source can be used to play audio from an
external player connected to a Rear Seat En-
tertainment system (only if the vehicle does
not have MDI).
a) Bluetooth ®
is a registered trademark of Bluetooth SIG, Inc.
Restrictions and notes
Dirt, high temperatures or mechanical damage may damage the data medi-
ums. Please observe the manufacturer's instructions.
Page 29 of 112

28Audio mode
Variations in the quality of data media produced by different manufacturers
may lead to problems during playback.
Please observe copyright laws.
CDs recorded in UDF or Direct CD format cannot be played. Under Windows
Vista ®
ensure that the correct format is selected.
The unit may be unable to read individual tracks or the entire data medium
due to the data medium configuration or the devices and programs used for
recording. Information about the best ways to create audio files and data
media (compression rate, ID3 tag etc.) can be found on the Internet.
Due to the larger quantity of data, it takes longer to read a data medium
containing compressed audio files (MP3, WMA etc.) than a “normal” audio
CD. Complex folder structures can also slow down the reading of a data me-
dium.
Playlists only determine a certain playing order. There are no files stored in
a playlist. The unit will not play a playlist if the files are not stored on the
data medium at the locations referred to by the playlist (relative file paths). Playing order of files and folders
Fig. 23 Possible struc-
ture on an audio data CD
Audio files on data media are often organised by means of folders and
playlists to determine a certain playing order.
Tracks, folders and playlists on a data medium are sorted by name in alpha-
numeric order.
Page 30 of 112

29
Audio mode
The illustration ⇒ Fig. 23 shows a typical audio data CD that contains tracks
, folders and subfolders.
The tracks are played in the following order: Tracks 1
and 2 in the CD's root directory
Tracks 3 and 4 in the first folder F1 in the CD's root directory
Track 5 in the first subfolder F1.1 of the folder
F1
Track 6 in the first subfolder F1.1.1 of the subfolder
F1.1
Track 7 in the second subfolder F1.2 of the folder
F1
Tracks 8 and 9 in the second folder F2
The playlists are also treated as folders.
The playback order may differ from that described depending on the selec-
ted settings (Playback mode: Repeat, Mix,...) ⇒ page 38.
MEDIA main menu
Fig. 24 MEDIA main
menu: Audio CD track
display.
1.
2.
3.
4.
5.
6.
Fig. 25 MEDIA main
menu: Track display for
an audio data CD.
In the MEDIA main menu, various media sources can be selected and
played ⇒ page 38.
● Press the MEDIA
unit button.
The last Media source played continues to be played.
The Media source being played is displayed in the centre of the bottom line
of the screen in the MEDIA main menu.
If it is not possible to select a Media source, when you try to enter the ME-
DIA main menu, a pop-up window opens displaying the AUX2
function but-
ton. If this function button is pressed, the check box Activate AUX2 input is
marked in the Media setup menu, and in the Media Selector , the MDI
source or the AUX2 source (depending on the vehicle configuration) is dis-
played as active, even if there is no device connected to this source. There-
fore, this option should not be switched on, except in the cases shown (see
⇒ page 33 and
⇒ page 40.
Track information display
As the default display, Track and the track number corresponding to the
track order on the CD are displayed in the centre of the screen ⇒ Fig. 24.
Page 31 of 112
, the track name is displayed in the centre, with the artist
above and the album name")
30Audio mode
If the audio files contain additional track information (CD text, ID3 tag in the
case of MP3 files), the track name is displayed in the centre, with the artist
above and the album name below it ⇒ Fig. 25.
Press the
unit button
⇒ Fig. 1 7 to display further track information (stor-
age location).
The elapsed playing time and the remaining playing time of the track are
displayed in minutes and seconds on the left and right. The remaining play-
ing time cannot be displayed for files with variable bit rate ( VBR).
Inserting and ejecting a CD
Fig. 26 MEDIA main
menu: CD Media source.
The internal CD player can play audio CDs and audio data CDs.
An audio CD or MP3 CD is indicated by CD or on the screen. Insert CD
●
Hold the CD with the printed side facing up.
● Push the CD into the CD slot ⇒ Fig. 1 4
only to the point where it is
drawn in automatically.
● When the CD is inserted, playback will start automatically.
Ejecting CDs
● Press the
unit button.
● The CD in the drive will be ejected and must be removed within 10 sec-
onds.
If the CD is not removed within 10 seconds, it is retracted again for safety
reasons.
CD cannot be read
If the unit cannot read the CD, you are informed by a pop-up window.
Depending on the unit, the unit will try to read the illegible CD three times
before the pop-up window is opened, automatically ejecting and retracting
the CD briefly each time.
● Press the function button OK
to confirm the display and remove the CD.
If the CD is not removed within 10 seconds, it is retracted again without
changing to CD mode. The function button
of the
Media selection menu
remains inactive ⇒ page 36. The CD must be removed manually.
Note
Uneven road surfaces and strong vibrations may cause the CD to jump.
Note
If the interior temperature of the unit is too high, it will not accept or play
more CDs.
Page 32 of 112

31
Audio mode
Note
If you insert a number of different CDs and receive the message CD drive er-
ror every time, contact a specialised workshop.
Inserting and removing memory cards
Fig. 27 System settings
menu: removing the
memory card.
Only supported audio files are displayed and played in the MEDIA main
menu. Other file types will be ignored.
A compatible memory card is indicated by SD card or on the screen.
Inserting the memory card
If a memory card cannot be inserted, ensure that it is positioned correctly
and is compatible with the unit. ●
Insert a compatible memory card into the memory card slot ⇒ Fig. 1 12
with the cut-off corner first and facing upwards until the card clicks into
place.
●
Playback starts automatically if supported audio files are stored on the
memory card.
Removing a memory card
● To avoid damaging it, the memory card should be removed through the
System Settings Menu , Remove SD card ⇒ Fig. 27.
● Press the inserted memory card. The memory card jumps to the eject po-
sition.
● Remove the memory card.
Memory card cannot be read
If legible audio files have not been stored on a memory card, the unit will
not change to memory card mode after it is loaded.
If the unit cannot read from the memory card at all, you will also be in-
formed by a pop-up window.
● Press the OK
function button.
If an illegible memory card or a card which does not contain audio files is
inserted, the function button
for the Media selection menu
remains inac-
tive ⇒ page 36.
The memory card must be removed manually.
 1
1 2
2 3
3 4
4 5
5 6
6 7
7 8
8 9
9 10
10 11
11 12
12 13
13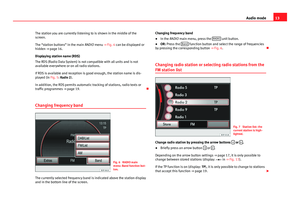 14
14 15
15 16
16 17
17 18
18 19
19 20
20 21
21 22
22 23
23 24
24 25
25 26
26 27
27 28
28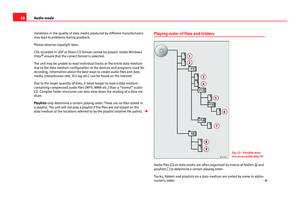 29
29 30
30 31
31 32
32 33
33 34
34 35
35 36
36 37
37 38
38 39
39 40
40 41
41 42
42 43
43 44
44 45
45 46
46 47
47 48
48 49
49 50
50 51
51 52
52 53
53 54
54 55
55 56
56 57
57 58
58 59
59 60
60 61
61 62
62 63
63 64
64 65
65 66
66 67
67 68
68 69
69 70
70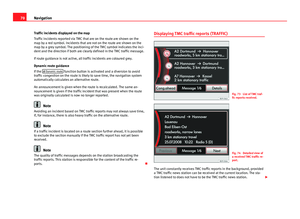 71
71 72
72 73
73 74
74 75
75 76
76 77
77 78
78 79
79 80
80 81
81 82
82 83
83 84
84 85
85 86
86 87
87 88
88 89
89 90
90 91
91 92
92 93
93 94
94 95
95 96
96 97
97 98
98 99
99 100
100 101
101 102
102 103
103 104
104 105
105 106
106 107
107 108
108 109
109 110
110 111
111 is disp")