Page 25 of 72

24Audio modeRestrictions and notes
Contamination, exposure to high temperatures and mechanical damage canrender a data medium unusable. Please observe the manufacturer's instruc-tions.
Variations in the quality of data media produced by different manufacturersmay lead to anomalies during playback.
Please observe copyright laws.
The unit may be unable to read individual tracks or the entire data mediumdue to the data medium configuration or the devices and programs used forrecording. Information can be found on the internet regarding the best waysto create audio files and data media (compression rate, ID3 tag etc.).
Depending on the size, its condition due to use (copy and delete process-es), the folder structure and file type, the read time of the data media usedcan vary considerably.
Playlists only determine a certain playing order. There are no files stored ina playlist. The unit will not play a playlist if the files are not on the data me-dium at the locations referred to by the playlist (relative file paths).
Note
●Do not use adaptors for memory cards.●
We will not accept any responsibility for files damaged or lost on the da-ta medium.
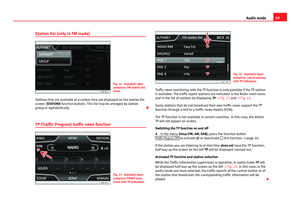
Playing sequence of files and foldersFig. 17
Possible struc-ture of an audio data CD.
Audio files on data media , to determine a certain playing order.
Tracks, folders and playlists on a data medium are sorted by name in alpha-betic or numeric order.
are often organised by means of folders and playlists
Page 26 of 72

Tracks
1
and
2
in t")
25Audio modeThe diagram shows an example of a conventional audio data CD containingtracks , folders and subfolders ⇒ Fig. 17 that are played in the follow-ing way:1)
Tracks
1
and
2
in the CD's root directory
Tracks
3
and
4
in the first folder F1 in the CD's root directory
Track
5
in the first subfolder F1.1 of the folder F1
Track
6
in the first subfolder F1.1.1 of the subfolder F1.1
Track
7
in the second subfolder F1.2 of the folder F1
Tracks
8
and
9
in the second folder F2
Note
●The play order can be modified by selecting between the different play-back modes ⇒ page 27.●
The playlists are not automatically activated; they must be selectedthrough the menu ⇒ page 32.
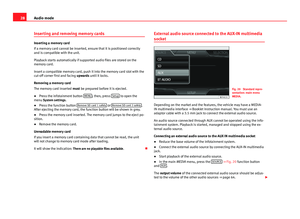
1.2.3.4.5.6.MEDIA main menuFig. 18
Standard repre-sentation: main menuMEDIA.
Through the main menu MEDIA you can select and play different mediasources.
●
Press the infotainment button MEDIA to open the main menu MEDIA⇒ Fig. 18.
Playback of the media source that was most recently played resumes fromthe point where it stopped.
If there is no media source that can be selected, it will be indicated on themain menu MEDIA.
1)
In the menu Media setup the function , Mix/Repeat incl. subfolders must be activated.
Page 27 of 72

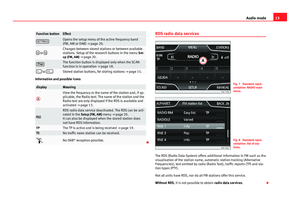
26Audio modeFunction buttons of the main menu MediaFunctionbuttonEffectSOURCEOpens the list of available devices/media. Press to select an-other media source ⇒ page 27.CD, internal CD drive ⇒ page 27.SD card 1, SD card 2: SD memory card ⇒ page 28.BT Audio: Bluetooth audio ⇒ page 31.MEDIA-IN: Media-In ⇒ page 29.
SELECTIONOpens the list of tracks ⇒ page 33. or Changes track in Media mode ⇒ page 32.Playback will stop. The function button changes to ⇒ page 32.Playback will continue. The function button changes to ⇒ page 32.SETTINGSOpens the menu Media setup ⇒ page 33.Repeat all the tracks.Repeat the current track.Random play.SCANSCANWith the scan function running, all the tracks in the currentplaylist will be played for ten seconds each.The function button is displayed only when the scan functionis running. To start the scan function, press the setup buttonor open the track list Selection and press the function buttonSCAN or press the right knob.
Instructions and symbols in the main menu MediaNotice⇒ Fig. 18MeaningADisplay of the track information (CD text , ID3 tag in MP3)files.audio CDs: Display of the title and number, in accordance withthe play order on the data medium.Audio files: Display of the artist, album and title.
BDisplay of the album cover, if available on the data medium.CRemaining time in minutes and seconds. The remaining play-ing time cannot be displayed for files with variable bit rate(VBR).
DTime passed RDS radio data service deactivated. The RDS can be activatedin the menu Setup (FM, AM) ⇒ page 20.TPThe TP is active and receiving ⇒ page 19. No traffic news station can be received.No DAB reception possible.
Page 28 of 72

27Audio modeChanging the media sourceFig. 19
Standard repre-sentation: main menuMEDIA.
●
In the main menu MEDIA, repeatedly press the infotainment buttonMEDIA to activate all the available media sources, one after another.
●
OR: In the main menu MEDIA, press the button Source ⇒ Fig. 19 and se-lect the desired media source.
In the pop-up window, the media sources not selected are shown as deacti-vated (in grey).
When a media source that has already been played is selected again, play-back is resumed from the point at which it was stopped.
Media sources that can optionally be selected
Function button: media sourceCD: internal CD drive unit ⇒ page 27.SD card 1 SD card 2: SD memory card ⇒ page 28.BT audio: Bluetooth audio ⇒ page 31.MEDIA-IN: Media-In ⇒ page 29.
Inserting or ejecting a CD
The internal CD drive can play both audio and audio data CDs.
Inserting a CD
●
Keep the printed side of the CD facing upwards.
●
Push the CD into the CD slot only to the point where it is drawn in auto-matically.
●
When the CD is inserted, playback will start automatically.
Ejecting a CD
●
Press the unit button.
●
The CD in the drive will be ejected and must be removed within 10 sec-onds.
If you do not remove the CD in the following 10 seconds, it will be drawnback in for safety reasons, without changing to CD mode.
Unreadable or defective CD
If the data on the inserted CD cannot be read or the CD is damaged, the cor-responding indication will be shown on the screen.
Depending on the unit, when a CD cannot be read it will retry three times,ejecting and reinserting the CD, before showing the indication.
Note
●Uneven road surfaces and strong vibrations may cause the CD to jump.●
If the interior temperature of the unit is too high, it will not accept or playany more CDs.
●
If, after having inserted several CDs, the indication CD drive error still ap-pears, contact a specialist workshop.
Page 29 of 72

28Audio modeInserting and removing memory cards
Inserting a memory card
If a memory card cannot be inserted, ensure that it is positioned correctlyand is compatible with the unit.
Playback starts automatically if supported audio files are stored on thememory card.
Insert a compatible memory card, push it into the memory card slot with thecut-off corner first and facing upwards until it locks.
Removing a memory card
The memory card inserted must be prepared before it is ejected.
●
Press the infotainment button MENU; then, press Setup to open themenu System settings.
●
Press the function button Remove SD card 1 safely or Remove SD card 2 safely.After ejecting the memory card, the function button will be shown in grey.
●
Press the memory card inserted. The memory card jumps to the eject po-sition.
●
Remove the memory card.
Unreadable memory card
If you insert a memory card containing data that cannot be read, the unitwill not change to memory card mode after loading.
It will show the indication: There are no playable files available.
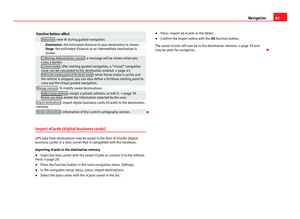
External audio source connected to the AUX-IN multimedia
socket
Fig. 20
Standard repre-sentation: main menuMEDIA.
Depending on the market and the features, the vehicle may have a MEDIA-IN multimedia interface ⇒ Booklet Instruction manual. You must use anadaptor cable with a 3.5 mm jack to connect the external audio source.
An audio source connected through AUX cannot be operated using the info-tainment system. Playback is started, managed and stopped using the ex-ternal audio source.
Connecting an external audio source to the AUX IN multimedia socket
●
Reduce the base volume of the infotainment system.
●
Connect the external audio source by connecting the AUX-IN multimediajack.
●
Start playback of the external audio source.
●
In the main MEDIA menu, press the SOURCE ⇒ Fig. 20 function buttonand AUX.
The output volume of the connected external audio source should be adjus-ted to the volume of the other audio sources ⇒ page 64.
Page 30 of 72

29Audio modeThings to note when operating an external audio source using the AUX-INmultimediauseEffectSelection of another audio sourceon the radio-navigation system.The external audio source continuesto run in the background.Stopping playback on the externalaudio source.The infotainment system remains inthe AUX menu.Disconnecting the plug from theAUX-IN multimedia socket.The infotainment system changes,and plays the last media source thatwas active.
Note
●Please read and observe the external audio source manufacturer operat-ing manual.●
Interference may be heard if the external audio source is powered fromthe vehicle’s 12-volt socket.
MEDIA-IN multimedia interface
Fig. 21
Standard repre-sentation: MEDIA-IN mul-timedia interface.
Depending on the market and the features, the vehicle may have a MEDIA-IN multimedia interface ⇒ Booklet Instruction manual.
The infotainment system enables you to play and manage audio files andsome video files from an external data medium connected to the MEDIA-INmultimedia interface.
Where this manual refers to external data media, this means USB mass stor-age devices containing supported audio files, such as MP3 players, iPods®
and USB sticks.
The MEDIA-IN multimedia interface supplies the usual USB voltage of 5volts.
Adapter for connecting a data medium
The external data media are connected to the MEDIA-IN multimedia inter-face using an adaptor.
Depending on the market and features, the adaptor is included in the sup-ply. Other adaptors can be purchased from your SEAT Dealership.
Do not use memory card adaptors, USB extension cords or USB hubs!
Requirements
Connectable data mediaCompatible formats and filesData media compliant with the USB 2.0specification.Data media with the FAT16 (< 2 GB)or FAT32 (> 2 GB) file system.iPods® and iPhones® of various genera-tions.a)
MTP players with the “PlaysForSure” or“ReadyForVista” logo.
– Audio files in MP3, WMA,OGG Vorbis and AAC format.– Playlists in PLS, B4S, ASXand WPL format.
Read and bear in mind the manufacturer's instruction manual for the exter-nal data medium.
a)
iPod® and iPhone® are protected registered trademarks of Apple Inc.
Page 31 of 72

30Audio modeNotes and restrictions
The infotainment system enables you to view, play and manage compatibleaudio files through the MEDIA-IN multimedia interface.
In the case of MTP players and depending on the battery charge and thequantity of data, it may take a few minutes for them to be ready for use.
External hard discs with a capacity greater than 32 GB must, in certain cir-cumstances, be reformatted to the FAT32 file system. On the Internet, for ex-ample, you will find programs and instructions for this.
If the data carrier has several partitions, only the first partition will be recog-nised (except with USB, in which the first 2 will be visible). Take into ac-count all other instructions and limitations regarding requirements for me-dia sources.
Connecting and disconnecting an external data medium
●
Connect a suitable adaptor to the MEDIA-IN multimedia interface.
●
Connect the external data medium to the MEDIA-IN multimedia interfacevia the adapter.
●
If necessary, switch on the external data medium or select the appropri-ate data mode.
Regardless of any indications to the contrary that there may be on the mat-ter, the external data medium can be disconnected from the MEDIA-IN multi-media interface at any time without losing the data.
When disconnecting an iPod® or iPhone® from the adaptor, take care topress the two unlocking tabs on the narrow sides of the iPod® connector si-multaneously.
Operating the infotainment system
An external data medium that is correctly connected to the MEDIA-IN multi-media interface can be operated using the infotainment system.
●
In the main MEDIA menu, press the button SOURCE ⇒ Fig. 20 and selectUSB or iPod.... ⇒ page 29.
Other operations with the external data medium (changing tracks, selectingtracks and activating playback modes) are carried out as described in thecorresponding chapters.
iPod® and iPhone®
If you connect an iPod® or iPhone®, the top selection level will display thespecific lists of the iPod ( playlists, artist, album, title, pod-casts etc.). The appearance of these lists is similar to that of the media cen-tre, and they are managed as described.
Music management is blocked so it can be managed with the iPod® oriPhone® that is connected.
The playback volume of some iPods® or iPhones® can adapt to the volumeof the other audio sources ⇒ page 29.
Files from iPods® or iPhones® cannot be imported.
Possible error messages after connecting an external data mediumError messageCauseProcedureDevice not suppor-tedThe external data me-dium cannot be played– Consult the list of suppor-ted devices on the web.– When possible, update thesoftware of the external datamedium.
Unit not operationalCommunication fault.Check the connection andmake sure the external datamedium is working correctly.
Due to the large number of different data media available, it is not possi-ble to guarantee fault-free operation of all functions described here.
Page 32 of 72

31Audio modeNote●The connecting adaptor used must not be crushed or bent sharply. Thiscould damage the adaptor and cause operational faults.●
To play music, do not simultaneously link the external media player tothe infotainment system using bluetooth and the MEDIA-IN multimedia in-terface, as this can cause limitations in the playback.
Connecting an external media player via Bluetooth®
Fig. 22
Standard repre-sentation: main menuMedia.
In Bluetooth audio mode, audio files from an external audio source that isconnected via Bluetooth®, for example a mobile phone (Bluetooth audioplayback), can be played over the vehicle speakers.
The Bluetooth audio source must be compatible with the Bluetooth A2DPprofile.
Starting sound transmission via Bluetooth
●
Connect the Bluetooth visibility in the Bluetooth external audio source(for example, a mobile phone).
●
Reduce the base volume of the infotainment system.
●Press the MEDIA infotainment button.●
Press the function button ⇒ Fig. 22 and select AUDIO BT.
●
Press Search for new device to connect a Bluetooth external audio sourcefor the first time.
●
OR: Select the Bluetooth external audio source from the list.
●
Please refer to the notes on the display of the infotainment system andthe Bluetooth audio source regarding the rest of the procedure. Similarly,you will still need to start playback manually from the Bluetooth audiosource. Once playback of the Bluetooth audio source has finished, the info-tainment system will remain in AUDIO BT mode.
Controlling playback
The extent to which the Bluetooth audio source can be controlled via the in-fotainment system depends on the Bluetooth audio source connected.
Media players with the AVRCP Bluetooth profile, the playback of the Blue-tooth audio source can be started and stopped automatically when chang-ing to Bluetooth audio mode, or to another audio source. In addition, it ispossible to view or change the track via the infotainment system.
Note
Due to the large number of different Bluetooth audio sources available, it isnot possible to guarantee fault-free operation of all functions describedhere.
Note
●Deactivate the service and warning sounds of a connected Bluetooth au-dio source (for example, the key tones of the mobile phone) to avoid inter-ference noise and anomalies in the operation.
●
Depending on the external player connected, the response time of thesystem can vary.
●
To ensure your BT player works correctly, check the compatibility listsfirst.