Page 7 of 308

.
5
Familiarisation
For economical driving, caring for the environment
The fuel consumptionof a vehicle varies greatly:
- according to the driver's style of driving
(moderate, aggressive, fast, ...),
- according to the type of journeys
made (urban, main road, motorway, flowing, heavy traffic, …) and the speed.
Main recommendations for driving economically
Hybrid mode selector
To optimise fuel consumption, use the Automodeof the selector whenever possible (the mode is activated
automatically when starting) including for urban journeys.
This mode optimises the use of the energy sources (internal combustion engine and/or electric) contrary to other modes, which are for use in par ticular cases.
Gear lever
Use the automatic
mode A
as much as possible as this optimises gear changes to suit the requirements.
Drive smoothly
Stay in the "eco" zone
displayed in the energy consumption / generation indicator: accelerate gently, drive atsteady speeds using the speed limiter or cruise control as soon as possible. Use the "charge" zone: anticipate the need to slow down by taking your foot off the accelerator rather than
braking. The movement of the energy consumption / generation indicator needle (into the "charge" zone), shows
the level of energy recovery.
Consumption history
See the impact of your style of driving and the type of journey by reviewing the history of your energyconsumption. Refer to the "Multifunction screens" section.
Causes of high consumption and checks
As with any vehicle, limit overloading, wind resistance (windows open above 30 mph (50 km/h), roof rack, loaded
or not, …), the use of power consumers (air conditioning, heated seats, heated rear screen, …).
Obser ve the recommendations on checks (regular check of tyre pressures, correct tyre pressures, …) and routine servicing.
Page 43 of 308

.
41
Hybrid system
Limit the causes of excess
consumption
Spread loads throughout the vehicle; placethe heaviest items in the bottom of the boot,
as close as possible to the rear seats.Limit the loads carried in the vehicle and reduce wind resistance (roof bars, roof rack, bicycle carrier, trailer...). Use a roof box inpreference.Remove roof bars and roof racks after use.
At the end of winter, remove snow tyres and refit your summer tyres.
Observe the recommendations
on maintenance
Check the tyre pressures regularly, when cold, referring to the label in the door aper ture, driver's side.Carry out this check in par ticular:- before a long journey,- at each change of season,- after a long period out of use.
When refuelling, do not continue after the 3rdcut-off of the nozzle to avoid any overflow.
Have your vehicle ser viced regularly (engine oil, oil filter, air filter...) and obser ve the schedule of operations recommended by the
manufacturer.
At the wheel of your new vehicle, it is only after the first 1 800 miles (3 000 kilometres) that youwill see the fuel consumption settle down to aconsistent average.
Page 177 of 308

7
175
Safety
Snow driving assistance
(Intelligent Traction Control)
Your vehicle has a system to help driving on snow: Intelligent Traction Control. This automatic system continuously checks for situations of difficult surface adhesion thatcould make it difficult to move off or makeprogress on deep fresh snow or compacted snow.
In these situations, Intelligent Traction
Controllimits the amount of wheel slip to provide the best traction and trajectory control.
In extremely severe conditions (deep snow,mud…), it can be useful to temporarilydeactivate the dynamic stability control andwheel anti-slip
systems to allow a degree of
wheel spin and so recover grip.
It is recommended that the system be
reactivated as soon as possible.
Snow t
yres are strongly recommended on sur faces offering low levels of adhesion.
Operation
Anti-lock braking system (ABS)and electronic brake force
distribution (EBFD)
In emergency braking, press very firmly without releasing the pressure.
When changing wheels (tyres and rims),make sure that these are approved for your vehicle.
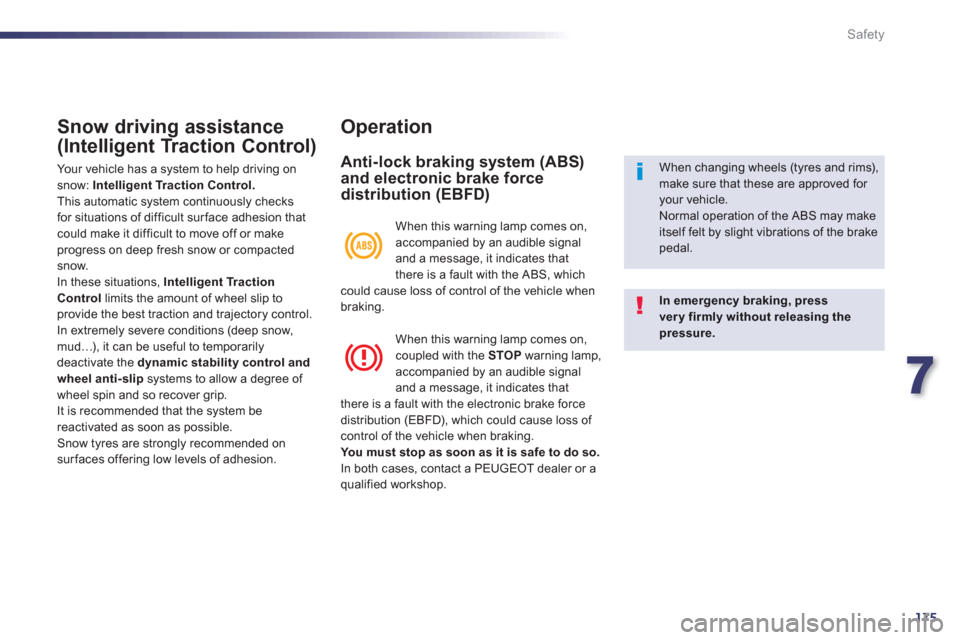
Normal operation of the ABS may makeitself felt by slight vibrations of the brake pedal. When this warnin
g lamp comes on,
accompanied by an audible signal
and a message, it indicates that
there is a fault with the ABS, which could cause loss of control of the vehicle whenbraking.
When this warnin
g lamp comes on,coupled with the STOPwarning lamp,
accompanied by an audible signaland a message, it indicates that
there is a fault with the electronic brake forcedistribution (EBFD), which could cause loss of control of the vehicle when braking.
You must stop as soon as it is safe to do so.In both cases, contact a PEUGEOT dealer or a qualified workshop.
Page 186 of 308
184
Practical information
Complete system consisting of a compressor and a sealant car tridge which permits
temporary repair of a tyre so that you can rdrive to the nearest garage.It is designed to repair most punctures which could affect the tyre, located on the tyre tread or shoulder.
Temporary puncture repair kit
Access to the kit
List of tools
All of these tools are specific to your vehicle
and can vary according to equipment. Do not
use them for other purposes. 1.12 V compressor.
Contains a sealant car tridge for the
temporary repair of a tyre and can also be used for adjusting tyre pressures.
2. One chock *
to block one of the front wheels of the vehicle.3.
Removable towing eye.
See the "Towing the vehicle" section.
*
Dependin
g on destination country or equipment.
Page 187 of 308
8
185
Practical information
A."Sealant" or "Air" position selector.
B.On "I"/ off "O"switch. C.Deflation button.D.Pressure gauge (in bar or p.s.i.). E.
Compartment housing:
- a cable with adaptor for 12 V socket,
- various inflation adaptors for accessories, such as balls, bicycle
tyres...
Description of the kit
F.
Sealant car tridge.G.
White pipe with cap for repair. H.Black pipe for inflation.I.Speed limit sticker.
The speed limit sticker I
must be affixedto the vehicle's steering wheel to remind you that a wheel is in temporary use.
Do not exceed a speed of 50 mph(80 km/h) when driving with a tyre repaired using this type of kit.
Page 189 of 308
8
187
Practical information
If after around 5 to 7 minutes the pressure is not attained, this indicates that the tyre is not repairable; contacta PEUGEOT dealer or a qualifiedworkshop for assistance.
�)Switch on the compressor by moving
the switch B
to position "I"until the tyre pressure reaches 2.0 bars.
The sealant is injected into the tyre under pressure; do not disconnect the pipe from
the valve during this operation (risk of splashing).
�) Remove the kit and screw the cap back on
the white pipe.
Take care to avoid stainin
g your vehicle
with traces of fluid. Keep the kit to hand.
�) Drive immediately for approximatelythree miles (five kilometres), at reduced speed (between 15 and 35 mph (20 and 60 km/h)), to plug the puncture.�)
Stop to check the repair and the tyre
pressure using the kit.
Page 190 of 308

188
Practical information
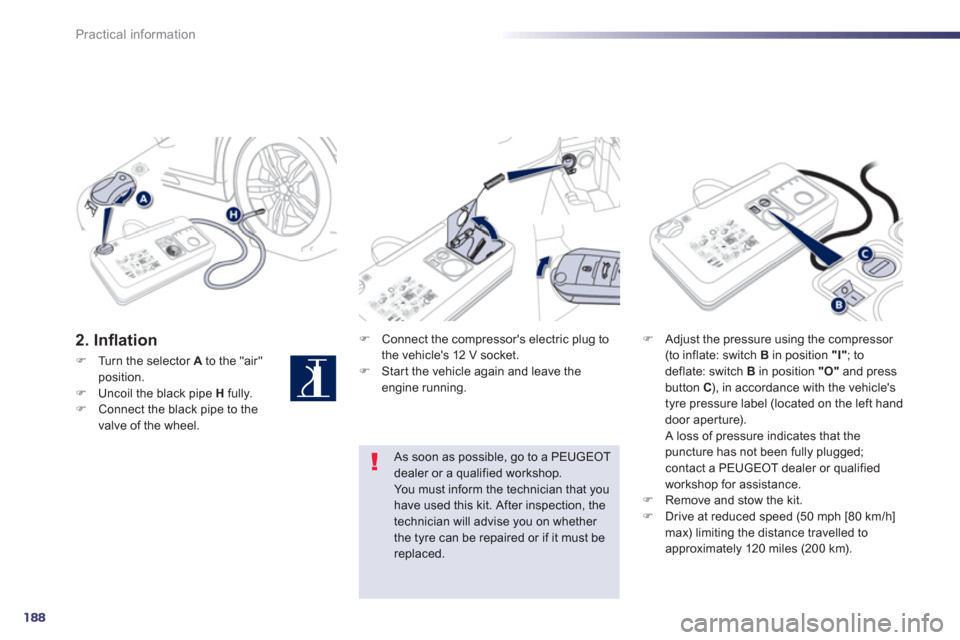
2. Infl ation �)
Connect the compressor's electric plug to
the vehicle's 12 V socket.�) Star t the vehicle again and leave the engine running.
�)Adjust the pressure using the compressor (to inflate: switch B
in position "I"
; to deflate: switch B
in position "O"and press button C), in accordance with the vehicle's
tyre pressure label (located on the left hand
door aperture).
A loss of pressure indicates that thepuncture has not been fully plugged; contact a PEUGEOT dealer or qualified
workshop for assistance.�)Remove and stow the kit.�)Drive at reduced speed (50 mph [80 km/h] max) limiting the distance travelled to
approximately 120 miles (200 km).
As soon as possible, go to a PEUGEOTdealer or a qualified workshop.You must inform the technician that you have used this kit. After inspection, the technician will advise you on whether
the tyre can be repaired or if it must be replaced.
�)Turn the selector Ato the "air" position.�)Uncoil the black pipe Hfully. �)Connect the black pipe to the
valve of the wheel.
Page 191 of 308

8
189
Practical information
Removing the cartridge
�)Stow the black pipe. �)Detach the angled base from the white pipe.�)Suppor t the compressor ver tically.�)Unscrew the car tridge from the bottom.
Beware of discharges of fluid.
The expiry date of the fluid is indicated on the car tridge.
The sealant car tridge is designed for single use; even if only partly used, itmust be replaced. After use, do not discard the car tridgeinto the environment, take it to an authorised waste disposal site or a PEUGEOT dealer.
Do not forget to obtain a new sealantcartridge, available from PEUGEOT dealers or from a qualified workshop.
Checking tyre pressures /
inflating accessories
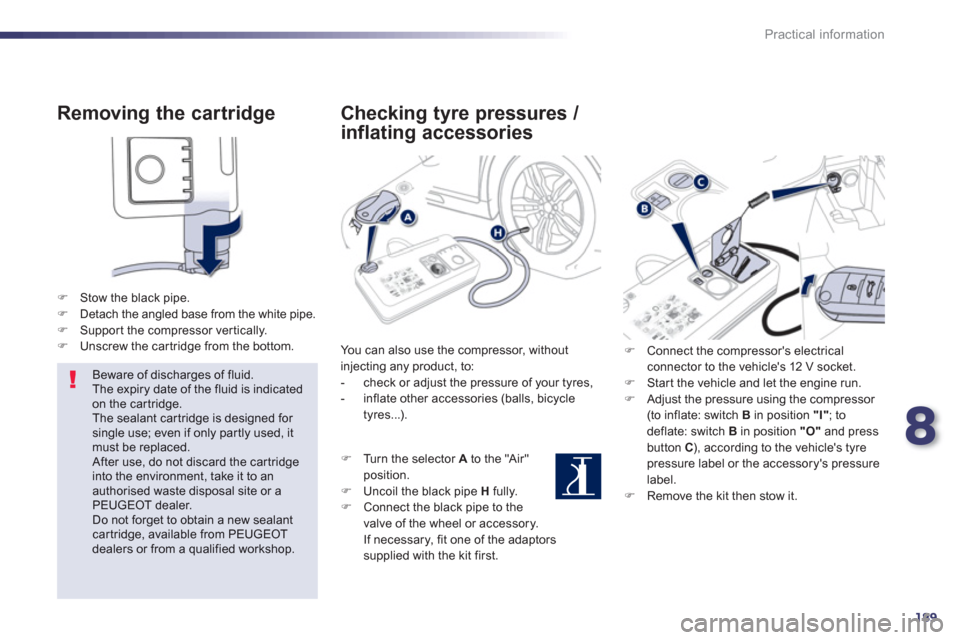
You can also use the compressor, withoutinjecting any product, to:
- check or adjust the pressure of your tyres,
- inflate other accessories (balls, bicycle
tyres...).
�)
Turn the selector Ato the "Air"
position.
�) Uncoil the black pipe H
fully.�)
Connect the black pipe to the
valve of the wheel or accessory.
If necessary, fit one of the adaptorssupplied with the kit first.
�) Connect the compressor's electrical connector to the vehicle's 12 V socket. �)
Star t the vehicle and let the engine run. �)
Adjust the pressure using the compressor (to inflate: switch B
in position "I"
; to deflate: switch B
in position "O"and press button C), according to the vehicle's tyrepressure label or the accessory's pressure
label. �) Remove the kit then stow it.