2013 Peugeot 508 RXH head light
[x] Cancel search: head lightPage 4 of 308

.
.
Contents
Instrument panel 49
Indicator and warning lamps 50
Gauges and indicators 61
Tr ip computer 66
Setting the date and time 69
Instruments and controlsFamiliarisation
Remote control key 70
Alarm 80
Electric windows 82
Boot 84
Motorised tailgate 85
Panoramic sunroof 88
Fuel tank 89
Diesel misfuel prevention 90
Access
Front seats 92
Rear seats 96
Mirrors 98
Steering wheel adjustment 100
Interior fi ttings 101
Boot fi ttings 104
Heating and Ventilation 110
Dual-zone digital air conditioning 112
Quad-zone digital air conditioning 115
Rear screen demist - defrost 120
Programmable Heating / Ventilation 121
Comfort
Electric parking brake 123
6-speed electronic gearbox 130
Hill star t assist 134
Head-up display 135
Speed limiter 138
Cruise control 140
Parking sensors 142
Parking space sensors 144
Driving
Lighting controls 146
LED lamps 149
Automatic illumination of headlamps 151
Headlamp adjustment 154
Directional lighting 155
Wiper controls 156
Automatic rain sensitive wipers 158
Cour tesy lamps 160
Interior mood lighting 161
Visibility Hybrid system
Presentation 22
Starting / switching off 25
Ready lamp 29
HYbrid4 mode selector 29
Energy consumption / generation
indicator 32
Display of hybrid power fl ow 33
HYbrid4 frequently asked questions 36
Eco off 39
Eco-driving 40
Consumption 42
High voltage battery 43
Car washing machine or tunnel 47
Vehicle recovery 48
Page 11 of 308

.
9
Familiarisation
Interior
Interior mood lighting
This subdued passenger compar tment lighting
improves visibility inside the vehicle in low light conditions.
Head-up display
This system projects speed and cruise control/speed limiter information onto a smoked strip
in the driver's field of vision, so that they do not need to take their eyes off the road.
Digital air conditioning
After setting the desired level of comfor t, the system then automatically controls this level
according to the ambient conditions.
Dual-zone
Audio and communication system
This system benefits from the latest technology: MP3 compatible audio system, USB player,
Bluetooth hands-free system, satellite
navigation system with colour screen, auxiliary
inputs, Hi-Fi audio s
ystem, ...
16
1
135112 239
115 Quad-zone
If your vehicle is fitted with aJBL Hi-Fi audio system, this
is designed specifically for thepassenger compar tment of your
vehicle. Peu
geot Connect Navigation (RT6)
R
efer to the "Audio and telematics" section.
Page 12 of 308

10
Familiarisation
the corresponding function.
Switch panels
Electric parking brake.
Opening the boot.
123
Massa
ge.
95
80
Al
arm.
El
ectric child lock.
73
, 84
171
Peugeot Connect SOS
236
Starting/stopping using the electronic
key.
25-26
Deactivation of parking sensors.
143
Inhibition of internal combustion engine stop.
39
Programmable heating warning lamp.
121
Parkin
g space sensor.
14 4
Deactivation of the DSC system.
176
Opening the fuel filler flap.
89
Adaptive lighting
152
Head-up display (on/off, settings).
135
, 136
Page 14 of 308

12
Familiarisation
11.Front door window demisting/defrostingvent.
12.Windscreen demisting/defrosting vent.
13
. Steering lock and star ting with the key. 14 .
Starting using the electronic key.
15. Audio equipment steering wheel controls.
16.Wiper / screenwash / trip computer stalk.
17. Central locking and hazard warningbuttons.
18. Screen.
19.Central adjustable air vents.
20.Passenger's airbag. 21. Side adjustable air vents.
Instruments and controls
1.
Cruise control / speed limiter controls. 2.
Headlamp height adjustment. 3.
Lighting and direction indicator stalk
4.
Instrument panel. 5.
Driver's airbag.Horn.
6.Gear selector.
7. HYbrid4 mode selector. 8.12 V accessory socket
USB por t / auxiliary socket. 9. Bonnet release lever.10.Fusebox.
22.
Glove box / Passenger's airbag deactivation. 23.
Electric parking brake.
24.
Central armrest with storage. 25.Storage (according to version).26.Audio system. 27.
Heating / air conditioning controls.28.
Alarm / Peugeot Connect SOS - PeugeotConnect Assistance. 29.
Peugeot Connect Navigation (RT6)controls. 30.
Massage / Adaptive lighting / Parkingspace sensor.
Page 42 of 308

40
Hybrid system
Eco-driving
Eco-driving is a range of everyday practices that allow the motorist to optimise their fuel consumption and CO2emissions.
Eco-driving suited to your
HYbrid4 vehicle
Use gear selector position A , as thisoptimises gear changes to suit the
circumstances and the AUTOmode of theHYbrid4 mode selector. When moving off, accelerate normally up tothe desired speed (POWER
zone between 20and 40 %).
At steady speeds, drive gently with smallmovements of the accelerator pedal (ECO
or CHARGEzone), run in electric mode as oftenas possible when driving at low speed. Anticipate the need to slow down and use engine braking ( CHARGE
zone), so as to make use of free energy recovery while keeping light pressure on the accelerator pedal.
Control the use of your
electrical equipment
Before moving off, if the passenger compartment is too warm, ventilate it byopening the windows and air vents before using the air conditioning.
Above 30 mph (50 km/h), close the windows and leave the air vents open.
Remember to make use of equipment that canhelp keep the temperature in the passenger compartment down (sun roof and windowblinds...). Switch off the air conditioning, unless it has automatic digital regulation, as soon as thedesired temperature is attained. Switch off the demisting and defrostingcontrols, if not automatic.
Switch off the heated seat as soon as possible.
Switch off the headlamps and front foglampswhen the level of light does not require their use.
Avoid running the Diesel engine when stationary, par ticularly in winter; your vehicle will warm up much faster while driving.
As a passenger, if you avoid connecting your multimedia devices (film, music, videogame...), you will contribute towards limitingthe consumption of electrical energy, and soof fuel.
Disconnect your por table devices beforeleaving the vehicle.
Page 52 of 308

50
Instruments and controls
Indicator and warning
lamps
Visual indicators informing the driver that a system is in operation, switched off or has a
fault.
When the ignition is switched on
Certain warning lamps come on for a few seconds in the instrument panel and/or
instrument panel screen when the vehicle's
ignition is switched on.
When the engine is started, these same
warning lamps should go off.
If they remain on, before moving off, refer to the
information on the warning lamp concerned.
Associated warnings
The switching on of cer tain warning lamps maybe accompanied by an audible signal and a message in the instrument panel screen.
The warning lamps may come on continuously(fixed) or flash.
Certain warning lamps may come on inone of two modes. Only by relating thetype of lighting to the operating status
of the vehicle can it be ascertainedwhether the situation is normal or whether a fault has occurred.
1
2
2
2
3
3
3
2
3
3
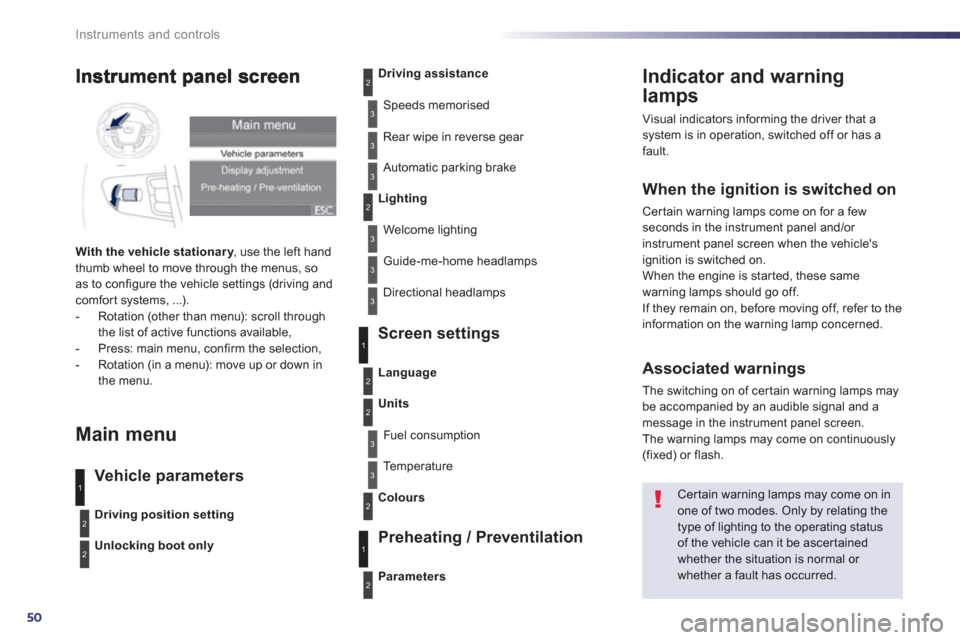
With the vehicle stationar y
, use the left handythumb wheel to move through the menus, so as to configure the vehicle settings (driving andcomfort systems, ...).
- Rotation (other than menu): scroll through
the list of active functions available,
- Press: main menu, confirm the selection,
- Rotation (in a menu): move up or down in
the menu.
Main menu
Vehicle parameters Screen settin
gs
Preheatin
g / Preventilation
Driving position setting
Unlocking boot only
Driving assistance
Speeds memorised
Rear wipe in reverse
gear
Automatic parkin
g brake
Lighting
Welcome lighting
Guide-me-home headlamps
Directional headlamps
Parameters
Language
Units
Fuel consumption
Te m p e r a t u r e
Colours
3
1
2
2
3
2
3
1
2
Page 53 of 308

1
51
Instruments and controls
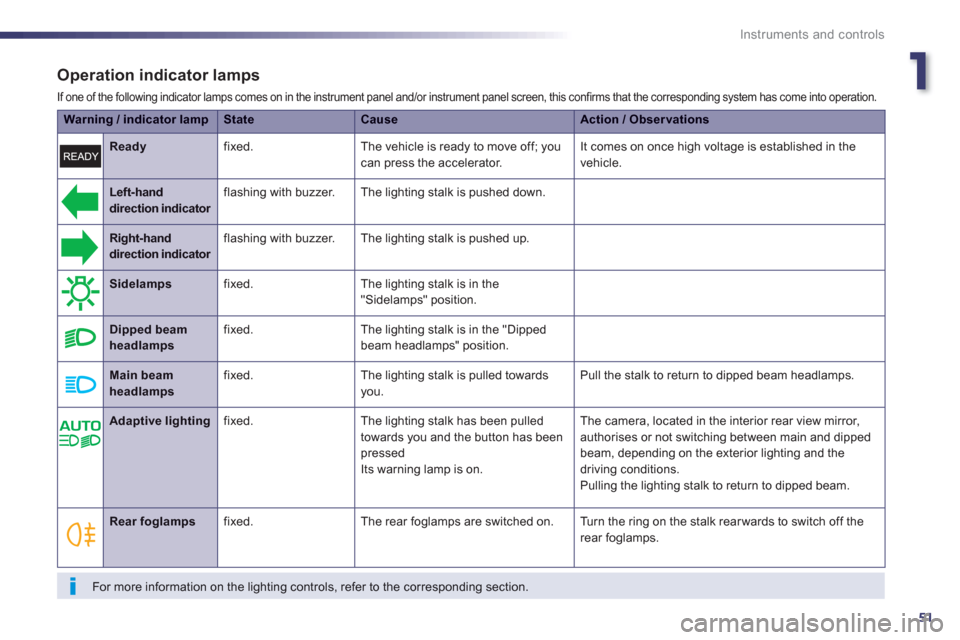
Operation indicator lamps
If one of the following indicator lamps comes on in the instrument panel and/or instrument panel screen, this confirms that the corresponding system has come into operation.
Warning / indicator lampStateCauseAction / Observations
Left-handdirection indicator
flashing with buzzer. The lighting stalk is pushed down.
Right-handdirection indicator flashing with buzzer. The lighting stalk is pushed up.
Sidelamps
fixed. The lighting stalk is in the
"Sidelamps" position.
Dipped beamheadlamps
fixed. The lighting stalk is in the "Dipped
beam headlamps" position.
Main beam headlamps fixed. The lighting stalk is pulled towards
you. Pull the stalk to return to dipped beam headlamps.
Ready fixed. The vehicle is ready to move off; you can press the accelerator. It comes on once high voltage is established in the
vehicle.
Rear foglamps
fixed. The rear foglamps are switched on. Turn the ring on the stalk rear wards to switch off the
rear foglamps.
For more information on the lighting controls, refer to the corresponding section.
Adaptive lighting
fixed. The lighting stalk has been pulled
towar
ds you and the button has been pressedIts warning lamp is on. The camera
, located in the interior rear view mirror,
authorises or not switching between main and dippedbeam, depending on the exterior lighting and thedriving conditions.
Pulling the lighting stalk to return to dipped beam.
Page 64 of 308

62
Instruments and controls
* According to country.
CHECK (vehicle autotest)
Automatic CHECK
With the key in the ignition on position, all of the
warning lamps for the functions tested are displayed.They are switched off after a few seconds. At the same time, an automatic CHECK(vehicle autotest) is carried out.
In the presence of a fault
A "minor" fault has been detected: the warning
lamp(s) are displayed then go off.You can star t your vehicle; however, contact a
PEUGEOT dealer or a qualified workshop assoon as possible.
A "major" fault has been detected: theassociated warning lamps(s) remain onaccompanied by the STOP or SERVICE
warning lamp.
Do not star t your vehicle. Call a PEUGEOT dealer or a qualified
wor
kshop without delay.
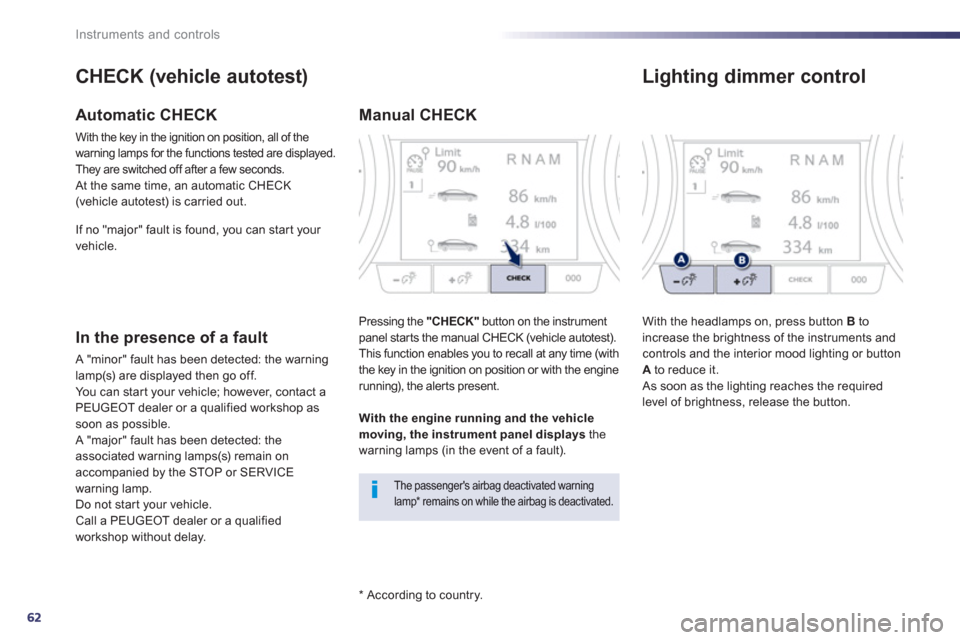
Manual CHECK
Pressing the "CHECK"
button on the instrument
panel star ts the manual CHECK (vehicle autotest).
This function enables you to recall at any time (with
the key in the ignition on position or with the enginerunning), the aler ts present.
The passenger's airbag deactivated warning lamp * remains on while the airbag is deactivated.
With the engine running and the vehiclemoving, the instrument panel displays
the
warning lamps (in the event of a fault). I
f no "major" fault is found, you can star t your
vehicle.
Lighting dimmer control
With the headlamps on, press button Bto
increase the brightness of the instruments and controls and the interior mood lighting or button Ato reduce it.
As soon as the lighting reaches the required
level of brightness, release the button.