2013 Peugeot 508 Hybrid ignition
[x] Cancel search: ignitionPage 174 of 340
172
Safety
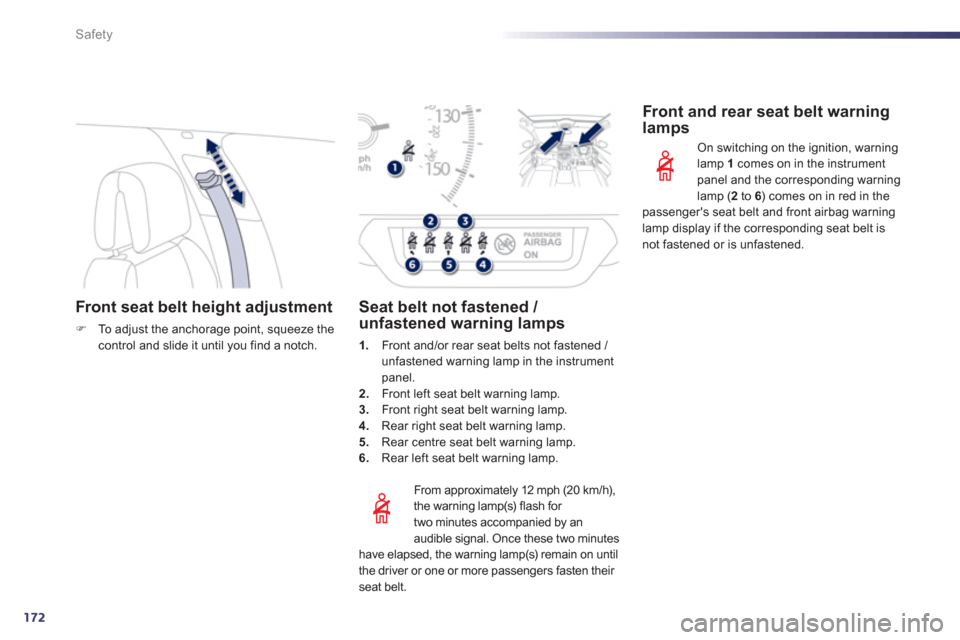
Front seat belt height adjustment
FTo a djust the anchorage point, squeeze thecontrol and slide it until you find a notch.
From approximatel
y 12 mph (20 km/h),
the warning lamp(s) flash for
two minutes accompanied by an
audible si
gnal. Once these two minutes
have elapsed, the warning lamp(s) remain on until
the driver or one or more passengers fasten their seat belt.
Seat belt not fastened / unfastened warning lamps
1.Front and/or rear seat belts not fastened / unfastened warning lamp in the instrument
panel.
2. Front left seat belt warning lamp.3.
Front right seat belt warning lamp.4.Rear right seat belt warning lamp.
5.Rear centre seat belt warning lamp.
6. Rear left seat belt warning lamp.
Front and rear seat belt warning lamps
On switching on the ignition, warninglamp 1
comes on in the instrument
panel and the corresponding warning lamp (2 to 6) comes on in red in thepassenger's seat belt and front airbag warninglamp display if the corresponding seat belt isnot fastened or is unfastened.
Page 176 of 340
174
Safety
Airbags
System designed to maximise the safety of the
occupants (with the exception of the rear centrepassenger) in the event of violent collisions.
It supplements the action of the force-limiting seat belts (with the exception of the rear centrepassenger).
If a collision occurs, the electronic detectors record and analyse the front and side impacts sustained in the impact detection zones:
- in the case of a serious impact, the airbagsare deployed instantly and protect the
occupants of the vehicle (with the exception
of the rear centre passenger); immediately after the impact, the airbags deflate rapidlyso that they do not hinder visibility or the
exit of the occupants,
- in the case of a minor or rear impact or incer tain roll-over conditions, the airbags
will not be deployed; the seat belt alone is
sufficient to provide optimum protection in
th
ese situations.
The airbags do not operate when the ignition is switched off. This equipment will only deploy once. If a second impact occurs (during thesame or a subsequent accident), theairbag will not be deployed again.
Deployment of the airbag(s) is accompanied by a slight emission of harmless smoke and a noise, due to theactivation of the pyrotechnic cartridgeincorporated in the system.This smoke is not harmful, but sensitiveindividuals may experience slight irritation. The noise of the detonation may result in a slight loss of hearing for a shorttime.
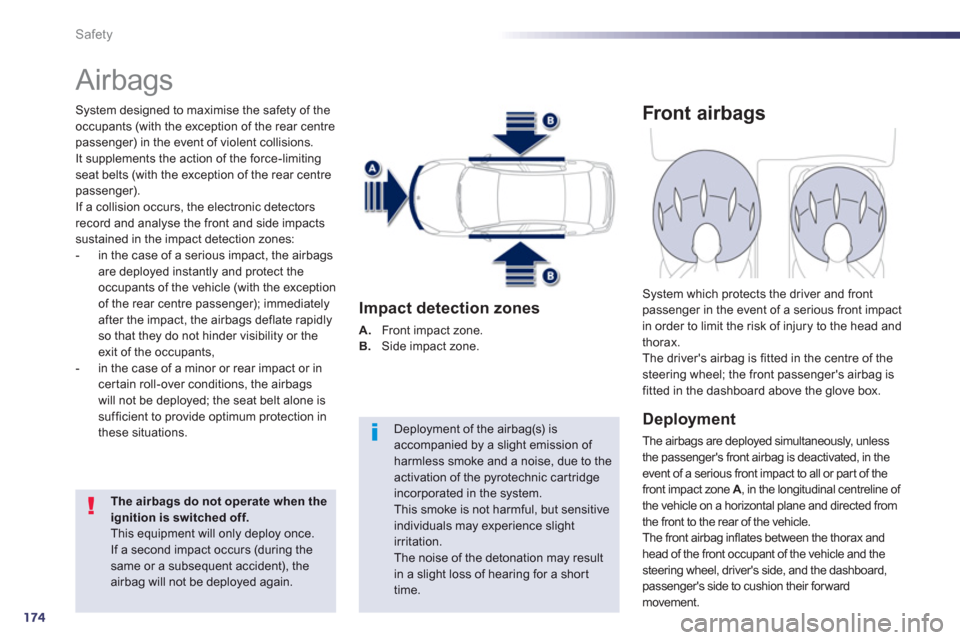
Impact detection zones
A.
Front impact zone. B.
Side impact zone.
Front airbags
Deployment
The airbags are deployed simultaneously, unless
the passenger's front airbag is deactivated, in the event of a serious front impact to all or part of thefront impact zone A , in the longitudinal centreline of
the vehicle on a horizontal plane and directed from
the front to the rear of the vehicle.
The front airbag inflates between the thorax and head of the front occupant of the vehicle and thesteering wheel, driver's side, and the dashboard,passenger's side to cushion their forward movement.
System which protects the driver and frontpassenger in the event of a serious front impact
in order to limit the risk of injury to the head and
thorax.
The driver's airbag is fitted in the centre of the steering wheel; the front passenger's airbag isfitted in the dashboard above the glove box.
Page 177 of 340
7
175
Safety
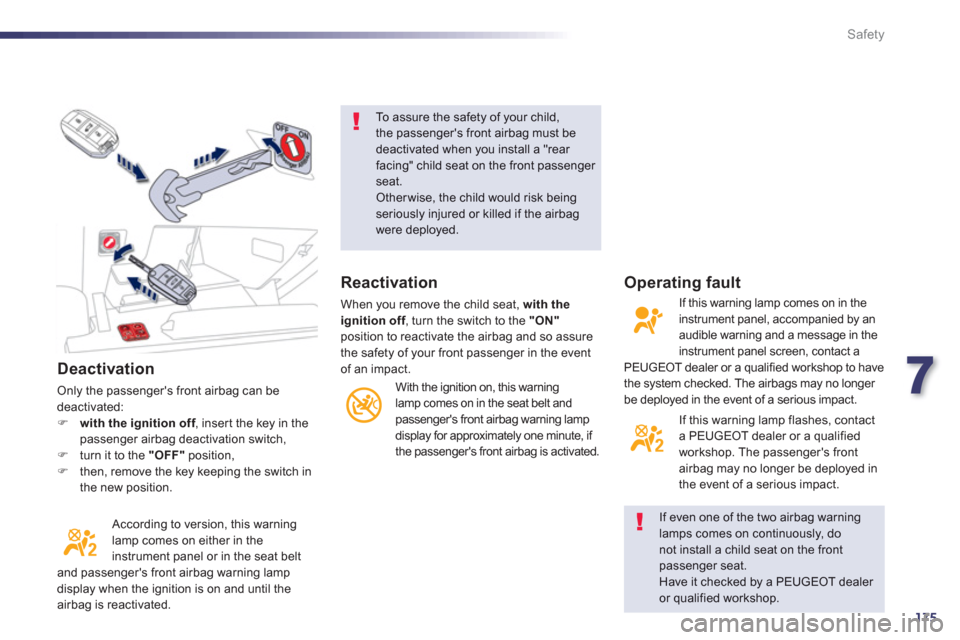
Deactivation
Only the passenger's front airbag can be deactivated:Fwith the ignition off, inser t the key in thefpassenger airbag deactivation switch, F
turn it to the "OFF"position, F
then, remove the key keeping the switch in
the new position.
According to version, this warning lamp comes on either in the instrument panel or in the seat belt
and passenger's front airbag warning lamp
displa
y when the ignition is on and until the
airbag is reactivated.
To assure the safety of your child,the passenger's front airbag must be deactivated when you install a "rear facing" child seat on the front passenger seat.Other wise, the child would risk beingseriously injured or killed if the airbag were deployed.
If even one of the two airbag warning
lamps comes on continuously, donot install a child seat on the frontpassenger seat.
Have it checked by a PEUGEOT dealer or qualified workshop.
Reactivation
When you remove the child seat, with the ignitionoff
, turn the switch to the f"ON"position to reactivate the airbag and so assure
the safety of your front passenger in the event
of an impact.
With the ignition on, this warninglamp comes on in the seat belt and
passenger's front airbag warning lamp
displa
y for approximately one minute, if
the passenger's front airbag is activated.
Operating fault
If this warning lamp comes on in theinstrument panel, accompanied by an audible warning and a message in the
instrument panel screen, contact a
PEUGEOT dealer or a qualified workshop to have
the system checked. The airbags may no longer
be deployed in the event of a serious impact.
If this warnin
g lamp flashes, contacta PEUGEOT dealer or a qualified
workshop. The passenger's front airbag may no longer be deployed in
the event of a serious impact.
Page 182 of 340
180
Practical information
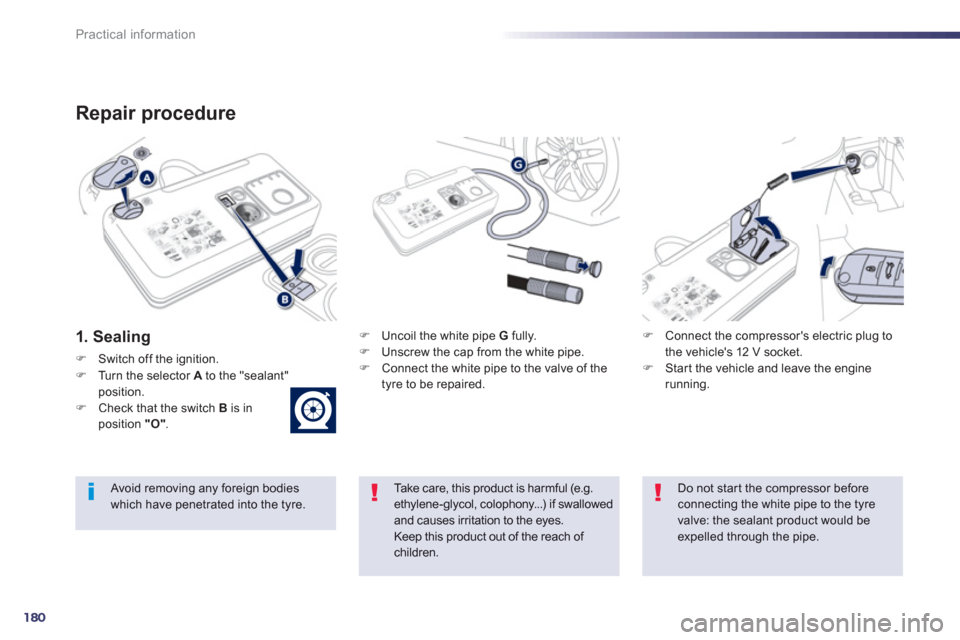
Repair procedure
1. SealingF Uncoil the white pipe G
fully.F
Unscrew the cap from the white pipe.F
Connect the white pipe to the valve of the
tyre to be repaired.
F
Connect the compressor's electric plug to
the vehicle's 12 V socket. F Star t the vehicle and leave the engine running.
Take care, this product is harmful (e.g.ethylene-glycol, colophony...) if swallowed and causes irritation to the eyes.Keep this product out of the reach of children.
Avoid removing any foreign bodieswhich have penetrated into the tyre.
Do not star t the compressor before connecting the white pipe to the tyre valve: the sealant product would be expelled through the pipe.
FSwitch off the ignition.
FTurn the selector Ato the "sealant"position.FCheck that the switch B
is in position "O".
Page 189 of 340
8
187
Practical information
Removing a wheel
Parking the vehicle
Immobilise the vehicle where it does notblock traffic: the ground must be level, stable and not slippery. Apply the parking brake unless it has
been programmed to automatic mode, switch off the ignition and engage firstgear *
to block the wheels.
Check that the braking warning lamp and the Pwarning lamp in the parkingbrake control lever come on.
The occupants must get out of the vehicle and wait where they are safe. Never go underneath a vehicle raised using a jack; use an axle stand.
List of operations
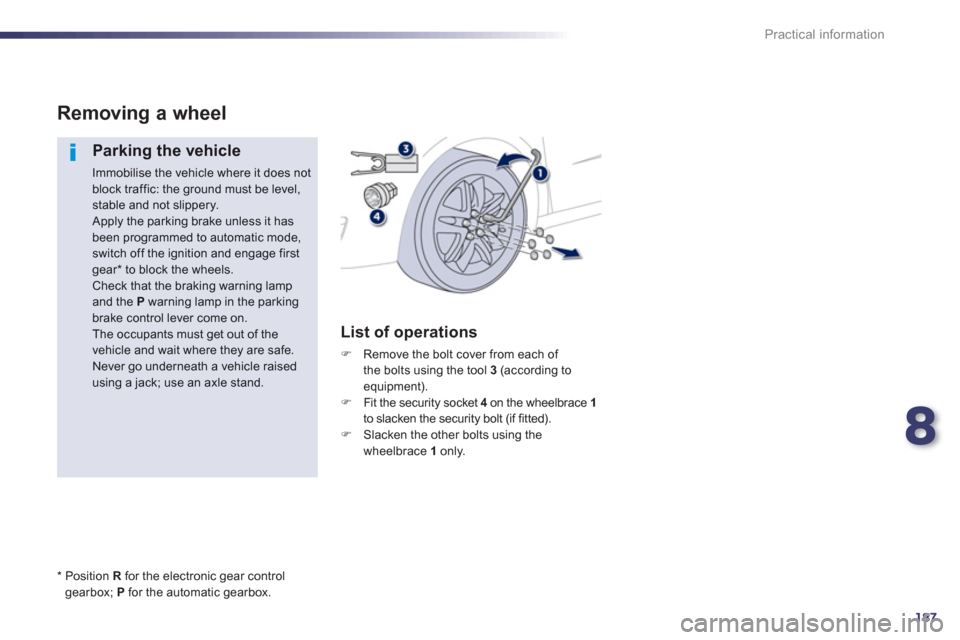
FRemove the bolt cover from each of
the bolts using the tool 3(according toequipment). FFit the security socket 4on the wheelbrace 1to slacken the security bolt (if fitted). FSlacken the other bolts using the
wheelbrace 1 only.
*
P
osition Rfor the electronic gear controlgearbox; Pfor the automatic gearbox.
Page 208 of 340
206
Practical information
The batteries contain harmful substancessuch as sulphuric acid and lead. They must be disposed of in accordance with regulations and must not, in anycircumstances, be discarded with household waste.
Take used remote control batteries andvehicle batteries to a special collection point.
Do not reverse the polarity and use only a 12 V charger.
Do not disconnect the terminals whilethe engine is running.
Do not charge the batteries without disconnecting the terminals first. Do not push the vehicle to star t the engine if it is fitted with the 6 -speed electronic gearbox system or an automatic gearbox.
It is advisable to disconnect the 12 Vbattery if the vehicle is to be left unusedfor more than one month.
Before disconnecting the battery
Wait 2 minutes after switching off the ignitionbefore disconnecting the 12 V battery.
Close the windows and the doors beforedisconnecting the battery.
Following reconnection of thebattery
Following reconnection of the 12 V battery,
switch on the ignition and wait 1 minute before
star ting to permit initialisation of the electronic
systems. However, if problems remain followingthis operation, contact a PEUGEOT dealer or a
qualified workshop.
Referring to the corresponding section, you
must yourself reinitialise:
- the remote control key,
- the panoramic sunroof blind,
- the GPS satellite navigation system.
Load reduction mode
System which manages the use of cer tain
functions according to the level of charge
remaining in the battery.
When the vehicle is bein
g driven, the load
reduction function temporarily deactivates certain functions, such as the air conditioning,
the heated rear screen...
The deactivated functions are reactivated
automatically as soon as conditions permit.
Page 210 of 340
208
Practical information
Changing a wiper blade
wiper blade
F
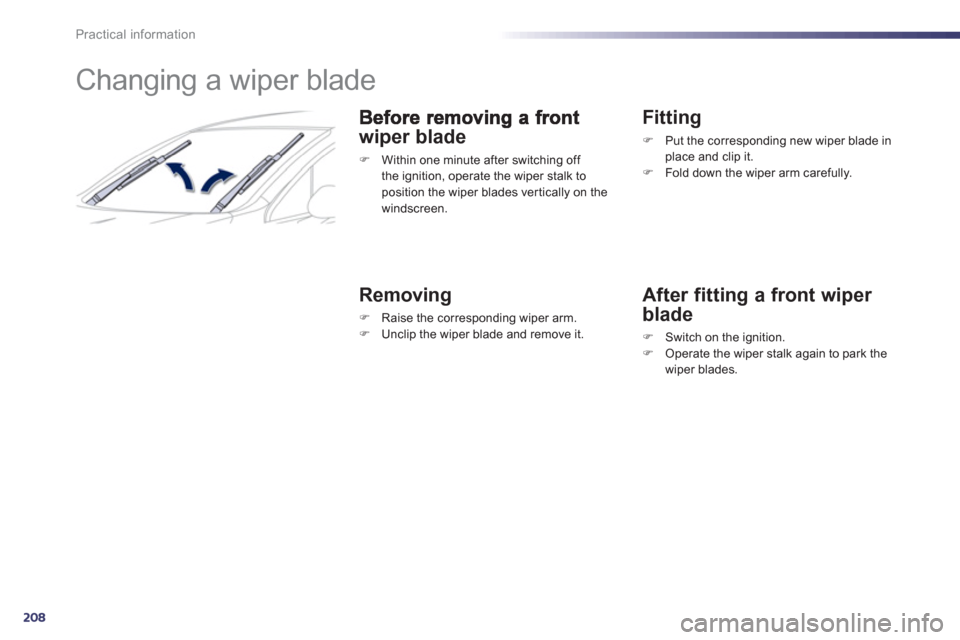
Within one minute after switching off
the ignition, operate the wiper stalk to
position the wiper blades vertically on the
windscreen.
Removing
F
Raise the corresponding wiper arm. F
Unclip the wiper blade and remove it.
Fitting
F
Put the corresponding new wiper blade inplace and clip it.
F
Fold down the wiper arm carefully.
After fitting a front wiper
blade
F
Switch on the ignition.F
Operate the wiper stalk again to park the
wiper blades.
Page 224 of 340
222
Checks
Checking levels
Ta k e c a r e w h e n w o r k i ng under the
bonnet, as certain areas of the enginemay be extremely hot (risk of burns).
Oil level
The check is carried out either when
the ignition is switched on using the oil level indicator on the instrument panel, or using the dipstick.
This manual check will only be correct if the
vehicle is on level ground and the engine has
been o
ff for more than 30 minutes.
It is normal to top up the oil level between
two ser vices
(or oil changes). PEUGEOTrecommends that you check the level, and top
up if necessary, every 3 000 miles (5 000 kms).
After topping up the oil, the check whenswitching on the ignition with the oil levelindicator in the instrument panel is not validduring the 30 minutes after topping up.
Engine oil change
Refer to the ser vicing booklet for details ofthe inter val for this operation.
In order to maintain the reliability of the engine
and emission control system, the use of
additives in the engine oil is prohibited.
Oil specifi cation
The oil must be the correct grade for your engine and conform to the manufacturer'srecommendations.
Th
e brake fluid level should be close
to the "MA X" mark. If it is not, check
the brake pad wear.
Brake fluid level
Changing the fl uid
Refer to the ser vicing booklet for details ofthe inter val for this operation.
Fluid specifi cation
The brake fluid must conform to themanufacturer's recommendations and meet
the DOT3 or DOT4 standard.
Power steering fluid level
The power steering fluid level shouldbe close to the "MAX" mark. With
the engine cold, unscrew the cap to
check the level. I
f a level drops significantly, have the corresponding system checked by a PEUGEOT dealer or a qualified workshop. Check all of these levels regularly, in line with the ser vicing booklet and the requirements of the warranty. Top them up if necessary, unless other wise indicated.