2013 PEUGEOT 5008 warning
[x] Cancel search: warningPage 2 of 364
This personal space offers advice and other useful information for
the care and maintenance of your vehicle.
You can find your user guide on thePEUGEOTwebsite, under theheading "Personal space".
Referring to the user guide on-line also gives you access to thelatest information available, easily identified by the bookmarks, associated with this pictogram:
If the heading "Personal space" is not available on the public websitefor your country, you can find your user guide at the following address:http://public.servicebox.peugeot.com
the link in "Private customer access",
the language,
the model,
the edition date appropriate for the date of registration of your vehicle.
Please note the following point:
The fitting of electrical equipment or accessories which are
not recommended by PEUGEOT may result in a failure of your
vehicle’s electronic system. Please note this specific warning.
It is advisable to contact a PEUGEOT dealer to be shown the
recommended equipment and accessories.
Select:
You will find your user guide, presented in the same way as the paper version.
Page 3 of 364
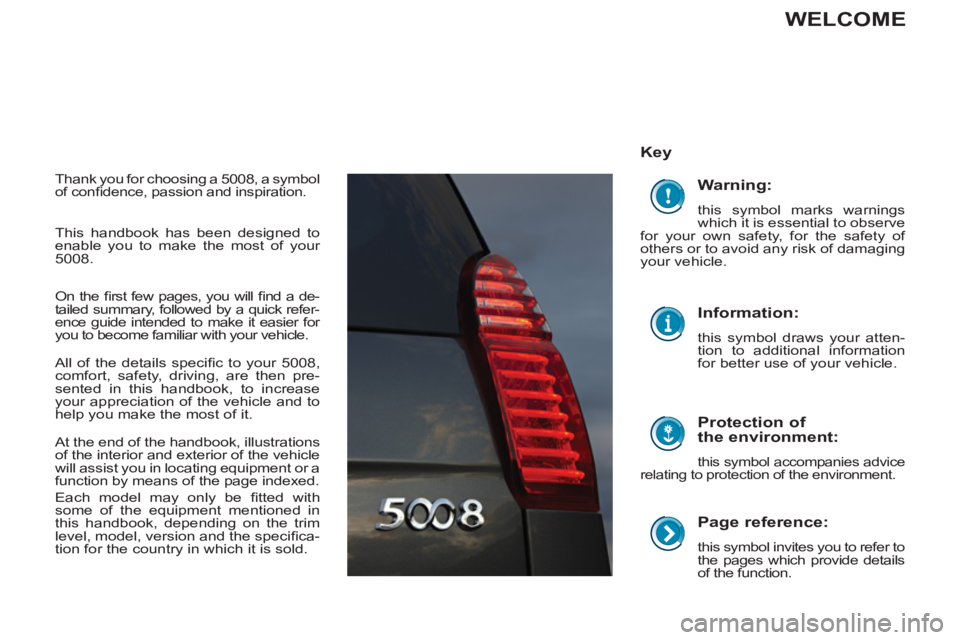
Page reference:
this symbol invites you to refer to
the pages which provide details
of the function.
Key
Protection of
the environment:
this symbol accompanies advice
relating to protection of the environment.
Information:
this symbol draws your atten-
tion to additional information
for better use of your vehicle.
Warning:
this symbol marks warnings
which it is essential to observe
for your own safety, for the safety of
others or to avoid any risk of damaging
your vehicle.
WELCOME
Thank you for choosing a 5008, a symbol
of confi dence, passion and inspiration.
This handbook has been designed to
enable you to make the most of your
5008.
On the fi rst few pages, you will fi nd a de-
tailed summary, followed by a quick refer-
ence guide intended to make it easier for
you to become familiar with your vehicle.
All of the details specifi c to your 5008,
comfort, safety, driving, are then pre-
sented in this handbook, to increase
your appreciation of the vehicle and to
help you make the most of it.
At the end of the handbook, illustrations
of the interior and exterior of the vehicle
will assist you in locating equipment or a
function by means of the page indexed.
Each model may only be fi tted with
some of the equipment mentioned in
this handbook, depending on the trim
level, model, version and the specifi ca-
tion for the country in which it is sold.
Page 4 of 364
CONTENTS
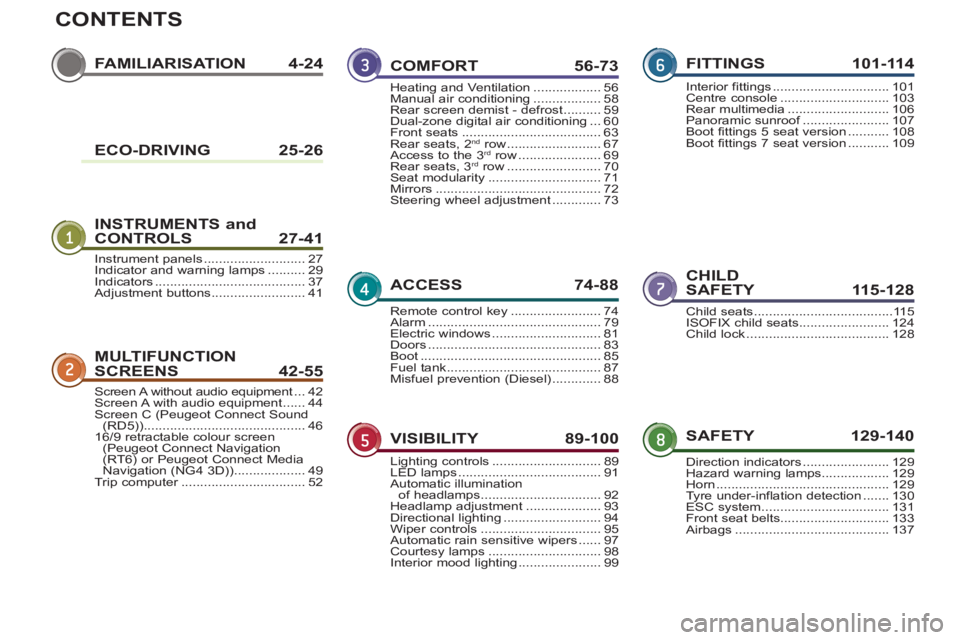
FAMILIARISATION4-24
INSTRUMENTS and
CONTROLS 27-41
CHILD
SAFETY 115-128
MULTIFUNCTION
SCREEN
S42-55
SAFETY 129-140 COMFORT 56-7
3
ACCESS 74-88
VISIBILITY 89-100
FITTINGS 101-114
Instrument panels ...........................27Indicator and warning lamps ..........29Indicators........................................37Adjustment buttons.........................41
Child seats.....................................115ISOFIX child seats........................124Child lock......................................128
Screen A without audio equipment...t42Screen A with audio equipment......44Screen C (Peugeot Connect Sound (RD5))...........................................4616/9 retractable colour screen(Peugeot Connect Navigation (RT6) or Peugeot Connect Media
Navigation (NG4 3D))...................49Trip computer.................................r52
Direction indicators.......................129Hazard warning lamps..................129Horn..............................................129Tyre under-inflation detection .......130ESC system..................................131Front seat belts.............................133Airbags .........................................137
Heating and Ventilation ..................56Manual air conditioning ..................58Rear screen demist - defrost..........59Dual-zone digital air conditioning...60Front seats.....................................63Rear seats, 2nd row.........................67Access to the 3rdrow ......................69Rear seats, 3rdrow.........................70Seat modularity..............................71Mirrors............................................72Steering wheel adjustment .............73
Remote control key........................74Alarm..............................................79Electric windows.............................81Doors ..............................................83Boot................................................85Fuel tank.........................................87Misfuel prevention (Diesel).............88
Lighting controls.............................89LED lamps......................................91Automatic illumination
of headlamps................................92Headlamp adjustment ....................93Directional lighting..........................94Wiper controls................................95Automatic rain sensitive wipers ......97Courtesy lamps..............................98Interior mood lighting......................99
Interior fittings ...............................101Centre console .............................103Rear multimedia...........................106Panoramic sunroof.......................f107Boot fittings 5 seat version ...........108Boot fittings 7 seat version ...........109ECO-DRIVING 25-26
Page 12 of 364
FA
M
10
INSTRUMENTS AND CONTROLS
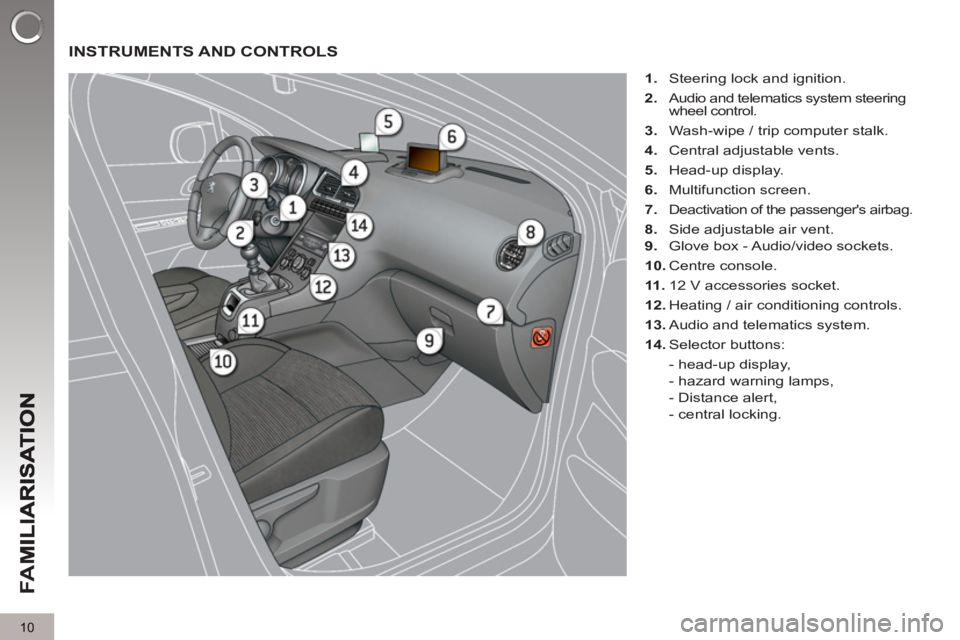
1.
Steering lock and ignition.
2.
Audio and telematics system steering
wheel control.
3.
Wash-wipe / trip computer stalk.
4.
Central adjustable vents.
5.
Head-up display.
6.
Multifunction screen.
7.
Deactivation of the passenger's airbag.
8.
Side adjustable air vent.
9.
Glove box - Audio/video sockets.
10.
Centre console.
11 .
12 V accessories socket.
12.
Heating / air conditioning controls.
13.
Audio and telematics system.
14.
Selector buttons:
- head-up display,
- hazard warning lamps,
- Distance alert,
- central locking.
Page 18 of 364
FA
M
16
MONITORING
Instrument
panels
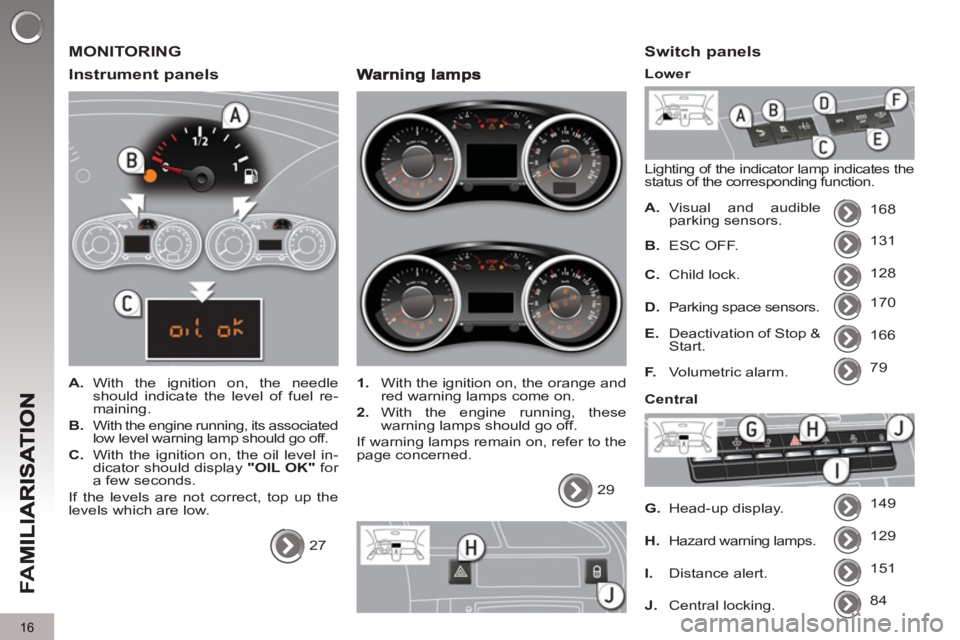
A.
With the ignition on, the needle
should indicate the level of fuel re-
maining.
B.
With the engine running, its associated
low level warning lamp should go off.
C.
With the ignition on, the oil level in-
dicator should display "OIL OK"
for
a few seconds.
If the levels are not correct, top up the
levels which are low.
27
1.
With the ignition on, the orange and
red warning lamps come on.
2.
With the engine running, these
warning lamps should go off.
If warning lamps remain on, refer to the
page concerned.
29
Switch panels
Lighting of the indicator lamp indicates the
status of the corresponding function.
A.
Visual and audible
parking sensors. 168
131
128
170
166
79
149
129
B.
ESC OFF.
C.
Child lock.
D.
Parking space sensors.
E.
Deactivation of Stop &
Start.
F.
Volumetric alarm.
G.
Head-up display.
H.
Hazard warning lamps.
Lower
Central
151
I.
Distance alert.
84
J.
Central locking.
Page 19 of 364
FA
M
17
PASSENGER SAFETY
Passen
ger's front airbag
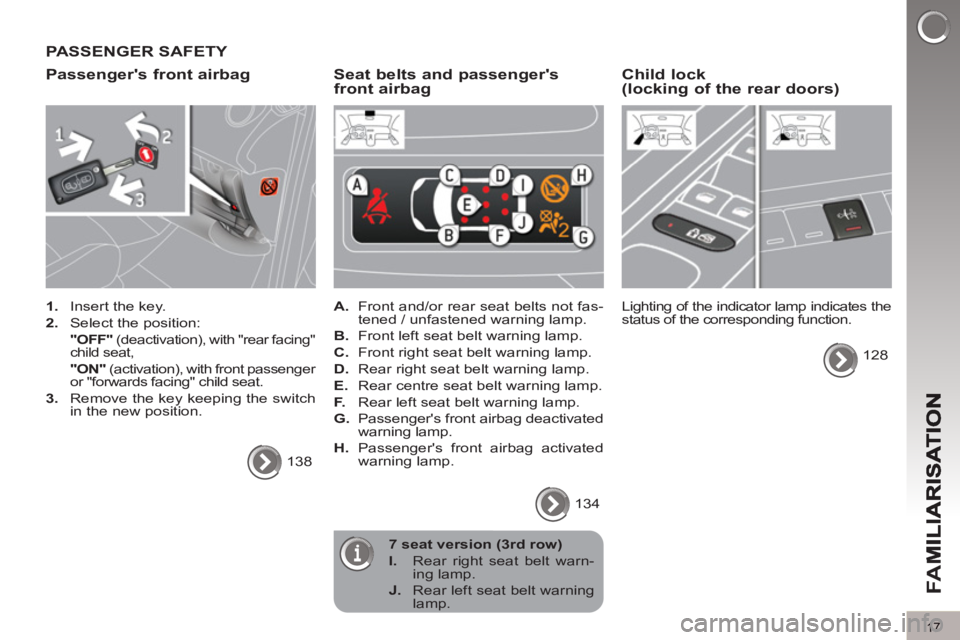
1.
Insert the key.
2.
Select the position:
"OFF"
(deactivation), with "rear facing"
child seat,
"ON"
(activation), with front passenger
or "forwards facing" child seat.
3.
Remove the key keeping the switch
in the new position.
138
Seat belts and passenger's front airbag
A.
Front and/or rear seat belts not fas-
tened / unfastened warning lamp.
B.
Front left seat belt warning lamp.
C.
Front right seat belt warning lamp.
D.
Rear right seat belt warning lamp.
E.
Rear centre seat belt warning lamp.
F.
Rear left seat belt warning lamp.
G.
Passenger's front airbag deactivated
warning lamp.
H.
Passenger's front airbag activated
warning lamp.
134
Child lock (locking of the rear doors)
Lighting of the indicator lamp indicates the
status of the corresponding function.
128
7 seat version (3rd row)
I.
Rear right seat belt warn-
ing lamp.
J.
Rear left seat belt warning
lamp.
Page 22 of 364
FA
M
20
DRIVING SAFELY
Sto
p & Start
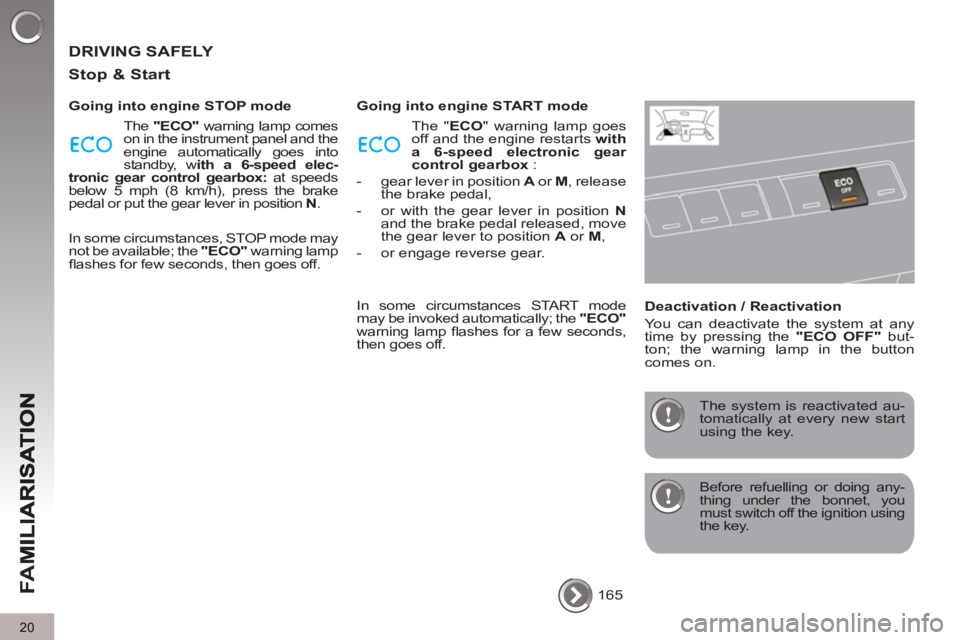
Going into engine STOP mode
The "ECO"
warning lamp comes
on in the instrument panel and the
engine automatically goes into
standby, w ith a 6-speed elec-
tronic gear control gearbox:
at speeds
below 5 mph (8 km/h), press the brake
pedal or put the gear lever in position N
.
In some circumstances, STOP mode may
not be available; the "ECO"
warning lamp
fl ashes for few seconds, then goes off.
Going into engine START mode
The "ECO" warning lamp goes
off and the engine restarts with
a 6-speed electronic gear
control gearbox
:
- gear lever in position A
or M
, release
the brake pedal,
- or with the gear lever in position N
and the brake pedal released, move
the gear lever to position A
or M
,
- or engage reverse gear.
In some circumstances START mode
may be invoked automatically; the "ECO"
warning lamp fl ashes for a few seconds,
then goes off.
Deactivation / Reactivation
You can deactivate the system at any
time by pressing the "ECO OFF"
but-
ton; the warning lamp in the button
comes on.
Before refuelling or doing any-
thing under the bonnet, you
must switch off the ignition using
the key.
The system is reactivated au-
tomatically at every new start
using the key.
165
Page 23 of 364
FA
M
21
DRIVING SAFELY
Electric parkin
g brake
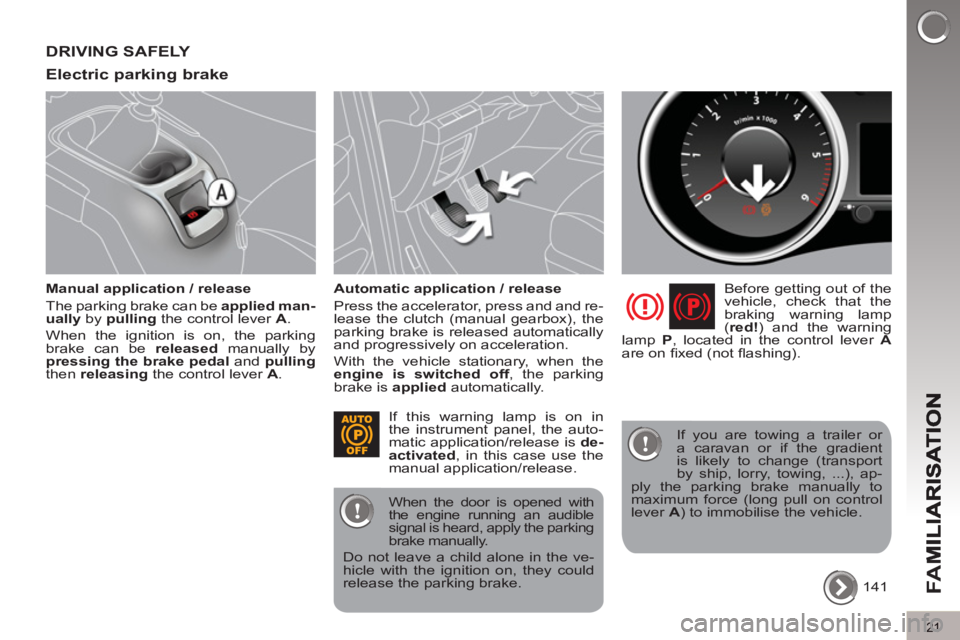
Manual application / release
The parking brake can be applied man-
ually
by pulling
the control lever A
.
When the ignition is on, the parking
brake can be released
manually by
pressing the brake pedal
and pulling
then releasing
the control lever A
.
Automatic application / release
Press the accelerator, press and and re-
lease the clutch (manual gearbox), the
parking brake is released automatically
and progressively on acceleration.
With the vehicle stationary, when the
engine is switched off
, the parking
brake is applied
automatically.
Before getting out of the
vehicle, check that the
braking warning lamp
( red!
) and the warning
lamp P
, located in the control lever A
are on fi xed (not fl ashing).
141 If this warning lamp is on in
the instrument panel, the auto-
matic application/release is de-
activated
, in this case use the
manual application/release.
When the door is opened with
the engine running an audible
signal is heard, apply the parking
brake manually.
Do not leave a child alone in the ve-
hicle with the ignition on, they could
release the parking brake.
If you are towing a trailer or
a caravan or if the gradient
is likely to change (transport
by ship, lorry, towing, ...), ap-
ply the parking brake manually to
maximum force (long pull on control
lever A
) to immobilise the vehicle.