Page 83 of 364

AC
81
The electric window controls
remain operational for ap-
proximately 45 seconds after
the ignition is switched off or until the
vehicle is locked after a front door is
opened.
If one of the passenger windows can-
not be operated from the driver's door
control panel, carry out the operation
from the control pad of the passen-
ger door concerned, and vice versa.
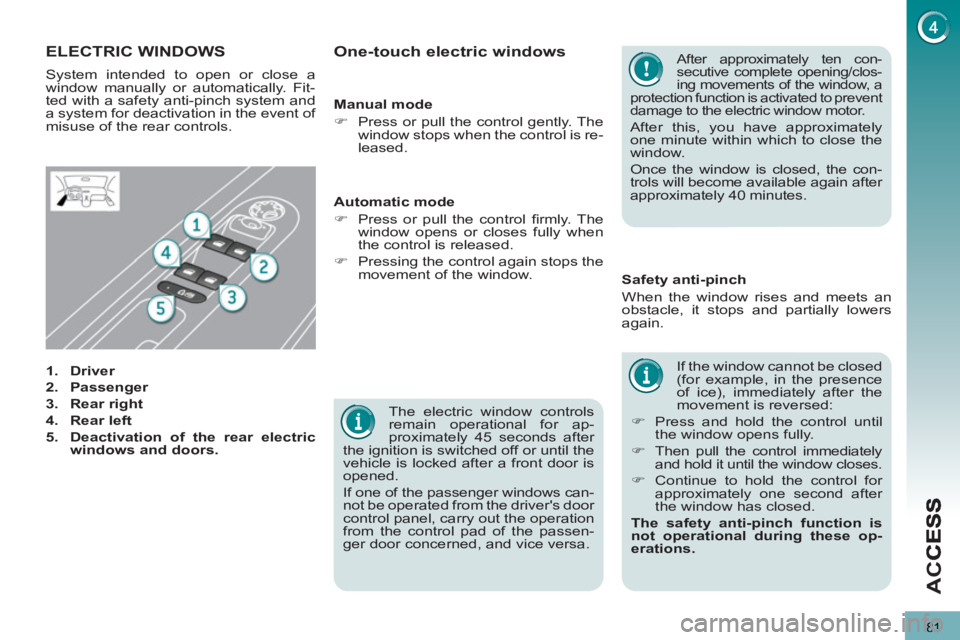
ELECTRIC WINDOWS
1.
Driver
2.
Passenger
3.
Rear right
4.
Rear left
5.
Deactivation of the rear electric
windows and doors.
If the window cannot be closed
(for example, in the presence
of ice), immediately after the
movement is reversed:
�)
Press and hold the control until
the window opens fully.
�)
Then pull the control immediately
and hold it until the window closes.
�)
Continue to hold the control for
approximately one second after
the window has closed.
The safety anti-pinch function is
not operational during these op-
erations.
Safety anti-pinch
When the window rises and meets an
obstacle, it stops and partially lowers
again.
Automatic mode
�)
Press or pull the control fi rmly. The
window opens or closes fully when
the control is released.
�)
Pressing the control again stops the
movement of the window.
One-touch electric windows
After approximately ten con-
secutive complete opening/clos-
ing movements of the window, a
protection function is activated to prevent
damage to the electric window motor.
After this, you have approximately
one minute within which to close the
window.
Once the window is closed, the con-
trols will become available again after
approximately 40 minutes.
System intended to open or close a
window manually or automatically. Fit-
ted with a safety anti-pinch system and
a system for deactivation in the event of
misuse of the rear controls.
Manual mode
�)
Press or pull the control gently. The
window stops when the control is re-
leased.
Page 89 of 364

AC
87
The key cannot be removed
from the lock until the cap is
put back on the tank.
Opening the cap may trigger an in-
rush of air. This vacuum, which is
completely normal, is caused by the
sealing of the fuel system.
FUEL TANK
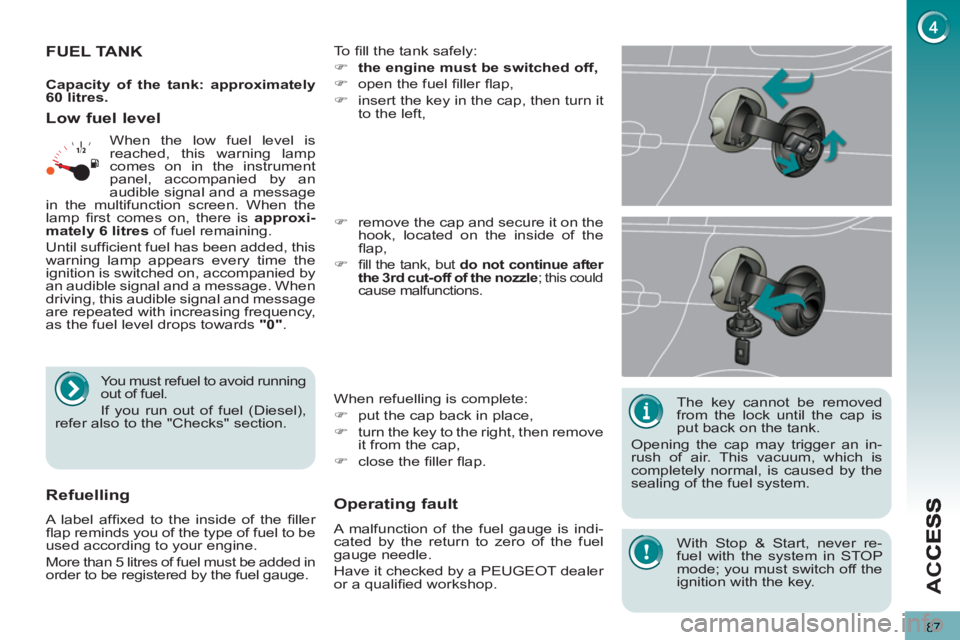
To fi ll the tank safely:
�)
the engine must be switched off,
�)
open the fuel fi ller fl ap,
�)
insert the key in the cap, then turn it
to the left,
When refuelling is complete:
�)
put the cap back in place,
�)
turn the key to the right, then remove
it from the cap,
�)
close the fi ller fl ap.
�)
remove the cap and secure it on the
hook, located on the inside of the
fl ap,
�)
fi ll the tank, but do not continue after
the 3rd cut-off of the nozzle
; this could
cause malfunctions.
Low fuel level
Operatin
g fault
A malfunction of the fuel gauge is indi-
cated by the return to zero of the fuel
gauge needle.
Have it checked by a PEUGEOT dealer
or a qualifi ed workshop.
Refuelling
A label affi xed to the inside of the fi ller
fl ap reminds you of the type of fuel to be
used according to your engine.
More than 5 litres of fuel must be added in
order to be registered by the fuel gauge. When the low fuel level is
reached, this warning lamp
comes on in the instrument
panel, accompanied by an
audible signal and a message
in the multifunction screen. When the
lamp fi rst comes on, there is approxi-
mately
6 litres
of fuel remaining.
Until suffi cient fuel has been added, this
warning lamp appears every time the
ignition is switched on, accompanied by
an audible signal and a message. When
driving, this audible signal and message
are repeated with increasing frequency,
as the fuel level drops towards "0"
.
You must refuel to avoid running
out of fuel.
If you run out of fuel (Diesel),
refer also to the "Checks" section.
Capacity of the tank: approximately
60 litres.
With Stop & Start, never re-
fuel with the system in STOP
mode; you must switch off the
ignition with the key.
Page 106 of 364
FITTINGS
104
To avoid any risk of jamming
of the pedals:
MATS
Removable carpet protection.
Refitting
To refi t the mat on the driver's side:
�)
position the mat correctly,
�)
refi t the fi xings by pressing,
�)
check that the mat is secured correctly.
Fitting
When fi tting the mat for the fi rst time,
on the driver's side use only the fi xings
provided in the wallet attached.
The other mats are simply placed on
the carpet.
Removal
To remove the mat on the driver's side:
�)
move the seat as far back as possible,
�)
unclip the fi xings,
�)
remove the mat.
- only use mats which are suited
to the fi xings already present in
the vehicle; these fi xings must be
used,
- never fi t one mat on top of another.
The use of mats not approved by
PEUGEOT may interfere with access
to the pedals and hinder the operation
of the cruise control/speed limiter.
Page 112 of 364

FITTINGS
110
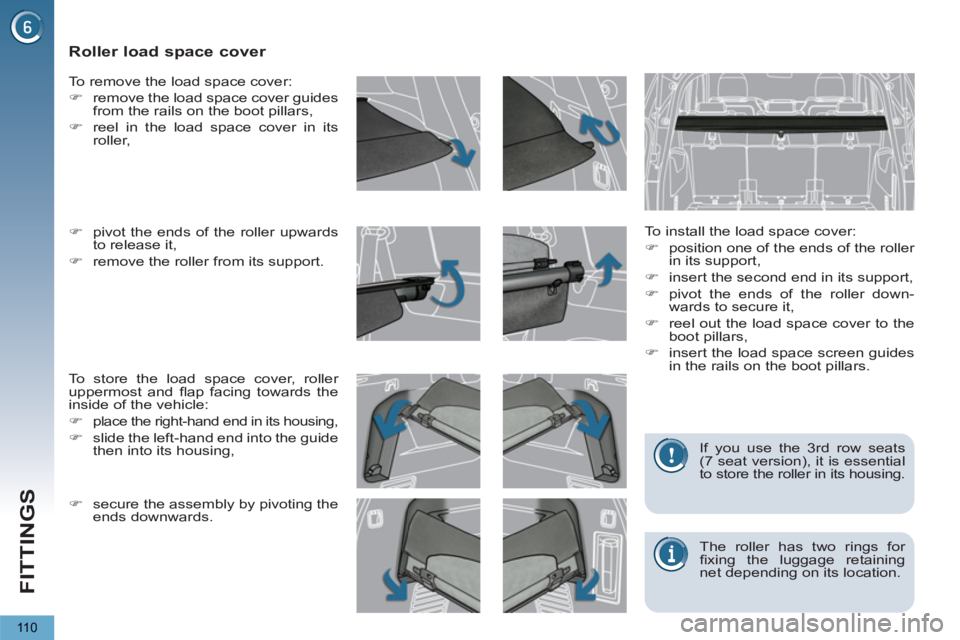
Roller load space cover
To install the load space cover:
�)
position one of the ends of the roller
in its support,
�)
insert the second end in its support,
�)
pivot the ends of the roller down-
wards to secure it,
�)
reel out the load space cover to the
boot pillars,
�)
insert the load space screen guides
in the rails on the boot pillars.
To remove the load space cover:
�)
remove the load space cover guides
from the rails on the boot pillars,
�)
reel in the load space cover in its
roller,
To store the load space cover, roller
uppermost and fl ap facing towards the
inside of the vehicle:
�)
place the right-hand end in its housing,
�)
slide the left-hand end into the guide
then into its housing,
�)
pivot the ends of the roller upwards
to release it,
�)
remove the roller from its support.
The roller has two rings for
fi xing the luggage retaining
net depending on its location. If you use the 3 rd row seats
(7 seat version), it is essential
to store the roller in its housing.
�)
secure the assembly by pivoting the
ends downwards.
Page 114 of 364
FITTINGS
Luggage retaining net
Hooked onto the stowing rings on the
fl oor and/or on the load space cover
roller, the luggage retaining net avail-
able as an accessory enables you to
secure your luggage. There are 4 possible positions:
- fl at at the bottom of the boot,
- horizontal, level with the load space
cover,
- vertical at the back of the rear seats,
- fl at at the bottom of the boot and ver-
tical at the back of the rear seats.
Page 115 of 364
FITTINGS
113
The hooks permit the securing of shop-
ping bags.
Hooks
�)
To connect a 12 V accessory (max
power: 120 W), remove the cap and
connect an appropriate adaptor.
�)
Turn the key to the ignition on position.
12 V accessory socket
�)
Raise the concertina board to gain
access to the storage box.
Depending on the confi guration, this
has areas for storing:
- a box of spare bulbs,
- a fi rst aid kit,
- a tyre repair kit,
- two warning triangles,
- ...
Storage box (5 seat version)
Page 121 of 364
CHILD SAFETY
11 9
CHILD SEATS RECOMMENDED BY PEUGEOT
PEUGEOT offers a complete range of recommended child seats which are secured using a three point seat belt
.
Group 0+: from birth to 13 kg
Group 1: from 9 to 18 kg
L1
"RÖMER/BRITAX Baby-Safe Plus".
Installed in the rearwards-facing position.
L2
"RÖMER Duo Plus ISOFIX".
Groups 2 and 3: from 15 to 36 kg
L5
"KLIPPAN Optima".
From the age of 6 years (approximately 22 kg),
the booster is used on its own.
L6
"RÖMER KIDFIX"
.
Can be secured using the vehicle's
ISOFIX mountings. The child is
restrained by the seat belt.
Page 123 of 364

CHILD SAFETY
121
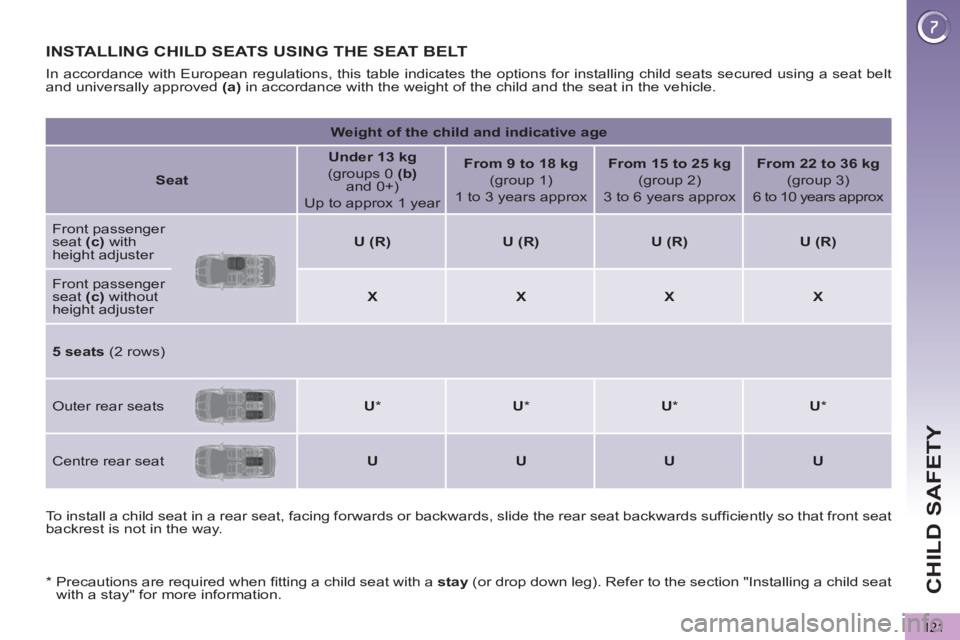
INSTALLING CHILD SEATS USING THE SEAT BELT
To install a child seat in a rear seat, facing forwards or backwards, slide the rear seat backwards suffi ciently so that front seat
backrest is not in the way.
In accordance with European regulations, this table indicates the options for installing child seats secured using a seat belt
and universally approved (a)
in accordance with the weight of the child and the seat in the vehicle.
Weight of the child and indicative age
Seat
Under 13 kg
(groups 0 ( b )
and 0+)
Up to approx 1 year
From 9 to 18 kg
(group 1)
1 to 3 years approx
From 15 to 25 kg
(group 2)
3 to 6 years approx
From 22 to 36 kg
(group 3)
6 to 10 years approx
Front passenger
seat ( c ) with
height adjuster
U (R)
U (R)
U (R)
U (R)
Front passenger
seat (c)
without
height adjuster
X
X
X
X
5 seats
(2 rows)
Outer rear seats
U
*
U
*
U
*
U
*
Centre rear seat
U
U
U
U
*
Precautions are required when fi tting a child seat with a stay
(or drop down leg). Refer to the section "Installing a child seat
with a stay" for more information.