Page 9 of 22

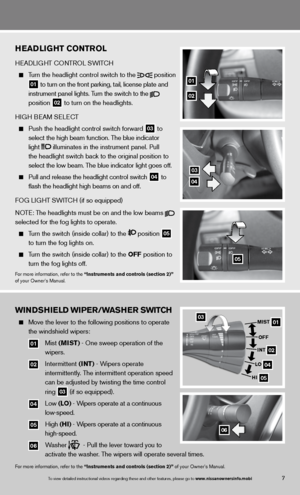
HeaD liGHT CoNTrol
H eAd LiGHT c OnTROL SW iTc H
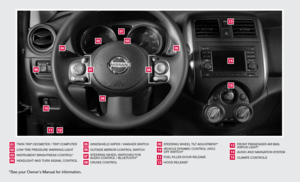
Turn the headlight control switch to the
position
01 to turn on the front parking, tail, license plate and
instrument panel lights. Turn the switch to the
position
02 to turn on the headlights.
H iGH B eAM S eLec T
Push the headlight control switch forward
03 to
select the high beam function. The blue indicator
light
illuminates in the instrument panel. Pull
the headlight switch back to the original position to
select the low beam. The blue indicator light goes off.
Pull and release the headlight control switch
04 to
flash the headlight high beams on and off.
fOG Li GHT SW iTc H (if so equipped)
NOTE: The headlights must be on and the low beams
selected for the fog lights to operate.
Turn the switch (inside collar) to the position
05
to turn the fog lights on.
Turn the switch (inside collar)
to the oFF position to
turn the fog lights off.
for more information, refer to the “instruments and controls (section 2)”
of your Owner’s Manual.
01
02
05
03
04
wiNDSHiel D wiPer/waSHer Swi TCH
Move the lever to the following positions to operate
the windshield wipers:
01 Mist (MiST) - One sweep operation of the
wipers.
02 intermittent (iNT) - Wipers operate
intermittently. The intermittent operation speed
can be adjusted by twisting the time control
ring
03 (if so equipped).
04 Low (lo) - Wipers operate at a continuous
low-speed.
05 High (Hi) - Wipers operate at a continuous
high-speed.
06 Washer - Pull the lever toward you to
activate the washer. The wipers will operate several times.
for more information, refer to the “instruments and controls (section 2)” of your Owner’s Manual.
0301
02
04
05
MiST
oFF
i NT
lo
Hi
06
7To view detailed in\fstructional videos\f regarding these a\fnd other features\f \fplease go to www.nissanownersin\hfo.mobi
Page 10 of 22
 function
02 intermittent
(iNT) wiper function
03 Time delay adjustment ring (if so equipped)
04 Low
(lo) sp")
wiNDSHielD wiPer/waSHer Swi TCH
Demonstrate Yes
01 MiST
(one sweep) function
02 intermittent
(iNT) wiper function
03 Time delay adjustment ring (if so equipped)
04 Low
(lo) speed wiper function
05 High
(Hi) speed wiper function 06 front washer function
Bluetooth\f han\bs-free Phone s
ystem (if so equipped)
ye s
1. \bonnect the custome\fr’s phone
2. Explain voice tagg\fing
3. Identify microphone \flocation
4. Explain how to dia\fl a number
5. Explain how to rec\feive and end a cal\fl
heating, Ventilation an\b air Con\bitioning
Demonstrate ye s
1. Fan speed control
2. Air flow control
3. Temperature control\f
4. A/\b function (if so \fequipped)
5. Defrost and Defog o\fperation
(include air intak\fe lever)
2013 Versa Sedan delivery checklist
Bluetooth\f Controls
0301
02
04
05
MiST
oFF
i NT
lo
Hi
06
au\bio system
\bemonstrate yes
1. How to turn the sys\ftem on/off
2. How to tune the ra\fdio
3. How to operate SEE\fK/TRA\bK/\bAT feature
(if so equipped)
4. How to set a stati\fon preset into mem\fory
Page 11 of 22

ye s
1. Identify TPMS icon i\fn meter cluster
2. Demonstrate TPMS r\feset procedure
3. Explain effects of l\fow ambient tempera\ftures")
tire Pressure monitoring system (tPms)
ye s
1. Identify TPMS icon i\fn meter cluster
2. Demonstrate TPMS r\feset procedure
3. Explain effects of l\fow ambient tempera\ftures
on tire pressure
outsi\be mirror Control sWit Ch (if so equipped)
Demonstrate ye s
1. Right and left outs\fide mirror selecti\fon
2. Outside mirror adj\fustment switch loc\fation
3. Neutral switch pos\fition
2013 Versa Sedan delivery checklist
eleCtroniC QuiCK referenCe gui\be (eQrg) yes
1. Explain that addit\fional vehicle oper\fation information c\fan be viewed via t\fhe
Nissan EQRG websit\fe at www.nissanownersinfo.mo\fbi
2. Explain that EQRG \finformation can be \fviewed via SmartPh\fone or personal co\fmputer
3. Identify where on th\fe vehicle’s Quick \fReference Guide the\fy can find the inter\fnet
address (P\b viewing\f) or Quick Respons\fe \bode (SmartPhone \fviewing) to access\f
the Nissan EQRG si\fte
All information\f specifications\f photographs and illustrations are those in effect at the time of printing. NISSAN reserves the right to
change specifications or design without notice and without obligation. For additional information\f see your NISSAN dealer or contact
NISSAN North America\f Inc\f. See Owner’s Manua\fl for important war\fnings and details \fon vehicle operati\fon and maintenance\f. Sales \bonsultant Si\fgnature Date
Sales Manager Sign\fature Date
\bustomer Signature Date
Nissan\f the Nissan \fBrand Symbol\f Z and
Nissan model names\f are Nissan tradem\farks.
© 2012 Nissan North Ame\frica\f Inc.
QR
3E 0N17U0
Printing: August 2\f012 (04)
CloCK set/a\bJustment
\bemonstrate yes
1. How to set the clo\fck in the Audio Sys\ftem or Navigation Syste\fm (if so equipped) .
Page 12 of 22

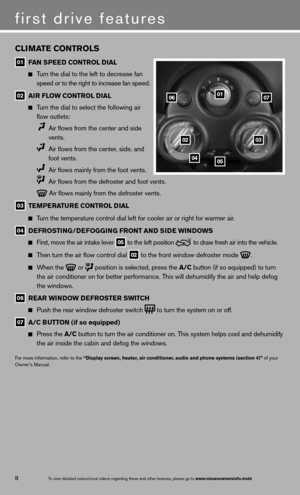
CliMaTe CoNTrolS
01 F
aN SPee D CoNTrol D ial
Turn the dial to the left to decrease fan
speed or to the right to increase fan speed.
02 air Flow CoNTrol D
ial
Turn the dial to select the following air
flow outlets:
Air flows from the center and side
vents.
Air flows from the center, side, and
foot vents.
Air flows mainly from the foot vents.
Air flows from the defroster and foot vents.
Air flows mainly from the defroster vents.
03 Te
MPera Ture CoNTrol D ial
Turn the temperature control dial left for cooler air or right for warmer\
air.
04 D
eFroSTi NG/DeFoGG iNG FroNT aND S iD e wi NDowS
first, move the air intake lever 05 to the
left position to draw fresh air into the vehicle.
Then turn the air flow control dial
02 to the front window defroster mode
.
When the
or
position is selected, press the a/C button (if so equipped) to turn
the air conditioner on for better performance. This will dehumidify the air and help defog
the windows.
06 rear wi
NDow D eFroSTer SwiTCH
Push the rear window defroster switch
to turn the system on or off.
07 a/C B
uTToN (if so equipped)
Press the a/C button to turn the air conditioner on. This system helps cool and dehumidify
the air inside the cabin and defog the windows.
for more information, refer to the “Display screen, heater, air conditioner, audio and phone systems (section 4)” of your
Owner’s Manual.
01
0203
0405
0607
first drive features
8To view detailed in\fstructional videos\f regarding these a\fnd other features\f \fplease go to www.nissanownersin\hfo.mobi
Page 13 of 22

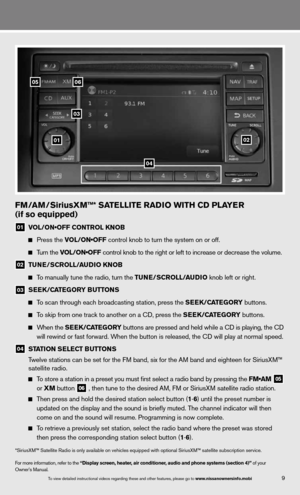
01 VOL/ON•OFF CONTROL KNOB
Press the VOL/ON•OFF control knob to turn the system on or off.
Turn the VOL/ON•OFF")
FM/aM/SiriusXM™* Sa TelliTe raDio wiTH CD Pla Yer
(if so equipped)
01 VOL/ON•OFF CONTROL KNOB
Press the VOL/ON•OFF control knob to turn the system on or off.
Turn the VOL/ON•OFF control knob to the right or left to increase or decrease the volume.
02 Tu
Ne/SCroll/ auDio KN oB
To manually tune the radio, turn the Tu Ne/SCroll/ auDio knob left or right.
03
S
ee K/C aTe Gor Y B uTT oNS
To scan through each broadcasting station, press the S eeK/C aTe Gor Y buttons.
To skip from one track to another on a cd, press the S eeK/C aTe Gor Y buttons.
When the S eeK/C aTe Gor Y buttons are pressed and held while a CD is playing, the CD
will rewind or fast forward. When the button is released, the CD will play at normal speed.
04 ST
aTioN S eleCT B uTToNS
Twelve stations can be set for the FM band, six for the AM band and eighteen for SiriusXM™
satellite radio.
To store a station in a preset you must first select a radio band by pressing the FM•AM
05
or
XM button
06 , then tune to the desired AM, f
M or SiriusXM satellite radio station.
Then press and hold the desired station select button (1 -6 ) until the preset number is
updated on the display and the sound is briefly muted. The channel indicator will then
come on and the sound will resume. Programming is now complete.
To retrieve a previously set station, select the radio band where the preset was stored
then press the corresponding station select button (1 -6 ).
*SiriusXM™ Satellite Radio is only available on vehicles equipped with optional SiriusXM™ satellite subscription service.
for more information, refer to the “Display screen, heater, air conditioner, audio and phone systems (section 4)” of your
Owner’s Manual.
01
05
03
06
02
04
9To view detailed in\fstructional videos\f regarding these a\fnd other features\f \fplease go to www.nissanownersin\hfo.mobi
Page 14 of 22

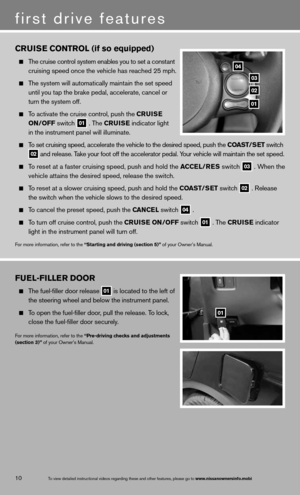
Fuel-Filler Door
The fuel-filler door release
01 is located to the left of
the steering wheel and below the instrument panel.
To open the fuel-filler door, pull the release. To lock,
close the fuel-filler door securely.
for more information, refer to the “Pre-driving checks and adjustments
(section 3)” of your Owner’s Manual.
01
C rui Se C oNT rol (if so equipped)
The cruise control system enables you to set a constant
cruising speed once the vehicle has reached 25 mph.
The system will automatically maintain the set speed
until you tap the brake pedal, accelerate, cancel or
turn the system off.
To activate the cruise control, push the C ruiSe
oN/oFF switch
01 . The C
ruiSe indicator light
in the instrument panel will illuminate.
To set cruising speed, accelerate the vehicle to the desired speed, push \
the CoaST/S eT switch
02 and release. Take your foot off the accelerator pedal. Your vehicle will maintain the set speed.
To reset at a faster cruising speed, push and hold the a CCel/reS switch
03 . When the
vehicle attains the desired speed, release the switch.
To reset at a slower cruising speed, push and hold the CoaST/S eT switch
02 . Release
the switch when the vehicle slows to the desired speed.
To cancel the preset speed, push the C aNCel switch
04 .
To turn off cruise control, push the Crui Se oN/oFF switch
01 . The C
ruiSe indicator
light in the instrument panel will turn off.
for more information, refer to the “Starting and driving (section 5)” of your Owner’s Manual.
04
03
02
01
10
first drive features
To view detailed in\fstructional videos\f regarding these a\fnd other features\f \fplease go to www.nissanownersin\hfo.mobi
Page 15 of 22

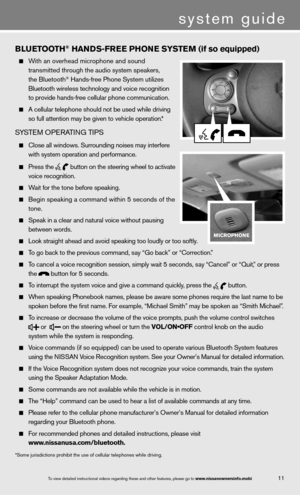
With an overhead microphone and sound
transmitted through the audio system speakers,
the Bluetooth
® Hands-free Phone System ut")
11
BlueT ooTH® HaNDS-Free PH oNe SYSTe M (if so equipped)
With an overhead microphone and sound
transmitted through the audio system speakers,
the Bluetooth
® Hands-free Phone System utilizes
Bluetooth wireless technology and voice recognition
to provide hands-free cellular phone communication.
A cellular telephone should not be used while driving
so full attention may be given to vehicle operation.*
SYSTe M OPeRATin G TiPS
close all windows. Surrounding noises may interfere
with system operation and performance.
Press the
button on the steering wheel to activate
voice recognition.
Wait for the tone before speaking.
Begin speaking a command within 5 seconds of the
tone.
Speak in a clear and natural voice without pausing
between words.
Look straight ahead and avoid speaking too loudly or too softly.
To go back to the previous command, say “Go back” or “Correction.”
To cancel a voice recognition session, simply wait 5 seconds, say “cancel” or “Quit,” or press
the
button for 5 seconds.
To interrupt the system voice and give a command quickly, press the
button.
When speaking Phonebook names, please be aware some phones require the last name to be
spoken before the first name. For example, “Michael Smith” may be spoken as “Smith Michael”.
To increase or decrease the volume of the voice prompts, push the volume \
control switches
or
on the steering wheel or turn the VOL/ON•OFF control knob on the audio
system while the system is responding.
Voice commands (if so equipped) can be used to operate various Bluetooth System features
using the ni SSAn Voice Recognition system. See your Owner’s Manual for detailed information.
if the Voice Recognition system does not recognize your voice commands, train th\
e system
using the Speaker Adaptation Mode.
Some commands are not available while the vehicle is in motion.
The “Help” command can be used to hear a list of available commands at any time.
Please refer to the cellular phone manufacturer’s Owner’s Manual f\
or detailed information
regarding your Bluetooth phone.
f or recommended phones and detailed instructions, please visit
www.nissanusa.com/bluetooth.
*Some jurisdictions prohibit the use of cellular telephones while driving.
To view detailed in\fstructional videos\f regarding these a\fnd other features\f \fplease go to www.nissanownersin\hfo.mobi
system guide
Page 16 of 22

cOnnecTinG PROcedu Re
NOTE: The vehicle must be stationary when connecting the phone.
1. Press the
button on the steering wheel. The system announces the available commands.
2. Say: “Connect phone”. The system acknowledges the command and announces the next set
of available commands.
3. Say: “Add phone”. The system acknowledges the command and asks you to initiate connecting
from the phone handset.
4. Initiate connecting from the phone:
The connecting procedure varies according to each cellular phone model. f or detailed
connecting instructions and compatible phones, please visit
www.nissanusa.com/bluetooth.
When prompted for a Passkey code, enter “1234” from the handset. (The Passkey code is
assigned by NISSAN and cannot be changed.)
5. Say a name for the phone when the system asks you to provide one. You can give the phone
a name of your choice.
PHOne BOOk SeTu P
depending on your cell phone, the system may automatically download your \
cell phone’s
entire phonebook to the vehicle’s Bluetooth system.
If the phonebook does not download automatically, 40 entries can be individually downloaded.
To manually download entries:
1. Push the
button on the steering wheel.
2. After the tone, say “Phonebook”.
3. After the next tone, say “Transfer entry”. The system acknowledges the command and
asks you to initiate the transfer from the phone handset. The new contact phone number
will be transferred from the cellular phone to the vehicle.
The transfer procedure varies according to each cellular phone. See your cellular phone’s
owner’s manual for details. You can also visit www.nissanusa.com/bluetooth for
instructions on transferring phone numbers from NISSAN recommended cellular phones.
4. The system repeats the number and prompts you for the next command. When you have
finished entering numbers or transferring an entry, choose “Store”.
5. The system confirms the name, location and number.
MAkin G A cALL fROM TH e PHOneBOO k
1. Press the
button.
2. After waiting for the tone, say “call”.
3. After the next tone, speak a name of a phonebook entry. For example, “Michael Smith”.
4. Confirm the correct name is recognized by saying “Dial” after the tone.
NOTE: In some cases, names stored in all UPPERCASE letters may not be recognized by the
voice recognition system.
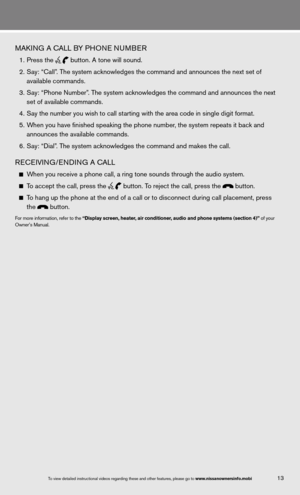
system guide
12To view detailed in\fstructional videos\f regarding these a\fnd other features\f \fplease go to www.nissanownersin\hfo.mobi