Page 9 of 20

To open the liftgate, unlock the liftgate using one
of the following methods:
•
Press the butt")
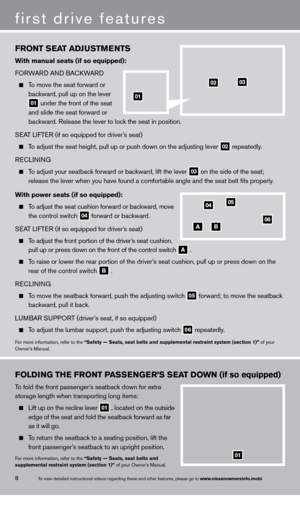
liFTGaT e relea Se (NiS S a N i ntelligent
Key® models only – if so equipped)
To open the liftgate, unlock the liftgate using one
of the following methods:
•
Press the button 01 on the keyfob twice.
•
Push the liftgate request switc
h
02 .
Then push the liftgate release switch 03 just above
the license plate and pull the liftgate up.
Note: It is import
ant to make sure the Intelligent k
ey is
with you (that is, in your poc
ket or purse).
For more information, refer to the “Pre-driving checks and adjustments
(section 3)” of your Owner’s Manual.
01
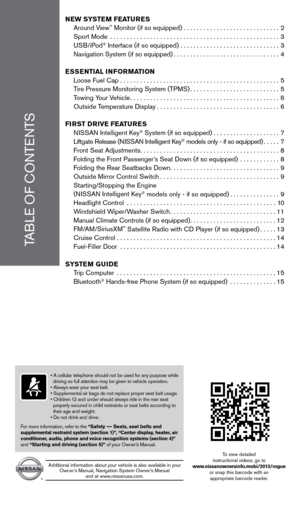
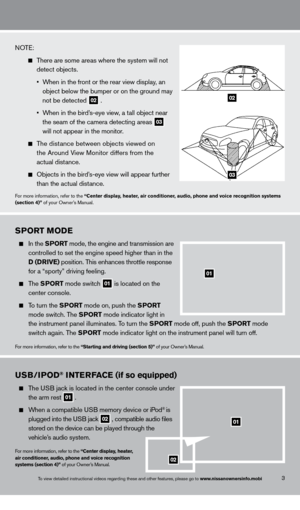
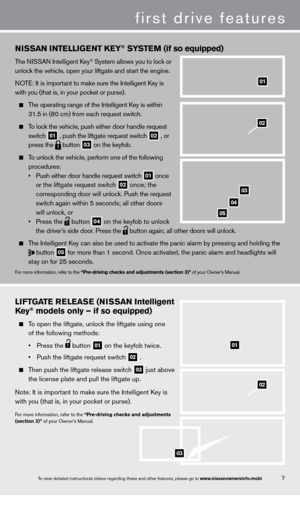
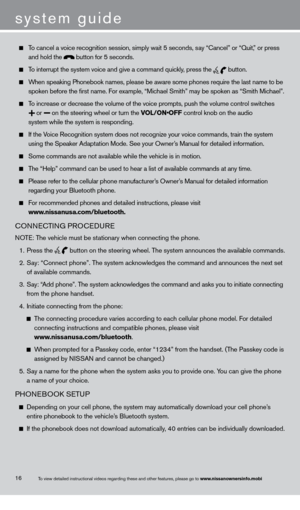
NiSS a N iNT elliGeNT Ke Y® SYSTeM (if so equipped)
The NISSAN Intelligent key® System allows you to lock or
unlock the vehicle, open your liftgate and start the engine.
NOTE: It is important to make sure the Intelligent
k
ey is
with you (that is, in your pocket or purse).
The operating range of the Intelligent key is within
31.5 in (8
0 cm) from each request switch.
To lock the vehicle, push either door handle request
switc
h
01 , push the liftgate request switch
02 , or
press the button
03 on the keyfob.
To unlock the vehicle, perform one of the following
procedures:
•
Push either door handle request switc
h
01 once
o
r the liftgate request switch 02 once; the
corresponding door will unloc
k. Push the request
switc
h again within 5 seconds; all other doors
will unloc
k, or
•
Press the button
04 on the keyfob to unlock
t
he driver’s side door. Press the button again; all other doors will unlock.
The Intelligent
key can also be used to activate the panic alarm by pressing and holding \
the
button
05 for more than 1 second. Once activated, the panic alarm and headlights w\
ill
st
ay on for 25 seconds.
For more information, refer to the “Pre-driving checks and adjustments (section 3)” of your Owner’s Manual.
01
03
04
05
02
02
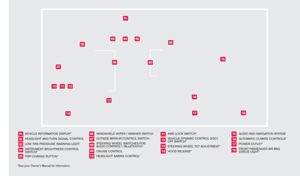
7
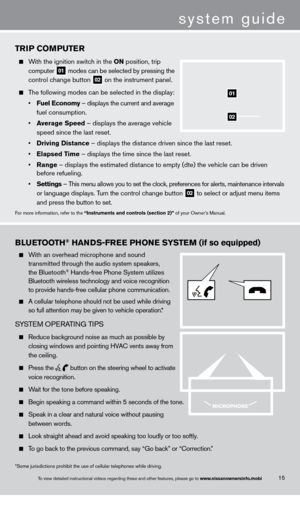
first drive features
03
To view detailed instructional videos regarding these and other features, please go\
to www.nissanownersinfo.mobi
1276461_13c_Rogue_QRG_122112.indd 712/21/12 10:30 AM
Page 10 of 20
:
FO RWARD AND BA
c
k WARD
To move the seat forward or
bac
kward, pull up on the lever
01 under the front of the seat
and")
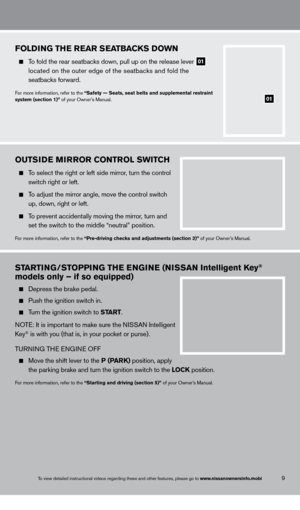
FroNT SeaT a DJuSTMeNTS
with manual seats (if so equipped):
FO RWARD AND BA
c
k WARD
To move the seat forward or
bac
kward, pull up on the lever
01 under the front of the seat
and slide the seat forward or
bac
kward. Release the lever to lock the seat in position.
SEAT LIFTER (if so equipped for driver’s seat)
To adjust the seat height, pull up or push down on the adjusting lever
02 repeatedly.
RE
cL
INING
To adjust your seatback forward or backward, lift the lever
03 on the side of the seat;
release the lever when you have found a comfort
able angle and the seat belt fits properly.
w
ith power seats (if so equipped):
To adjust the seat cushion forward or backward, move
the control switc
h
04 forward or backward.
SEAT LIFTER (if so equipped for driver’s seat)
To adjust the front portion of the driver’s seat cushion,
pull up or press down on the front of the control switc
h
a .
To raise or lower the rear portion of the driver’s seat cushion, pull up or press down on the
rear of the control switc
h
B .
RE
cL
INING
To move the seatback forward, push the adjusting switch
05 forward; to move the seatback
bac
kward, pull it back.
LUMBAR SUPPORT (driver’s seat, if so equipped)
To adjust the lumbar support, push the adjusting switch
06 repeatedly.
For more information, refer to the “Safety — Seats, seat belts and supplemental restraint system (se\
ction 1)” of your
Owner’s Manual.
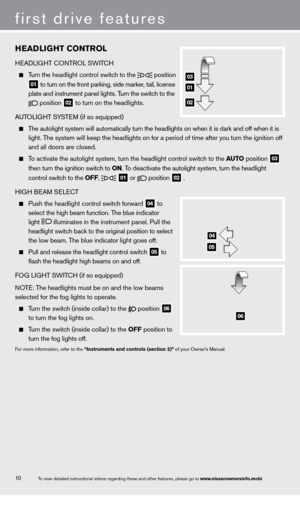
Fol
DiNG THe F ro NT Pa SSeN Ge r ’S SeaT Do w N (if so equipped)
To fold the front passenger’s seatback down for extra
storage length when transporting long items:
Lift up on the recline lever
01 , located on the outside
edge of the seat and fold the seatbac k forward as far
as it will go.
To return the seatback to a seating position, lift the
front passenger’s seatback to an upright position.
For more information, refer to the “Safety — Seats, seat belts and
supplemental restraint system (section 1)” of your Owner’s Manual.
0405
06
first drive features
8
01
0203
aB
01
To view detailed instructional videos regarding these and other features, please go\
to www.nissanownersinfo.mobi
1276461_13c_Rogue_QRG_122112.indd 812/21/12 10:30 AM
Page 11 of 20

ouTSiDe Mi rror C o NT rol S wi TCH
To select the right or left side mirror, turn the control
switc
h right or left.
To adjust the mirror angle, move the control switch
up, down, right or left.
To prevent accidentally moving the mirror, turn and
set the switc
h to the middle “neutral” position.
For more information, refer to the “Pre-driving checks and adjustments (section 3)” of your Owner’s Manual.
STarT iNG/STo PP iN G THe eN GiNe (NiS S a N i ntelligent Key®
models only – if so equipped)
Depress the brake pedal.
Push the ignition switc h in.
Turn the ignition switch to STar T.
NOTE: It is important to make sure the NISSAN Intelligent
k
ey
® is with you (that is, in your pocket or purse).
TURNING THE ENGINE OFF
Move the shift lever to the P (ParK) position, apply
the parking brake and turn the ignition switch to the lo CK position.
For more information, refer to the “Starting and driving (section 5)” of your Owner’s Manual.
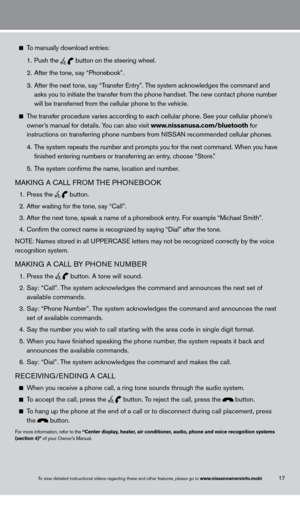
FolDiNG THe rear SeaTBaCK S Do w N
To fold the rear seatbacks down, pull up on the release lever
01
located on the outer edge of the seatbac
ks and fold the
seatbac
ks forward.
For more information, refer to the “Safety — Seats, seat belts and supplemental restraint
system (section 1)” of your Owner’s Manual.
9
01
To view detailed instructional videos regarding these and other features, please go\
to www.nissanownersinfo.mobi
1276461_13c_Rogue_QRG_122112.indd 912/21/12 10:30 AM
Page 12 of 20

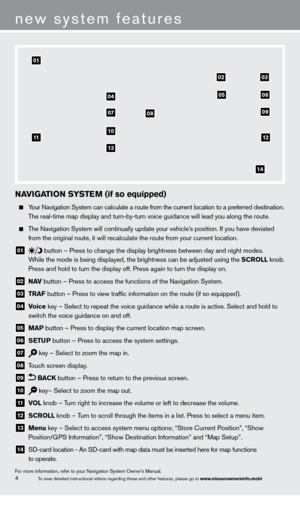
HeaDliGHT C o NT rol
HEADLIGHT
c
O
NTROL SWIT
cH
Turn the headlight control switch to the
position
01 to turn on the front parking, side marker, tail, license
plate and instrument panel lights. T urn the switch to the
position
02 to turn on the headlights.
AUTOLIGHT SYSTEM (if so equipped)
The autolight system will automatically turn the headlights on when it is\
dark and off when it is
light. T
he system will keep the headlights on for a period of time after you tur\
n the ignition off
and all doors are closed.
To activate the autolight system, turn the headlight control switch to the auTo position
03
t
hen turn the ignition switch to
o
N. To deactivate the autolight system, turn the headlight
control switc
h to the
o
FF,
01 or
position
02 .
HIGH BEAM SELE
cT
Push the headlight control switc h forward
04 to
select the high beam function. T
he blue indicator
light illuminates in the instrument panel. Pull the
headlight switc
h back to the original position to select
the low beam. T
he blue indicator light goes off.
Pull and release the headlight control switc h
05 to
flash the headlight high beams on and off.
FO
G LIGHT SWIT
cH (if so equipped)
N
OTE: The headlights must be on and the low beams
selected for the fog lights to operate.
Turn the switch (inside collar) to the
position
06
to turn the fog lights on.
Turn the switch (inside collar) to the
o FF position to
turn the fog lights off.
For more information, refer to the “instruments and controls (section 2)” of your Owner’s Manual.
first drive features
10
04
05
06
01
03
02
To view detailed instructional videos regarding these and other features, please go\
to www.nissanownersinfo.mobi
1276461_13c_Rogue_QRG_122112.indd 1012/21/12 10:30 AM
Page 13 of 20
 - One sweep operation of the
front wipers.")
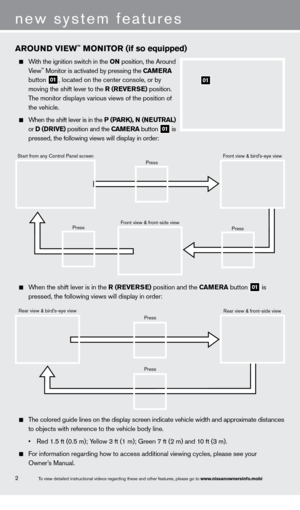
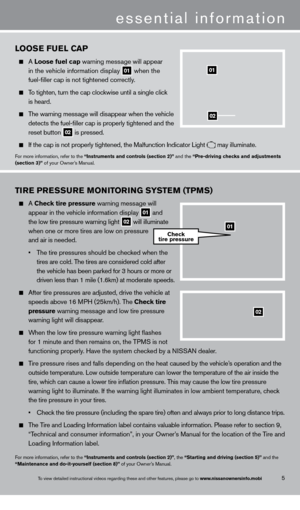
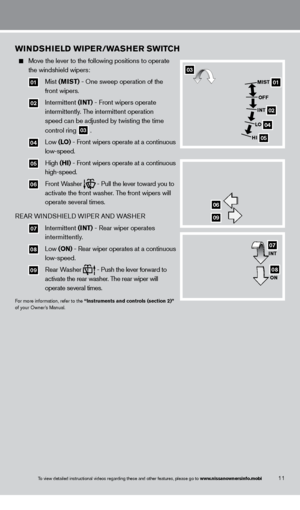
wiNDSHielD wi Per /w aSH er Sw iT CH
Move the lever to the following positions to operate
the windshield wipers:
01 Mist (MiST) - One sweep operation of the
front wipers.
02 Intermittent ( iNT) - Front wipers operate
intermittently
. The intermittent operation
speed can be adjusted by twisting the time
control ring
03 .
04 Low ( lo ) - Front wipers operate at a continuous
low-speed.
05 High (Hi ) - Front wipers operate at a continuous
high-speed.
06 Front Washer - Pull the lever toward you to
activate the front washer
. The front wipers will
operate several times.
RE
AR WINDSHIELD WIPER AND WASHER
07 Intermittent ( iNT) - Rear wiper operates
intermittently.
08 Low ( o N) - Rear wiper operates at a continuous
low-speed.
09 Rear Washer - Push the lever forward to
activate the rear washer . The rear wiper will
operate several times.
For more information, refer to the “instruments and controls (section 2)”
of your Owner ’s Manual.
11
03
01
02
04
05
MiST
o
FF
iNT
lo
H
i
06
09
iNT
o
N07
08
To view detailed instructional videos regarding these and other features, please go\
to www.nissanownersinfo.mobi
1276461_13c_Rogue_QRG_122112.indd 1112/21/12 10:30 AM
Page 14 of 20

01 FaN SP eeD C o NT rol Dial
Turn the fan speed control dial to the left (lo) or right (Hi ) to control fan speed.
02 T")
first drive features
12
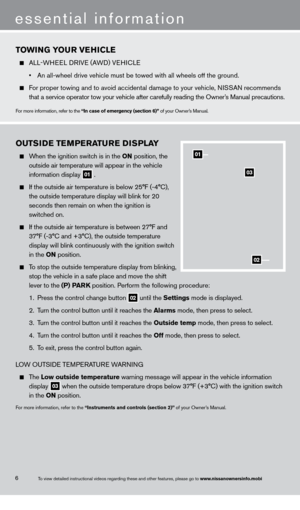
MaNual C liM aT e C o NT rol S (if so equipped)
01 FaN SP eeD C o NT rol Dial
Turn the fan speed control dial to the left (lo) or right (Hi ) to control fan speed.
02 TeM P eraT ure C o NT rol Dial
Turn the temperature control dial to set the desired temperature. Turn the control dial to the left for cooler air or right for warmer air.
03 air F low C o NT rol Dial
Turn the dial to select the following air flow outlets:
Air flows from center and side vents with maximum cooling (air condit\
ioning).
Air flows from the center and side vents.
Air flows from the center , side and foot vents.
Air flows mainly from the foot vents.
Air flows from the defroster and foot vents.
Air flows mainly from the defroster vents.
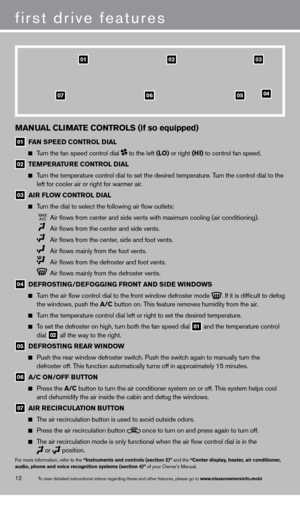
04 DeF ro ST iN G/DeFo GGiN G F ro NT a ND SiDe wiN Do w S
Turn the air flow control dial to the front window defroster mode
. If it is difficult to defog
the windows, push the
a
/C button on. This feature removes humidity from the air.
Turn the temperature control dial left or right to set the desired temper\
ature.
To set the defroster on high, turn both the fan speed dial 01 and the temperature control
dial 02 all the way to the right.
05 DeF ro ST iN G rear wiN Do w
Push the rear window defroster switc h. Push the switch again to manually turn the
defroster off. This function automatically turns off in approximately 15 minutes.
06 a /C o N/ o FF Bu TTo N
Press the a
/C button to turn the air conditioner system on or off. This system helps cool
and dehumidify the air inside the cabin and defog the windows.
07 air reC irC ulaT io N Bu TTo N
The air recirculation button is used to avoid outside odors.
Press the air recirculation button
once to turn on and press again to turn off.
The air recirculation mode is only functional when the air flow control\
dial is in the
or
position.For more information, refer to the “instruments and controls (section 2)” and the “Center display, heater, air conditioner,
audio, phone and voice recognition systems (section 4)” of your Owner’s Manual.
010302
05040607
To view detailed instructional videos regarding these and other features, please go\
to www.nissanownersinfo.mobi
1276461_13c_Rogue_QRG_122112.indd 1212/21/12 10:30 AM
Page 15 of 20

01 V OL/ON•OFF CONTROL KNOB
Press the
VOL/ON•OFF control knob to turn the system on or off.
Turn the VOL/ON")
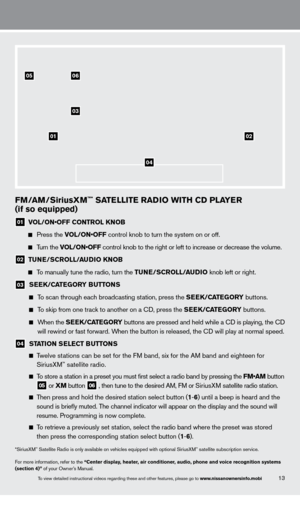
FM/aM/SiriusXM™* SaTelli T e ra Di o wi TH CD P laY er
(if so equipped)
01 V OL/ON•OFF CONTROL KNOB
Press the
VOL/ON•OFF control knob to turn the system on or off.
Turn the VOL/ON•OFF control knob to the right or left to increase or decrease the volume.
02 TuNe/ SC roll /a uDi o KNo B
To manually tune the radio, turn the T uNe/ SC roll /a uDi o knob left or right.
03 SeeK/CaT eGorY Bu TTo NS
To scan through each broadcasting station, press the Se eK/CaT eGorY buttons.
To skip from one track to another on a cD, press the Se eK/CaT eGorY buttons.
When the SeeK/CaT eGorY buttons are pressed and held while a cD is playing, the cD
w
ill rewind or fast forward. When the button is released, the c
D will play at normal speed.
04 STaTio N Se leC T Bu TTo NS
Twelve stations can be set for the FM band, six for the AM band and eighteen for
SiriusX
M™ satellite radio.
To store a station in a preset you must first select a radio band by pressing the FM•AM button
05 or XM button
06 , then tune to the desired AM, FM or SiriusX M satellite radio station.
Then press and hold the desired station select button (1 -6 ) until a beep is heard and the
sound is briefly muted. T
he channel indicator will appear on the display and the sound will
r
esume. Programming is now complete.
To retrieve a previously set station, select the radio band where the preset was stored
then press the corresponding st
ation select button (1-6 ).
*SiriusXM™ Satellite Radio is only available on vehicles equipped with optional Siri\
usXM™ satellite subscription service.
For more information, refer to the “Center display, heater, air conditioner, audio, phone and voice recognition systems
(section 4)” of your Owner’s Manual.
01
03
0506
02
04
13To view detailed instructional videos regarding these and other features, please go\
to www.nissanownersinfo.mobi
1276461_13c_Rogue_QRG_122112.indd 1312/21/12 10:30 AM
Page 16 of 20

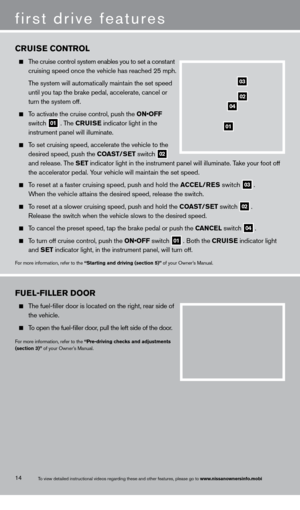
CruiSe C o NT rol
The cruise control system enables you to set a constant
cruising speed once the vehicle has reac
hed 25 mph.
T
he system will automatically maintain the set speed
until you t
ap the brake pedal, accelerate, cancel or
turn the system off.
To activate the cruise control, push the ON•OFF
switc
h
01 . The Crui S e indicator light in the
instrument panel will illuminate.
To set cruising speed, accelerate the vehicle to the
desired speed, push the
C oa ST/S
e
T switch
02
and release. T
he Se
T indicator light in the instrument panel will illuminate. Take your foot off
the accelerator pedal. Y
our vehicle will maintain the set speed.
To reset at a faster cruising speed, push and hold the aC Cel/ re S switch
03 .
When the vehicle attains the desired speed, release the switch.
To reset at a slower cruising speed, push and hold the C oa ST/Se T switch
02 .
Release the switch when the vehicle slows to the desired speed.
To cancel the preset speed, tap the brake pedal or push the Ca NC el switch
04 .
To turn off cruise control, push the ON•OFF switch 01 . Both the Crui S e indicator light
and Se
T indicator light, in the instrument panel, will turn off.
For more information, refer to the “Starting and driving (section 5)” of your Owner’s Manual.
03
02
01
04
Fuel-Filler Door
The fuel-filler door is located on the right, rear side of
the vehicle.
To open the fuel-filler door, pull the left side of the door.
For more information, refer to the “Pre-driving checks and adjustments
(section 3)” of your Owner’s Manual.
14
first drive features
To view detailed instructional videos regarding these and other features, please go\
to www.nissanownersinfo.mobi
1276461_13c_Rogue_QRG_122112.indd 1412/21/12 10:30 AM