Page 17 of 28

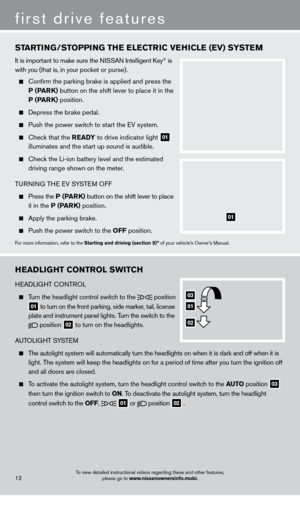
01 POwe r Bu TTON
Press the
button to turn the audio system on or off.
02 V OL uMe Bu TTON
Press the volume control b")
FM/aM/SiriusXM* SaTeLLIT e ra DIO w ITH CD PL aY er (if so equipped)
01 POwe r Bu TTON
Press the
button to turn the audio system on or off.
02 V OL uMe Bu TTON
Press the volume control button up
to increase or down
to decrease the volume .
03 TuNe/ Se eK/CH Bu TTON
To manually tune the radio, press the Tu
N e /S ee K/CH button up
or down
.
To scan quickly and stop at the previous or next broadcast station, press the
T
u
N e /S ee K/CH button for more than 1.5 seconds.
For SiriusXM Satellite Radio, press the Tu N e /S ee K/CH button to switch to the first
channel of the previous or next category
.
To change tracks on a CD, press the Tu N e /S ee K/CH button.
To fast forward or rewind a track on a CD, press and hold the Tu N e /S ee K/CH button.
04 PreSe T STaTI ON/CH a NNeL Ke YS
Twelve stations can be set for the FM band, six for the AM band and eighteen for
SiriusXM Satellite Radio .
To store a station in a preset you must first select a radio band by pressing the FM•AM 05
or XM
button
06 , then tune to the desired AM, FM or SiriusXM Satellite Radio station .
Now, select and hold the desired preset key (1-6) to store the selected station in memory .
To retrieve a previously set station, select the radio band where it was stored. Then select the corresponding preset key (1-6) .
07 OPeN /TILT Bu TTON
To insert a CD, press the OP eN /TILT button and the monitor will open. Insert a CD into the
slot with the label side facing up.
To close the monitor, press the OP eN /TILT button again.
08 ZerO e MISSION B uT TON
Press the
Z erO e MISSION button to display a menu screen where several electric
vehicle driving functions can be set.
*SiriusXM Satellite Radio is only available on vehicles equipped with optional SiriusXM Satellite Radio subscription service.
For more information, refer to the “Getting started (section 1)” and “
audio system (section 4)”
of your Navigation System
Owner’s Manual
.
02
01
03
0807
04
05
06
15To view detailed instructional videos regarding these and other features, please go to www.nissanownersinfo.mobi.
1275820_13_Leaf_QRG_Text-Insert_121912.indd 1512/19/12 10:11 AM
Page 18 of 28

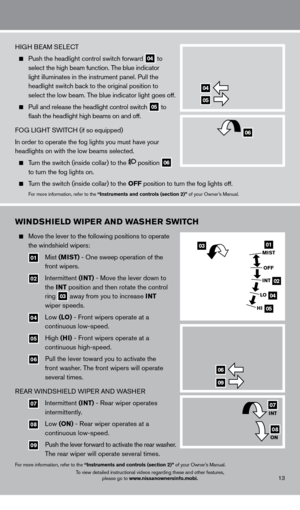
The cruise control system enables you to set a
constant cruising speed once the vehicle has
reached 25 MPH (40 km/h)
.
The system will automatically mainta")
CruISe CONT rOL (if so equipped)
The cruise control system enables you to set a
constant cruising speed once the vehicle has
reached 25 MPH (40 km/h)
.
The system will automatically maintain the set speed
until you t
ap the brake pedal, accelerate, cancel or
turn the system off
.
To activate the cruise control, push the Cru IS e
ON
/OFF switch
01 . The Cru IS e indicator light
in the instrument panel will illuminate .
To set cruising speed, accelerate the vehicle to the desired speed, push \
the COa ST/Se T
switc
h
02 and release . Take your foot off the accelerator pedal . Your vehicle will maintain
the set speed .
To reset at a faster cruising speed, push and hold the aC Ce L/ re S switch
03 .
When the vehicle attains the desired speed, release the switch
.
To reset at a slower cruising speed, push and hold the COa ST/Se T switch
02 .
Release the switch when the vehicle slows to the desired speed
.
To cancel the preset speed, push the Ca NC eL switch
04 .
To turn off cruise control, push the C ruI Se ON/OFF switch
01 . The Cru IS e indicator
light in the instrument panel will turn off
.
For more information, refer to the “Starting and driving (section 5)” of your Owner’s Manual .
first drive features
To view detailed instructional videos regarding these and other features,
please go to www.nissanownersinfo.mobi.16
03
02
01
04
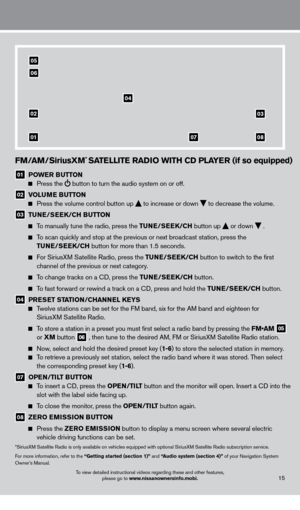
uSB/iPOD® INTerFaC e
The USB jack
01 is located on the instrument panel,
below the climate controls.
When a compatible USB memory device or iPod®
is plugged into the USB jack, compatible audio files
stored on the device can be played through the
vehicle’s audio system
.
For more information, refer to the “Heater, air conditioner, audio and phone systems (section 4)” of your Owner’s Manual,
and “audio systems (section 4)” of your Navigation System Owner’s Manual .
01
1275820_13_Leaf_QRG_Text-Insert_121912.indd 1612/19/12 10:11 AM
Page 19 of 28

To view detailed instructional videos regarding these and other features, please go to www.nissanownersinfo.mobi.17
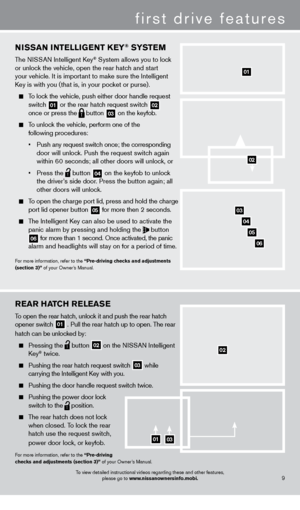
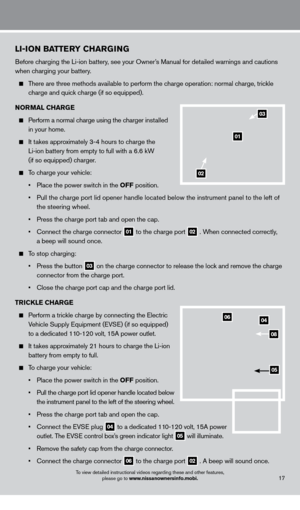
LI-ION BaTT erY CH arG ING
Before charging the Li-ion battery, see your Owner’s Manual for detailed warnings and cautions
when charging your battery.
There are three methods available to perform the charge operation: normal charge, trickle
c
harge and quick charge (if so equipped) .
N
O r
M
a L CH ar
Ge
Perform a normal charge using the charger installed
in your home
.
It takes approximately 3-4 hours to charge the
Li-ion battery from empty to full with a 6.6 kW
(if so equipped) c
harger
.
To charge your vehicle:
•
Place the power switc
h in the OFF position
.
•
Pull the c
harge port lid opener handle located below the instrument panel to the left of
the steering wheel
.
•
Press the c
harge port tab and open the cap.
•
Connect the c
harge connector
01 to the charge port
02 . When connected correctly,
a beep will sound once.
To stop charging:
•
Press the button 03 on the charge connector to release the lock and remove the charge
connector from the c
harge port .
•
Close the c
harge port cap and the charge port lid.
T
r
I
CKL
e
CH
ar
Ge
Perform a trickle charge by connecting the Electric
V
ehicle Supply Equipment (EVSE) (if so equipped)
to a dedicated 11
0-120 volt, 15A power outlet .
It takes approximately 21 hours to charge the Li-ion
battery from empty to full.
To charge your vehicle:
•
Place the power switc
h in the OFF position
.
•
Pull the c
harge port lid opener handle located below
the instrument panel to the left of the steering wheel
.
•
Press the c
harge port tab and open the cap.
•
Connect the EV
SE plug
04 to
a dedicated 110-120 volt, 15A power
outlet. T
he EVSE control box’s green indicator light 05 will illuminate .
•
Remove the s
afety cap from the charge connector
.
•
Connect the c
harge connector
06 to the charge port
02 . A beep will sound once .
04
08
06
05
01
02
03
1275820_13_Leaf_QRG_Text-Insert_121912.indd 1712/19/12 10:11 AM
Page 20 of 28

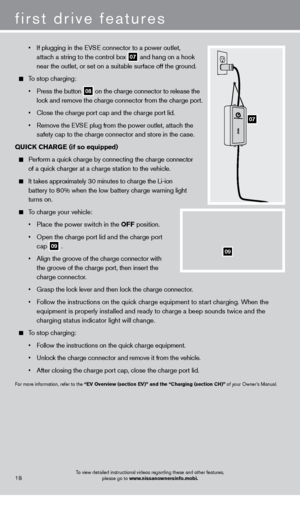
• If plugging in the EV SE connector to a power outlet,
attach a string to the control box
07 and hang on a hook
near the outlet, or set on a suitable surface off the ground.
To stop charging:
•
Press the button 08 on the charge connector to release the
loc
k and remove the charge connector from the charge port .
•
Close the c
harge port cap and the charge port lid.
•
Remove the EV
SE plug from the power outlet, attach the
s
afety cap to the charge connector and store in the case .
Q
u
I
CK CH
ar
Ge
(if so equipped)
Perform a quick charge by connecting the charge connector
of a quick charger at a charge station to the vehicle .
It takes approximately 30 minutes to charge the Li-ion
battery to 8
0% when the low battery charge warning light
turns on
.
To charge your vehicle:
•
Place the power switc
h in the OFF position
.
•
Open the c
harge port lid and the charge port
cap
09 .
•
Align the groove of the c
harge connector with
the groove of the charge port, then insert the
charge connector
.
•
Grasp the loc
k lever and then lock the charge connector.
•
F
ollow the instructions on the quick charge equipment to start charging. When the
equipment is properly inst
alled and ready to charge a beep sounds twice and the
c
harging status indicator light will change .
To stop charging:
•
F
ollow the instructions on the quick charge equipment.
•
Unloc
k the charge connector and remove it from the vehicle.
•
After closing the c
harge port cap, close the charge port lid.
For more information, refer to the “eV Overview (section eV)” and the “Charging (section CH)” of your Owner’s Manual .
first drive features
To view detailed instructional videos regarding these and other features, please go to www.nissanownersinfo.mobi.18
09
07
1275820_13_Leaf_QRG_Text-Insert_121912.indd 1812/19/12 10:11 AM
Page 21 of 28

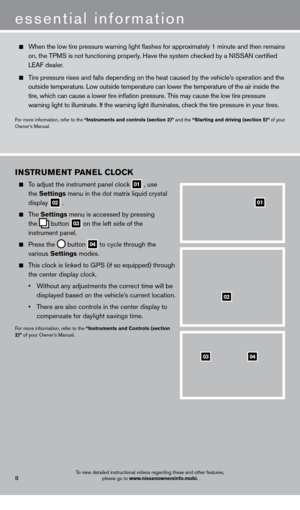
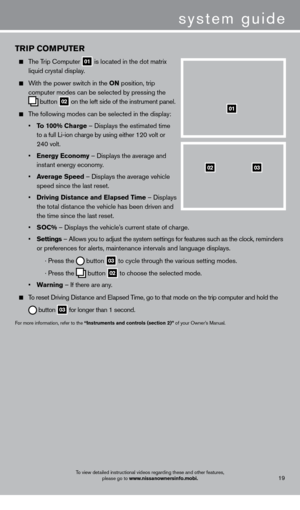
TrIP COMPu T er
The Trip Computer
01 is located in the dot matrix
liquid cryst
al display .
With the power switch in the ON position, trip
computer modes can be selected by pressing the
button
02 on the left side of the instrument panel .
The following modes can be selected in the display:
•
T
o 100% Charge – Displays the estimated time
to a full Li-ion c
harge by using either 120 volt or
24
0 volt .
•
e
nergy e conomy – Displays the average and
inst
ant energy economy
.
•
a
verage Speed
– Displays the average vehicle
speed since the last reset
.
•
Driving Distance and
e lapsed Time – Displays
the tot
al distance the vehicle has been driven and
the time since the last reset
.
•
S
OC% – Displays the vehicle’s current state of charge .
•
Settings
– Allows you to adjust the system settings for features such as the clock, reminders
or preferences for alerts, maintenance intervals and language displays
.
· Press the button
03 to cycle through the various setting modes .
· Press the button
02 to choose the selected mode .
•
w
arning
– If there are any
.
To reset Driving Distance and Elapsed Time, go to that mode on the trip computer and hold the
button 03 for longer than 1 second .
For more information, refer to the “Instruments and controls (section 2)” of your Owner’s Manual .
0302
01
system guide
To view detailed instructional videos regarding these and other features,
please go to www.nissanownersinfo.mobi.19
1275820_13_Leaf_QRG_Text-Insert_121912.indd 1912/19/12 10:11 AM
Page 22 of 28

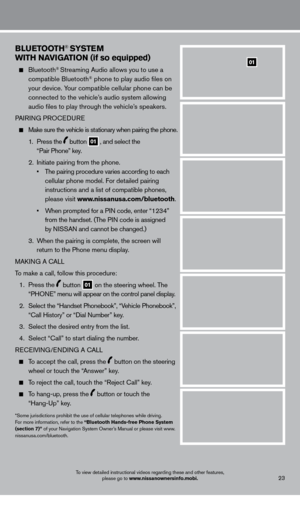
BLueTOOTH® HaNDS-Free PHONe SYST eM
A cellular telephone should not be used while driving
so full attention may be given to vehicle operation. *
SYSTEM OPERATING TIPS
The “Help” command can be used to hear a list of
available commands at any time.
Reduce bac kground noise as much as possible by
closing windows and pointing HVAC vents away from
the ceiling
.
Say commands after the tone, or press the
button to say a command at any time.
Speak naturally without long pauses and without
raising your voice .
When speaking Phonebook names, please be aware some phones require the last name to be spoken before the first name. For example, “Michael
Smith” may be spoken as “Smith Michael”.
To cancel a voice recognition session, simply wait 5 seconds, say “Cancel” or “Quit,” or press and hold the
button for 5 seconds.
To increase or decrease the volume of the voice prompts, push the volume \
control switches
+ or -
on the steering wheel or turn the control dial on the audio system while\
the audio system
is responding
.
If the Voice Recognition system does not recognize your voice commands, train the system using the Voice Adaptation Mode . See your Owner’s Manual for detailed information .
For more detailed information and instructions, see your cellular phone Owner’s Manual and visit www.nissanusa.com/bluetooth .
*Some jurisdictions prohibit the use of cellular telephones while driving.
BLue TOOTH® SYSTeM w ITHO u T NaVI G aTI ON (if so equipped)
CONNECTING PROCEDURE
The vehicle must be stationary when connecting
the phone .
1
. Press the
button on the steering wheel. The
system announces the available commands.
2
.
S
ay: “Connect phone” . The system
acknowledges the command and announces the
next set of available commands.
3
.
S
ay: “Add phone” . The system acknowledges the
command and asks you to initiate connecting from
the phone handset
.
system guide
To view detailed instructional videos regarding these and other features, please go to www.nissanownersinfo.mobi.20
Bluetooth®
Controls
Microphone
1275820_13_Leaf_QRG_Text-Insert_121912.indd 2012/19/12 10:11 AM
Page 23 of 28

To view detailed instructional videos regarding these and other features, please go to www.nissanownersinfo.mobi.21
4 . Initiate connecting from the phone:
•
T
he connecting procedure varies according to each cellular phone model . For detailed
connecting instructions and compatible phones, please visit www.nissanusa.com/bluetooth
.
•
W
hen prompted for a PIN code, enter “1234” from the handset . (The PIN code is
assigned by NISSAN and cannot be changed.)
5
.
S
ay a name for the phone when the system asks you to provide one . You can give the
phone a name of your choice
.
PHON
EBOOK SETUP
The phonebook stores up to 1,000 names for each phone paired with the system.
Depending on your cell phone, the system may automatically download your\
cell phone’ s
entire phonebook to the vehicle’
s Bluetooth® system .
If the phonebook does not download automatically , entries can be individually downloaded.
To manually download entries:
1
.
Push the
button on the steering wheel.
2.
After the tone, s ay “Phonebook”.
3
.
After the next tone, s
ay “Transfer Entry” . The system acknowledges the command and
asks you to initiate the transfer from the phone handset. The new contact phone number
will be transferred from the cellular phone to the vehicle.
•
T
he transfer procedure varies according to each cellular phone. See your cellular phone’s
owner’s manual for details
. You can also visit www.nissanusa.com/bluetooth for
instructions on transferring phone numbers from NISSAN recommended cellular phones.
4.
T
he system repeats the number and prompts you for the next command. When you have
finished entering numbers or transferring an entry
, choose “Store.”
5.
T
he system confirms the name, location and number.
MAKING A CALL FROM THE PHONEBOOK
In some cases, names stored using all U PPERCASE letters may not be recognized by
the voice recognition system
.
1
.
Press the
button.
2
. After waiting for the tone, s ay “Call” .
3.
After the next tone, speak a name of a phonebook entry
. For example “Michael Smith”.
4.
Once you have confirmed the name and location the system begins
the call.
MAKING A CALL BY PHONE NUMBER
1
.
Press the
button. A tone will sound. 2
. S
ay: “Call”
.
The system acknowledges the command and announces the next set of
available commands.
3.
S
ay: “Phone Number”. The system acknowledges the command and announces the next
set of available commands.
4.
S
ay the number you wish to call starting with the area code in single digit format.
5.
W
hen you have finished speaking the phone number, the system repeats it back and
announces the available commands.
6
.
S
ay: “Dial”
.
The system acknowledges the command and makes the call .
1275820_13_Leaf_QRG_Text-Insert_121912.indd 2112/19/12 10:11 AM
Page 24 of 28
system guide
To view detailed instructional videos regarding these and other features, please go to www.nissanownersinfo.mobi.22
RECEIVING/ENDING A CALL
When you receive a phone call, a ring tone sounds through the audio syste\
m .
To accept the call, press the button.
To reject the call, press the button.
To hang up the phone at the end of a call or to disconnect during call pl\
acement,
press the
button.
For more information, refer to the “Heater, air conditioner, audio and phone systems (section 4)” of your Owner’s Manual or
please visit www.nissanusa.com/bluetooth.
1275820_13_Leaf_QRG_Text-Insert_121912.indd 2212/19/12 10:11 AM