Page 61 of 402

– Do not use if a malfunction occursor if charger has been damaged in
any manner. Return to a NISSAN
certified LEAF dealer for replace-
ment.
– The charger contains no user ser- viceable parts. Do not attempt to
repair the charger, doing so will void
your warranty.
Pass the lower side belt of the EVSE
(Electric Vehicle Supply Equipment)
case securely through the fastener on
the bottom of the luggage board. If the
case suddenly becomes loose, it may
cause serious injury or death.
CAUTION
Only charge using a standard 110 - 120 volt, 15A dedicated electrical outlet
(For example do not use an electric
generator) . Failure to do so may cause
charging to fail and could cause dam-
age to the Li-ion battery charging
equipment due to power surges.
NISSAN recommends using genuine NISSAN charging equipment to charge
the vehicle. Using non-NISSAN equip-
ment could cause the Li-ion battery to
not charge correctly and may damage
the Li-ion battery.
Trickle charging is performed using an AC 110 - 120 volt, 15A dedicated electrical outlet using
the EVSE (Electric Vehicle Supply Equipment)
provided with the vehicle.
The genuine NISSAN EVSE (Electric Vehicle Supply Equipment) charging equipment or
trickle charge cable performs a communication
function with the vehicle before Li-ion charging
starts. If this communication does not occur
because other equipment is used, the Li-ion
battery will not charge. Immediate charge, charging timer and remote
charge (models with navigation system) can be
performed in the trickle charge mode. See
�Charging timer� and�Charging related remote
function�.
CH-12Charging
Page 70 of 402
CHARGING TIMER
Use charging timer to schedule when the Li-ion
battery charges. The vehicle automatically begins
charging at the scheduled times when the charge
connector is connected to the vehicle. The timers
do not need to be reset each time the Li-ion
battery needs charging.
With navigation system
The charging timer can save two timer settings
that include the charging start time and end time.
The charging timer can be applied to one of the
timer settings for each day of the week.1. Push the Zero Emission button
and
touch [Charging Timer]. 2. Touch [Set Timer 1] or [Set Timer 2]. The
following procedure explains Timer 1 setting.
CHARGING METHODS
ChargingCH-21
Page 72 of 402
![NISSAN LEAF 2013 1.G Owners Manual 7. The [Timer 1] indicator illuminates after thecharging timer is set. Use the same procedure
to set the Timer 2 setting.
8. Place the power switch in the OFF position, and then connect the charge con](/manual-img/5/325/w960_325-71.png "NISSAN LEAF 2013 1.G Owners Manual 7. The [Timer 1] indicator illuminates after thecharging timer is set. Use the same procedure
to set the Timer 2 setting.
8. Place the power switch in the OFF position, and then connect the charge con")
7. The [Timer 1] indicator illuminates after thecharging timer is set. Use the same procedure
to set the Timer 2 setting.
8. Place the power switch in the OFF position, and then connect the charge connector to the
vehicle.
NOTE:
Always place the power switch in the OFF
position after setting the charging timers.
When the power switch is in the ON posi-
tion, the Li-ion battery will not start charg-
ing.
The Li-ion battery may not be charged to
the expected level if the charging timer start time and end time are set so there is
not enough time to charge the Li-ion bat-
tery.
When either the charge start time or
charge end time is set, the charging timer
function is activated.
When only the charging timer end time is
set, the system automatically determines
when to begin charging based on the Li-
ion battery charge level. The Li-ion battery
may not be charged to the expected level
in the following conditions: – The Li-ion battery is charged in cold weather.
– The charge connector is connected to the vehicle too close to the scheduled
charging end time.
When only the charging timer end time is
set, the system automatically stops charg-
ing when the Li-ion battery charges to the
selected level. Charging may stop before
the scheduled end time.
Touch [Timer 1] or [Timer 2] to turn off the
charging timer function. Touch [Yes] if the
settings shown on the screen are correct.
After this operation has been performed,
the indicator disappears and the charging timer function is turned off. The start and
stop time settings are not deleted, even if
the charging timer function is turned off.
If charging timer and the Climate Ctrl.
Timer are operating at the same time due
to an overlap of the timer settings, you can
prioritize which function receives electri-
cal power first. See LEAF Navigation Sys-
tem Owner’s Manual.
When charging is set as the first priority,
the Climate Ctrl. Timer does not start until
10 segments of the Li-ion battery avail-
able charge gauge are illuminated.
When the climate control is set as the first
priority, the climate control system will be
turned on as scheduled by the Climate
Ctrl. Timer regardless of the remaining
battery energy.
Even when the climate control is set as
the first priority, the climate control sys-
tem will be turned off when the electric
demands of the climate control system is
more than can be provided to the Li-ion
battery for charging.
Some charging stations used to perform
normal charge are equipped with timer
functions. If the charger timer function
ChargingCH-23
Page 73 of 402

and the vehicle timer are both set, and the
two timers are not set to operate at the
same time, it is possible that the charger
will not start or the battery will not be
charged to the level expected.
If the Li-ion battery warmer is operating
while the Climate Ctrl. Timer or Remote
Climate Control is being used, perfor-
mance of the Climate Control will be re-
duced.
The Li-ion battery may not charge to the
expected level using the Charging Timer
When a Start time and End time are set
while the Li-ion battery warmer operates.
Set only the Charging Timer End time
when charging in cold weather. The ve-
hicle automatically determines when to
start charging to fully charge the Li-ion
battery, even if the Li-ion battery warmer
operates. Charging ends before the set
End time if the Li-ion battery is fully
charged.
The 12-volt battery can become dis-
charged if the charging timer is operated
repeatedly between the Li-ion battery
charges while the vehicle is not used for
an extended period of time.
Without navigation system
1. Push theswitch�Aon the left side of
the combination meter panel. 2. Push the
switch�Bto highlight “Charg-
ing Timer” on the dot matrix liquid crystal
display and then push the switch.
CH-24Charging
Page 75 of 402
LONG LIFE MODE
Use the default setting, long distance mode
(100% charge) to maximize vehicle range. Use
the long life mode to help maximize the Li-ion
battery useful life.
The long life mode is set by changing the [%
Charge] to [80% Charge (Improves Battery Lon-
gevity)] using the following procedure.
How to set long life mode with
charging timer (models with navigation
system)
To set the long life mode of the charging timer,
use the following procedure:
1.
Push the(Zero Emission menu) button .2. Touch [Charging Timer].
CH-26Charging
Page 77 of 402
8. Touch [Yes] if the settings shown on thescreen are correct. 9. The [Timer 1] or [Timer 2] indicator illuminates
after the charging timer is set.
How to set long life mode without
charging timer (models with navigation
system)
Long life mode can be set using the following
charging method:
remote charge
immediate charge
quick charge
CH-28Charging
Page 79 of 402
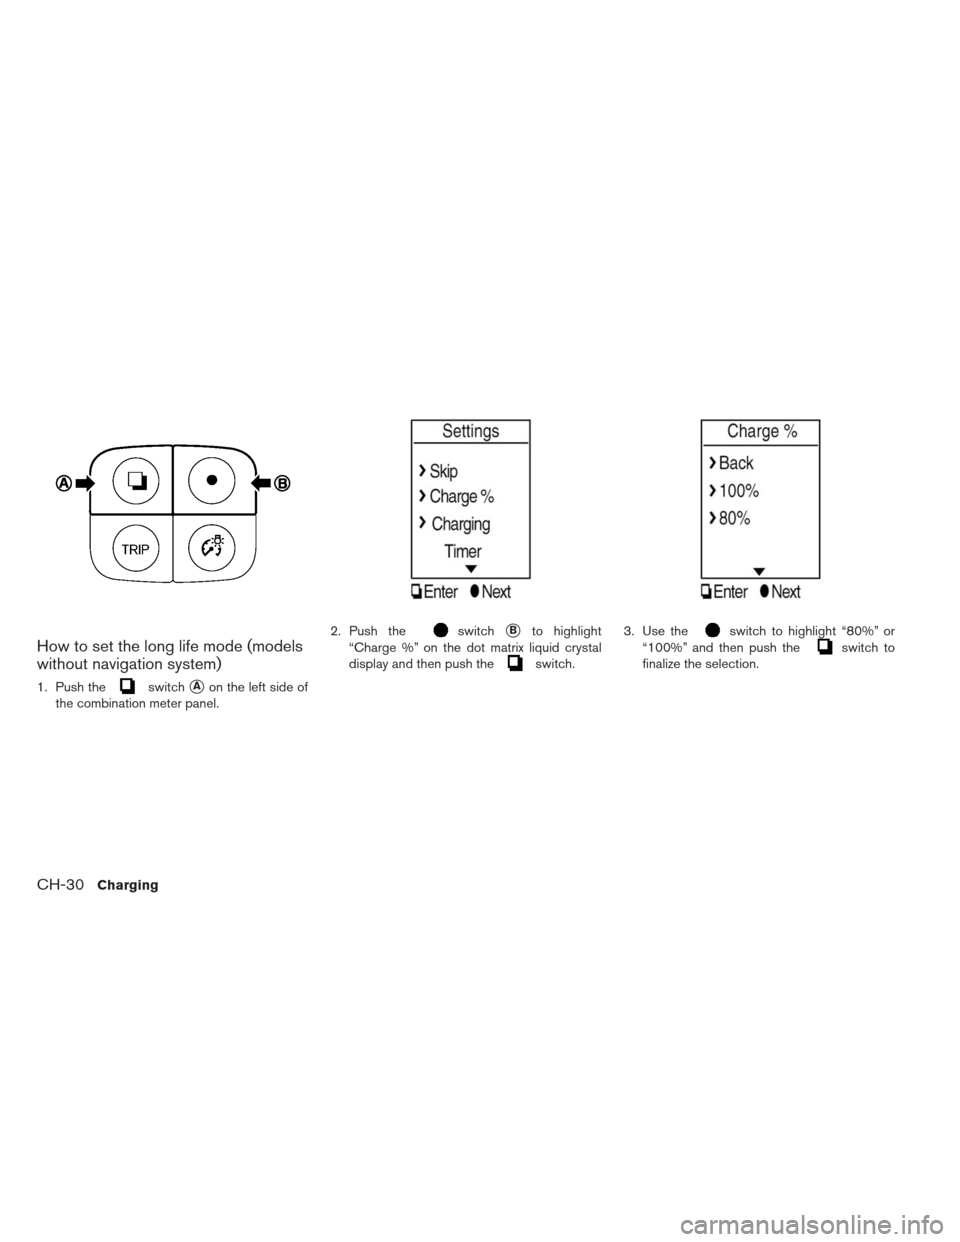
How to set the long life mode (models
without navigation system)
1. Push theswitch�Aon the left side of
the combination meter panel. 2. Push the
switch�Bto highlight
“Charge %” on the dot matrix liquid crystal
display and then push the
switch. 3. Use the
switch to highlight “80%” or
“100%” and then push the
switch to
finalize the selection.
CH-30Charging
Page 80 of 402

IMMEDIATE CHARGE
When a charging timer is not turned on, charging
automatically starts when a normal or trickle
charge connector is connected to the vehicle.
Use the immediate charge mode anytime you
want to start charging when a charging timer is
turned on by performing the following:
1. Place the power switch in the OFF position.
2. Press the immediate charge switch.
3. Connect the normal or trickle charge cablewhen the charging status indicator light changes to display immediate charge mode.
See
�Charging status indicator light�.
NOTE:
You have 15 minutes to connect a normal
or trickle charge connector to the vehicle
after the immediate charge switch is
pressed. If a charge connector is not con-
nected to the vehicle within 15 minutes,
the vehicle automatically returns to the
previous setting.
Immediate charge will be available for 15
minutes before returning automatically to
the previous setting.
To cancel immediate charge mode press
the immediate charge switch again.
If charge cable is disconnected, the Li-ion
battery automatically switches to charg-
ing timer. To perform an immediate
charge again, press the immediate charge
switch and connect charge cable.
If the charge cable is already connected,
press the immediate charge switch to
start performing an immediate charge.
CHARGING RELATED REMOTE
FUNCTION (MODELS WITH
NAVIGATION SYSTEM)
This vehicle incorporates a communication de-
vice that is called a TCU (Telematics Communi-
cation Unit) . The communication connection be-
tween this unit and NISSAN CARWINGS™ Data
Center allows for various remote function ser-
vices.
Li-ion battery status check:
The charging status of the Li-ion battery can
be checked using your personal computer or
internet enabled smart phone even if you are
not in the vehicle.
Remote charge:
The function of starting Li-ion battery charge
or starting the heater and air conditioner is
available using your personal computer or in-
ternet enabled smart phone.
Unplugged status:
A notification e-mail will be sent to your per-
sonal computer or internet enabled smart
phone if the plug is not connected at the
certain time you selected, after you turning off
the power switch in registered place.
ChargingCH-31

 to maximize vehicle range. Use
the long life mode to help maximize the Li-ion
battery useful life.
The long life mode is set by")
![NISSAN LEAF 2013 1.G Owners Manual 8. Touch [Yes] if the settings shown on thescreen are correct. 9. The [Timer 1] or [Timer 2] indicator illuminates
after the charging timer is set.
How to set long life mode without
charging timer (mo](/manual-img/5/325/w960_325-76.png "NISSAN LEAF 2013 1.G Owners Manual 8. Touch [Yes] if the settings shown on thescreen are correct. 9. The [Timer 1] or [Timer 2] indicator illuminates
after the charging timer is set.
How to set long life mode without
charging timer (mo")