2013 NISSAN LEAF navigation system
[x] Cancel search: navigation systemPage 53 of 275
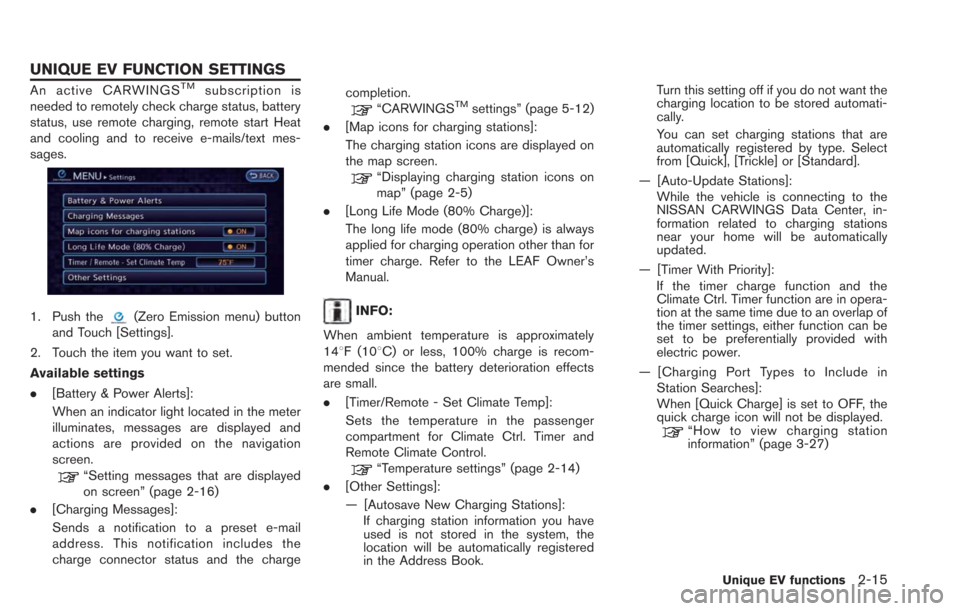
An active CARWINGSTMsubscription is
needed to remotely check charge status, battery
status, use remote charging, remote start Heat
and cooling and to receive e-mails/text mes-
sages.
1. Push the(Zero Emission menu) button
and Touch [Settings].
2. Touch the item you want to set.
Available settings
. [Battery & Power Alerts]:
When an indicator light located in the meter
illuminates, messages are displayed and
actions are provided on the navigation
screen.
“Setting messages that are displayed
on screen” (page 2-16)
. [Charging Messages]:
Sends a notification to a preset e-mail
address. This notification includes the
charge connector status and the charge completion.
“CARWINGSTMsettings” (page 5-12)
. [Map icons for charging stations]:
The charging station icons are displayed on
the map screen.
“Displaying charging station icons on
map” (page 2-5)
. [Long Life Mode (80% Charge)]:
The long life mode (80% charge) is always
applied for charging operation other than for
timer charge. Refer to the LEAF Owner’s
Manual.
INFO:
When ambient temperature is approximately
148F (108C) or less, 100% charge is recom-
mended since the battery deterioration effects
are small.
. [Timer/Remote - Set Climate Temp]:
Sets the temperature in the passenger
compartment for Climate Ctrl. Timer and
Remote Climate Control.
“Temperature settings” (page 2-14)
. [Other Settings]:
— [Autosave New Charging Stations]:
If charging station information you have
used is not stored in the system, the
location will be automatically registered
in the Address Book. Turn this setting off if you do not want the
charging location to be stored automati-
cally.
You can set charging stations that are
automatically registered by type. Select
from [Quick], [Trickle] or [Standard].
— [Auto-Update Stations]: While the vehicle is connecting to the
NISSAN CARWINGS Data Center, in-
formation related to charging stations
near your home will be automatically
updated.
— [Timer With Priority]: If the timer charge function and the
Climate Ctrl. Timer function are in opera-
tion at the same time due to an overlap of
the timer settings, either function can be
set to be preferentially provided with
electric power.
— [Charging Port Types to Include in Station Searches]:
When [Quick Charge] is set to OFF, the
quick charge icon will not be displayed.
“How to view charging station
information” (page 3-27)
Unique EV functions2-15
UNIQUE EV FUNCTION SETTINGS
Page 54 of 275
![NISSAN LEAF 2013 1.G Navigation Manual 2-16Unique EV functions
INFO:
For vehicles without the quick charge port,
NISSAN recommends turning off the quick
charging station icons by setting [Quick Charge]
to OFF.
SETTING MESSAGES THAT ARE
DIS NISSAN LEAF 2013 1.G Navigation Manual 2-16Unique EV functions
INFO:
For vehicles without the quick charge port,
NISSAN recommends turning off the quick
charging station icons by setting [Quick Charge]
to OFF.
SETTING MESSAGES THAT ARE
DIS](/manual-img/5/324/w960_324-53.png)
2-16Unique EV functions
INFO:
For vehicles without the quick charge port,
NISSAN recommends turning off the quick
charging station icons by setting [Quick Charge]
to OFF.
SETTING MESSAGES THAT ARE
DISPLAYED ON SCREEN
When an indicator light located in the meter
illuminates, messages are displayed and actions
are provided on the navigation screen.
1. Touch [Battery & Power Alerts].
2. Touch the item you want to set. The indicator of the selected item is illuminated.
Available settings
. [Use All Battery & Power Alerts]:
Displays all information on the navigation
screen. .
[Limited Power]:
Displays a message on the navigation
screen when the power limitation indicator
light illuminates in the meter.“Limited Power Notice” (page 2-17)
. [Low Battery]:
Displays the Low Battery message when the
low battery charge warning light
illumi-
nates in the meter.
“Low Battery” (page 2-17)
. [Dest. out of Range]:
Displays a message on the navigation
screen to inform the driver that the battery
should be charged soon. This will be
indicated if the estimated driving range is
less than the remaining distance to the
destination when a route to the destination
is set.
“Charge recommendation guidance”
(page 2-16)
BATTERY AND POWER INFORMA-
TION
For detail information about the warning/indica-
tor lights, see the LEAF Owner’s Manual.
Charge recommendation guidance
If the remaining driving range is less than the
distance to the destination that is entered while
setting the route, the system displays a message
on the navigation screen that recommends
battery charging.
1. The notification is displayed on the upper left
side of the screen. Touch [Show] to display
the detailed information screen.
Page 55 of 275
![NISSAN LEAF 2013 1.G Navigation Manual 2. The system displays a message screen andannounces the contents of the message to
recommend battery charging. Check the
message displayed on the screen.
Touch [Nearby Charging Station] to search
all NISSAN LEAF 2013 1.G Navigation Manual 2. The system displays a message screen andannounces the contents of the message to
recommend battery charging. Check the
message displayed on the screen.
Touch [Nearby Charging Station] to search
all](/manual-img/5/324/w960_324-54.png)
2. The system displays a message screen andannounces the contents of the message to
recommend battery charging. Check the
message displayed on the screen.
Touch [Nearby Charging Station] to search
all charging stations that are located near
the current vehicle position.
“Finding charging station” (page 3-25)
3. Touch [BACK] or push the MAPbutton to
return to the current location map screen.
INFO:
. The charge recommendation guidance can
be set to off.
“Setting messages that are displayed
on screen” (page 2-16)
. When the route is changed to avoid a traffic
jam or the possible driving distance indi-
cated in the meter is changed, the charge
recommendation guidance is displayed again.
Low Battery
When the Low battery charge warning lightand the master warning light (yellow)illuminate, the system displays a message on
the navigation screen that notices the driver that
the Li-ion battery charge is low.
1. The notification is displayed on the upper left
side of the screen. Touch [Show] to display
the detailed information screen.
2. The system displays a message screen andannounces the contents of the message to
warn that the Li-ion battery charge is low.
Check the message displayed on the
screen.
Touch [Nearby Charging Station] to search
all charging stations that are located near
the current vehicle position.
“Finding charging station” (page 3-25)
3. Touch [BACK] or push the MAPbutton to
return to the vehicle location screen.
INFO:
. The Low Battery message display can be
set to off.
“Setting messages that are displayed
on screen” (page 2-16)
. When the Li-ion battery charge is low, the
system automatically obtains charging sta-
tion information.
Limited Power Notice
When the power limitation indicatorand the
master warning light (yellow)illuminate, the
system displays a message on the navigation
screen that notices the driver that power output
is restricted for various reasons. See LEAF
Owner’s Manual for details of the indicator/
Unique EV functions2-17
Page 62 of 275
3-6Navigation
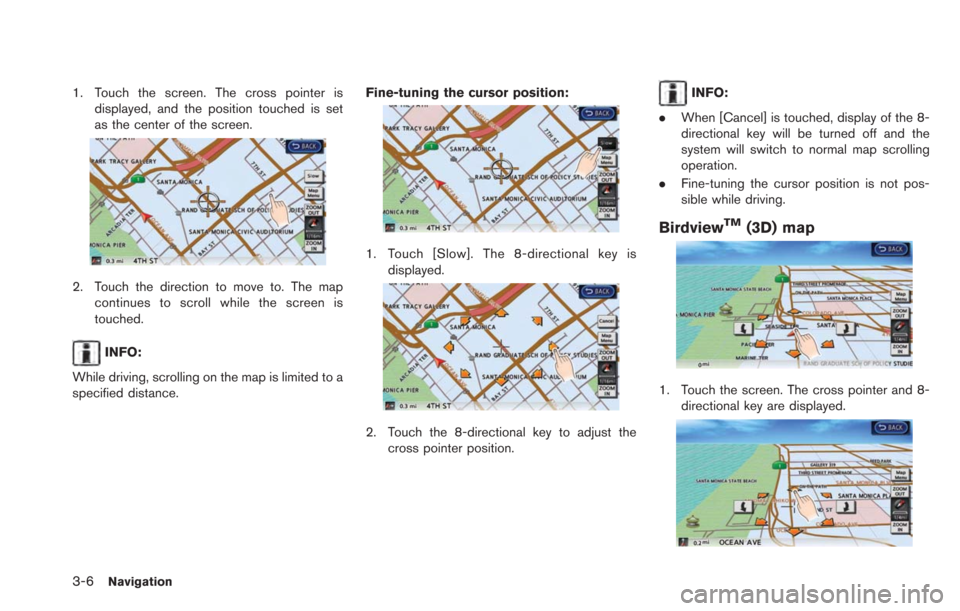
1. Touch the screen. The cross pointer isdisplayed, and the position touched is set
as the center of the screen.
2. Touch the direction to move to. The mapcontinues to scroll while the screen is
touched.
INFO:
While driving, scrolling on the map is limited to a
specified distance. Fine-tuning the cursor position:
1. Touch [Slow]. The 8-directional key is
displayed.
2. Touch the 8-directional key to adjust thecross pointer position.
INFO:
. When [Cancel] is touched, display of the 8-
directional key will be turned off and the
system will switch to normal map scrolling
operation.
. Fine-tuning the cursor position is not pos-
sible while driving.
BirdviewTM(3D) map
1. Touch the screen. The cross pointer and 8-
directional key are displayed.
Page 72 of 275
3-16Navigation
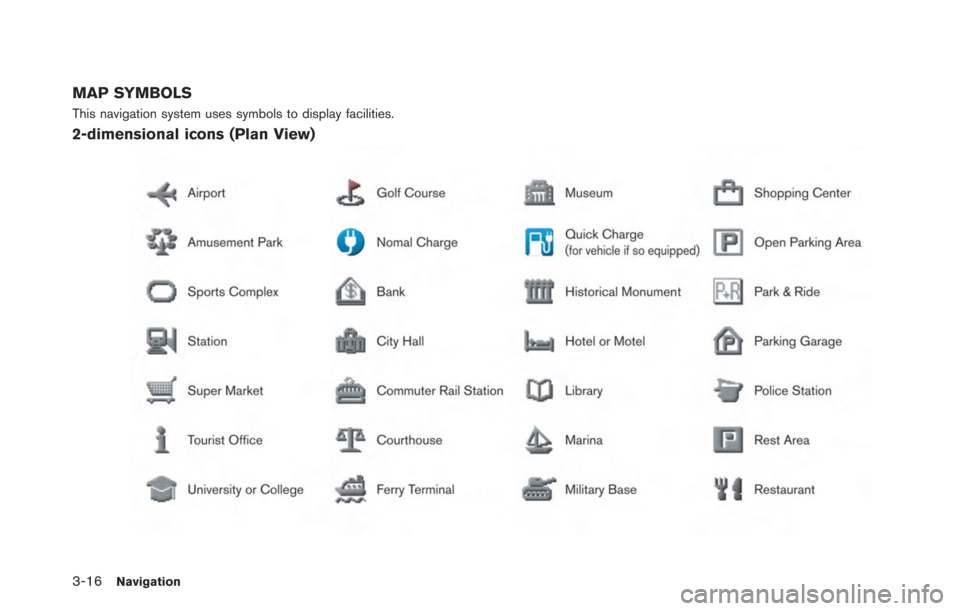
MAP SYMBOLS
This navigation system uses symbols to display facilities.
2-dimensional icons (Plan View)
Page 74 of 275
![NISSAN LEAF 2013 1.G Navigation Manual 3-18Navigation
.[Home]:
Searches for a route from the current
location to the previously stored home
destination.
“Setting home as destination”
(page 3-24)
. [Charging Stations]:
Searches for char NISSAN LEAF 2013 1.G Navigation Manual 3-18Navigation
.[Home]:
Searches for a route from the current
location to the previously stored home
destination.
“Setting home as destination”
(page 3-24)
. [Charging Stations]:
Searches for char](/manual-img/5/324/w960_324-73.png)
3-18Navigation
.[Home]:
Searches for a route from the current
location to the previously stored home
destination.
“Setting home as destination”
(page 3-24)
. [Charging Stations]:
Searches for charging stations located near
the current vehicle location.
“Finding charging station” (page 3-25)
. [POIs powered by GoogleTM]:
Key words can be searched for using
Google.
“Google search” (page 5-10)
. [Address Book]:
Searches for a destination from the list of the
stored locations.
“Searching from address book”
(page 3-28)
. [Previous Destinations]:
Sets the previous starting point as the
destination. Searches for the destination
from the previous destinations.
“Searching from history” (page 3-28)
. [Nearby Points of Interest]:
Searches for points of interest near the
current vehicle location, such as restaurants
and charging stations, etc.
“Finding nearby Points of Interest”
(page 3-29)
Available settings (next page screen)
. [ Google(TM) Send-To-Car]:
Searches for a destination using Google
Maps.
“Using Google Map” (page 3-30)
. [Route Planner]:
Sets a route plan downloaded from the
NISSAN Owner’s Portal Website.
“Using route planner” (page 3-31)
. [Stored Routes]:
Selects a stored route.
“Setting from stored routes”
(page 3-31)
. [Phone Number]:
Searches for a point of interest by a
telephone number.
“Setting by phone number”
(page 3-32)
. [Intersection]:
Searches for a destination from an intersec-
tion.
“Setting intersection” (page 3-32)
. [City Center]:
Sets the center of a city as the destination.
“Setting city center” (page 3-34) .
[Freeway Entrance/Exit]:
Searches for a destination from a freeway
entrance/exit.
“Setting freeway entrance/exit”
(page 3-35)
INFO:
. If the required battery power level may be
insufficient when the destination is set, the
system provides guidance to any available
charging stations.
. If setting a destination when the Li-ion
battery power level may be insufficient to
reach the set destination, the information for
charging stations is displayed, allowing you
to set a charging station as the destination.
CHANGING REGION
When setting a destination, the location can be
narrowed down by specifying the region or city.
Page 76 of 275
3-20Navigation
INFO:
In some cases, when a city name has been
entered, the number of matching destinations in
the “Matches” column may be different from the
number displayed on the list screen. If this
occurs, enter more characters to further reduce
the number of matches.
FINDING ADDRESS
When the address of the destination is known,
use the following method to enter the address
and then have the system calculate a route. A
location near the preferred destination can also
be searched by entering the house number if the
map data contains the relevant data.
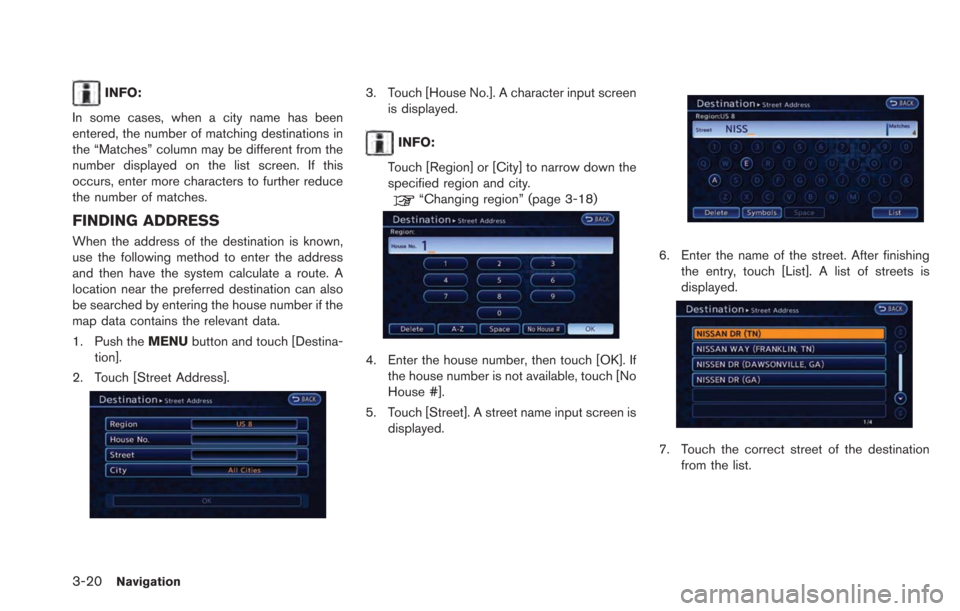
1. Push the MENUbutton and touch [Destina-
tion].
2. Touch [Street Address].
3. Touch [House No.]. A character input screen is displayed.
INFO:
Touch [Region] or [City] to narrow down the
specified region and city.
“Changing region” (page 3-18)
4. Enter the house number, then touch [OK]. If the house number is not available, touch [No
House #].
5. Touch [Street]. A street name input screen is displayed.
6. Enter the name of the street. After finishingthe entry, touch [List]. A list of streets is
displayed.
7. Touch the correct street of the destination
from the list.
Page 77 of 275
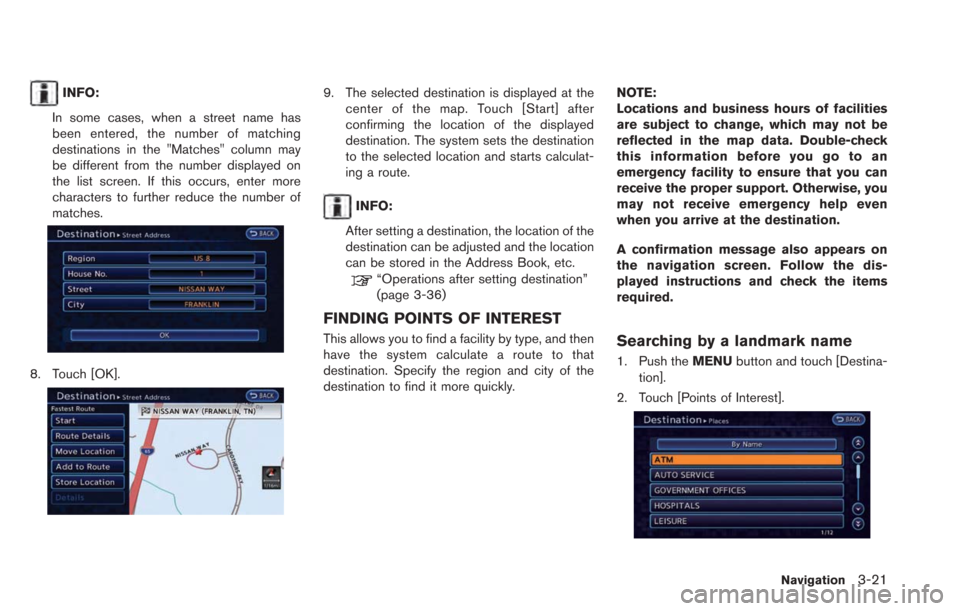
INFO:
In some cases, when a street name has
been entered, the number of matching
destinations in the "Matches" column may
be different from the number displayed on
the list screen. If this occurs, enter more
characters to further reduce the number of
matches.
8. Touch [OK].
9. The selected destination is displayed at the center of the map. Touch [Start] after
confirming the location of the displayed
destination. The system sets the destination
to the selected location and starts calculat-
ing a route.
INFO:
After setting a destination, the location of the
destination can be adjusted and the location
can be stored in the Address Book, etc.
“Operations after setting destination”
(page 3-36)
FINDING POINTS OF INTEREST
This allows you to find a facility by type, and then
have the system calculate a route to that
destination. Specify the region and city of the
destination to find it more quickly. NOTE:
Locations and business hours of facilities
are subject to change, which may not be
reflected in the map data. Double-check
this information before you go to an
emergency facility to ensure that you can
receive the proper support. Otherwise, you
may not receive emergency help even
when you arrive at the destination.
A confirmation message also appears on
the navigation screen. Follow the dis-
played instructions and check the items
required.Searching by a landmark name
1. Push the
MENUbutton and touch [Destina-
tion].
2. Touch [Points of Interest].
Navigation3-21