2013 NISSAN GT-R Low battery
[x] Cancel search: Low batteryPage 160 of 346
button - releasing when the device begins to
activate.
5. If the indicator light on HomeLink
®blinks
rapidly for two seconds and then turns solid,
HomeLink
®has picked up a “rolling code”
garage door opener signal. You will need to
proceed with the next steps to train
HomeLink
®, completing the programming
may require a ladder and another person
for convenience.
6. Push and release the program button located on the garage door opener’s motor
to activate the “training mode”. This button is
usually located near the antenna wire that
hangs down from the motor. If the wire
originates from under a light lens, you will
need to remove the lens to access the
training button.
NOTE:
Once you have pushed and released
the training button on the garage door
opener’s motor and the “training light”
is lit, you have 30 seconds in which to
perform step 7. For convenience, use
the help of a second person to assist
when performing this step.
7. Quickly (within 30 seconds of pushing and releasing the garage door opener training
button) and firmly push and release the HomeLink
®button you’ve just programmed.
Push and release the HomeLink®button up
to three times to complete the training.
8. Your HomeLink
®button should now be
programmed. To program the remaining
HomeLink
®buttons for additional door or
gate openers, follow steps 2 through 8 only.
NOTE:
Do not repeat step 1 unless you want to
“clear” all previously programmed
HomeLink
®buttons.
If you have any questions or are having difficulty
programming your HomeLink
®buttons, please
refer to the HomeLink®web site at: www.
homelink.com or call 1-800-355-3515.
PROGRAMMING HomeLink®FOR
CANADIAN CUSTOMERS
Prior to 1992, D.O.C. regulations required
hand-held transmitters to stop transmitting after
2 seconds. To program your hand-held trans-
mitter to HomeLink
®, continue to push and hold
the HomeLink®button (note steps 2 through 4
under “Programming HomeLink®”) while you
push and re-push (“cycle”) your hand-held
transmitter every 2 seconds until the indicator
light flashes rapidly (indicating successful pro-
gramming) . NOTE:
If programming a garage door opener, etc.,
it is advised to unplug the device during
the “cycling” process to prevent possible
damage to the garage door opener com-
ponents.
OPERATING THE HomeLink®UNI-
VERSAL TRANSCEIVER
HomeLink®Universal Transceiver (once pro-
grammed) may now be used to activate the
garage door, etc. To operate, simply push the
appropriate programmed HomeLink
®Universal
Transceiver button. The red indicator light will
illuminate while the signal is being transmitted.
PROGRAMMING TROUBLE-DIAG-
NOSIS
If HomeLink®does not quickly learn the hand-
held transmitter information:
. replace the hand-held transmitter batteries
with new batteries.
. position the hand-held transmitter with its
battery area facing away from the
HomeLink
®surface.
. push and hold both the HomeLink®and
hand-held transmitter buttons without inter-
ruption.
Instruments and controls2-65
Page 163 of 346
3-2Pre-driving checks and adjustments
A key number plate is supplied with your keys.
Record the key number and keep it in a safe
place (such as your wallet), not in the vehicle. If
you lose your keys, see a GT-R certified
NISSAN dealer for duplicates by using the key
number. NISSAN does not record any key
numbers so it is very important to keep track of
your key number plate.
A key number is only necessary when you have
lost all keys and do not have one to duplicate
from. If you still have a key, this key can be
duplicated by a GT-R certified NISSAN dealer.
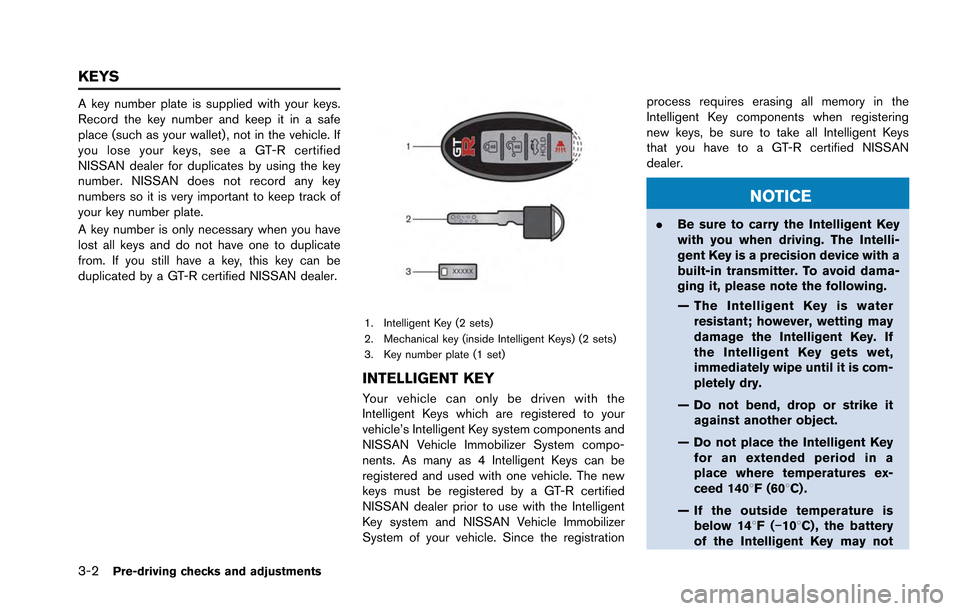
1. Intelligent Key (2 sets)
2. Mechanical key (inside Intelligent Keys) (2 sets)
3. Key number plate (1 set)
INTELLIGENT KEY
Your vehicle can only be driven with the
Intelligent Keys which are registered to your
vehicle’s Intelligent Key system components and
NISSAN Vehicle Immobilizer System compo-
nents. As many as 4 Intelligent Keys can be
registered and used with one vehicle. The new
keys must be registered by a GT-R certified
NISSAN dealer prior to use with the Intelligent
Key system and NISSAN Vehicle Immobilizer
System of your vehicle. Since the registrationprocess requires erasing all memory in the
Intelligent Key components when registering
new keys, be sure to take all Intelligent Keys
that you have to a GT-R certified NISSAN
dealer.
NOTICE
.
Be sure to carry the Intelligent Key
with you when driving. The Intelli-
gent Key is a precision device with a
built-in transmitter. To avoid dama-
ging it, please note the following.
— The Intelligent Key is water
resistant; however, wetting may
damage the Intelligent Key. If
the Intelligent Key gets wet,
immediately wipe until it is com-
pletely dry.
— Do not bend, drop or strike it against another object.
— Do not place the Intelligent Key for an extended period in a
place where temperatures ex-
ceed 1408F (608C) .
— If the outside temperature is below 148F( −108C) , the battery
of the Intelligent Key may not
KEYS
Page 165 of 346
3-4Pre-driving checks and adjustments
WARNING
.Always have the doors locked while
driving. Along with the use of seat
belts, this provides greater safety in
the event of an accident by helping
to prevent persons from being
thrown from the vehicle. This also
helps keep children and others from
unintentionally opening the doors,
and will help keep out intruders.
. Before opening any door, always
look for and avoid oncoming traffic.
. Do not leave children unattended
inside the vehicle. They could un-
knowingly activate switches or con-
trols. Unattended children could
become involved in serious acci-
dents.
CAUTION
To prevent theft or accidents, be sure to
stop the engine and lock the doors
before stepping away from the vehicle.
NOTICE
When the battery cable is removed from
the battery terminal, do not close either
of the front doors. The automatic win-
dow adjusting function will not work,
and the side roof panel may be da-
maged. (
“Automatic adjusting
function” page 2-60)
NOTE:
. The doors of this vehicle are somewhat
harder to close than those of an
ordinary vehicle (especially when the
vehicle is new) . This is because the
stiffness of the rubber has been in-
creased to improve the airtightness of
the vehicle interior during situations
such as higher speed driving. This does
not indicate that there is a malfunction.
. When the driver’s door is locked or
unlocked, the fuel-filler door is auto-
matically locked or unlocked at the
same time.
When the door is being opened, the window is
automatically lowered slightly to avoid contact
between the window and the side roof panel.
When the door is closed, the window is automatically raised slightly. (
“Automatic
adjusting function” page 2-60)
DOORS
Page 173 of 346
3-12Pre-driving checks and adjustments
Opening trunk lid:
1. Push the trunk open request switch
*Afor
more than 1 second.
2. The trunk will unlatch. An outside chime will sound four times.
3. Raise the trunk lid to open the trunk.
NOTE:
. To prevent the Intelligent Key from
being accidentally locked in the trunk,
lockout protection is equipped with the
Intelligent Key system.
. When the trunk lid is closed with the
Intelligent Key inside the trunk, the
outside buzzer will sound and the trunk
will open.
Battery saver system
When all the following conditions are met for 60
minutes, the battery saver system will cut off the
power supply to prevent battery discharge.
.The ignition switch is in the ACC position,
and
. All doors are closed, and
. The shift lever is in the
&Pposition.
REMOTE KEYLESS ENTRY FUNC-
TIONS
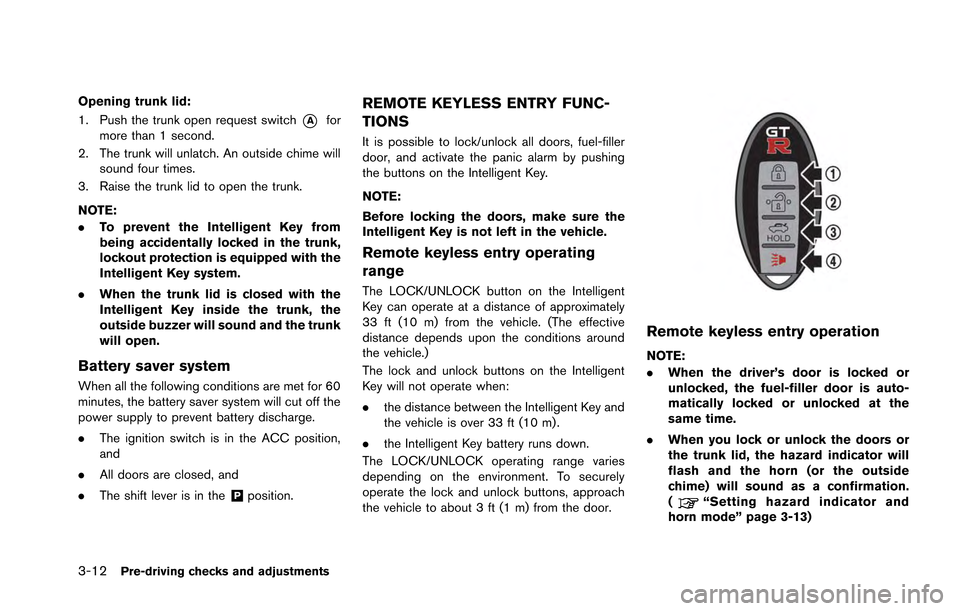
It is possible to lock/unlock all doors, fuel-filler
door, and activate the panic alarm by pushing
the buttons on the Intelligent Key.
NOTE:
Before locking the doors, make sure the
Intelligent Key is not left in the vehicle.
Remote keyless entry operating
range
The LOCK/UNLOCK button on the Intelligent
Key can operate at a distance of approximately
33 ft (10 m) from the vehicle. (The effective
distance depends upon the conditions around
the vehicle.)
The lock and unlock buttons on the Intelligent
Key will not operate when:
.the distance between the Intelligent Key and
the vehicle is over 33 ft (10 m) .
. the Intelligent Key battery runs down.
The LOCK/UNLOCK operating range varies
depending on the environment. To securely
operate the lock and unlock buttons, approach
the vehicle to about 3 ft (1 m) from the door.
Remote keyless entry operation
NOTE:
. When the driver’s door is locked or
unlocked, the fuel-filler door is auto-
matically locked or unlocked at the
same time.
. When you lock or unlock the doors or
the trunk lid, the hazard indicator will
flash and the horn (or the outside
chime) will sound as a confirmation.
(
“Setting hazard indicator and
horn mode” page 3-13)
Page 183 of 346
3-22Pre-driving checks and adjustments
.Do not leave the key inside the
trunk.
NOTE:
. To prevent the Intelligent Key from
being accidentally locked in the trunk,
lockout protection is equipped with the
Intelligent Key system. When the trunk
lid is closed with the Intelligent Key
inside the trunk, the outside buzzer will
sound and the trunk will open.
. The trunk of this vehicle is slightly
more difficult to close than an ordinary
vehicle (particularly when the vehicle is
new) . This is because the trunk rigidity
has been increased to handle the high
load on the rear spoiler during vehicle
operation. This does not indicate that
there is a malfunction. Check that the
trunk is securely locked.
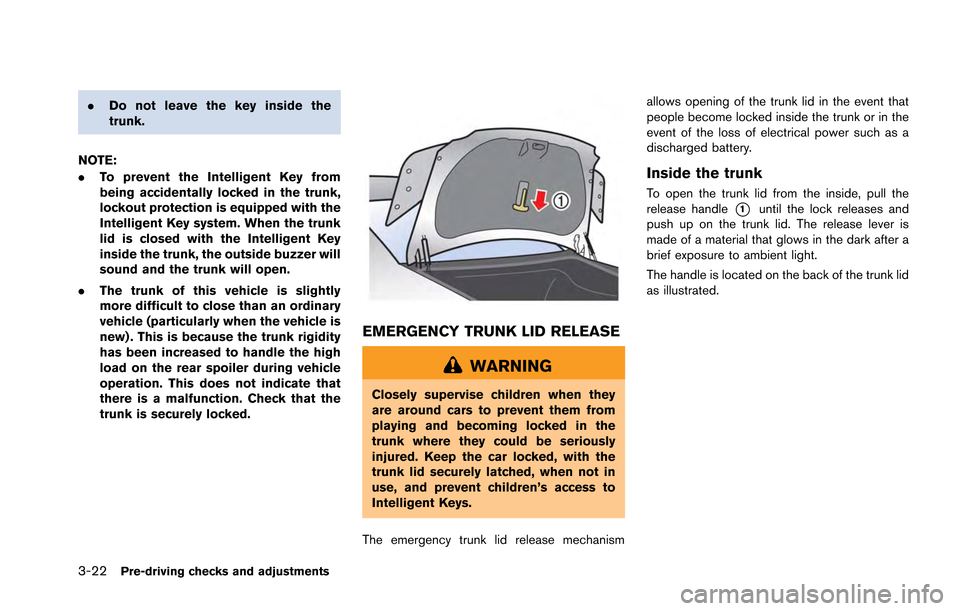
EMERGENCY TRUNK LID RELEASE
WARNING
Closely supervise children when they
are around cars to prevent them from
playing and becoming locked in the
trunk where they could be seriously
injured. Keep the car locked, with the
trunk lid securely latched, when not in
use, and prevent children’s access to
Intelligent Keys.
The emergency trunk lid release mechanism allows opening of the trunk lid in the event that
people become locked inside the trunk or in the
event of the loss of electrical power such as a
discharged battery.
Inside the trunk
To open the trunk lid from the inside, pull the
release handle
*1until the lock releases and
push up on the trunk lid. The release lever is
made of a material that glows in the dark after a
brief exposure to ambient light.
The handle is located on the back of the trunk lid
as illustrated.
Page 198 of 346
Your vehicle has also been equipped with a
TPMS malfunction indicator to indicate when the
system is not operating properly. The TPMS
malfunction indicator is combined with the low
tire pressure telltale. When the system detects a
malfunction, the telltale will flash for approxi-
mately one minute and then remain continuously
illuminated. This sequence will continue upon
subsequent vehicle start-ups as long as the
malfunction exists. When the malfunction indi-
cator is illuminated, the system may not be able
to detect or signal low tire pressure as intended.
TPMS malfunctions may occur for a variety of
reasons, including the installation of replace-
ment or alternate tires or wheels on the vehicle
that prevent the TPMS from functioning properly.
Always check the TPMS malfunction telltale
after replacing one or more tires or wheels on
your vehicle to ensure that the replacement or
alternate tires and wheels allow the TPMS to
continue to function properly.Additional information
.The TPMS will activate only when the
vehicle is driven at speeds above 16 MPH
(25 km/h) . Also, this system may not detect
a sudden drop in tire pressure (for example a
flat tire while driving) .
. The low tire pressure warning light does not
automatically turn off when the tire pressure
is adjusted. After the tire is inflated to the
recommended pressure, the vehicle must be
driven at speeds above 16 MPH (25 km/h)
to activate the TPMS and turn off the low tire
pressure warning light. Use a tire pressure
gauge to check the tire pressure.
. Tire pressure rises and falls depending on
the heat caused by the vehicle’s operation
and the outside temperature. Low outside
temperature can lower the temperature of
the air inside the tire which can cause a
lower tire inflation pressure. Altitude can
also affect tire pressure. These may cause
the low tire pressure warning light to
illuminate. If the warning light illuminates,
check the tire pressure for all four tires.
. GT-R vehicles are delivered from the factory
with nitrogen-filled tires. For best perfor-
mance, NISSAN recommends that GT-R
owners maintain their vehicles by using nitrogen for tire inflation. Because nitrogen
is more stable than compressed air, it is less
prone to pressure fluctuation resulting from
temperature variations. If nitrogen is not
available, compressed air may be safely
used under normal driving conditions. How-
ever, NISSAN recommends refilling with
Nitrogen for maximum tire performance.
. The Tire and Loading Information label (also
referred to as the vehicle placard or tire
inflation pressure label) is located in the
driver’s door opening.
. You can also check the pressure of all tires
on the multi function display. Refer to the
separate Multi Function Display Owner’s
Manual.
. The tire pressure sensor should be reset
anytime the wheels or tires are removed or
replaced.
. If the tire is removed in order to replace the
tire pressure sensor battery, it may not be
possible to reuse the removed tire from the
wheel. To replace the tire pressure sensor
battery, contact a GT-R certified NISSAN
dealer.
Starting and driving5-5
Page 204 of 346
NOTE:
.If the steering lock release malfunction
indicator appears on the vehicle infor-
mation display when the ignition
switch is pressed, press the ignition
switch again while gently turning the
steering wheel left and right.
(
“Steering lock release malfunc-
tion indicator” page 2-42)
. If the shift
&Pwarning appears on the
vehicle information display when the
ignition switch is pushed, the shift lever
is in any position except the
&Pposi-
tion. Move the shift lever to the&Pposition. (“Shift “P” warning”
page 2-42)
. If the Intelligent Key battery discharge
indicator appears on the vehicle infor-
mation display, the Intelligent Key
battery is discharged and the ignition
switch will not operate. Insert the
Intelligent Key into the key port to
operate the ignition switch.
(
“Intelligent Key battery discharge
indicator” page 2-43)
. When all of the following conditions
are met for 60 minutes, the battery
saver system will cut off the power
supply to prevent battery discharge. —
The ignition switch is in the ACC
position, and
— All doors are closed, and
— The shift lever is in the
&Pposition.
. Do not leave the vehicle with the
ignition switch in the ACC or ON
position when the engine is not run-
ning for an extended period of time.
This can discharge the battery.
EMERGENCY ENGINE SHUT OFF
To shut off the engine in an emergency situation
while driving, perform the following procedure:
.Rapidly push the push-button ignition switch
3 consecutive times in less than 1.5
seconds, or
. Push and hold the push button ignition
switch for more than 2 seconds.
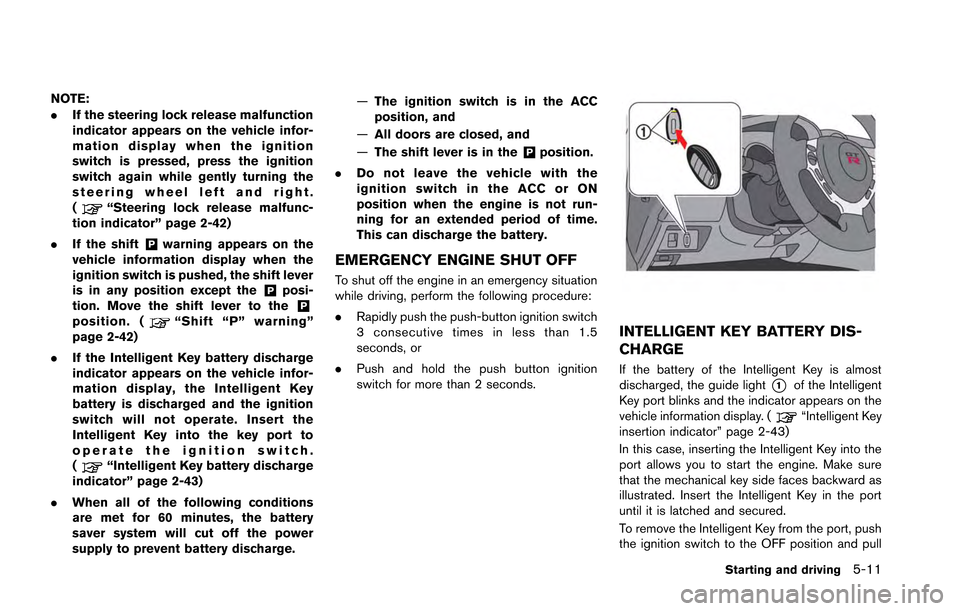
INTELLIGENT KEY BATTERY DIS-
CHARGE
If the battery of the Intelligent Key is almost
discharged, the guide light
*1of the Intelligent
Key port blinks and the indicator appears on the
vehicle information display. (
“Intelligent Key
insertion indicator” page 2-43)
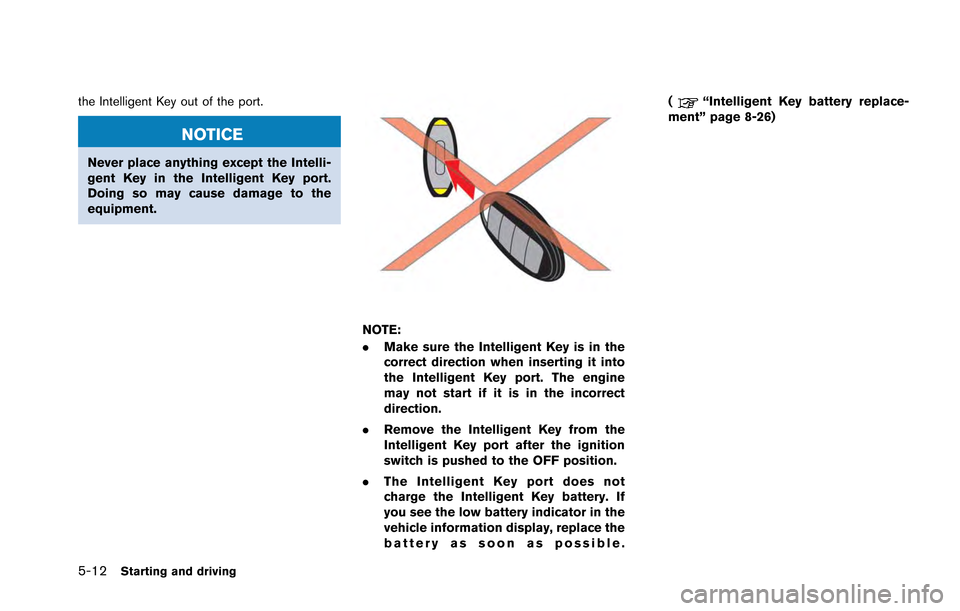
In this case, inserting the Intelligent Key into the
port allows you to start the engine. Make sure
that the mechanical key side faces backward as
illustrated. Insert the Intelligent Key in the port
until it is latched and secured.
To remove the Intelligent Key from the port, push
the ignition switch to the OFF position and pull
Starting and driving5-11
Page 205 of 346
5-12Starting and driving
the Intelligent Key out of the port.
NOTICE
Never place anything except the Intelli-
gent Key in the Intelligent Key port.
Doing so may cause damage to the
equipment.
NOTE:
.Make sure the Intelligent Key is in the
correct direction when inserting it into
the Intelligent Key port. The engine
may not start if it is in the incorrect
direction.
. Remove the Intelligent Key from the
Intelligent Key port after the ignition
switch is pushed to the OFF position.
. The Intelligent Key port does not
charge the Intelligent Key battery. If
you see the low battery indicator in the
vehicle information display, replace the
battery as soon as possible. (
“Intelligent Key battery replace-
ment” page 8-26)