2013 NISSAN GT-R ECO mode
[x] Cancel search: ECO modePage 125 of 346
2-30Instruments and controls
NOTICE
While the warning light is illuminated,
the engine output is controlled so that
it does not increase.
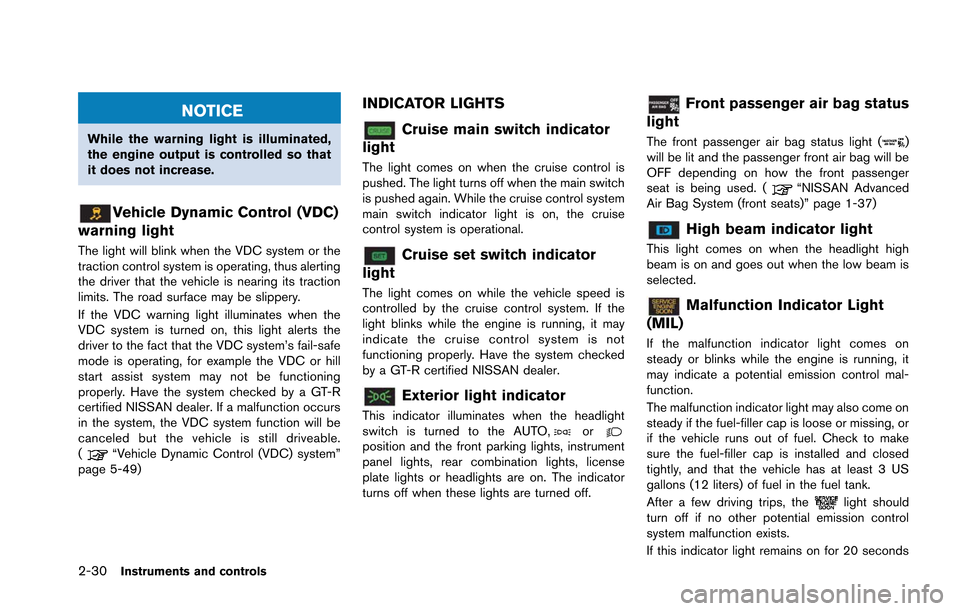
Vehicle Dynamic Control (VDC)
warning light
The light will blink when the VDC system or the
traction control system is operating, thus alerting
the driver that the vehicle is nearing its traction
limits. The road surface may be slippery.
If the VDC warning light illuminates when the
VDC system is turned on, this light alerts the
driver to the fact that the VDC system’s fail-safe
mode is operating, for example the VDC or hill
start assist system may not be functioning
properly. Have the system checked by a GT-R
certified NISSAN dealer. If a malfunction occurs
in the system, the VDC system function will be
canceled but the vehicle is still driveable.
(
“Vehicle Dynamic Control (VDC) system”
page 5-49)
INDICATOR LIGHTS
Cruise main switch indicator
light
The light comes on when the cruise control is
pushed. The light turns off when the main switch
is pushed again. While the cruise control system
main switch indicator light is on, the cruise
control system is operational.
Cruise set switch indicator
light
The light comes on while the vehicle speed is
controlled by the cruise control system. If the
light blinks while the engine is running, it may
indicate the cruise control system is not
functioning properly. Have the system checked
by a GT-R certified NISSAN dealer.
Exterior light indicator
This indicator illuminates when the headlight
switch is turned to the AUTO,orposition and the front parking lights, instrument
panel lights, rear combination lights, license
plate lights or headlights are on. The indicator
turns off when these lights are turned off.
Front passenger air bag status
light
The front passenger air bag status light ()
will be lit and the passenger front air bag will be
OFF depending on how the front passenger
seat is being used. (
“NISSAN Advanced
Air Bag System (front seats)” page 1-37)
High beam indicator light
This light comes on when the headlight high
beam is on and goes out when the low beam is
selected.
Malfunction Indicator Light
(MIL)
If the malfunction indicator light comes on
steady or blinks while the engine is running, it
may indicate a potential emission control mal-
function.
The malfunction indicator light may also come on
steady if the fuel-filler cap is loose or missing, or
if the vehicle runs out of fuel. Check to make
sure the fuel-filler cap is installed and closed
tightly, and that the vehicle has at least 3 US
gallons (12 liters) of fuel in the fuel tank.
After a few driving trips, the
light should
turn off if no other potential emission control
system malfunction exists.
If this indicator light remains on for 20 seconds
Page 160 of 346
button - releasing when the device begins to
activate.
5. If the indicator light on HomeLink
®blinks
rapidly for two seconds and then turns solid,
HomeLink
®has picked up a “rolling code”
garage door opener signal. You will need to
proceed with the next steps to train
HomeLink
®, completing the programming
may require a ladder and another person
for convenience.
6. Push and release the program button located on the garage door opener’s motor
to activate the “training mode”. This button is
usually located near the antenna wire that
hangs down from the motor. If the wire
originates from under a light lens, you will
need to remove the lens to access the
training button.
NOTE:
Once you have pushed and released
the training button on the garage door
opener’s motor and the “training light”
is lit, you have 30 seconds in which to
perform step 7. For convenience, use
the help of a second person to assist
when performing this step.
7. Quickly (within 30 seconds of pushing and releasing the garage door opener training
button) and firmly push and release the HomeLink
®button you’ve just programmed.
Push and release the HomeLink®button up
to three times to complete the training.
8. Your HomeLink
®button should now be
programmed. To program the remaining
HomeLink
®buttons for additional door or
gate openers, follow steps 2 through 8 only.
NOTE:
Do not repeat step 1 unless you want to
“clear” all previously programmed
HomeLink
®buttons.
If you have any questions or are having difficulty
programming your HomeLink
®buttons, please
refer to the HomeLink®web site at: www.
homelink.com or call 1-800-355-3515.
PROGRAMMING HomeLink®FOR
CANADIAN CUSTOMERS
Prior to 1992, D.O.C. regulations required
hand-held transmitters to stop transmitting after
2 seconds. To program your hand-held trans-
mitter to HomeLink
®, continue to push and hold
the HomeLink®button (note steps 2 through 4
under “Programming HomeLink®”) while you
push and re-push (“cycle”) your hand-held
transmitter every 2 seconds until the indicator
light flashes rapidly (indicating successful pro-
gramming) . NOTE:
If programming a garage door opener, etc.,
it is advised to unplug the device during
the “cycling” process to prevent possible
damage to the garage door opener com-
ponents.
OPERATING THE HomeLink®UNI-
VERSAL TRANSCEIVER
HomeLink®Universal Transceiver (once pro-
grammed) may now be used to activate the
garage door, etc. To operate, simply push the
appropriate programmed HomeLink
®Universal
Transceiver button. The red indicator light will
illuminate while the signal is being transmitted.
PROGRAMMING TROUBLE-DIAG-
NOSIS
If HomeLink®does not quickly learn the hand-
held transmitter information:
. replace the hand-held transmitter batteries
with new batteries.
. position the hand-held transmitter with its
battery area facing away from the
HomeLink
®surface.
. push and hold both the HomeLink®and
hand-held transmitter buttons without inter-
ruption.
Instruments and controls2-65
Page 173 of 346
3-12Pre-driving checks and adjustments
Opening trunk lid:
1. Push the trunk open request switch
*Afor
more than 1 second.
2. The trunk will unlatch. An outside chime will sound four times.
3. Raise the trunk lid to open the trunk.
NOTE:
. To prevent the Intelligent Key from
being accidentally locked in the trunk,
lockout protection is equipped with the
Intelligent Key system.
. When the trunk lid is closed with the
Intelligent Key inside the trunk, the
outside buzzer will sound and the trunk
will open.
Battery saver system
When all the following conditions are met for 60
minutes, the battery saver system will cut off the
power supply to prevent battery discharge.
.The ignition switch is in the ACC position,
and
. All doors are closed, and
. The shift lever is in the
&Pposition.
REMOTE KEYLESS ENTRY FUNC-
TIONS
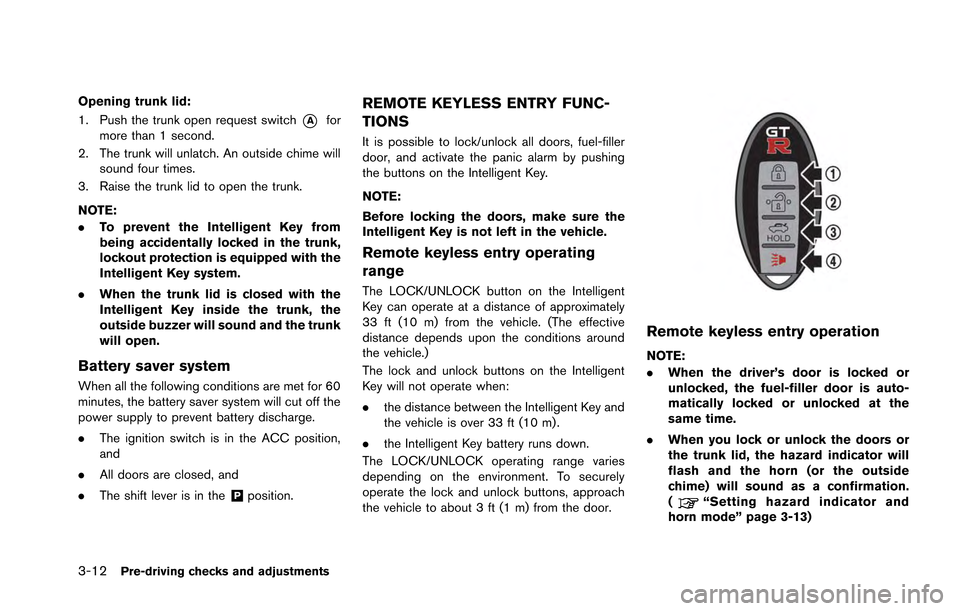
It is possible to lock/unlock all doors, fuel-filler
door, and activate the panic alarm by pushing
the buttons on the Intelligent Key.
NOTE:
Before locking the doors, make sure the
Intelligent Key is not left in the vehicle.
Remote keyless entry operating
range
The LOCK/UNLOCK button on the Intelligent
Key can operate at a distance of approximately
33 ft (10 m) from the vehicle. (The effective
distance depends upon the conditions around
the vehicle.)
The lock and unlock buttons on the Intelligent
Key will not operate when:
.the distance between the Intelligent Key and
the vehicle is over 33 ft (10 m) .
. the Intelligent Key battery runs down.
The LOCK/UNLOCK operating range varies
depending on the environment. To securely
operate the lock and unlock buttons, approach
the vehicle to about 3 ft (1 m) from the door.
Remote keyless entry operation
NOTE:
. When the driver’s door is locked or
unlocked, the fuel-filler door is auto-
matically locked or unlocked at the
same time.
. When you lock or unlock the doors or
the trunk lid, the hazard indicator will
flash and the horn (or the outside
chime) will sound as a confirmation.
(
“Setting hazard indicator and
horn mode” page 3-13)
Page 174 of 346
Locking doors:
1. Move the shift lever to the
&Pposition, push
the ignition switch to the OFF position, and
make sure you carry the Intelligent Key with
you.
2. Close all the doors.
3. Push the LOCK
button*1on the
Intelligent Key.
4. All the doors will lock.
5. The hazard indicator flashes twice and the horn chirps once.
NOTE:
. Doors will lock with the Intelligent Key
while the ignition switch is in the ACC
or ON position.
. Doors will not lock with the Intelligent
Key while any door is open.
Unlocking doors:
1. Push the UNLOCK
button*2on the
Intelligent Key once.
2. The hazard indicator flashes once. The driver’s door will unlock.
3. Push the UNLOCK
button*2on the
Intelligent Key again within 60 seconds.
4. The hazard indicator flashes once again. All the doors will unlock. All doors will be locked automatically unless one
of the following operations is performed within 1
minute after pushing the UNLOCK button on the
Intelligent Key while the doors are locked. If
during this 1-minute time period, the UNLOCK
button on the Intelligent Key is pushed, all doors
will be locked automatically after another 1
minute.
.
Opening any door
. Pushing the ignition switch
Opening trunk lid:
1. Push the TRUNK
button*3on the
Intelligent Key for more than 1 second.
2. The trunk will unlatch.
3. Raise the trunk lid to open the trunk.
Using panic alarm:
If you are near your vehicle and feel threatened,
you may activate the alarm to call attention as
follows:
1. Push the PANIC
button*4on the
Intelligent Key for more than 1 second.
2. The theft warning alarm and headlights will stay on for 25 seconds.
3. The panic alarm stops when:
.It has run for 25 seconds, or.Any of the buttons on the Intelligent Key
are pushed. (Note: the panic button should be pushed for more than 1
second to turn the panic alarm off.)
SETTING HAZARD INDICATOR AND
HORN MODE
This vehicle is set in hazard indicator and horn
mode when you first receive the vehicle.
When you lock/unlock the doors, the hazard
indicator will flash and the horn (or the outside
chime) will sound as a confirmation.
The following descriptions show how the hazard
indicator and horn will activate when locking/
unlocking the doors and how the horn feature
can be deactivated.
Pre-driving checks and adjustments3-13
Page 176 of 346
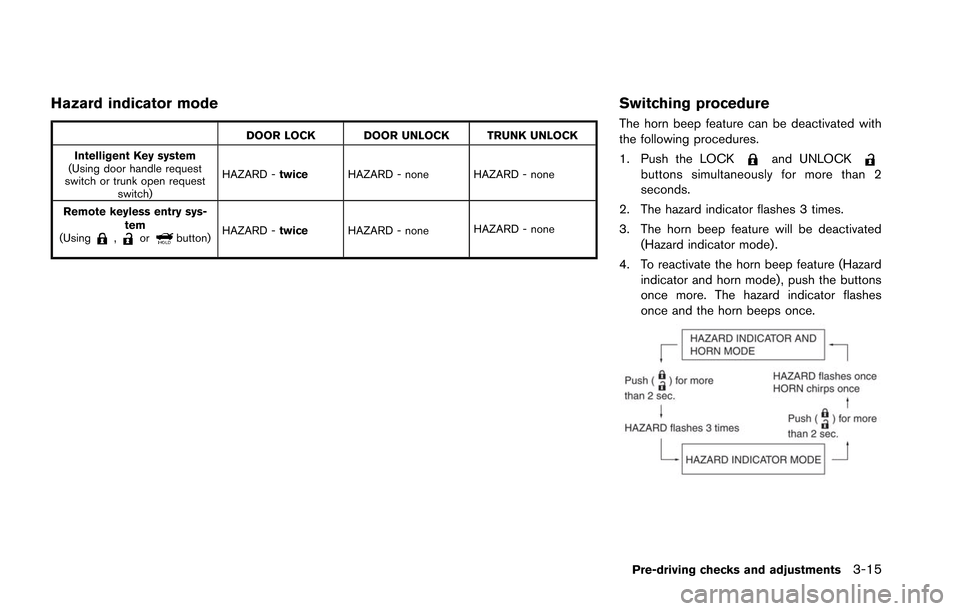
Hazard indicator mode
DOOR LOCK DOOR UNLOCK TRUNK UNLOCK
Intelligent Key system
(Using door handle request
switch or trunk open request switch) HAZARD -
twice HAZARD - none HAZARD - none
Remote keyless entry sys- tem
(Using
,orbutton) HAZARD -
twice HAZARD - none HAZARD - none
Switching procedure
The horn beep feature can be deactivated with
the following procedures.
1. Push the LOCK
and UNLOCKbuttons simultaneously for more than 2
seconds.
2. The hazard indicator flashes 3 times.
3. The horn beep feature will be deactivated (Hazard indicator mode) .
4. To reactivate the horn beep feature (Hazard indicator and horn mode) , push the buttons
once more. The hazard indicator flashes
once and the horn beeps once.
Pre-driving checks and adjustments3-15
Page 194 of 346
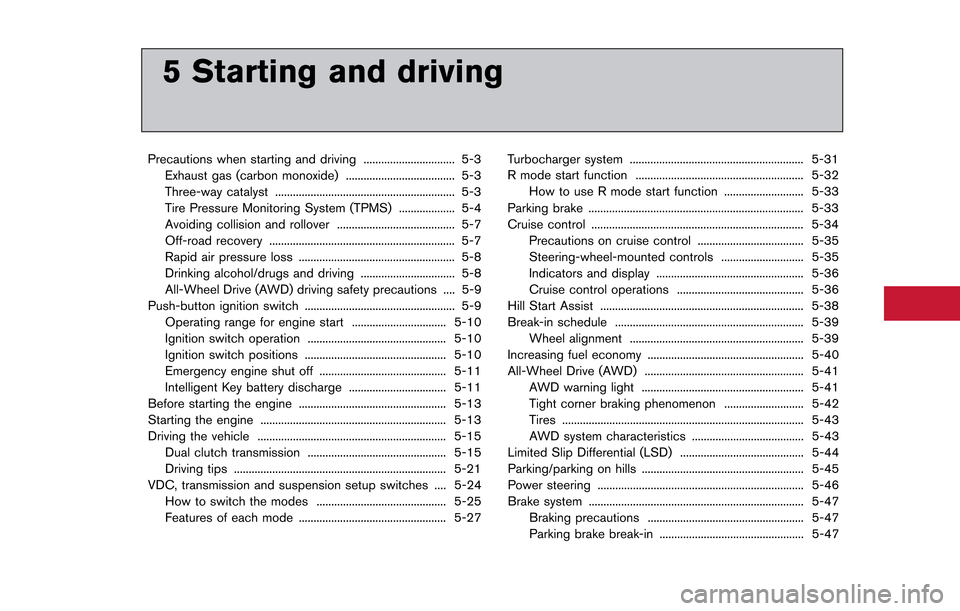
5 Starting and driving
Precautions when starting and driving ............................... 5-3Exhaust gas (carbon monoxide) ..................................... 5-3Three-way catalyst ............................................................. 5-3
Tire Pressure Monitoring System (TPMS) ................... 5-4
Avoiding collision and rollover ........................................ 5-7
Off-road recovery ............................................................... 5-7
Rapid air pressure loss ..................................................... 5-8
Drinking alcohol/drugs and driving ................................ 5-8All-Wheel Drive (AWD) driving safety precautions .... 5-9
Push-button ignition switch ................................................... 5-9
Operating range for engine start ................................ 5-10
Ignition switch operation ............................................... 5-10
Ignition switch positions ................................................ 5-10
Emergency engine shut off ........................................... 5-11
Intelligent Key battery discharge ................................. 5-11
Before starting the engine .................................................. 5-13
Starting the engine ............................................................... 5-13
Driving the vehicle ................................................................ 5-15 Dual clutch transmission ............................................... 5-15
Driving tips ........................................................................\
5-21
VDC, transmission and suspension setup switches .... 5-24 How to switch the modes ............................................ 5-25
Features of each mode .................................................. 5-27 Turbocharger system ........................................................... 5-31
R mode start function ......................................................... 5-32
How to use R mode start function ........................... 5-33
Parking brake ........................................................................\
. 5-33
Cruise control ........................................................................\
5-34 Precautions on cruise control .................................... 5-35
Steering-wheel-mounted controls ............................ 5-35
Indicators and display .................................................. 5-36
Cruise control operations ........................................... 5-36
Hill Start Assist ..................................................................... 5-38
Break-in schedule ................................................................ 5-39 Wheel alignment ........................................................... 5-39
Increasing fuel economy ..................................................... 5-40
All-Wheel Drive (AWD) ...................................................... 5-41 AWD warning light ....................................................... 5-41
Tight corner braking phenomenon ........................... 5-42
Tires ........................................................................\
.......... 5-43AWD system characteristics ...................................... 5-43
Limited Slip Differential (LSD) .......................................... 5-44
Parking/parking on hills ....................................................... 5-45
Power steering ...................................................................... 5-46
Brake system ........................................................................\
. 5-47 Braking precautions ..................................................... 5-47
Parking brake break-in ................................................. 5-47
Page 217 of 346
5-24Starting and driving
the brakes normally based on traffic and road
conditions.
The metallic brake pads and brake disc rotor
may rust together when the brakes are not
applied:
.If the vehicle is not idled for 20 seconds
without the brakes applied, or if the brakes
are applied when the vehicle is shut off, the
rotor and pads can rust together, even when
the brake pads are dry.
. If the brakes are wet when the vehicle is
parked and the parking brake is applied for a
long time.
Contact a GT-R certified NISSAN dealer if the
brake pads and brake rotor have rusted
together.
1. Bring the vehicle to a complete stop.
2. With the foot brake pedal depressed, apply the parking brake.
3. Move the shift lever to the
&Pposition.
4. Check the shift lever position indicator on the instrument panel to confirm that the
&Pposition is selected.
5. Push the ignition switch to stop the engine.
WARNING
Before exiting the vehicle, be sure to
move the shift lever to the&Pposition
and stop the engine. If the engine is
running and the shift lever is not in the
&Pposition, the vehicle may start mov-
ing due to partial engagement of the
clutch or to the effects of gravity on a
slope, or the vehicle may suddenly
accelerate due to accidental operation
of the accelerator pedal, possibly caus-
ing an accident.
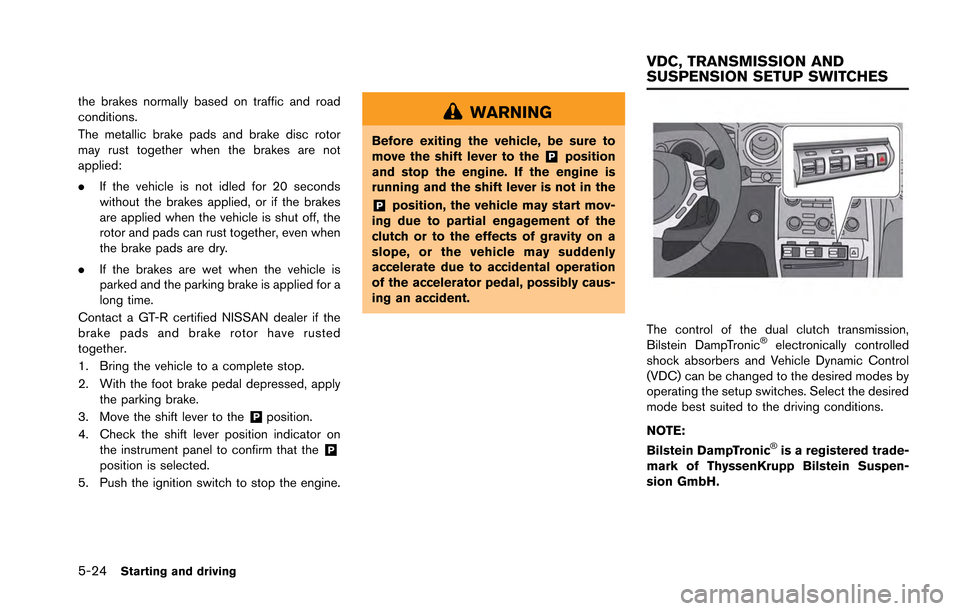
The control of the dual clutch transmission,
Bilstein DampTronic®electronically controlled
shock absorbers and Vehicle Dynamic Control
(VDC) can be changed to the desired modes by
operating the setup switches. Select the desired
mode best suited to the driving conditions.
NOTE:
Bilstein DampTronic
®is a registered trade-
mark of ThyssenKrupp Bilstein Suspen-
sion GmbH.
VDC, TRANSMISSION AND
SUSPENSION SETUP SWITCHES
Page 218 of 346
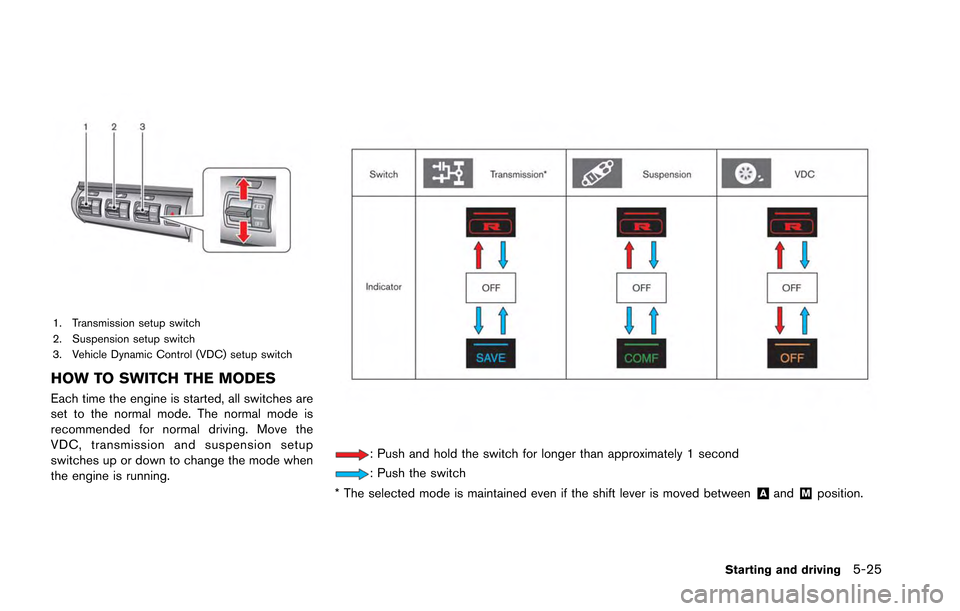
1. Transmission setup switch
2. Suspension setup switch
3. Vehicle Dynamic Control (VDC) setup switch
HOW TO SWITCH THE MODES
Each time the engine is started, all switches are
set to the normal mode. The normal mode is
recommended for normal driving. Move the
VDC, transmission and suspension setup
switches up or down to change the mode when
the engine is running.
: Push and hold the switch for longer than approximately 1 second
: Push the switch
* The selected mode is maintained even if the shift lever is moved between
&Aand&Mposition.
Starting and driving5-25