2013 NISSAN GT-R light
[x] Cancel search: lightPage 132 of 315
3-4Audio system
.Do not use the following CDs as they may
cause the CD player to malfunction.
— 3.1 in (8 cm) discs
— CDs that are not round
— CDs with a paper label
— CDs that are warped, scratched, or have
abnormal edges
. This audio system can only play prerecorded
CDs. It has no capabilities to record or burn
CDs.
. If the CD cannot be played, one of the
following messages will be displayed.
CHECK DISC:
— Confirm that the CD is inserted correctly
(the label side is facing up, etc.).
— Confirm that the CD is not bent or warped and it is free of scratches.
PUSH EJECT:
This is an error due to the temperature inside
the player is too high. Remove the CD by
pushing the EJECT button, and after a short
time reinsert the CD. The CD can be played
when the temperature of the player returns
to normal. UNPLAYABLE:
The file is unplayable in this audio system
(only MP3, WMA or AAC CD) .
DVD (Digital Versatile Disc) player
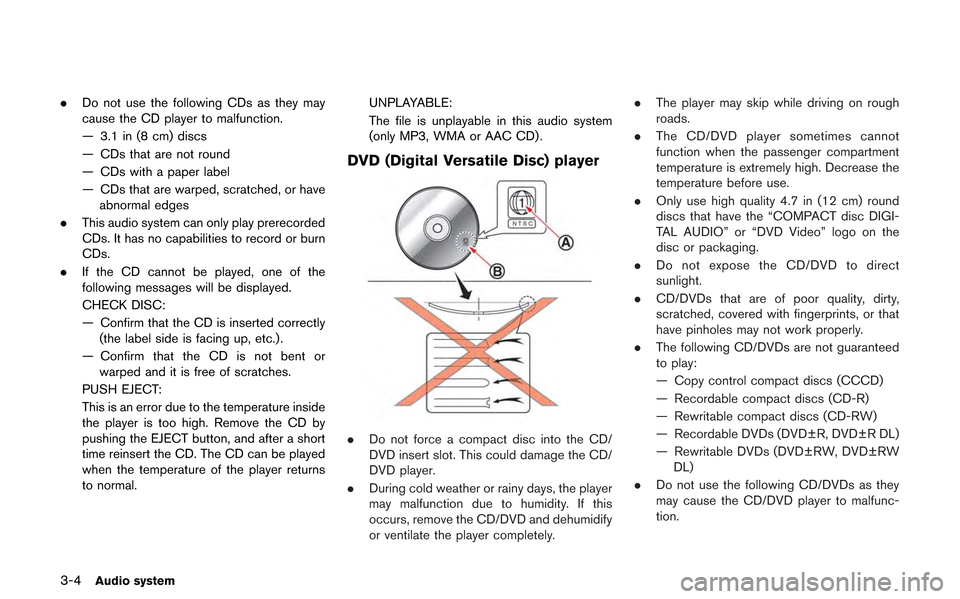
.
Do not force a compact disc into the CD/
DVD insert slot. This could damage the CD/
DVD player.
. During cold weather or rainy days, the player
may malfunction due to humidity. If this
occurs, remove the CD/DVD and dehumidify
or ventilate the player completely. .
The player may skip while driving on rough
roads.
. The CD/DVD player sometimes cannot
function when the passenger compartment
temperature is extremely high. Decrease the
temperature before use.
. Only use high quality 4.7 in (12 cm) round
discs that have the “COMPACT disc DIGI-
TAL AUDIO” or “DVD Video” logo on the
disc or packaging.
. Do not expose the CD/DVD to direct
sunlight.
. CD/DVDs that are of poor quality, dirty,
scratched, covered with fingerprints, or that
have pinholes may not work properly.
. The following CD/DVDs are not guaranteed
to play:
— Copy control compact discs (CCCD)
— Recordable compact discs (CD-R)
— Rewritable compact discs (CD-RW)
— Recordable DVDs (DVD±R, DVD±R DL)
— Rewritable DVDs (DVD±RW, DVD±RW
DL)
. Do not use the following CD/DVDs as they
may cause the CD/DVD player to malfunc-
tion.
Page 139 of 315
— Receiving a hands-free call.
— Checking the connection to the hands-free phone.
. Do not place a Bluetooth
®audio device in
an area surrounded by metal or far away
from the in-vehicle Bluetooth
®module to
prevent tone quality degradation and wire-
less connection disruption.
. While an audio device is connected through
a Bluetooth
®wireless connection, the bat-
tery power of the device may discharge
quicker than usual.
. This system supports the Bluetooth
®Audio
Distribution Profile (A2DP, AVRCP).
. Bluetooth
®is a trademark owned by Blue-
tooth SIG, Inc.
Music Box®(if so equipped)
Recording:
. Note that data that is lost and not stored to
the in-vehicle memory due to system da-
mage, improper operation or malfunction is
not under warranty.
. Vehicle owners are not permitted to record
music without permission of the owner of
the copyright except for personal use. .
Check if the music is appropriately recorded
to the in-vehicle memory after recording
when the compact disc cannot be rere-
corded.
. Some music cannot be recorded depending
on the disc condition due to high-speed
recording.
. Jumping sounds may be recorded when a
compact disc is recorded while driving on
rough roads and excessive vibration occurs.
. A mark indicating jumping sounds is dis-
played if jumping sounds are recorded.
. No sounds may be recorded if jumping
sounds occurs or the disc is in poor
condition.
. Tracks that include Serial Copy Manage-
ment System (SCMS) are not recorded.
. If a compact disc is scratched or dirty, it may
not be recorded, jumping sounds may occur
or it may take a long time to record.
Automatic title download:
. The title information that is automatically
downloaded may differ from the actual title.
. When newly released compact discs are
recorded, their title information may not be
downloaded.
ANTENNA
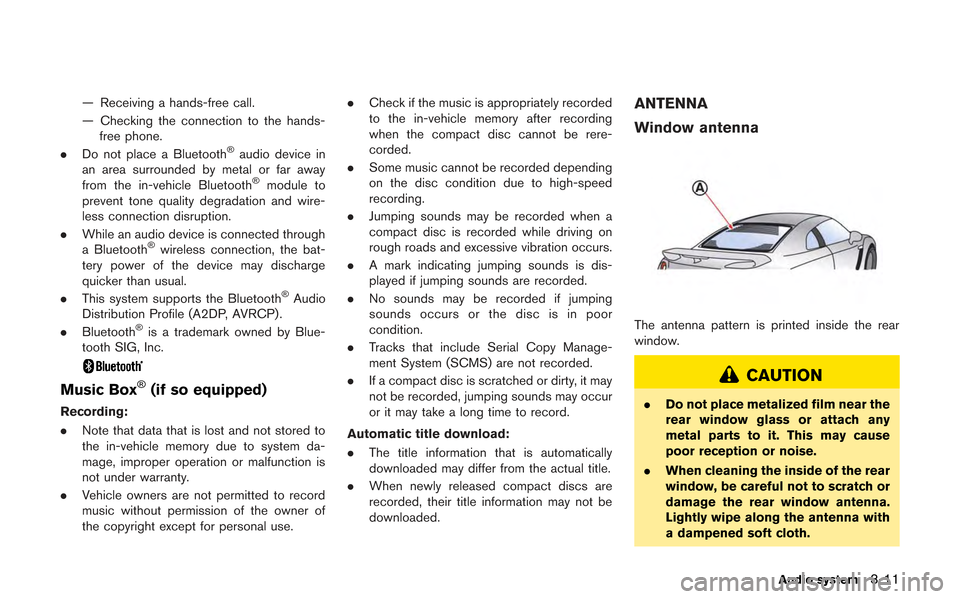
Window antenna
The antenna pattern is printed inside the rear
window.
CAUTION
.Do not place metalized film near the
rear window glass or attach any
metal parts to it. This may cause
poor reception or noise.
. When cleaning the inside of the rear
window, be careful not to scratch or
damage the rear window antenna.
Lightly wipe along the antenna with
a dampened soft cloth.
Audio system3-11
Page 159 of 315
.Handle a CD/DVD by its edges. Never touch
the surface of the disc. Do not bend the
disc.
. Always place the discs in the storage case
when they are not being used.
. To clean a disc, wipe the surface from the
center to the outer edge using a clean, soft
cloth. Do not wipe the disc using a circular
motion.
Do not use a conventional record cleaner or
alcohol intended for industrial use.
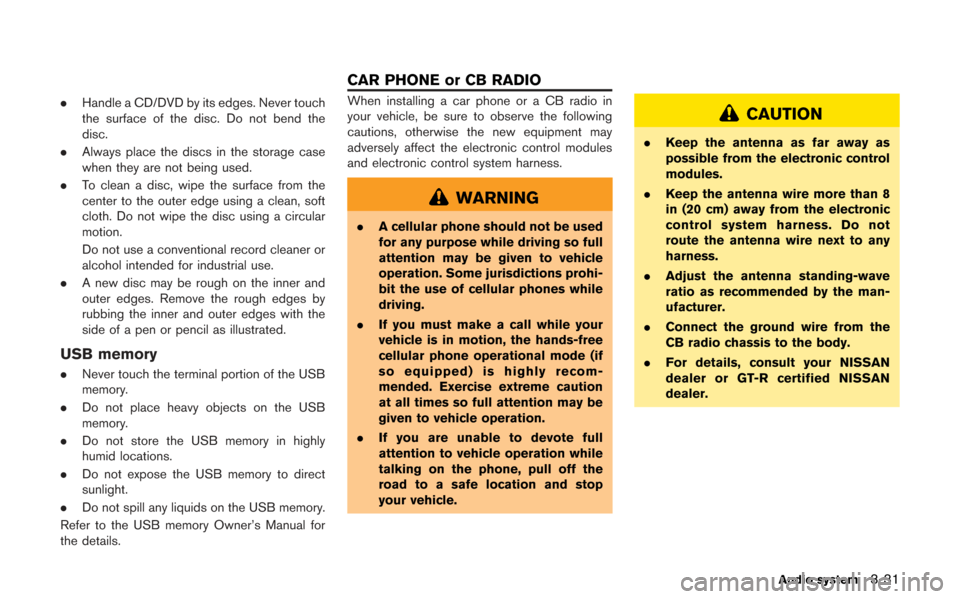
. A new disc may be rough on the inner and
outer edges. Remove the rough edges by
rubbing the inner and outer edges with the
side of a pen or pencil as illustrated.
USB memory
.Never touch the terminal portion of the USB
memory.
. Do not place heavy objects on the USB
memory.
. Do not store the USB memory in highly
humid locations.
. Do not expose the USB memory to direct
sunlight.
. Do not spill any liquids on the USB memory.
Refer to the USB memory Owner’s Manual for
the details.
When installing a car phone or a CB radio in
your vehicle, be sure to observe the following
cautions, otherwise the new equipment may
adversely affect the electronic control modules
and electronic control system harness.
WARNING
. A cellular phone should not be used
for any purpose while driving so full
attention may be given to vehicle
operation. Some jurisdictions prohi-
bit the use of cellular phones while
driving.
. If you must make a call while your
vehicle is in motion, the hands-free
cellular phone operational mode (if
so equipped) is highly recom-
mended. Exercise extreme caution
at all times so full attention may be
given to vehicle operation.
. If you are unable to devote full
attention to vehicle operation while
talking on the phone, pull off the
road to a safe location and stop
your vehicle.
CAUTION
. Keep the antenna as far away as
possible from the electronic control
modules.
. Keep the antenna wire more than 8
in (20 cm) away from the electronic
control system harness. Do not
route the antenna wire next to any
harness.
. Adjust the antenna standing-wave
ratio as recommended by the man-
ufacturer.
. Connect the ground wire from the
CB radio chassis to the body.
. For details, consult your NISSAN
dealer or GT-R certified NISSAN
dealer.
Audio system3-31
CAR PHONE or CB RADIO
Page 174 of 315
5-4Heater and air conditioner
.Do not set the temperature lower than the
outside air temperature. Otherwise the
system may not work properly.
. Not recommended if windows fog up.
DEHUMIDIFIED DEFROSTING or
DEFOGGING
1. Push the front defroster button <>. The
indicator light on the button will come on.
2. Operate the temperature control dial to set the desired temperature.
. To quickly remove ice from the outside of the
windows, turn the fan speed control dial
<
>and set it to the maximum position.
. As soon as possible after the windshield is
clean, push
the auto mode. .
When the front defroster button <
>is
pushed, the air conditioner will automatically
be turned on at outside temperatures above
238F( −58C) to defog the windshield, and
the air recirculate mode will automatically be
turned off.
Outside air is drawn into the passenger
compartment to improve the defogging
performance.FAN SPEED CONTROL
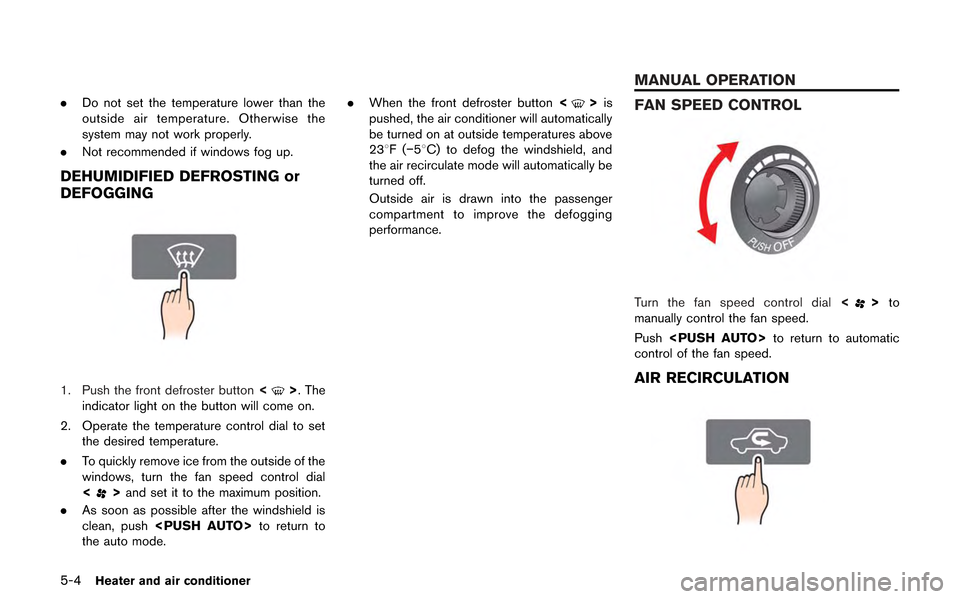
Turn the fan speed control dial <>to
manually control the fan speed.
Push
control of the fan speed.
AIR RECIRCULATION
MANUAL OPERATION
Page 175 of 315
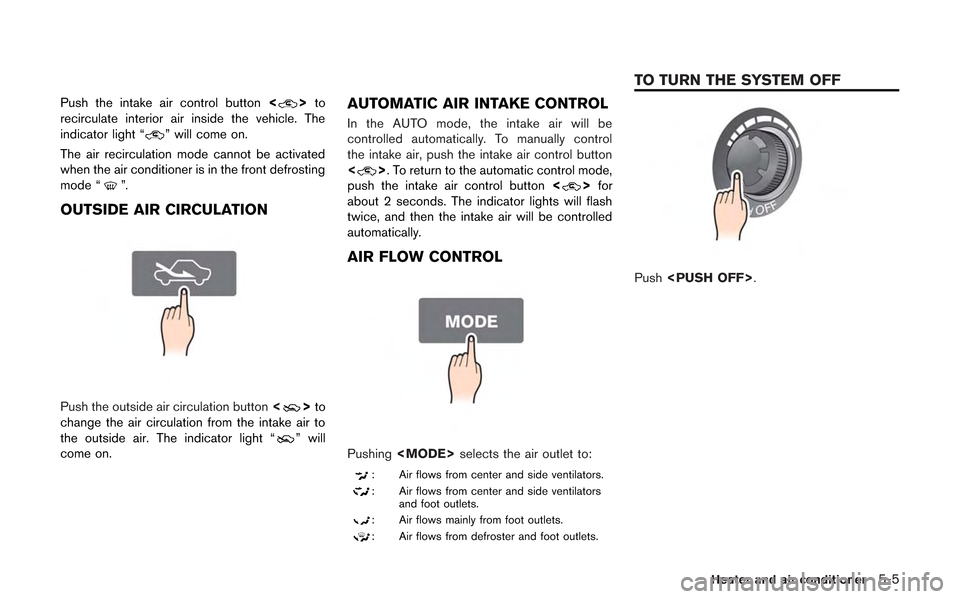
Push the intake air control button<>to
recirculate interior air inside the vehicle. The
indicator light “
” will come on.
The air recirculation mode cannot be activated
when the air conditioner is in the front defrosting
mode “
”.
OUTSIDE AIR CIRCULATION
Push the outside air circulation button <>to
change the air circulation from the intake air to
the outside air. The indicator light “
” will
come on.
AUTOMATIC AIR INTAKE CONTROL
In the AUTO mode, the intake air will be
controlled automatically. To manually control
the intake air, push the intake air control button
<
>. To return to the automatic control mode,
push the intake air control button <>for
about 2 seconds. The indicator lights will flash
twice, and then the intake air will be controlled
automatically.
AIR FLOW CONTROL
Pushing
: Air flows from center and side ventilators.
: Air flows from center and side ventilators
and foot outlets.
: Air flows mainly from foot outlets.
: Air flows from defroster and foot outlets.
Push
Heater and air conditioner5-5
TO TURN THE SYSTEM OFF
Page 180 of 315
6-2Viewing technical information
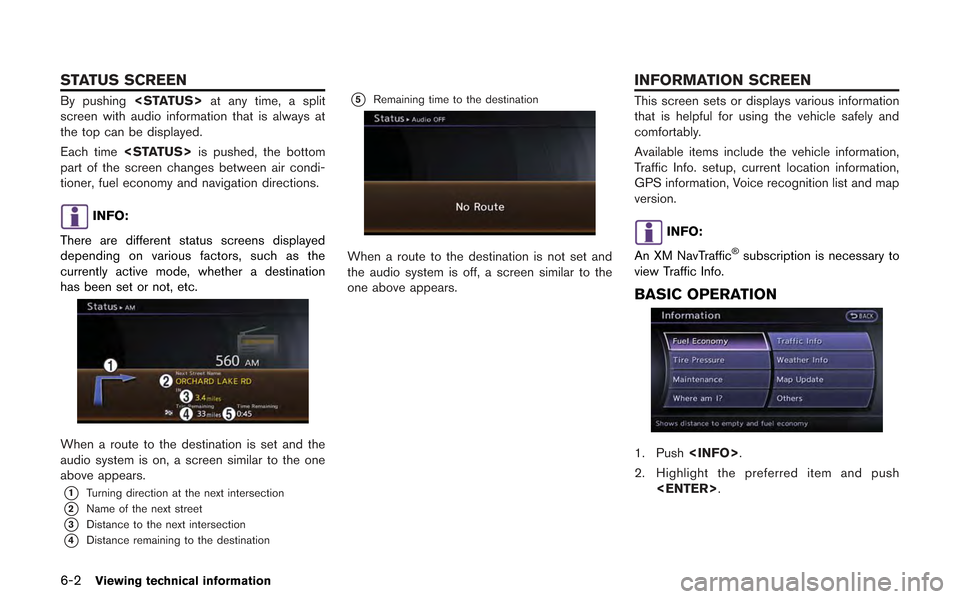
By pushing
screen with audio information that is always at
the top can be displayed.
Each time
part of the screen changes between air condi-
tioner, fuel economy and navigation directions.
INFO:
There are different status screens displayed
depending on various factors, such as the
currently active mode, whether a destination
has been set or not, etc.
When a route to the destination is set and the
audio system is on, a screen similar to the one
above appears.
*1Turning direction at the next intersection
*2Name of the next street
*3Distance to the next intersection
*4Distance remaining to the destination
*5Remaining time to the destination
When a route to the destination is not set and
the audio system is off, a screen similar to the
one above appears.
This screen sets or displays various information
that is helpful for using the vehicle safely and
comfortably.
Available items include the vehicle information,
Traffic Info. setup, current location information,
GPS information, Voice recognition list and map
version.
INFO:
An XM NavTraffic
®subscription is necessary to
view Traffic Info.
BASIC OPERATION
1. Push
2. Highlight the preferred item and push
STATUS SCREEN INFORMATION SCREEN
Page 181 of 315
![NISSAN GT-R 2013 R35 Multi Function Display Owners Manual Available items
.[Fuel Economy]:
Displays the fuel economy information.
“Fuel economy information” (page 6-4)
. [Tire Pressure]:
Displays the tire pressure information.
“Tire pressure informatio NISSAN GT-R 2013 R35 Multi Function Display Owners Manual Available items
.[Fuel Economy]:
Displays the fuel economy information.
“Fuel economy information” (page 6-4)
. [Tire Pressure]:
Displays the tire pressure information.
“Tire pressure informatio](/manual-img/5/316/w960_316-180.png)
Available items
.[Fuel Economy]:
Displays the fuel economy information.
“Fuel economy information” (page 6-4)
. [Tire Pressure]:
Displays the tire pressure information.
“Tire pressure information” (page 6-4)
. [Maintenance]:
Displays the vehicle maintenance informa-
tion.
“Maintenance information” (page 6-6)
. [Where am I?]:
Displays information regarding the current
vehicle location.
“Viewing information about current
vehicle location” (page 6-3)
. [Traffic Info]:
Allows Traffic Info. setup.
“Viewing available traffic information”
(page 6-7)
. [Weather Info]:
Displays weather information.
“Viewing available weather informa-
tion” (page 6-12)
. [Others]: — [Map Update]:
Display the map version and enable
updating of the map data.
“Map update” (page 6-21)
— [Navigation Version]: Displays the current navigation system
version.
“Viewing navigation system version
information” (page 6-22)
— [GPS Position]: Displays GPS information regarding the
current vehicle location.
“Viewing GPS current location in-
formation” (page 6-22)
— [Voice Recognition]: Displays the voice recognition list.
“8. Voice recognition”
This displays the information about the vehicle
location on the route when driving according to
route guidance.
BASIC OPERATION
1. Push
2. Highlight [Where am I?] and push
3. Push
screen. Push
Page 182 of 315
6-4Viewing technical information
*4Displays the distance to the next intersection on
the route.
*5Displays the distance traveled from the previous
intersection on the route.
Setting by voice command
1. Push <
>located on the steering wheel.
2. After the tone sounds, speak a command.
To display the information about the vehicle
location:
“Information” “Where am I?” (Standard Mode)
“Where am I?” (Alternate Command Mode)
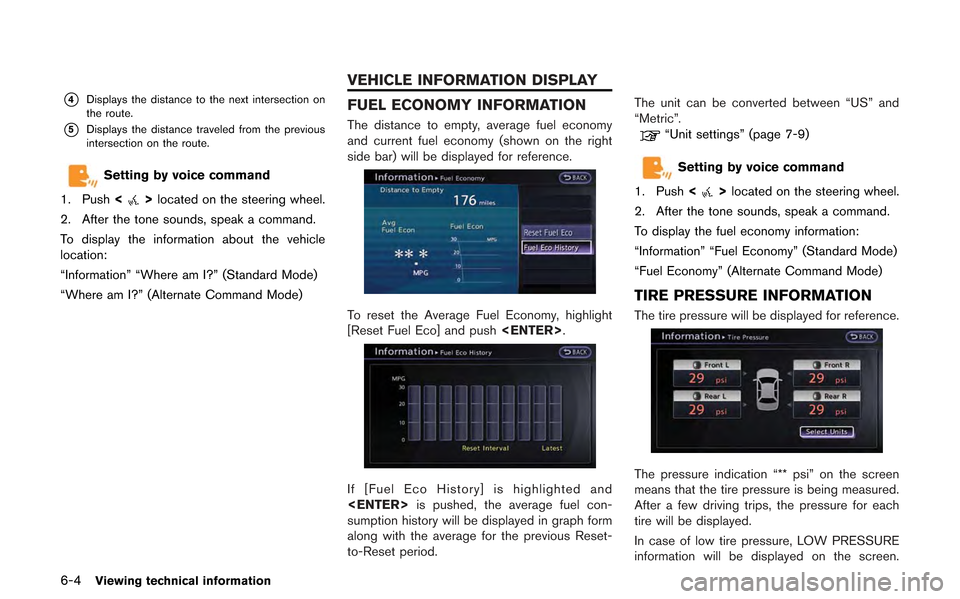
FUEL ECONOMY INFORMATION
The distance to empty, average fuel economy
and current fuel economy (shown on the right
side bar) will be displayed for reference.
To reset the Average Fuel Economy, highlight
[Reset Fuel Eco] and push
If [Fuel Eco History] is highlighted and
sumption history will be displayed in graph form
along with the average for the previous Reset-
to-Reset period. The unit can be converted between “US” and
“Metric”.
“Unit settings” (page 7-9)
Setting by voice command
1. Push <
>located on the steering wheel.
2. After the tone sounds, speak a command.
To display the fuel economy information:
“Information” “Fuel Economy” (Standard Mode)
“Fuel Economy” (Alternate Command Mode)
TIRE PRESSURE INFORMATION
The tire pressure will be displayed for reference.
The pressure indication “** psi” on the screen
means that the tire pressure is being measured.
After a few driving trips, the pressure for each
tire will be displayed.
In case of low tire pressure, LOW PRESSURE
information will be displayed on the screen.
VEHICLE INFORMATION DISPLAY