2013 NISSAN GT-R ECO mode
[x] Cancel search: ECO modePage 17 of 315
Audio system
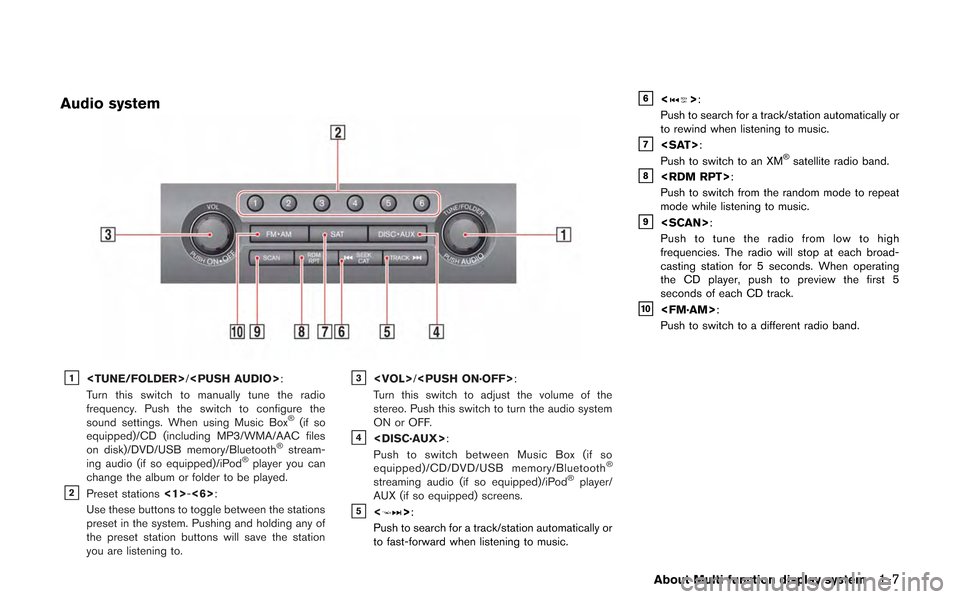
&1
Turn this switch to manually tune the radio
frequency. Push the switch to configure the
sound settings. When using Music Box
®(if so
equipped)/CD (including MP3/WMA/AAC files
on disk)/DVD/USB memory/Bluetooth
®stream-
ing audio (if so equipped)/iPod®player you can
change the album or folder to be played.
&2Preset stations <1>-<6>:
Use these buttons to toggle between the stations
preset in the system. Pushing and holding any of
the preset station buttons will save the station
you are listening to.
&3
Turn this switch to adjust the volume of the
stereo. Push this switch to turn the audio system
ON or OFF.
&4
Push to switch between Music Box (if so
equipped)/CD/DVD/USB memory/Bluetooth
®
streaming audio (if so equipped)/iPod®player/
AUX (if so equipped) screens.
&5<>:
Push to search for a track/station automatically or
to fast-forward when listening to music.
&6<>:
Push to search for a track/station automatically or
to rewind when listening to music.
&7
Push to switch to an XM®satellite radio band.&8
Push to switch from the random mode to repeat
mode while listening to music.
&9
Push to tune the radio from low to high
frequencies. The radio will stop at each broad-
casting station for 5 seconds. When operating
the CD player, push to preview the first 5
seconds of each CD track.
&10
Push to switch to a different radio band.
About Multi function display system1-7
Page 20 of 315
1-10About Multi function display system
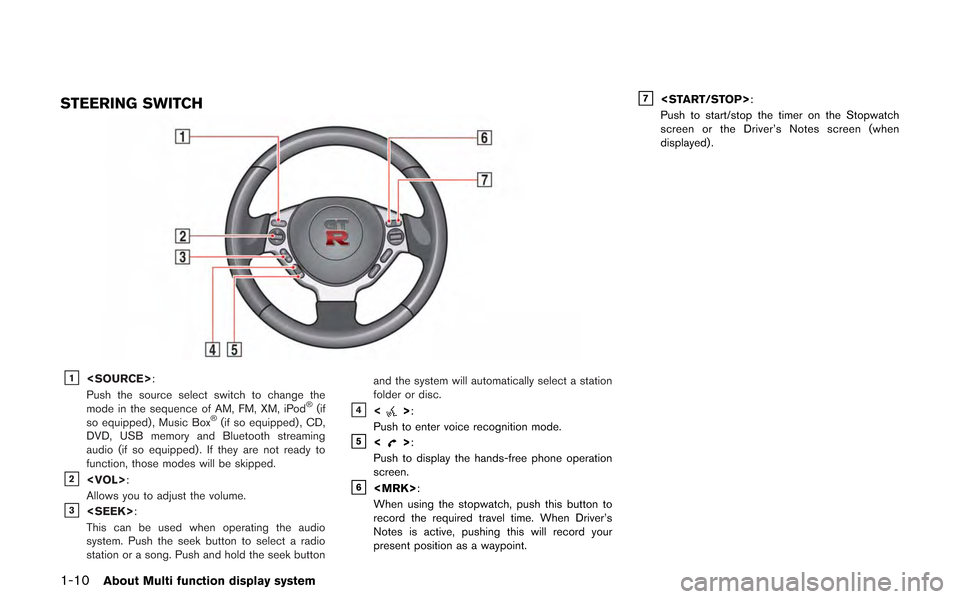
STEERING SWITCH
&1
Push the source select switch to change the
mode in the sequence of AM, FM, XM, iPod
®(if
so equipped) , Music Box®(if so equipped) , CD,
DVD, USB memory and Bluetooth streaming
audio (if so equipped) . If they are not ready to
function, those modes will be skipped.
&2
Allows you to adjust the volume.
&3
This can be used when operating the audio
system. Push the seek button to select a radio
station or a song. Push and hold the seek button and the system will automatically select a station
folder or disc.
&4<>:
Push to enter voice recognition mode.
&5<>:
Push to display the hands-free phone operation
screen.
&6
When using the stopwatch, push this button to
record the required travel time. When Driver’s
Notes is active, pushing this will record your
present position as a waypoint.
&7
Push to start/stop the timer on the Stopwatch
screen or the Driver’s Notes screen (when
displayed) .
Page 55 of 315
INFO:
Even after setting a destination, the location
of the destination can be adjusted, the route
can be stored, etc.
“Procedures after setting destination”
(page 2-44)
Setting by voice command
1. Push <
>located on the steering wheel.
2. After the tone sounds, speak a command.
To set the destination from a street address:
“Navigation” “Address” (Standard Mode)
“Address” (Alternate Command Mode)
INFO:
When using a voice command to set a street
name, it is recommended that the complete
street name is stated.
Examples: Correct input - North Elm Street East Jefferson Boulevard
Incorrect input - Elm Street East Jefferson
FINDING PLACE
There are 3 methods that can be used to set the
destination to places of interest: typing the
name, choosing a category or selecting a
ZAGAT reviewed location. To help improve
searching, different start points can be chosen
to search from such as near current location,
near the destination or city center.
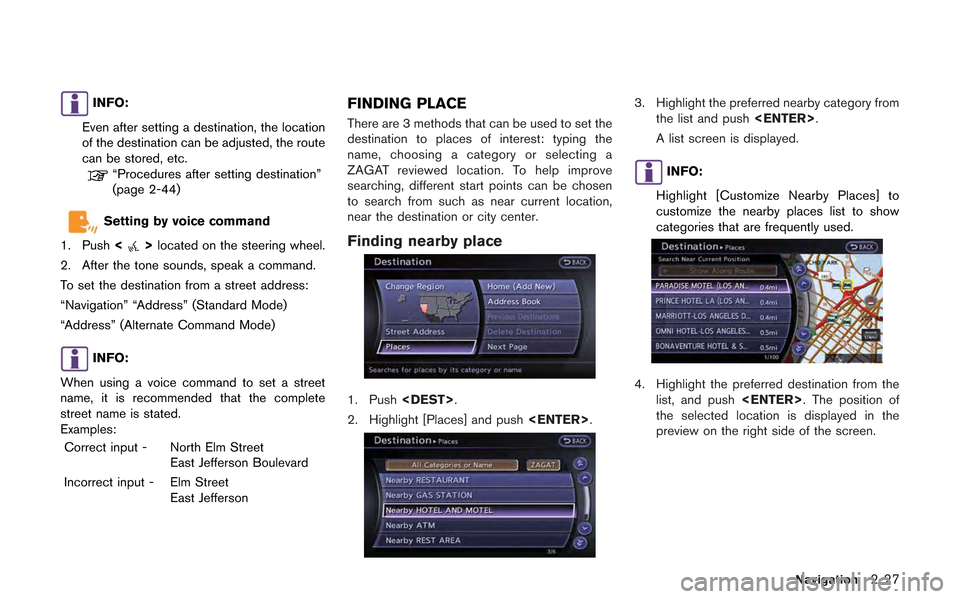
Finding nearby place
1. Push
2. Highlight [Places] and push
3. Highlight the preferred nearby category from
the list and push
A list screen is displayed.
INFO:
Highlight [Customize Nearby Places] to
customize the nearby places list to show
categories that are frequently used.
4. Highlight the preferred destination from the list, and push
the selected location is displayed in the
preview on the right side of the screen.
Navigation2-27
Page 108 of 315
![NISSAN GT-R 2013 R35 Multi Function Display Owners Manual 2-80Navigation
1. Highlight [Show Icon on Map] and push<ENTER>.
2. The indicator illuminates when the item is set. Then the system displays the icon on
the map.
Name (only for stored locations):
Chang NISSAN GT-R 2013 R35 Multi Function Display Owners Manual 2-80Navigation
1. Highlight [Show Icon on Map] and push<ENTER>.
2. The indicator illuminates when the item is set. Then the system displays the icon on
the map.
Name (only for stored locations):
Chang](/manual-img/5/316/w960_316-107.png)
2-80Navigation
1. Highlight [Show Icon on Map] and push
2. The indicator illuminates when the item is set. Then the system displays the icon on
the map.
Name (only for stored locations):
Changes the name of a stored location.
1. Highlight [Name] and push
A character input screen is displayed.
2. Enter the preferred name for the stored location.
“How to input letters and numbers”
(page 1-16)
3. Highlight [OK] and push
The name is stored.
Voicetag (only for stored locations):
1. Highlight [Voicetag] and push
2. Highlight [Store] and push
3. A beep sounds, and the system enters the
voice command reception mode.
4. Speak the name/word to be used as Voicetag.
5. The Voicetag is stored, provided the system recognizes it.
Page 131 of 315
AM radio reception:
AM signals, because of their low frequency, can
bend around objects and skip along the ground.
In addition, the signals can be bounced off the
ionosphere and bent back to earth. Because of
these characteristics. AM signals are also
subject to interference as they travel from
transmitter to receiver.
Fading: Occurs while the vehicle is passing
through freeway underpasses or in areas with
many tall buildings. It can also occur for several
seconds during ionospheric turbulence even in
areas where no obstacles exist.
Static: Caused by thunderstorms, electrical
power lines, electric signs and even traffic lights.
Satellite radio reception:
When the satellite radio is used for the first time
or the battery has been replaced, the satellite
radio may not work properly. This is not a
malfunction. Wait more than 10 minutes with the
satellite radio ON and the vehicle outside of any
metal or large building for the satellite radio to
receive all of the necessary data.
The satellite radio mode requires an active XM
®
Satellite Radio subscription. The satellite radio is
not available in Alaska, Hawaii and Guam.
The satellite radio performance may be affected
if cargo carried on the roof blocks the satelliteradio signal.
If possible, do not put cargo near the satellite
antenna.
A build up of ice on the satellite radio antenna
can affect satellite radio performance. Remove
the ice to restore satellite radio reception.
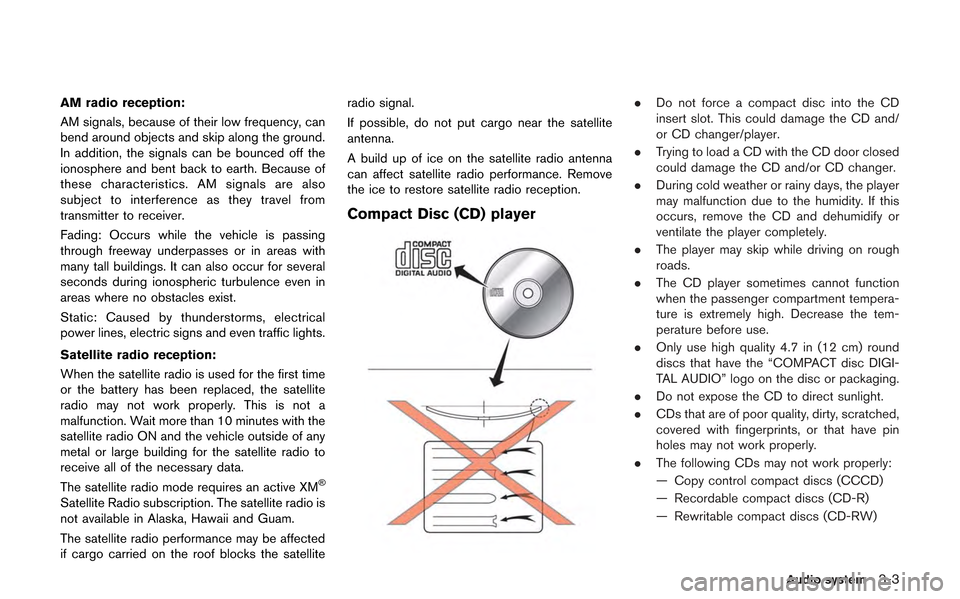
Compact Disc (CD) player
.
Do not force a compact disc into the CD
insert slot. This could damage the CD and/
or CD changer/player.
. Trying to load a CD with the CD door closed
could damage the CD and/or CD changer.
. During cold weather or rainy days, the player
may malfunction due to the humidity. If this
occurs, remove the CD and dehumidify or
ventilate the player completely.
. The player may skip while driving on rough
roads.
. The CD player sometimes cannot function
when the passenger compartment tempera-
ture is extremely high. Decrease the tem-
perature before use.
. Only use high quality 4.7 in (12 cm) round
discs that have the “COMPACT disc DIGI-
TAL AUDIO” logo on the disc or packaging.
. Do not expose the CD to direct sunlight.
. CDs that are of poor quality, dirty, scratched,
covered with fingerprints, or that have pin
holes may not work properly.
. The following CDs may not work properly:
— Copy control compact discs (CCCD)
— Recordable compact discs (CD-R)
— Rewritable compact discs (CD-RW)
Audio system3-3
Page 134 of 315
3-6Audio system
.Do not force the memory stick or USB cable
into the USB connector. This could damage
the connector.
. During cold weather or rainy days, the player
may malfunction due to humidity. If this
occurs, remove the USB device and dehu-
midify or ventilate the USB player comple-
tely.
. The USB player sometimes cannot function
when the passenger compartment tempera-
ture is extremely high. Decrease the tem-
perature before use.
. Do not leave USB memory in a place prone
to static electricity or where the air condi-
tioner blows directly. The data in the USB
memory may be damaged.
. The vehicle is not equipped with a USB
memory stick.
. A USB device cannot be formatted with this
system. To format a USB device, use a
personal computer.
. Partitioned USB devices may not be played
correctly.
. Some characters used in other languages
(Chinese, Japanese, etc.) are not displayed
properly on the vehicle center screen. Using
English language characters with a USB
device is recommended. .
Do not connect a USB device if a connector
or cable is wet. Allow the cable and/or
connectors to dry completely before con-
necting the USB device. If the connector is
exposed to fluids other than water, evapora-
tive residue may cause a short between the
connector pins.
. Large video podcast files cause slow
responses in an iPod
®. The vehicle center
display may momentarily black out, but it will
soon recover.
. If an iPod
®automatically selects large video
podcast files while in the shuffle mode, the
vehicle center display may momentarily
black out, but it will soon recover.
. Audiobooks may not play in the same order
as they appear on an iPod
®.
. An iPod nano®(1st Generation) may remain
in fast forward or rewind mode if it is
connected during a seek operation. In this
case, please manually reset the iPod
®.
. An iPod nano®(2nd Generation) will con-
tinue to fast forward or rewind if it is
disconnected during a seek operation.
. An incorrect song title may appear when the
Play Mode is changed while using the iPod
nano
®(2nd Generation)
iPod®is a trademark of Apple Inc., registered in
the U.S. and other countries.
Compressed Audio Files (MP3/
WMA/AAC/ATRAC3)
Explanation of terms:
. MP3 — MP3 is short for Moving Pictures
Experts Group Audio Layer 3. MP3 is the
most well known compressed digital audio
file format. This format allows for near “CD
quality” sound, but at a fraction of the size of
normal audio files. MP3 conversion of an
audio track can reduce the file size by
approximately a 10:1 ratio (Sampling: 44.1
kHz, Bit rate: 128 kbps) with virtually no
perceptible loss in quality. The compression
reduces certain parts of sound that seem
inaudible to most people.
. WMA — Windows Media Audio (WMA) is a
compressed audio format created by Micro-
soft as an alternative to MP3. The WMA
codec offers greater file compression than
the MP3 codec, enabling storage of more
digital audio tracks in the same amount of
space when compared to MP3s at the same
level of quality.
. AAC/M4A — Advanced Audio Coding
(AAC) is a lossy audio compression format.
Audio files that have been encoded with
AAC are generally smaller in size and deliver
a higher quality of sound than MP3.
Page 142 of 315
![NISSAN GT-R 2013 R35 Multi Function Display Owners Manual 3-14Audio system
.Favorite Artists & Songs
Stores the current artist or song that is being
played. Touch [Alert] to be reminded when
the stored artist or song is playing on a
station while listening t NISSAN GT-R 2013 R35 Multi Function Display Owners Manual 3-14Audio system
.Favorite Artists & Songs
Stores the current artist or song that is being
played. Touch [Alert] to be reminded when
the stored artist or song is playing on a
station while listening t](/manual-img/5/316/w960_316-141.png)
3-14Audio system
.Favorite Artists & Songs
Stores the current artist or song that is being
played. Touch [Alert] to be reminded when
the stored artist or song is playing on a
station while listening to XM.
. Categories
Selecting a category will go to the first
channel in that category as defined by XM
Radio.
. Direct Tune
Inputs the channel number by using a
keypad.
Compact Disc (CD) player operation
Push the ignition switch to the ACC or ON
position and insert the Compact Disc (CD) into
the slot with the label side facing up. The CD will
be guided automatically into the slot and start
playing.
After loading the CD, the number of tracks on the CD and the play time will appear on the
display.
If the radio is already operating, it will auto-
matically turn off and the CD will play.
If the system has been turned off while the CD
was playing, pushing the ON·OFF button will
start the CD.
Do not use 3.1 in (8 cm) discs.
PLAY:
When
off and the CD loaded, the system will turn on
and the CD will start to play.
When
loaded and the radio playing, the radio will
automatically be turned off and the CD will start
to play.
Menu:
When [Menu] on the display is selected while
the CD is being played, the menu screen will be
displayed. The following menu options are
available.
. Folder List (for CD with compressed audio
files)
Displays the folder list.
. Track List
Displays the track list. .
Play Mode
Select a play mode from the following items.
— Normal
— 1 Folder Repeat (for CD with com-
pressed audio files)
— 1 Track Repeat
— 1 Disc Random
— 1 Folder Random (for CD with com- pressed audio files)
. Record to Music Box (for CD) (if so
equipped)
Select to choose specific songs on the CD
to record to the Music Box.
. Title Text Priority (for CD)
Set the priority to CDDB (Compact Disc
Data Base) to acquire track information from
the Gracenote Database, or set the priority
to CD-TEXT to acquire the information from
CDs.
. Automatic Recording (for CD) (if so
equipped)
When this item is turned to ON, the Music
Box automatically starts recording when a
CD is inserted.
. Recording Quality (for CD) (if so equipped)
The larger number (132) will increase the
recorded sound quality while taking up more
space on the Music Box leaving less room
Page 147 of 315
Audio file operation
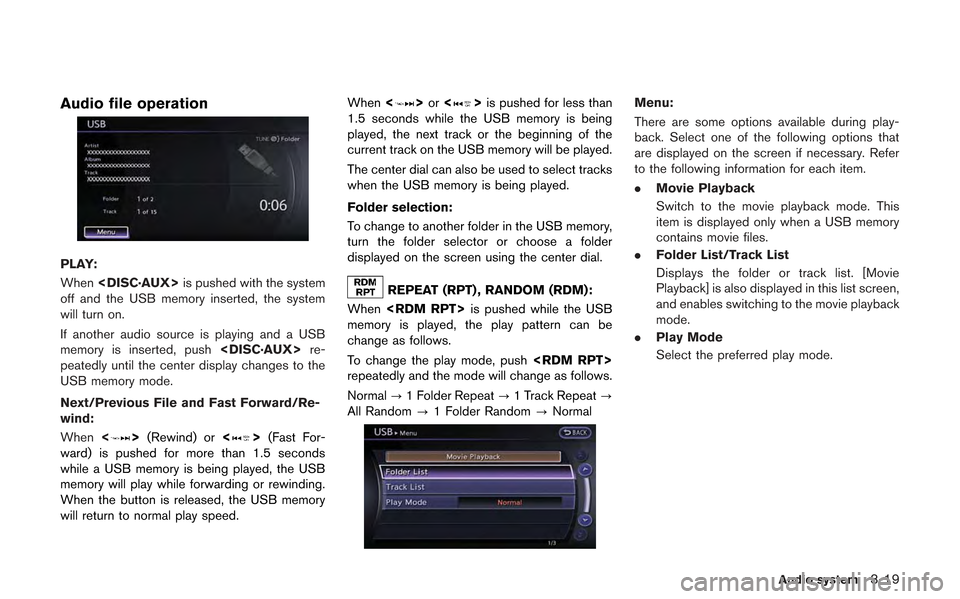
PLAY:
When
off and the USB memory inserted, the system
will turn on.
If another audio source is playing and a USB
memory is inserted, push
peatedly until the center display changes to the
USB memory mode.
Next/Previous File and Fast Forward/Re-
wind:
When <
>(Rewind) or <>(Fast For-
ward) is pushed for more than 1.5 seconds
while a USB memory is being played, the USB
memory will play while forwarding or rewinding.
When the button is released, the USB memory
will return to normal play speed. When
<
>or <>is pushed for less than
1.5 seconds while the USB memory is being
played, the next track or the beginning of the
current track on the USB memory will be played.
The center dial can also be used to select tracks
when the USB memory is being played.
Folder selection:
To change to another folder in the USB memory,
turn the folder selector or choose a folder
displayed on the screen using the center dial.
REPEAT (RPT) , RANDOM (RDM):
When
memory is played, the play pattern can be
change as follows.
To change the play mode, push
repeatedly and the mode will change as follows.
Normal ?1 Folder Repeat ?1 Track Repeat ?
All Random ?1 Folder Random ?Normal
Menu:
There are some options available during play-
back. Select one of the following options that
are displayed on the screen if necessary. Refer
to the following information for each item.
. Movie Playback
Switch to the movie playback mode. This
item is displayed only when a USB memory
contains movie files.
. Folder List/Track List
Displays the folder or track list. [Movie
Playback] is also displayed in this list screen,
and enables switching to the movie playback
mode.
. Play Mode
Select the preferred play mode.
Audio system3-19