Page 164 of 444

As many as 5 keyfobs can be used with one
vehicle. For information concerning the purchase
and use of additional keyfobs, contact a NISSAN
dealer.
The keyfob will not function when:● the battery is discharged
● the distance between the vehicle and the
keyfob is over 33 ft (10 m)
The panic alarm will not activate when the
key is in the ignition switch.
CAUTION
Listed below are conditions or occur-
rences which will damage the keyfob:
● Do not allow the keyfob, which contains
electrical components, to come into
contact with water or salt water. This
could affect the system function.
● Do not drop the keyfob.
● Do not strike the keyfob sharply against
another object.
● Do not change or modify the keyfob.
● Wetting may damage the keyfob. If the
keyfob gets wet, immediately wipe until
it is completely dry. ●
Do not place the keyfob for an extended
period in an area where temperatures
exceed 140°F (60°C) .
● Do not attach the keyfob with a key
holder that contains a magnet.
● Do not place the keyfob near equip-
ment that produces a magnetic field,
such as a TV, audio equipment and per-
sonal computers.
If a keyfob is lost or stolen, NISSAN rec-
ommends erasing the ID code of that key-
fob. This will prevent the keyfob from un-
authorized use to unlock the vehicle. For
information regarding the erasing proce-
dure, please contact a NISSAN dealer.HOW TO USE REMOTE KEYLESS
ENTRY SYSTEM
Locking doors
1. Close all windows.
2. Remove the key from the ignition switch.
3. Close the hood and all doors.
4. Press the
button on the keyfob. All
the doors lock. The hazard warning lights
flash twice and the horn beeps once to
indicate all doors are locked.
LPD0209
Pre-driving checks and adjustments3-7
Page 165 of 444

●When thebutton is pressed with
all doors locked, the hazard warning lights
flash twice and the horn beeps once as a
reminder that the doors are already
locked.
● If a door is open and you press
the
button, the doors will lock
but the horn will not beep and the hazard
lights will not flash.
The horn may or may not beep. Refer to “Silenc-
ing the horn beep feature” in this section for
details.
Unlocking doors
Press thebutton on the keyfob once.
● Only the driver’s door unlocks.
● The hazard warning lights flash once if all
doors are completely closed with the ignition
switch in any position except the ON posi-
tion.
● The interior lights illuminate for a period of
time when the interior light switch is in the
normal operation position. Press the
button on the keyfob again
within 5 seconds.
● All doors unlock.
● The hazard warning lights flash once if all
doors are completely closed.
The interior lights can be turned off without wait-
ing by inserting the key into the ignition switch
and placing the ignition switch in the ON or
START position, locking the doors with the key-
fob or pushing the interior light switch to the OFF
position.
Auto relock
When thebutton on the keyfob is pressed,
all doors will lock automatically within 1 minute
unless one of the following operations is per-
formed:
● Any door is opened.
● A key is inserted into the ignition switch and
the switch is cycled from OFF to ON.LPD0210
3-8Pre-driving checks and adjustments
Page 166 of 444
Opening windows (if so equipped)
The keyfob allows you to open windows
equipped with automatic operation.● To open the windows, press the
but-
ton on the keyfob for longer than 3 sec-
onds after all doors are unlocked.
The door windows will open while pressing
the
button on the keyfob.
The door windows cannot be closed by
using the keyfob.
Using the panic alarm
If you are near your vehicle and feel threatened,
you may activate the panic alarm to call attention
by pressing and holding the
button on the
keyfob for longer than 0.5 seconds.
The panic alarm and headlights will stay on for a
period of time.
The panic alarm stops when: ● it has run for a period of time, or
● any button is pressed on the keyfob.
Using the interior lights
Press thebutton on the keyfob once to
turn on the interior lights.
For additional information, refer to “Interior lights”
in the “Instruments and controls” section in this
manual.
LPD0211
Pre-driving checks and adjustments3-9
Page 167 of 444

Silencing the horn beep feature
If desired, the horn beep feature can be deacti-
vated using the keyfob.
To deactivate:Press and hold the
andbuttonsfor at least 2 seconds.
The hazard warning lights will flash three times to
confirm that the horn beep feature has been
deactivated.
To activate: Press and hold the
andbuttonsfor at least 2 seconds
once more. The hazard warning lights will flash once and the
horn will sound once to confirm that the horn
beep feature has been reactivated.
Deactivating the horn beep feature does not si-
lence the horn if the alarm is triggered.
�1Pull the hood lock release handle located
below the driver’s side instrument panel. The
hood will spring up slightly.
�2Push the lever at the front of the hood to the
side as illustrated with your fingertips and
raise the hood.
�3Insert the support rod into the slot on the
underside of the hood.
When closing the hood, return the hood rod to its
original position. Lower the hood approximately
12 in (30 cm) above the latch and release it. This
allows proper engagement of the hood latch.
LPD0262LPD0302
HOOD
3-10Pre-driving checks and adjustments
Page 177 of 444

Before closing the tailgate reconnect the rear
camera by performing the following:1. After attaching the rear tailgate to the truck, keep the tailgate open")
Connecting the rear camera (if so
equipped)
Before closing the tailgate reconnect the rear
camera by performing the following:1. After attaching the rear tailgate to the truck, keep the tailgate open and check that the
tailgate harness is not hanging below the
tailgate.
2. Remove the connector bracket
�2from the
sill by pressing the locking tab inward, in the
direction shown, while pulling the bracket
apart. 3. Disconnect the chassis plug and bracket
from the chassis wiring harness
�3. Keep
the connector and bracket in a safe place
such as the glove box.
4. Disconnect the tailgate plug from the tail- gate wiring harness. Keep the tailgate plug
in a safe place such as the glove box.
5. Connect the tailgate wiring harness to the chassis wiring harness.
6. Securely fix the rear camera connector bracket
�1to the rear sill.
7. Close the tailgate securely.
Locking the tailgate
To lock the tailgate, turn the key toward the pas-
senger side of the vehicle
�1. To unlock, turn the
key toward the driver side
�2.
LPD2097LPD0272
3-20Pre-driving checks and adjustments
Page 184 of 444
 control knob
10. CAMERA button
* For information regarding the Navigation system
control buttons, refer to the separate Navigation
System Owner’s Manual.
** For informat")
9. Power button/VOL (volume) control knob
10. CAMERA button
* For information regarding the Navigation system
control buttons, refer to the separate Navigation
System Owner’s Manual.
** For information regarding the Bluetooth®
Hands-Free Phone System control button, see
“Bluetooth® Hands-Free Phone System” in this
section.
When you use this system, make sure the engine
is running.
If you use the system with the engine not
running (ignition ON or ACC) for a long
time, it will discharge the battery, and the
engine will not start.
Reference symbols:
“Example” — Words marked in quotes refer to a
key shown only on the display. These keys can be
selected by touching the screen.HOW TO USE THE TOUCH
SCREEN
CAUTION
● The glass display screen may break if it
is hit with a hard or sharp object. If the
glass screen breaks, do not touch it.
Doing so could result in an injury.
● To clean the display, never use a rough
cloth, alcohol, benzine, thinner or any
kind of solvent or paper towel with a
chemical cleaning agent. They will
scratch or deteriorate the panel.
● Do not splash any liquid such as water
or car fragrance on the display. Contact
with liquid will cause the system to
malfunction.
To help ensure safe driving, some functions can-
not be operated while driving.
The on-screen functions that are not available
while driving will be “grayed out” or muted.
Park the vehicle in a safe location and then oper-
ate the navigation system.
WARNING
● ALWAYS give your full attention to
driving.
● Avoid using vehicle features that could
distract you. If distracted, you could
lose control of your vehicle and cause
an accident.
Monitor, climate, audio, phone and voice recognition systems4-5
Page 185 of 444
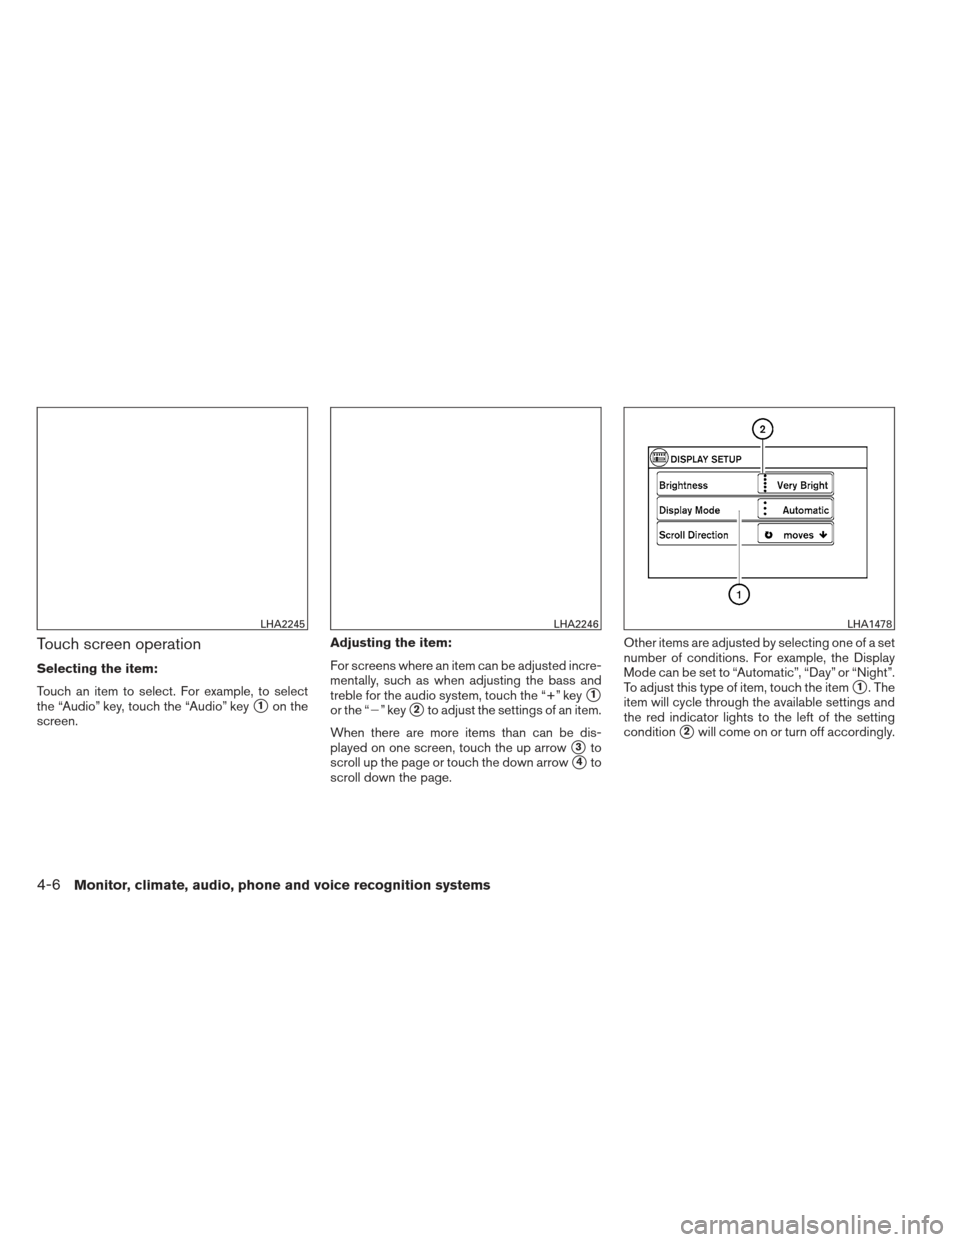
Touch screen operation
Selecting the item:
Touch an item to select. For example, to select
the “Audio” key, touch the “Audio” key
�1on the
screen. Adjusting the item:
For screens where an item can be adjusted incre-
mentally, such as when adjusting the bass and
treble for the audio system, touch the “+” key�1
or the “�” key�2to adjust the settings of an item.
When there are more items than can be dis-
played on one screen, touch the up arrow
�3to
scroll up the page or touch the down arrow
�4to
scroll down the page. Other items are adjusted by selecting one of a set
number of conditions. For example, the Display
Mode can be set to “Automatic”, “Day” or “Night”.
To adjust this type of item, touch the item
�1. The
item will cycle through the available settings and
the red indicator lights to the left of the setting
condition
�2will come on or turn off accordingly.
LHA2245LHA2246LHA1478
4-6Monitor, climate, audio, phone and voice recognition systems
Page 186 of 444

Inputting characters:
Touch the letter key
�1.
There are some options available when inputting
characters. ● 123 / ABC:
Changes the available character set to num-
bers.
● Space:
Inserts a space.
● Delete:
Deletes the last inputted character with one
touch. Touch and hold the “Delete” key to
delete all of the characters. ●
OK:
Completes the character input.
Touch screen maintenance
If you clean the display screen, use a dry, soft
cloth. If additional cleaning is necessary, use a
small amount of neutral detergent with a soft
cloth. Never spray the screen with water or de-
tergent. Dampen the cloth first and then wipe the
screen.
HOW TO USE THE BACK BUTTON
Press the BACK button to return to the previous
screen.
HOW TO USE THE MENU BUTTON
For more information about the “POIs Powered
by Google™”, “Google™ Send-To-Car, “Traffic
Information” and “Weather” features, see the
separate Navigation System Owner’s Manual.
For more information about the “Voice Com-
mands” key, see “NISSAN Voice Recognition
System” in this section.
To select and/or adjust several functions, fea-
tures and modes that are available for your ve-
hicle:
1. Press the MENU button.
2. Select the “Settings” key.
LHA2247LHA2253
Monitor, climate, audio, phone and voice recognition systems4-7

The keyfob allows you to open windows
equipped with automatic operation.● To open the windows, press the
but-
ton on the keyfob for longer than 3 sec-
onds after all")