2013 NISSAN ALTIMA COUPE buttons
[x] Cancel search: buttonsPage 5 of 26

NISSAN INTELLIGENT kEY® SYSTE M
The niSSAn intelligent k ey® system allows you to lock
or unlock the vehicle, open the trunk and start the engine.
n OTe: it is important to make sure the intelligent k ey is
with you (that is, in your pocket or purse).
The operating range of the intelligent k ey is within
31.5 in (80 cm) from each request switch.
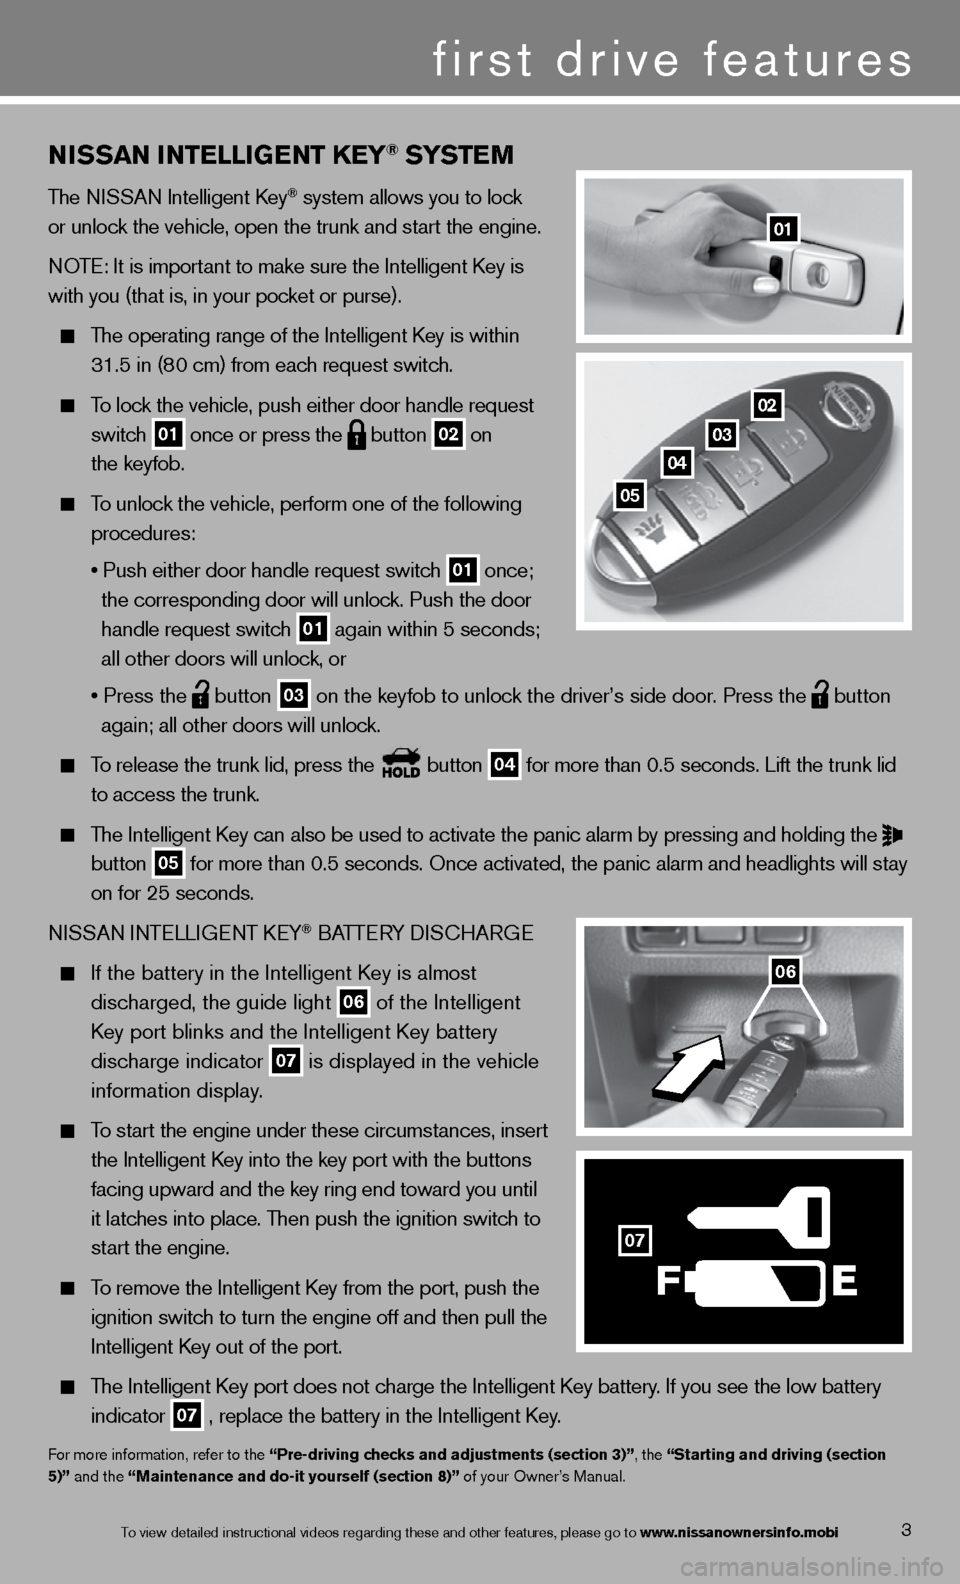
To lock the vehicle, push either door handle request
switch
01 once or press the
button
02 on
the keyfob.
To unlock the vehicle, perform one of the following
procedures:
• Push either door handle request switch
01 once;
the corresponding door will unlock. Push the door
handle request switch
01 again within 5 seconds;
all other doors will unlock, or
• Press the
button
03 on the keyfob to unlock the driver’s side door. Press the
button
again; all other doors will unlock.
To release the trunk lid, press the button
04 for more than 0.5 seconds. Lift the trunk lid
to access the trunk.
The Intelligent Key can also be used to activate the panic alarm by pressing and holding the
button
05 for more than 0.5 seconds. Once activated, the panic alarm and headlight\
s will stay
on for 25 seconds.
ni SSAn inTe LLiGenT keY
® BATTe RY diSc HARG e
If the battery in the Intelligent Key is almost
discharged, the guide light
06 of the intelligent
Key port blinks and the Intelligent Key battery
discharge indicator
07 is displayed in the vehicle
information display.
To start the engine under these circumstances, insert
the Intelligent Key into the key port with the buttons
facing upward and the key ring end toward you until
it latches into place. Then push the ignition switch to
start the engine.
To remove the intelligent k ey from the port, push the
ignition switch to turn the engine off and then pull the
intelligent k ey out of the port.
The Intelligent Key port does not charge the Intelligent Key battery. If you see the low battery
indicator
07 , replace the battery in the Intelligent Key.
f
or more information, refer to the “Pre-driving checks and adjustments (section 3)”, the “Starting and driving (section
5)” and the “Maintenance and do-it yourself (section 8)” of your Owner’s Manual.
01
3
first drive features
02
03
04
05
06
F
07
To view detailed in\fstructional videos\f regarding these a\fnd other features\f \fplease go to www.nissanownersin\hfo.mobi
Page 10 of 26

first drive features
8To view detailed in\fstructional videos\f regarding these a\fnd other features\f \fplease go to www.nissanownersin\hfo.mobi
05 DUAL BUTTON
Press the D UAL button to turn the passenger’s side temperature controls on or off. This will
allow the passenger’s side temperature to be adjusted independently from the driver’s side
by turning the passenger’s side temperature control dial.
06 AIR FLOW CONTROL BUTTONS
Press the preferred air flow control button to select the following air flow outlets:
Air flows from the center and side vents
Air flows from the center, side and foot vents
Air flows mainly from the foot vents
Air flows from the defroster and foot vents
07 AIR RECIRCULATION BUTTON
Press the air recirculation button to recirculate air inside the vehicle. The indicator
light on the button will come on. This system is used to avoid certain outside odors and
helps to adjust the inside vehicle temperature more effectively.
The air recirculation mode can only be selected if the air flow control mode is in the
,
or
position.
08 DEFROSTING/DEFOGGING FRONT AND SIDE WINDOWS
Press the front window defroster button
to turn the system on. The A/c automatically
turns on when the defroster mode is selected. This feature removes humidity from the air.
Set the fan speed control dial 04 and the temperature control dial 02 to their
maximum settings.
09 REAR WINDOW DEFROSTER SWITCh
Push the rear window defroster switch
RR to turn the system on or off.
The rear window defroster automatically turns off after approximately 15 minutes.
10 A/C BUTTON
Press the A/C button to manually turn the A/C on or off.
f or more information, refer to the “Instruments and controls (section 2)” and the “Monitor, climate, audio, phone and
voice recognition systems (section 4)” of your Owner’s Manual.
Page 11 of 26

9
FM/AM/SiriusXM™* SATELLITE RADIO WITh CD/DVD PLAYER
(if so equipped)
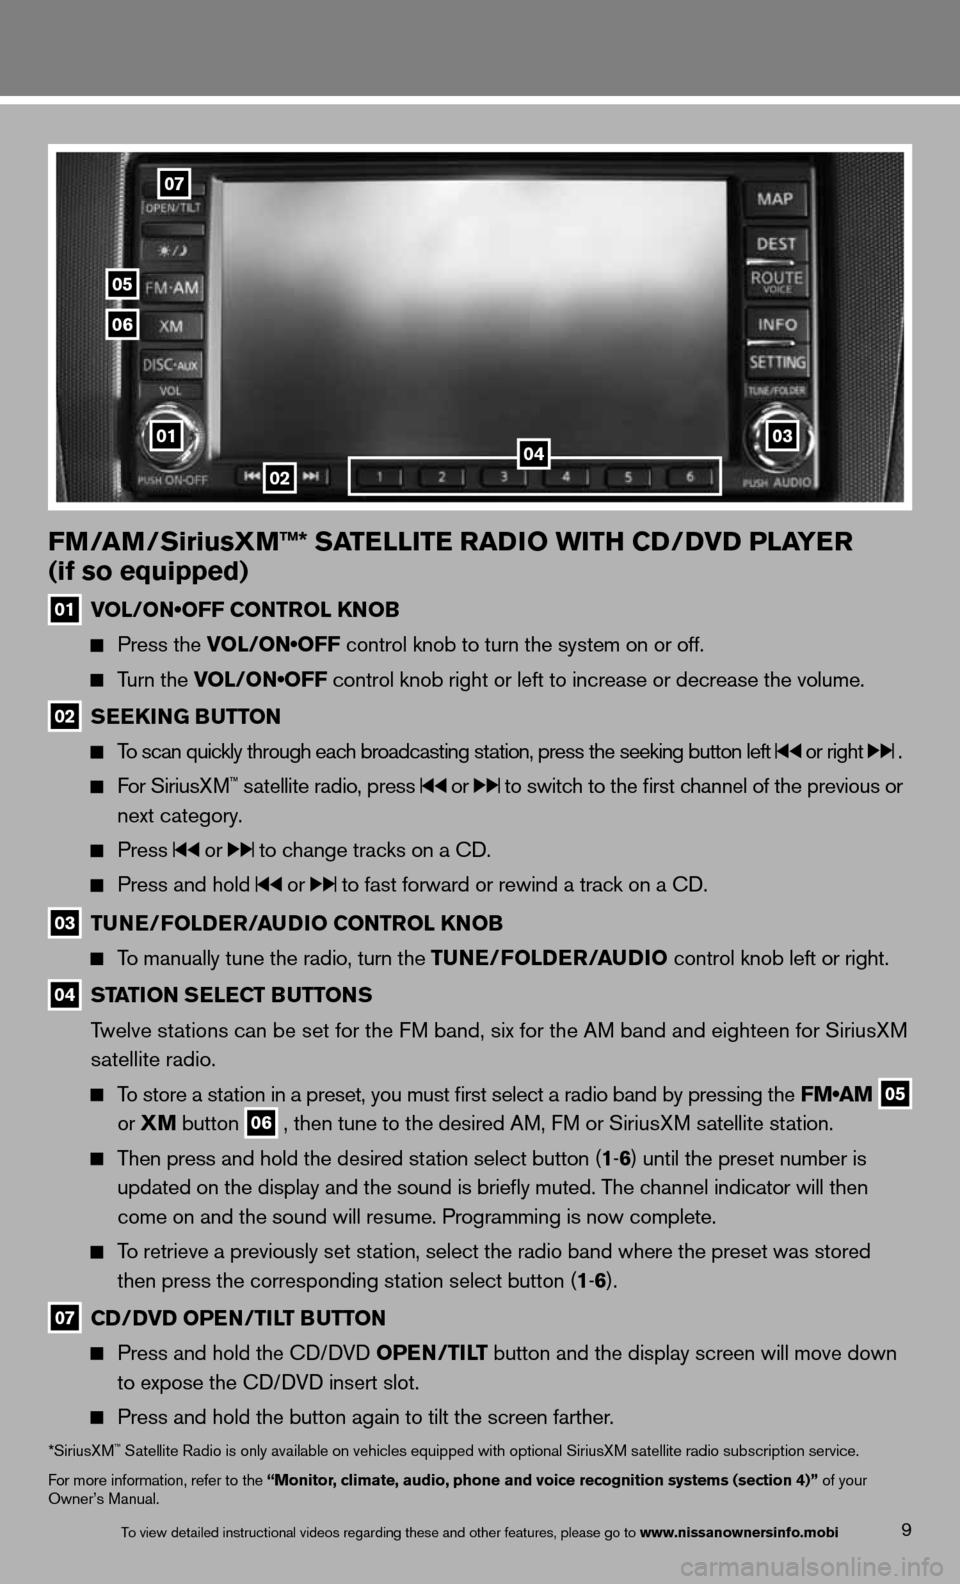
01 VOL/ON•OFF CONTROL KNOB
Press the VOL/ON•OFF control knob to turn the system on or off.
Turn the VOL/ON•OFF control knob right or left to increase or decrease the volume.
02 SEEk
ING BUTTON
To scan quickly through each broadcasting station, press the seeking button left or right .
f or SiriusXM™ satellite radio, press or to switch to the first channel of the previous or
next category.
Press or to change tracks on a cd.
Press and hold or to fast forward or rewind a track on a cd.
03 TUNE/FOLDER/AUDIO CONTROL k
NOB
To manually tune the radio, turn the TUNE/FOLDER/AUDIO control knob left or right.
04 STATION SELECT BUTTONS
Twelve stations can be set for the FM band, six for the AM band and eighteen for SiriusXM
satellite radio.
To store a station in a preset, you must first select a radio band by pressing the FM•AM
05
or
XM button
06 , then tune to the desired AM, f
M or SiriusXM satellite station.
Then press and hold the desired station select button (1 -6 ) until the preset number is
updated on the display and the sound is briefly muted. The channel indicator will then
come on and the sound will resume. Programming is now complete.
To retrieve a previously set station, select the radio band where the preset was stored
then press the corresponding station select button (1 -6 ).
07 CD/DVD OPEN/TILT BUTTON
Press and hold the cd/ dVd OPEN/TILT button and the display screen will move down
to expose the cd/ dVd insert slot.
Press and hold the button again to tilt the screen farther.
*SiriusXM™ Satellite Radio is only available on vehicles equipped with optional SiriusXM satellite radio subscription service.
for more information, refer to the “Monitor, climate, audio, phone and voice recognition systems (section 4)” of your
Owner’s Manual.
02
07
05
06
010304
To view detailed in\fstructional videos\f regarding these a\fnd other features\f \fplease go to www.nissanownersin\hfo.mobi