Page 9 of 26

01 AUTO BUTTON
The auto mode may be used year-round. Press the AUTO button to turn the system on and
the system will automatically control t")
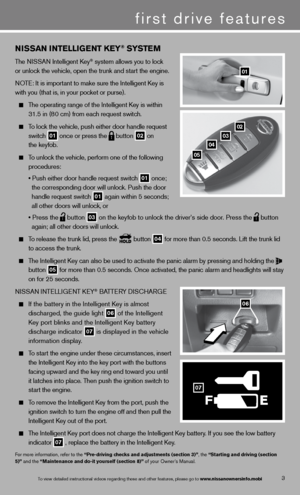
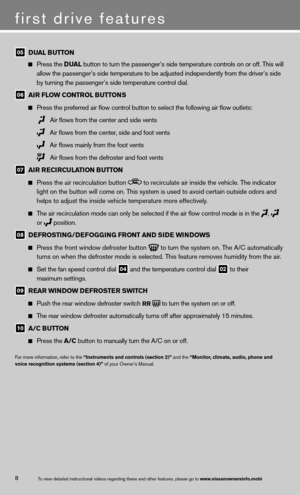
AUTOMATIC CLIMATE CONTROLS (if so equipped)
01 AUTO BUTTON
The auto mode may be used year-round. Press the AUTO button to turn the system on and
the system will automatically control the inside temperature (automatic\
cooling and/or
dehumidified heating), air flow distribution and fan speed.
02 D
RIVER’S S IDE TEMPERATURE CONTROL DIAL
Turn the driver’s side temperature control dial left for cooler or rig\
ht for warmer air.
03 PASSENGER’S S
IDE TEMPERATURE CONTROL DIAL
Turn the passenger’s side temperature control dial left for cooler or \
right for warmer air.
04 FAN SPEED CONTROL DIAL/OFF BUTTON
Turn the fan speed control dial to the left to decrease fan speed or to the right to increase
fan speed.
Press the button to turn the system off.
0302
01
04
0809
0606
071005
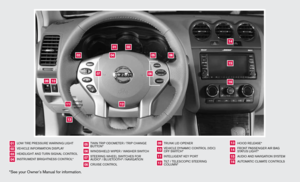
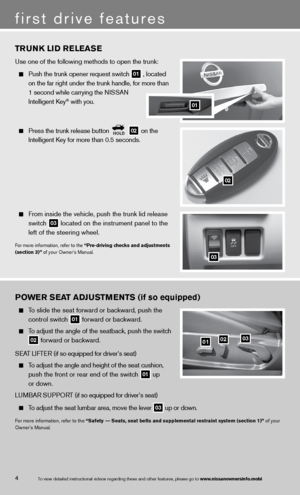
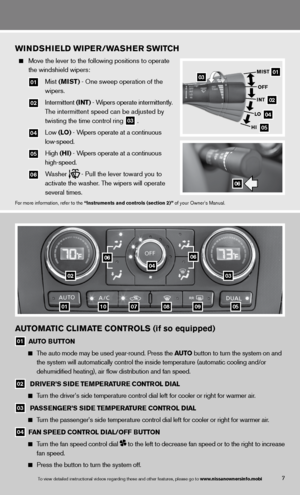
WINDShIELD WIPER/WAShER SWITC h
Move the lever to the following positions to operate
the windshield wipers:
01 Mist (MIST) - One sweep operation of the
wipers.
02 intermittent (INT) - Wipers operate intermittently.
The intermittent speed can be adjusted by
twisting the time control ring
03 .
04 Low (LO) - Wipers operate at a continuous
low-speed.
05 High (hI) - Wipers operate at a continuous
high-speed.
06 Washer - Pull the lever toward you to
activate the washer. The wipers will operate
several times.
f or more information, refer to the “Instruments and controls (section 2)” of your Owner’s Manual.
7
01
02
04
05
MIST
OFF
INT
LO
hI
06
03
To view detailed in\fstructional videos\f regarding these a\fnd other features\f \fplease go to www.nissanownersin\hfo.mobi
Page 10 of 26

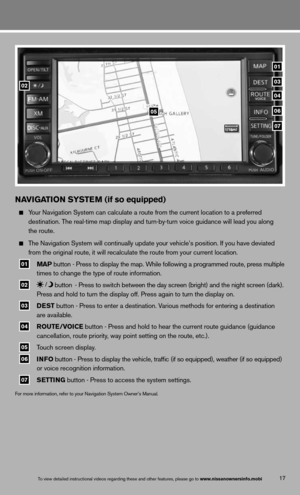
first drive features
8To view detailed in\fstructional videos\f regarding these a\fnd other features\f \fplease go to www.nissanownersin\hfo.mobi
05 DUAL BUTTON
Press the D UAL button to turn the passenger’s side temperature controls on or off. This will
allow the passenger’s side temperature to be adjusted independently from the driver’s side
by turning the passenger’s side temperature control dial.
06 AIR FLOW CONTROL BUTTONS
Press the preferred air flow control button to select the following air flow outlets:
Air flows from the center and side vents
Air flows from the center, side and foot vents
Air flows mainly from the foot vents
Air flows from the defroster and foot vents
07 AIR RECIRCULATION BUTTON
Press the air recirculation button to recirculate air inside the vehicle. The indicator
light on the button will come on. This system is used to avoid certain outside odors and
helps to adjust the inside vehicle temperature more effectively.
The air recirculation mode can only be selected if the air flow control mode is in the
,
or
position.
08 DEFROSTING/DEFOGGING FRONT AND SIDE WINDOWS
Press the front window defroster button
to turn the system on. The A/c automatically
turns on when the defroster mode is selected. This feature removes humidity from the air.
Set the fan speed control dial 04 and the temperature control dial 02 to their
maximum settings.
09 REAR WINDOW DEFROSTER SWITCh
Push the rear window defroster switch
RR to turn the system on or off.
The rear window defroster automatically turns off after approximately 15 minutes.
10 A/C BUTTON
Press the A/C button to manually turn the A/C on or off.
f or more information, refer to the “Instruments and controls (section 2)” and the “Monitor, climate, audio, phone and
voice recognition systems (section 4)” of your Owner’s Manual.
Page 11 of 26

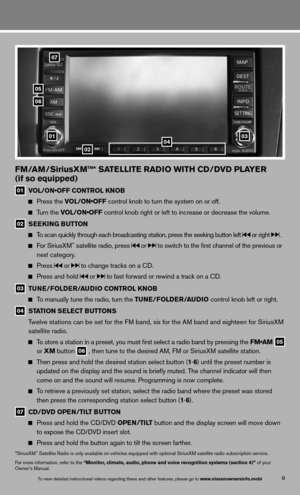
01 VOL/ON•OFF CONTROL KNOB
Press the VOL/ON•OFF control knob to turn the system on or off.
Turn the VOL/ON•OFF")
9
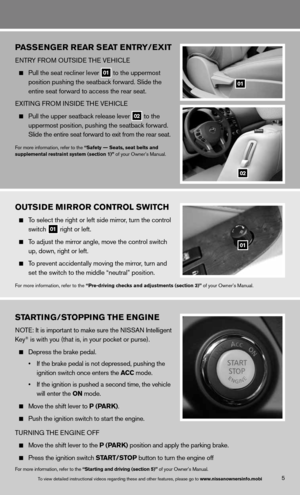
FM/AM/SiriusXM™* SATELLITE RADIO WITh CD/DVD PLAYER
(if so equipped)
01 VOL/ON•OFF CONTROL KNOB
Press the VOL/ON•OFF control knob to turn the system on or off.
Turn the VOL/ON•OFF control knob right or left to increase or decrease the volume.
02 SEEk
ING BUTTON
To scan quickly through each broadcasting station, press the seeking button left or right .
f or SiriusXM™ satellite radio, press or to switch to the first channel of the previous or
next category.
Press or to change tracks on a cd.
Press and hold or to fast forward or rewind a track on a cd.
03 TUNE/FOLDER/AUDIO CONTROL k
NOB
To manually tune the radio, turn the TUNE/FOLDER/AUDIO control knob left or right.
04 STATION SELECT BUTTONS
Twelve stations can be set for the FM band, six for the AM band and eighteen for SiriusXM
satellite radio.
To store a station in a preset, you must first select a radio band by pressing the FM•AM
05
or
XM button
06 , then tune to the desired AM, f
M or SiriusXM satellite station.
Then press and hold the desired station select button (1 -6 ) until the preset number is
updated on the display and the sound is briefly muted. The channel indicator will then
come on and the sound will resume. Programming is now complete.
To retrieve a previously set station, select the radio band where the preset was stored
then press the corresponding station select button (1 -6 ).
07 CD/DVD OPEN/TILT BUTTON
Press and hold the cd/ dVd OPEN/TILT button and the display screen will move down
to expose the cd/ dVd insert slot.
Press and hold the button again to tilt the screen farther.
*SiriusXM™ Satellite Radio is only available on vehicles equipped with optional SiriusXM satellite radio subscription service.
for more information, refer to the “Monitor, climate, audio, phone and voice recognition systems (section 4)” of your
Owner’s Manual.
02
07
05
06
010304
To view detailed in\fstructional videos\f regarding these a\fnd other features\f \fplease go to www.nissanownersin\hfo.mobi
Page 12 of 26

ye s
1. \bonnect the custome\fr’s phone
2. Explain voice tagg\fing
3. Identify microphone \flocation
4. Exp")
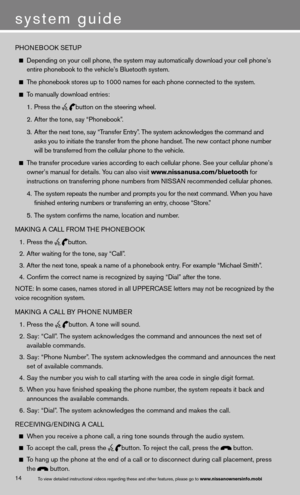
Bluetooth\f han\bs-free Phone system (if so equipped)
ye s
1. \bonnect the custome\fr’s phone
2. Explain voice tagg\fing
3. Identify microphone \flocation
4. Explain how to dia\fl a number
5. Explain how to rec\feive and end a cal\fl
2013 Altima coupe delivery checklist
Bluetooth\f Controls
heating, Ventilation an\b air Con\bitioning
\bemonstrate yes
1. auto and \bual modes (if so equip\fped)
2. Fan Speed control
3. Mode control
4. A/\b function
5. Defrost and Defog o\fperation
(include recircula\ftion button)
au\bio system
\bemonstrate yes
1. How to turn the sys\ftem on/off
2. How to tune the ra\fdio
3. How to operate seeK/traCK/Cat feature
(if so equipped)
4. How to set a stati\fon preset into mem\fory
seat a\bJustments
\bemonstrate yes
1. How to slide the fr\font seat forward or\f backward
2. How to recline the\f front seat
3. How to operate the\f seat lifter (if so\f equipped)
4. How to operate the\f lumbar support (i\ff so equipped)
5. How to operate pas\fsenger rear seat e\fntry/exit
hea\blight Control sWit Ch
\bemonstrate yes
1. How to turn the fro\fnt parking\f tail\f l\ficense plate
and instrument pan\fel lights on/off
2. How to turn the he\fadlights on/off
3. How to operate the\f Autolight system
4. How to turn the fog\f lights on/off (if s\fo equipped)
Page 13 of 26

\bemonstrate yes
1. How to operate the\f touch screen
and/or scrolling d\fial
2. How to add a home \flocation")
2013 Altima coupe delivery checklist
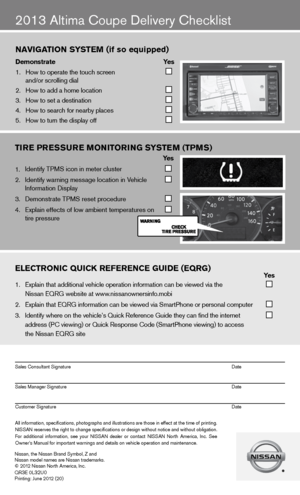
naVigation s ystem (if so equipped)
\bemonstrate yes
1. How to operate the\f touch screen
and/or scrolling d\fial
2. How to add a home \flocation
3. How to set a desti\fnation
4. How to search for n\fearby places
5. How to turn the di\fsplay off
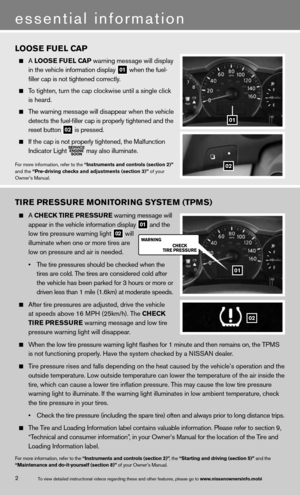
TIRE PRESSURE MONITORING SYSTEM (TPMS)
Ye s
1. identify TPMS icon in meter cluster
2. identify warning message location in Vehicle
information display
3. demonstrate TPMS reset procedure
4. Explain effects of low ambient temperatures on
tire pressure
eleCtroniC QuiCK referenCe gui\be (eQrg) yes
1. Explain that addit\fional vehicle oper\fation information c\fan be viewed via t\fhe
Nissan EQRG websit\fe at www.nissanownersinfo.mo\fbi
2. Explain that EQRG \finformation can be \fviewed via SmartPh\fone or personal co\fmputer
3. Identify where on th\fe vehicle’s Quick \fReference Guide the\fy can find the inter\fnet
address (P\b viewing\f) or Quick Respons\fe \bode (SmartPhone \fviewing) to access\f
the Nissan EQRG si\fte
All information\f specifications\f photographs and illustrations are those in effect at the time of printing.
NISSAN reserves the right to change specifications or design without notice and without obligation.
For additional information\f see your NISSAN dealer or contact NISSAN North America\f Inc. See
Owner’s Manual for \fimportant warnings\f and details on ve\fhicle operation an\fd maintenance. Sales \bonsultant Si\fgnature Date
Sales Manager Sign\fature Date
\bustomer Signature Date
Nissan\f the Nissan \fBrand Symbol\f Z and
Nissan model names\f are Nissan tradem\farks.
© 2012 Nissan North Ame\frica\f Inc.
QR
3E 0L32U0Printing: June 2012 (20)
Page 14 of 26

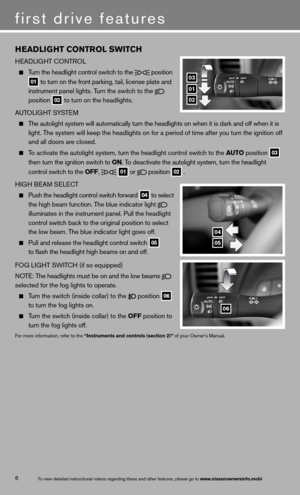
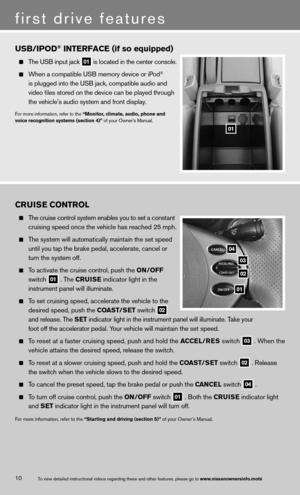
CRUISE CONTROL
The cruise control system enables you to set a constant
cruising speed once the vehicle has reached 25 mph.
The system will automatically maintain the set speed
until you tap the brake pedal, accelerate, cancel or
turn the system off.
To activate the cruise control, push the ON/OFF
switch
01 . The CRUISE
indicator light in the
instrument panel will illuminate.
To set cruising speed, accelerate the vehicle to the
desired speed, push the COAST/SET switch
02
and release. The SET indicator light in the instrument panel will illuminate. Take your
foot off the accelerator pedal. Your vehicle will maintain the set speed.
To reset at a faster cruising speed, push and hold the ACCEL/RES switch
03 . When the
vehicle attains the desired speed, release the switch.
To reset at a slower cruising speed, push and hold the COAST/SET switch
02 . Release
the switch when the vehicle slows to the desired speed.
To cancel the preset speed, tap the brake pedal or push the CANCEL switch
04 .
To turn off cruise control, push the ON/OFF switch
01 . Both the CRUISE
indicator light
and SET indicator light in the instrument panel will turn off.
for more information, refer to the “Starting and driving (section 5)” of your Owner’s Manual.
first drive features
10
03
02
04
01
To view detailed in\fstructional videos\f regarding these a\fnd other features\f \fplease go to www.nissanownersin\hfo.mobi
usB/iPo\b\f interfaCe (if so equipped)
The USB input jack\f
01 is located in the \fcenter console.
When a compatible \fUSB memory device o\fr iPod®
is plugged into th\fe USB jack\f compati\fble audio and
video files stored \fon the device can \fbe played through
the vehicle’s audi\fo system and front d\fisplay.
For more informatio\fn\f refer to the “monitor, climate, a\hudio, phone and
voice recognition \hsystems (section 4)\h” of your Owner’s Man\fual.
01
Page 15 of 26
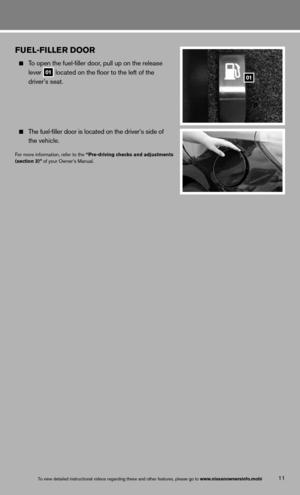
FUEL-FILLER DOOR
To open the fuel-filler door, pull up on the release
lever
01 located on the floor to the left of the
driver’s seat.
The fuel-filler door is located on the driver’s side of
the vehicle.
for more information, refer to the “Pre-driving checks and adjustments
(section 3)” of your Owner’s Manual.
11
01
To view detailed in\fstructional videos\f regarding these a\fnd other features\f \fplease go to www.nissanownersin\hfo.mobi
Page 16 of 26

With an overhead microphone and sound
transmitted through the audio system speakers,
the Bluetooth
® Hands-free Phone System utilizes")
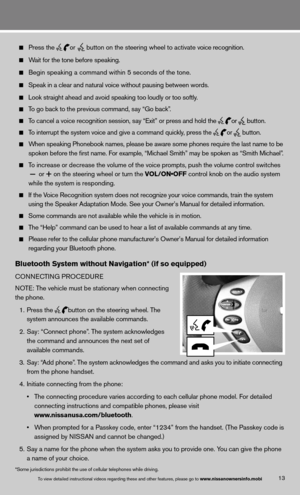
BLUETOOTh® hANDS-FREE PhONE SYSTEM (if so equipped)
With an overhead microphone and sound
transmitted through the audio system speakers,
the Bluetooth
® Hands-free Phone System utilizes
Bluetooth wireless technology and voice recognition
to provide hands-free cellular phone communication.
Bluetooth Streaming Audio (available with Navigation
System only) allows you to use a compatible Bluetooth
phone to play audio files on your device. Your
compatible cellular phone can be connected to the
vehicle’s audio system allowing audio files to play
through the vehicle’s speakers.
A cellular telephone should not be used while driving
so full attention may be given to vehicle operation.*
SYSTe M OPeRATin G TiPS
close all windows. Surrounding noises may interfere
with system operation and performance.
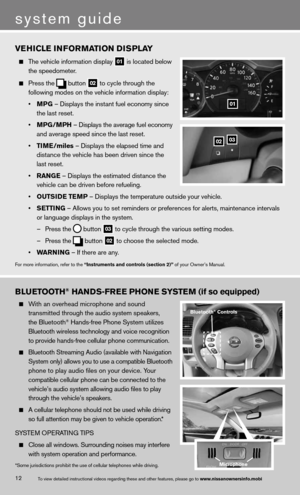
VEhICLE INFORMATION DISPLAY
The vehicle information display
01 is located below
the speedometer.
Press the
button
02 to cycle through the
following modes on the vehicle information display:
• MPG – displays the instant fuel economy since
the last reset.
• MPG/MP h – displays the average fuel economy
and average speed since the last reset.
• TIME/miles – displays the elapsed time and
distance the vehicle has been driven since the
last reset.
• RANGE – displays the estimated distance the
vehicle can be driven before refueling.
• OUTSIDE TEMP – displays the temperature outside your vehicle.
• SETTING – Allows you to set reminders or preferences for alerts, maintenance\
intervals
or language displays in the system.
– Press the
button
03 to cycle through the various setting modes.
– Press the
button
02 to choose the selected mode.
• WARNING – if there are any.
for more information, refer to the “Instruments and controls (section 2)” of your Owner’s Manual.
0203
01
*Some jurisdictions prohibit the use of cellular telephones while driving.
Bluetooth® Controls
Microphone
system guide
12To view detailed in\fstructional videos\f regarding these a\fnd other features\f \fplease go to www.nissanownersin\hfo.mobi