Page 371 of 706

3-278 Features and controls
3
To import a devices phonebook
Follow the steps below to transfer to the mobile phonebook the
phonebook stored in the cellular phone.NOTE�Transfer should be completed while the vehicle is parked.
Before transferring, make sure that the vehicle is parked
in a safe location.
�The already stored phonebook in the mobile phonebook is
overwritten by the stored phonebook in the cellular phone.
�All or part of data may not be transferred, even when the
cellular phone supports Bluetooth
®, depending on the
compatibility of the device.
�Only a home, a work, and a mobile number can be
imported.
�The maximum supported telephone number length is 19
digits. Any telephone number of 20 digits or more will be
truncated to the first 19 digits.
�If telephone numbers contain characters other than 0 to 9,
*, # or +, these characters are deleted before the transfer.
�For the connection settings on the cellular phone side,
refer to the instructions for the cellular phone.
1. Press the SPEECH button.
2. Say “Phonebook.”
3. The voice guide will say “Select one of the following:
new entry, edit number, edit name, list names, delete,
erase all, or import contact.” Say “Import contact.”
4. The voice guide will say “Would you like to import a sin-
gle entry or all contacts?” Say “All contacts.”5. The voice guide will say “Importing the contact list from
the mobile phonebook. This may take several minutes to
complete. Would you like to continue?” Answer “Yes,”
transferring to the mobile phonebook the phonebook
stored in the cellular phone will start.
Answer “No,” the system will return to the main menu.
NOTE�The transfer may take some time to complete depending
on the number of contacts.
�If the Bluetooth
® 2.0 interface could not be connected to
the Bluetooth
® compatible cellular phone, the voice guide
will say “Unable to transfer contact list from phone” and
then the system will return to the main menu.
�If you press the HANG-UP button or press and hold the
SPEECH button during the data transfer, the transfer will
be cancelled and the system will return to the main menu.
�If an error occurs during the data transfer, all transfer will
be cancelled and the voice guide will say “Unable to com-
plete the phonebook import” and then the system will
return to the main menu.
�If there are no contacts in the phonebook, the voice guide
will say “There are no contacts on the connected phone.”
6. When the transfer is complete, the voice guide will say
“Import complete” and then the system will return to the
main menu.
BK0151000US.book 278 ページ 2012年3月29日 木曜日 午後6時8分
Page 372 of 706

Features and controls
3-279
3
General information
N00566300053
MODEL: MMC FCC ID: CB2MDGMY10 IC: 279B-
MDGMY10
Your Bluetooth
® 2.0 interface operates on a radio frequency
subject to Federal Communications Commission (FCC) Rules
(For vehicles sold in U.S.A.) and Industry Canada Rules (For
vehicles sold in Canada). This device complies with Part 15 of
the FCC Rules and RSS-210 of the Industry Canada Rules.
Operation is subject to the following two conditions:
�This device may not cause harmful interference.
�This device must accept any interference received, includ-
ing interference that may cause undesired operation.
The term “IC:” before the radio certification number only sig-
nifies that Industry Canada technical specifications were met.
The antenna used for this transmitter must not be co-located or
operating in conjunction with any other antenna or transmitter.
End-users and installers must be provided with installation
instructions and transmitter operating conditions for satisfying
RF exposure compliance.
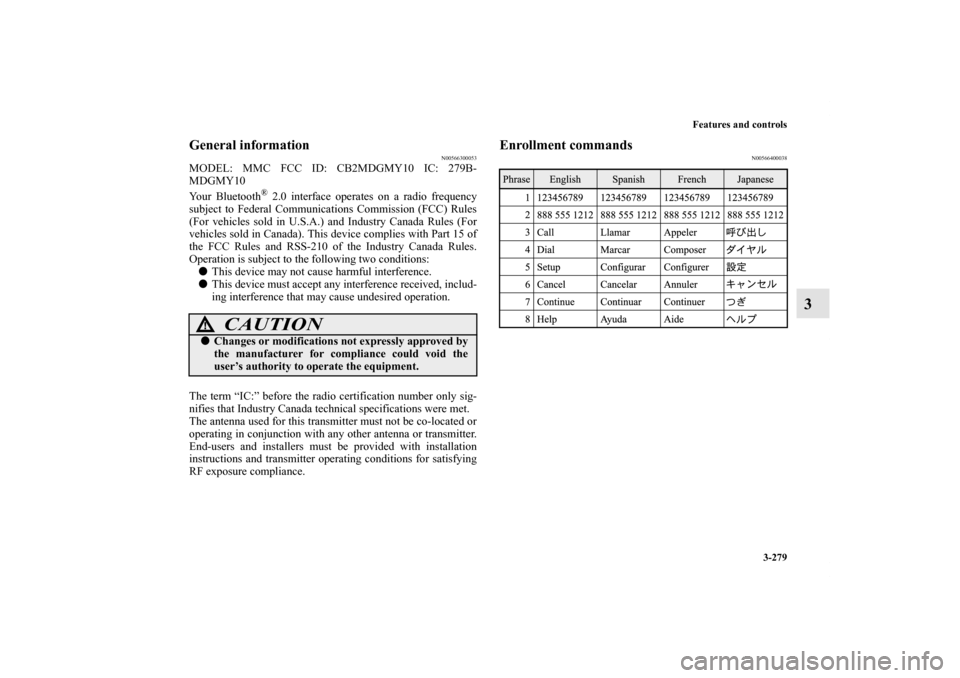
Enrollment commands
N00566400038
CAUTION
!�Changes or modifications not expressly approved by
the manufacturer for compliance could void the
user’s authority to operate the equipment.
BK0151000US.book 279 ページ 2012年3月29日 木曜日 午後6時8分
Page 373 of 706
3-280 Features and controls
3USB input terminal
(if so equipped)
N00566700015
You can connect your USB memory device or iPod* to play
music files stored in the USB memory device or iPod.
The following explains how to connect and remove a USB
memory device or iPod.
Refer to the following sections for details on how to play music
files:
Refer to “To play tracks from USB device” on page 5-104.
*: “iPod” is a registered trademark of Apple Inc. in the United
States and other countries.
How to connect a USB memory device
N00566800074
1. Park your vehicle in a safe place and turn the ignition
switch to the “LOCK” position.
2. Open the USB input terminal cover (A) in the glove com-
partment.
BK0151000US.book 280 ページ 2012年3月29日 木曜日 午後6時8分
Page 377 of 706
3-284 Features and controls
3
5. To remove the Dock connector, turn the ignition switch to
the “LOCK” position first and perform the installation
steps in reverse.
Types of connectable devices and supported file
specifications
N00567000015
Device types
N00567100087
Devices of the following types can be connected.
*: “iPod touch,” “iPod classic,” “iPod” and “iPod nano” are
registered trademarks of Apple Inc. in the United States and
other countries.Model name
Condition
USB memory deviceStorage capacity of 256 Mbytes
or more
iPod touch* F/W Ver.1.1.1 or later
iPod classic* F/W Ver.1.0 or later
iPod (fifth generation)* F/W Ver.1.2.2 or later
iPod nano (fifth generation)* F/W Ver.1.2 or later
iPod nano (second generation)* F/W Ver.1.1.2 or later
Models other than USB mem-
ory devices and iPodsDigital audio player supporting
mass storage class
BK0151000US.book 284 ページ 2012年3月29日 木曜日 午後6時8分
Page 378 of 706

Features and controls
3-285
3
NOTE�Depending on the type of the USB memory device or
other device connected, the connected device may not
function properly or the available functions may be lim-
ited.
�It is recommended to use an iPod with firmware updated
to the latest version.
�You can charge your iPod by connecting it to the USB
input terminal when the ignition switch is in the “ACC” or
“ON” position.
�Do not keep your USB memory device or iPod in your
vehicle.
�It is recommended that you back up the files in case of
data damage.
�Do not connect to the USB input terminal any device
(hard disk, card reader, memory reader, etc.) other than
the connectable devices specified in the previous section.
The device and/or data may be damaged. If any of these
devices was connected by mistake, remove it after turning
the ignition switch to the “LOCK” position.
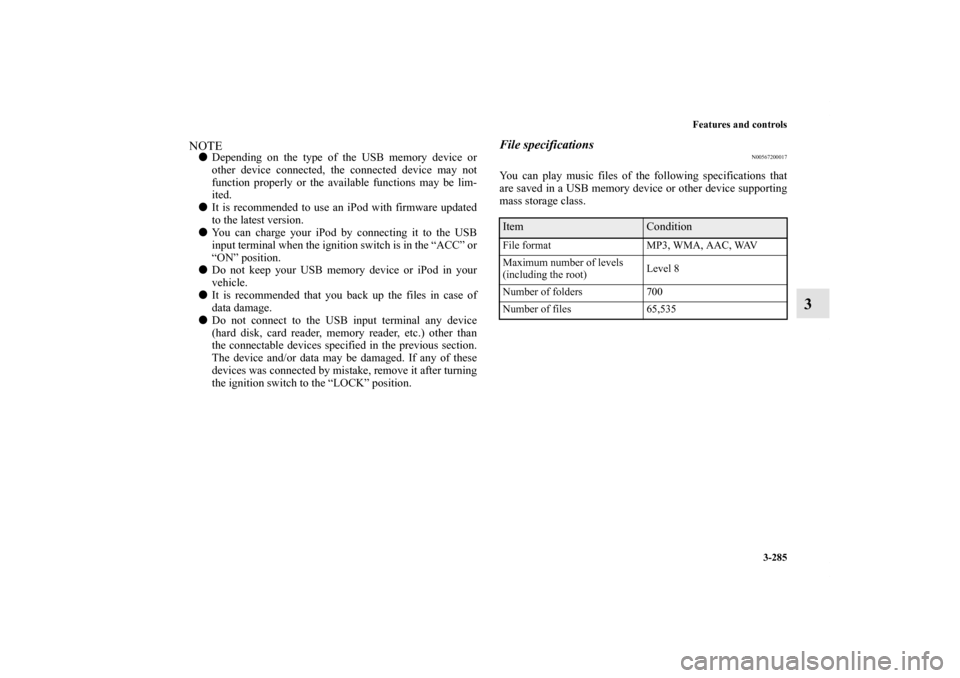
File specifications
N00567200017
You can play music files of the following specifications that
are saved in a USB memory device or other device supporting
mass storage class.Item
Condition
File format MP3, WMA, AAC, WAV
Maximum number of levels
(including the root)Level 8
Number of folders 700
Number of files 65,535
BK0151000US.book 285 ページ 2012年3月29日 木曜日 午後6時8分
Page 390 of 706
Features and controls
3-297
3
Front console boxes
(if so equipped)
N00546400058
To open, push the lid.Upper boxNOTE�The Auxiliary Audio connector (RCA) (if so equipped) or
the Auxiliary Video connector (RCA) (if so equipped) is
located in the upper box.
For details, refer to “To use the external audio input func-
tion” on page 5-125.
Lower box
CAUTION
!�Do not use the front console boxes as an ashtray.
This could cause a fire.
BK0151000US.book 297 ページ 2012年3月29日 木曜日 午後6時8分
Page 395 of 706

3-302 Features and controls
3
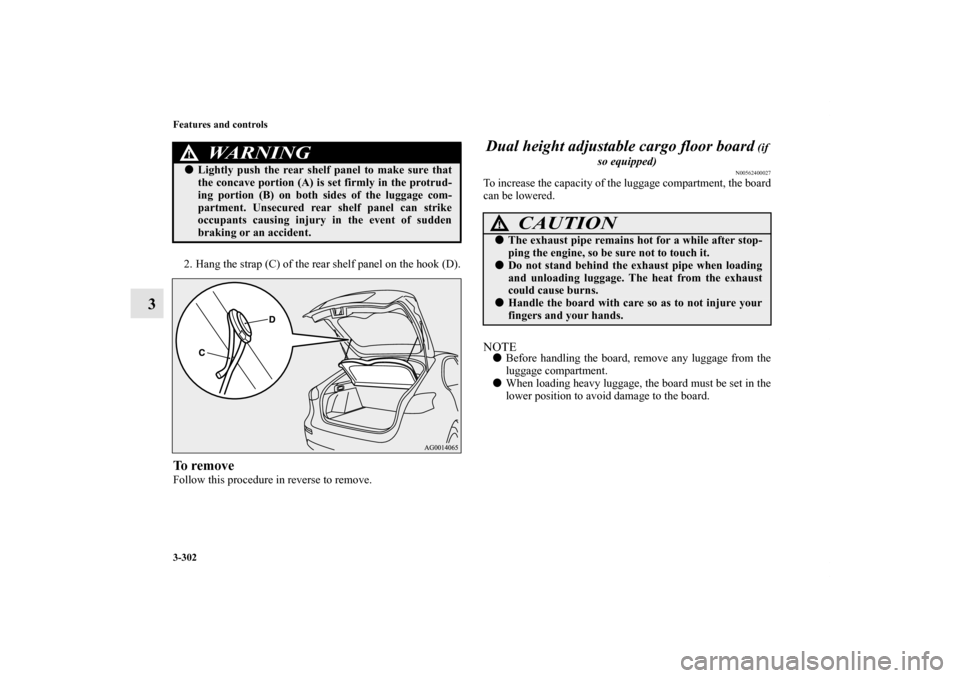
2. Hang the strap (C) of the rear shelf panel on the hook (D).To removeFollow this procedure in reverse to remove.
Dual height adjustable cargo floor board
(if
so equipped)
N00562400027
To increase the capacity of the luggage compartment, the board
can be lowered.NOTE�Before handling the board, remove any luggage from the
luggage compartment.
�When loading heavy luggage, the board must be set in the
lower position to avoid damage to the board.
WA R N I N G
!�Lightly push the rear shelf panel to make sure that
the concave portion (A) is set firmly in the protrud-
ing portion (B) on both sides of the luggage com-
partment. Unsecured rear shelf panel can strike
occupants causing injury in the event of sudden
braking or an accident.
CAUTION
!�The exhaust pipe remains hot for a while after stop-
ping the engine, so be sure not to touch it.�Do not stand behind the exhaust pipe when loading
and unloading luggage. The heat from the exhaust
could cause burns.�Handle the board with care so as to not injure your
fingers and your hands.
BK0151000US.book 302 ページ 2012年3月29日 木曜日 午後6時8分
Page 396 of 706
Features and controls
3-303
3
1. Raise the rear part of the board.
2. Pull the board toward you until the front part is lowered.3. Push the board in all the way with the front part lowered,
then set the board into place.
4. Make sure the board is set firmly in place.
5. Follow this procedure in reverse to return the board to its
original position.
BK0151000US.book 303 ページ 2012年3月29日 木曜日 午後6時8分