Page 228 of 706
Features and controls
3-135
3
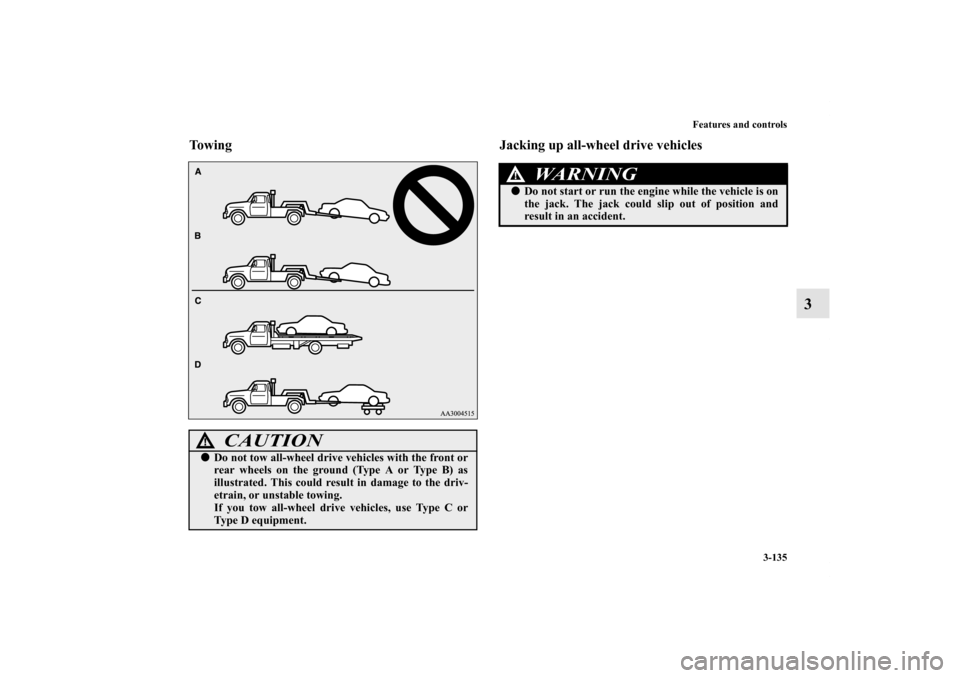
Towing Jacking up all-wheel drive vehicles
CAUTION
!�Do not tow all-wheel drive vehicles with the front or
rear wheels on the ground (Type A or Type B) as
illustrated. This could result in damage to the driv-
etrain, or unstable towing.
If you tow all-wheel drive vehicles, use Type C or
Type D equipment.
WA R N I N G
!�Do not start or run the engine while the vehicle is on
the jack. The jack could slip out of position and
result in an accident.
BK0151000US.book 135 ページ 2012年3月29日 木曜日 午後6時8分
Page 566 of 706
 at the tire that is diago-
nally opposite from the tire (B) you are changing.
NOT")
For emergencies
6-9
6
5. To prevent the vehicle from rolling when it is raised on the
jack, place chocks or blocks (A) at the tire that is diago-
nally opposite from the tire (B) you are changing.
NOTE�The chocks shown in the illustration do not come with
your vehicle. It is recommended that you purchase chocks
or blocks and keep them in the vehicle for use if needed.
�If chocks or blocks are not available, use stones or any
other objects that are large enough to hold the wheel in
position.
6. Get the jack, bar and wheel nut wrench ready.
Refer to “Tools and jack” on page 6-7.Spare tire information
N00849600302
Compact spare tireThe compact spare tire is designed to save space in the luggage
compartment. Its lighter weight makes it easier to use if a flat
tire occurs.
WA R N I N G
!�Be sure to apply chocks or blocks to the correct tire
when jacking up the vehicle. If the vehicle moves
while jacked up, the jack could slip out of position,
leading to an accident.
WA R N I N G
!�Tires, including spare tire, degrade over time with
age even when they are not being used. It is recom-
mended that tires over 6 years generally be replaced
even if damage is not obvious.
BK0151000US.book 9 ページ 2012年3月29日 木曜日 午後6時8分
Page 569 of 706
6-12 For emergencies
6
To change a tire
N00849800434
1. On vehicles equipped with wheel covers, first remove the
covers (refer to “Wheel covers” on page 6-19). Then
loosen the wheel nuts with the wheel nut wrench. Do not
remove the wheel nuts yet.2. Place the jack under one of the jacking points (A) shown
in the illustration. Use the jacking point closest to the tire
you wish to change.
WA R N I N G
!�Set the jack only at the positions shown here. If the
jack is set at a wrong position, it could dent your
vehicle or the jack might fall over and cause per-
sonal injury. �Do not use the jack on a tilted or soft surface.
Otherwise, the jack might slip and cause personal
injury. Always use the jack on a flat, hard surface.
Before setting the jack, make sure there are no sand
or pebbles under the jack base.
BK0151000US.book 12 ページ 2012年3月29日 木曜日 午後6時8分
Page 570 of 706
For emergencies
6-13
6
3. Rotate the jack by hand until the flange portion (B) fits in
the groove (C) at the top of the jack. 4. Insert the bar (D) into the wheel nut wrench (E). Then put
the end of the bar into the shaft’s jack end, as shown in the
illustration.
Slowly rotate the wheel nut wrench until the tire is raised
slightly off the ground surface.
WA R N I N G
!�Stop jacking up the vehicle as soon as the tire is
raised off the ground. It is dangerous to raise the
vehicle any higher. �Never get under the vehicle or put any portion of
your body under the vehicle while it is supported by
the jack. �Do not bump the raised vehicle or leave it sitting on
the jack for a long time. Both are very dangerous. �Do not use a jack except the one that came with your
vehicle.
BK0151000US.book 13 ページ 2012年3月29日 木曜日 午後6時8分
. Then
loosen the wheel nuts with the")
 fits in
the groove (C) at the top of the jack. 4. Insert the bar (D) into the wheel nut wrench (E). Then put
the end of t")