2013 MITSUBISHI iMiEV lock
[x] Cancel search: lockPage 104 of 258

l
If there is no operation for about 10 seconds
when the meter illumination control or serv-
ice reminder is shown, the display returns to
the odometer.
Odometer E00530800016
The odometer indicates the total distance the vehi-
cle has travelled.
NOTE
l Even
if the electric motor switch is turned to
“ACC” or “LOCK”, the odometer will be dis-
played for about 30 seconds after the reset but-
ton is pressed.
Tripmeter E00530900017
The tripmeter indicates the distance travelled dur-
ing a particular trip or period.
There
are two tripmeter displays: Tripmeter and .
Tripmeter can be used to measure the distance
travelled
since the current trip began. At the same
time, Tripmeter can be used to measure the dis-
tance from an intermediate location.
NOTE
l Even
if the electric motor switch is turned to
the “ACC” or “LOCK” position, the tripme-
ter will be displayed for about 30 seconds af-
ter the reset button is pressed.
To reset the tripmeter
To return the display to “0”, press the reset button
(A) for more than 2 seconds. Only the currently dis-
played value will be reset. NOTE
l If
the auxiliary battery terminal is removed,
the memories for the tripmeter and
displays are erased and the displays return to
0.
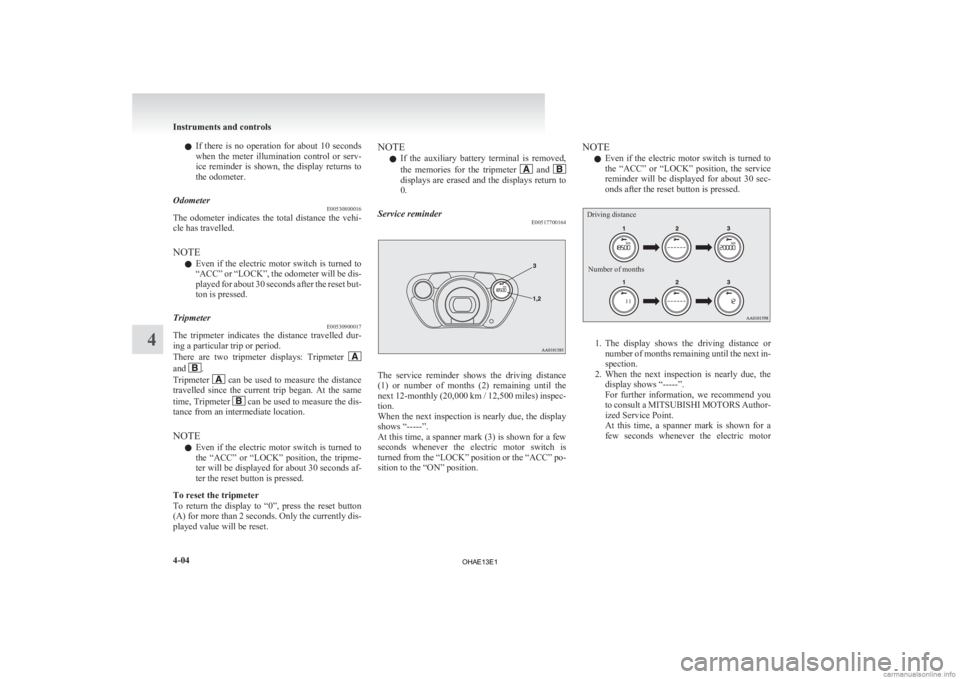
Service reminder E00517700164 The service reminder shows the driving distance
(1)
or number of months (2) remaining until the
next 12-monthly (20,000 km / 12,500 miles) inspec-
tion.
When the next inspection is nearly due, the display
shows “-----”.
At this time, a spanner mark (3) is shown for a few
seconds whenever the electric motor switch is
turned from the “LOCK” position or the “ACC” po-
sition to the “ON” position. NOTE
l Even
if the electric motor switch is turned to
the “ACC” or “LOCK” position, the service
reminder will be displayed for about 30 sec-
onds after the reset button is pressed.
Driving distance
Number of months 1. The
display shows the driving distance or
number of months remaining until the next in-
spection.
2. When the next inspection is nearly due, the display shows “-----”.
For further information, we recommend you
to consult a MITSUBISHI MOTORS Author-
ized Service Point.
At this time, a spanner mark is shown for a
few seconds whenever the electric motor Instruments and controls
4-04
4
OHAE13E1
Page 105 of 258

switch is turned from the “LOCK” position
or the “ACC” position to the “ON” position.
3. When the vehicle is inspected at a
MITSUBISHI MOTORS Authorized Service
Point, the driving distance or number of
months remaining until the next inspection
will be shown.
NOTE l The indicated distance decreases in steps of
100 km (62 miles). The indicated number of
months decreases in steps of one month.
l It is possible to change the settings for the
service reminder.
For further information, we recommend you
to consult a MITSUBISHI MOTORS Author-
ized Service Point.
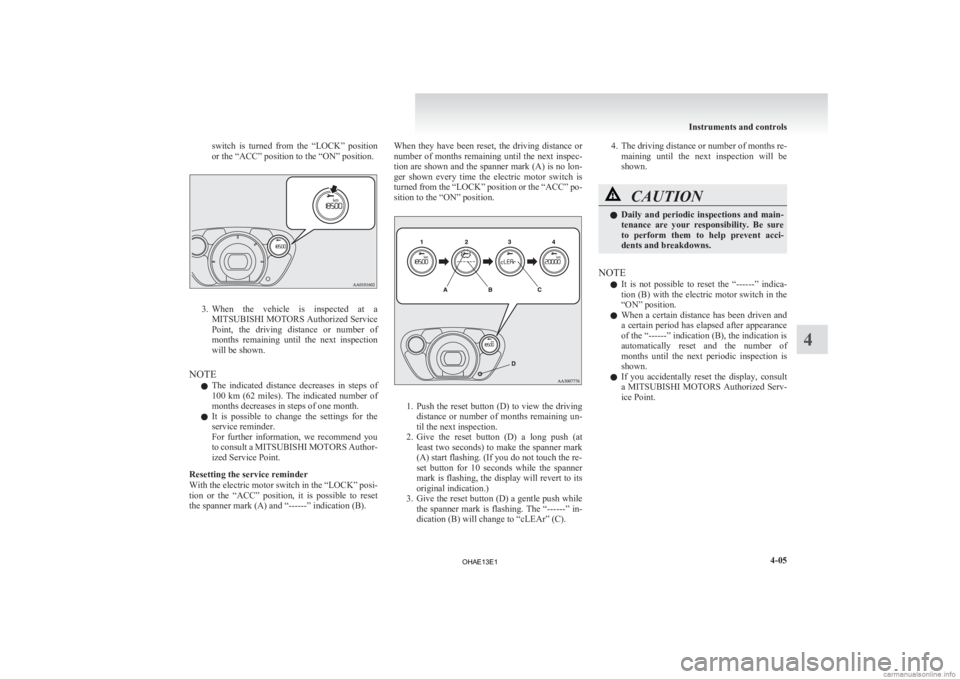
Resetting the service reminder
With the electric motor switch in the “LOCK” posi-
tion or the “ACC” position, it is possible to reset
the spanner mark (A) and “------” indication (B). When they have been reset, the driving distance or
number
of months remaining until the next inspec-
tion are shown and the spanner mark (A) is no lon-
ger shown every time the electric motor switch is
turned from the “LOCK” position or the “ACC” po-
sition to the “ON” position. 1. Push
the reset button (D) to view the driving
distance or number of months remaining un-
til the next inspection.
2. Give the reset button (D) a long push (at least two seconds) to make the spanner mark
(A) start flashing. (If you do not touch the re-
set button for 10 seconds while the spanner
mark is flashing, the display will revert to its
original indication.)
3. Give the reset button (D) a gentle push while the spanner mark is flashing. The “------” in-
dication (B) will change to “cLEAr” (C). 4. The
driving distance or number of months re-
maining until the next inspection will be
shown. CAUTION
l
Daily
and periodic inspections and main-
tenance are your responsibility. Be sure
to perform them to help prevent acci-
dents and breakdowns.
NOTE l It
is not possible to reset the “------” indica-
tion (B) with the electric motor switch in the
“ON” position.
l When a certain distance has been driven and
a certain period has elapsed after appearance
of the “------” indication (B), the indication is
automatically reset and the number of
months until the next periodic inspection is
shown.
l If you accidentally reset the display, consult
a MITSUBISHI MOTORS Authorized Serv-
ice Point. Instruments and controls
4-05 4
OHAE13E1
Page 108 of 258

Indication and warning lamps
E00501502220Type 1Type 21-
Low energy warning indicator
® p. 4-07
2. Selector lever position indicator ® p. 5-10
3- High-beam indication lamp ® p. 4-09
4- Turn-signal indication lamps/Hazard warning indication lamps ® p. 4-09
5- Position lamp indication lamp ® p. 4-09
6- Front fog lamp indication lamp* ® p. 4-09
7- Service reminder ® p. 4-04
8- Driver’s and front passenger’s seat belt warning lamp ® p. 3-09
9- Supplement Restraint System (SRS) warning lamp ® p. 3-29
10- Rear fog lamp indication lamp ® p. 4-09
11- Ready indicator ® p. 4-09 12-
Auxiliary battery charge warning lamp ® p. 4-10
13- Electric power steering system (EPS) warning lamp ® p. 5-17
14- Electric motor unit warning lamp ® p. 4-10
15- Brake warning lamp ® p. 4-09
16- Anti-lock brake system (ABS) warning lamp ® p. 5-15
17- Power down warning lamp ® p. 4-11
18- Active stability control (ASC) indication lamp ® p. 5-19
19- Active stability control (ASC) OFF indication lamp ® p. 5-19
20- Charging indicator ® p. 4-09
21- Door ajar warning lamp ® p. 4-10
22- Rear passenger’s seat belt warning lamps* ® p. 3-10Instruments and controls
4-08 4
OHAE13E1
Page 112 of 258

OFF All lamps off
AUTO With the electric motor switch
in the “ON” position, head-
lamps, position, tail, licence
plate, and instrument panel
lamps turn on and off automati-
cally in accordance with outside
light
level. All lamps turn off au-
tomatically when the electric
motor switch is turned to the
“OFF” position. Position, tail, licence plate and
instrument panel lamps on
Headlamps and other lamps go
on
NOTE
l The
sensitivity of the automatic on/off con-
trol can be adjusted. For further information,
please contact your MITSUBISHI MOTORS
Authorized Service Point.
l When the headlamps are turned off by the au-
tomatic on/off control with the electric motor
switch in the “ON” position, the front fog
lamps (if so equipped) and rear fog lamps al-
so go off. When the headlamps are subse-
quently turned back on by the automatic on/
off control, the front fog lamps also come on
but the rear fog lamp stays off. If you wish to
turn the rear fog lamp back on, operate the
switch again.
l Do not place anything on the automatic light
sensor (A), and do not clean with a glass clean-
er. l
If
the lamps do not turn on or off with the
switch in the “AUTO” position, manually op-
erate the switch and we recommend you to
have your vehicle checked.
Lamps (headlamps, fog lamp, etc.) au-
to-cutout function E00532700396
l If
the key is turned to the “LOCK” or
“ACC” position or removed from the electric
motor switch, and without opening the driv-
er’s door for 3 minutes while the lamp
switch in the “ ”
position, the lamps will
turn off automatically.
l If the key is turned to the “LOCK” or
“ACC” position or removed from the electric
motor switch and the driver’s door is opened
within 3 minutes while the lamp switch is in
the “ ”
position, a buzzer will sound to
warn the driver that the lamps have not been
turned off, and these lamps will automatical-
ly turn off. NOTE
l The
lamp auto-cutout will not function when
the lamp switch is in the “ ” position.
l When
the key has been turned to either the
“LOCK” or “ACC” position or removed
from the electric motor switch with the lamp
switch in the “ ”
position, and the lamp
switch is returned to the “OFF” position with-
in approximately 3 minutes, the auto-cutout
function will not be activated.
When you want to keep the lamps on 1. Turn the lamp switch in the “OFF” positionwhile the key is in the “LOCK” position.
2. Turn on the lamps with the switch in the
“ ”
or “ ” position again, then the
lamps will remain on.
NOTE l It is possible to disable the lamp auto-cutout
function. For further information, we recom-
mend you to consult MITSUBISHI
MOTORS Authorized Service Point.
Lamp monitor buzzer E00506100605
If the driver’s door is opened when the key is in the
“LOCK”
or “ACC” position or removed from the
electric motor switch while the lamps are on, a buz-
zer will sound to remind the driver to turn off the
lamps.
When the lamp auto-cutout function acts, the buz-
zer will stop automatically. Instruments and controls
4-12
4
OHAE13E1
Page 118 of 258

INT - The wiper operates continuously
for several seconds then operates
intermittently at intervals of about
every 8 seconds.
OFF - Off - The washer fluid will be sprayed
onto the rear window when the
knob
is turned fully in either direc-
tion.
The wipers operate automatically
several times while the washer flu-
id is being sprayed.
NOTE l To
ensure a clear rearward view, the wiper
performs several continuous operations when
the reverse gear is engaged while the switch
is in the “INT” position.
Following this continuous operation, the wip-
er will automatically switch to intermittent op-
eration.
l It is possible to activate the following func-
tions. For further information, we recom-
mend you to consult a MITSUBISHI
MOTORS Authorized Service Point.
• Adjustment of the interval for intermit-tent operation
• Changing intermittent wiper operation to continuous wiper operation Precautions to observe when using wip-
ers and washers
E00507600131
l If
the moving wipers become blocked by ice
or other deposits on the glass, the motor may
burn out even if the wiper switch is turned to
OFF. If obstruction occurs, park your vehicle
in a safe place, turn off the electric motor
switch, and clean the deposits from the glass
so that the wipers operate smoothly.
l Do not use the wipers when the glass is dry.
They may scratch the glass surface and the
blades wear out prematurely.
l Before using the wipers in cold weather,
check that the wiper blades are not frozen on-
to the glass. The motor may burn out if the
wipers are used with the blades frozen onto
the glass.
l Avoid using the washer continuously for
more than 20 seconds. Do not operate the
washer when the fluid reservoir is empty.
Otherwise, the motor may burn out.
l Periodically check the level of washer fluid
in the reservoir and refill if required.
During cold weather, add a recommended
washer solution that will not freeze in the
washer reservoir. Failure to do so could re-
sult in loss of washer function and frost dam-
age to the system components. Rear window demister switch
E00507901216
The
rear window demister switch can be operated
when the ready indicator illuminates.
Push the switch to turn on the rear window demis-
ter. It will be turned off automatically in about 20
minutes. To turn off the demister within about 20
minutes, push the switch again.
The indication lamp (A) will illuminate while the
demister is on. NOTE
l Since
the demister requires a significant
amount of power, stop the demister as soon
as the window is demisted. Instruments and controls
4-18
4
OHAE13E1
Page 121 of 258

Economical driving.......................................................................5-02
Driving, alcohol and drugs
........................................................... 5-02
Safe driving techniques ................................................................ 5-03
Parking brake................................................................................ 5-03
Parking.......................................................................................... 5-04
Inside rear-view mirror ................................................................. 5-05
Outside rear-view mirrors ............................................................. 5-05
Electric motor switch .................................................................... 5-07
Steering wheel lock ...................................................................... 5-08
Starting the electric motor unit ..................................................... 5-08
Transmission................................................................................. 5-09
Driving the vehicle ....................................................................... 5-11
Inspection
and maintenance following rough road oper-
ation.......................................................................................... 5-12
Acoustic Vehicle Alerting System (AVAS) .................................5-12
Braking......................................................................................... 5-14
Brake assist system....................................................................... 5-15
Anti-lock brake system (ABS) ..................................................... 5-15
Electric power steering system (EPS) ..........................................5-17
Active stability control (ASC) ...................................................... 5-18
Cargo loads................................................................................... 5-20
Trailer towing ............................................................................... 5-21Starting and driving
5
OHAE13E1
Page 123 of 258

Safe driving techniques
E00600300635
Driving
safety and protection against injury cannot
be fully ensured. However, we recommend that
you pay extra attention to the following:
Seat belts
Before starting the vehicle, make sure that you and
your passengers have fastened your seat belts.
Floor mats WARNING
l Keep
floor mats clear of the pedals by cor-
rectly laying floor mats that are suitable
for the vehicle.
To prevent the floor mats from slipping
out of position, securely retain them us-
ing the hook etc.
Note that laying a floor mat over a pedal
or laying one floor mat on top of another
can obstruct pedal operation and lead to
a serious accident. Carrying children in the vehicle
l Never leave your vehicle unattended with the
key
and children inside the vehicle. Children
may play with the driving controls and this
could lead to an accident.
l Make sure that infants and small children are
properly restrained in accordance with the
laws and regulations, and for maximum pro-
tection in case of an accident.
l Prevent children from playing in the luggage
compartment. It is quite dangerous to allow
them to play there while the vehicle is moving.
Loading luggage
When loading luggage, be careful not to load
above the height of seats. This is dangerous not on-
ly because rearward vision will be obstructed, but
also the luggage may be projected into the passen-
ger compartment under hard braking. Parking brake
E00600501647
To
park the vehicle, first bring it to a complete
stop, fully apply the parking lever sufficiently to
hold the vehicle.
To apply the parking brake 1- Firmly
depress and hold the brake pedal,
then pull the lever up without pushing the but-
ton at the end of hand grip. CAUTION
l
When
you intend to apply the parking
brake, firmly press the brake pedal to
bring the vehicle to a complete stop be-
fore pulling the parking brake lever.
Pulling the parking brake lever with the
vehicle moving could make the rear
wheels lock up, thereby making the vehi-
cle unstable. It could also make the park-
ing brake malfunction. Starting and driving
5-03 5
OHAE13E1
Page 125 of 258

Parking with the electric motor unit
running
Never
leave the electric motor unit running while
you take a short sleep/rest. WARNING
l Leaving
the electric motor unit running
risks injury or death from accidentally
moving the selector lever.
Do not keep the steering wheel fully
turned for a long time
More
effort could be required to turn the steering
wheel. Refer to “Electric power steering system
(EPS)” on page 5-17.
When leaving the vehicle
Always carry the key and lock all doors and the tail-
gate when leaving the vehicle unattended.
Always try to park your vehicle in a well lit area. Inside rear-view mirror
E00600800672
Adjust
the rear-view mirror only after making any
seat adjustments so you have a clear view to the
rear of the vehicle. WARNING
l Do
not attempt to adjust the rear-view
mirror while driving. This can be danger-
ous.
Always adjust the mirror before driving.
Adjust the rear-view mirror to maximize the view
through the rear window. Outside rear-view mirrors
E00600900628
To adjust the mirror position E00601000655
The outside rear-view mirrors can be operated
when
the electric motor switch is in the “ON” or
“ACC” position. WARNING
l Do
not attempt to adjust the rear-view
mirrors while driving. This can be danger-
ous.
Always adjust the mirrors before driving.
l Your vehicle is equipped with convex
type mirrors.
Please take into consideration, that ob-
jects you see in the mirror will look small-
er and farther away compared to a nor-
mal flat mirror.
Do not use this mirror to estimate dis-
tance of following vehicles when changing
lanes. Starting and driving
5-05 5
OHAE13E1