2013 MITSUBISHI iMiEV AUX
[x] Cancel search: AUXPage 205 of 258

WARNING
l If it is necessary to do work in the bonnet
room with the electric motor running, be
especially careful that your clothing, hair,
etc., does not become caught by the fan,
or other moving parts.
l The fan can turn on automatically even if
the electric motor is not running. Turn
the electric motor switch to the “LOCK”
position to be safe while you work in the
bonnet room.
l Do not smoke, cause sparks or allow open
flames around the auxiliary battery.
l Be extremely cautious when working
around the auxiliary battery. It contains
poisonous and corrosive sulphuric acid.
l Improper handling of components and
materials used in the vehicle can endan-
ger your personal safety. We recommend
you to consult a specialist for necessary in-
formation. CAUTION
l
The
components inside the electric motor
unit room might be very hot to touch.
To avoid being burnt, make sure all com-
ponents have sufficiently cooled before be-
ginning an inspection.
These components are affixed with the la-
bel indicating precautions for handling.
Follow the instructions on the label. CAUTION
l
When
replacing the auxiliary battery, re-
move the connected positive (+) and nega-
tive (-) terminals after turning the electric
motor switch to the “LOCK” position
and waiting at least 2 minutes. If the aux-
iliary battery terminal is removed just af-
ter the electric motor switch is turned to
the “LOCK” position, this may cause dam-
age to components of the electric motor
unit. If the electric motor unit warning
lamp illuminates, do not replace the auxil-
iary battery. Contact a MITSUBISHI
MOTORS Authorized Service Point. Bonnet
E08402000018
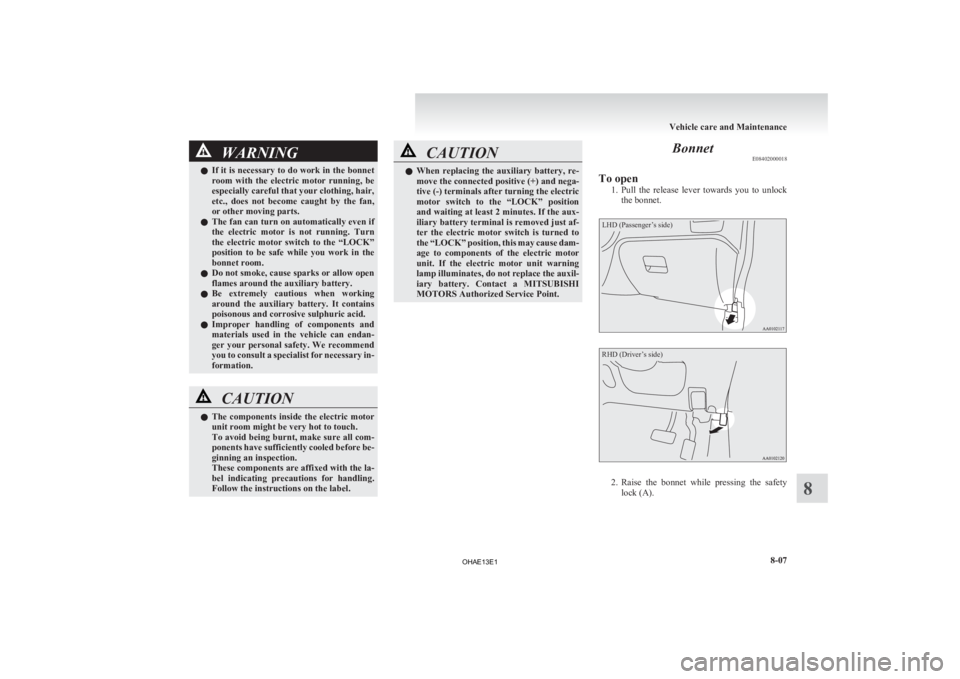
To open 1. Pull
the release lever towards you to unlock
the bonnet.
LHD (Passenger’s side)
RHD (Driver’s side) 2. Raise
the bonnet while pressing the safety
lock (A). Vehicle care and Maintenance
8-07 8
OHAE13E1
Page 210 of 258

The brake fluid in the master cylinder should be
checked
when doing other work under the bonnet.
The brake system should also be checked for leak-
age at the same time.
If the brake fluid level falls markedly in a short
length of time, it indicates leaks from the brake sys-
tem.
If this occurs, we recommend you to have the vehi-
cle checked.
Fluid type
Use brake fluid conforming to DOT3 or DOT4
from a sealed container. The brake fluid is hygro-
scopic. Too much moisture in the brake fluid will
adversely affect the brake system, reducing the per-
formance. CAUTION
l
Take
care in handling brake fluid as it is
harmful to the eyes, may irritate your
skin and also damage painted surfaces.
l Use only the specified brake fluid.
Do not mix or add different brands of
brake fluid to prevent chemical reactions.
Do not let any petroleum-based fluid
touch, mix with, or get into the brake fluid.
This will damage the seals.
l Keep the reservoir tank cap closed to pre-
vent the brake fluid from deteriorating ex-
cept maintenance.
l Clean the filler cap before removing and
close the cap securely after maintenance. Auxiliary battery
E08402300011
The
condition of the auxiliary battery is very impor-
tant to keep the vehicle’s electrical system working
properly. Regular inspection and care are especial-
ly important in cold weather.
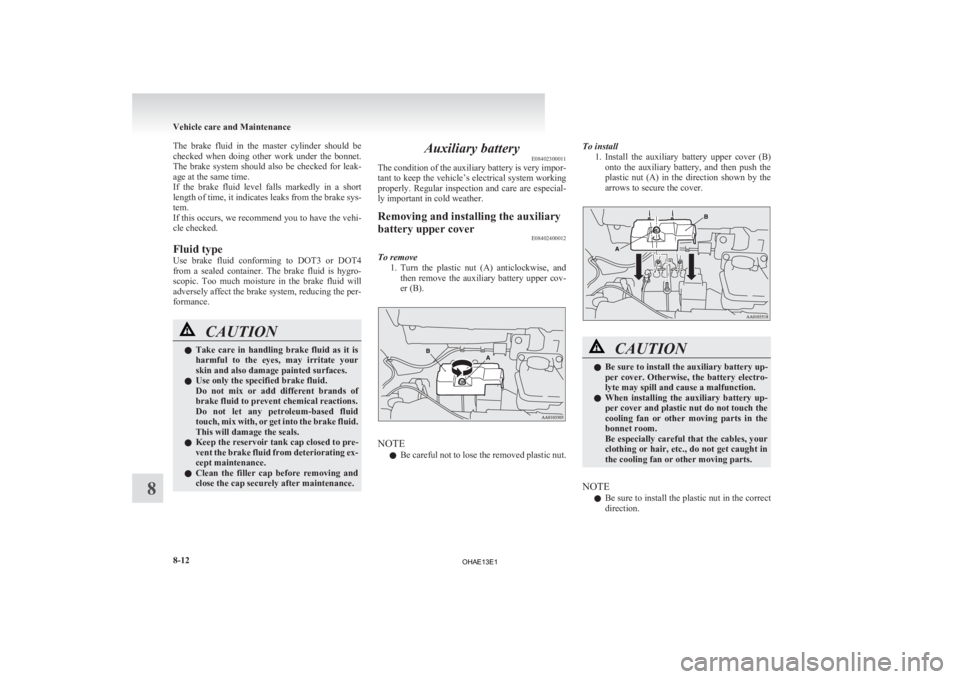
Removing and installing the auxiliary
battery upper cover E08402400012
To remove 1. Turn
the plastic nut (A) anticlockwise, and
then remove the auxiliary battery upper cov-
er (B). NOTE
l Be
careful not to lose the removed plastic nut. To install
1. Install
the auxiliary battery upper cover (B)
onto the auxiliary battery, and then push the
plastic nut (A) in the direction shown by the
arrows to secure the cover. CAUTION
l
Be sure to install the auxiliary battery up-
per
cover. Otherwise, the battery electro-
lyte may spill and cause a malfunction.
l When installing the auxiliary battery up-
per cover and plastic nut do not touch the
cooling fan or other moving parts in the
bonnet room.
Be especially careful that the cables, your
clothing or hair, etc., do not get caught in
the cooling fan or other moving parts.
NOTE l Be
sure to install the plastic nut in the correct
direction. Vehicle care and Maintenance
8-12
8
OHAE13E1
Page 211 of 258

Checking auxiliary battery electrolyte
level
E08402500013Before checking the auxiliary battery electrolyte lev-
el, remove the auxiliary battery’s upper cover.
The
electrolyte level must be between the specified
limit on the outside of the auxiliary battery. Replen-
ish with distilled water as necessary.
The inside of the auxiliary battery is divided into
several compartments; remove the cap from each
compartment and fill to the upper mark. Do not top
up beyond the upper mark because spillage during
driving could cause damage.
Check the electrolyte level at least once every 4
weeks, depending on the operating conditions.
If the auxiliary battery is not used, it will discharge
by itself with time.
Check it once every four weeks and charge with
low current if necessary. During cold weather
E08402600014
The
capacity of the auxiliary battery is reduced at
low temperatures. This is an inevitable result of its
chemical and physical properties. This is why a
very cold auxiliary battery, particularly one that is
not fully charged will only deliver a fraction of the
starting current which is normally available.
We recommend you to have the auxiliary battery
checked before the start of cold weather and, if nec-
essary, have it charged or replaced.
This does not only ensure reliable starting, but an
auxiliary battery which is kept fully charged also
has a longer life.
Disconnection and connection E08402700015
To disconnect the auxiliary battery cable, stop the
electric
motor unit, first disconnect the negative (-)
terminal and then the positive (+) terminal. When
connecting the auxiliary battery, first connect the
positive (+) terminal and then the negative (-) termi-
nal.
NOTE
l Open the terminal cover (A) before discon-
necting or connecting the positive (+) termi-
nal of the auxiliary battery.
l Loosen the nut (B), and then disconnect the
auxiliary battery cable from the positive (+)
terminal. WARNING
l Keep sparks, cigarettes, and flames away
from the auxiliary battery because the
auxiliary battery could explode.
l When installing the auxiliary battery,
start connection with the positive (+) ter-
minal. If connection is started from the
negative (-) terminal, sparks will occur if
the positive (+) terminal touches any oth-
er parts, and this may cause the auxiliary
battery to explode.
l The auxiliary battery electrolyte is ex-
tremely caustic. Do not allow it to come
in contact with your eyes, skin, clothing,
or the painted surfaces of the vehicle.
Spilt electrolyte should be flushed imme-
diately with ample amounts of water.
Irritation to eyes or skin from contact
with electrolyte requires immediate medi-
cal attention.
l Ventilate when charging or using the aux-
iliary battery in an enclosed space. Vehicle care and Maintenance
8-13 8
OHAE13E1
Page 212 of 258

CAUTION
l
Keep it out of reach of children.
l When
replacing the auxiliary battery, re-
move the connected positive (+) and nega-
tive (-) terminals after turning the electric
motor switch to the “LOCK” position
and waiting at least 1 minute. If the auxil-
iary battery terminal is removed just af-
ter the electric motor switch is turned to
the “LOCK” position, this may cause dam-
age to components of the electric motor
unit.
l Never short-circuit the auxiliary battery.
This could cause it to overheat and be dam-
aged.
l If the auxiliary battery is to be quick-
charged, first disconnect the battery ca-
bles.
l In order to prevent a short circuit, be
sure to disconnect the negative (-) termi-
nal first.
l Always wear protective eye goggles when
working near the auxiliary battery.
l Do not bring the nearby parts, the plastic
parts and so on into contact with sulphu-
ric acid (battery electrolyte) which may
crack, stain or discolour them.
If they are in contact, wipe off with soft
cloth, chamois or the like and an aqueous
solution of neutral detergent then imme-
diately rinse the affected parts with plen-
ty of water. NOTE
l Keep
the terminals clean. After the auxiliary
battery is connected, apply terminal protec-
tion grease. To clean the terminals, use luke-
warm water.
l Check to see if the auxiliary battery is secure-
ly installed and cannot be moved during trav-
el. Also check each terminal for tightness.
l When the vehicle is to be left unused for a
long period of time, remove the auxiliary bat-
tery and store it in a place where the battery
fluid will not freeze. The auxiliary battery
should be stored only in a fully charged con-
dition.
l It is necessary to adjust the electronic control-
led unit when the auxiliary battery is re-
moved for a long period of time.
Consult a MITSUBISHI MOTORS Author-
ized Service Point. Tyres
E08402800016 WARNING
l Driving
with tyres that are worn, dam-
aged or improperly inflated can lead to
loss of control or blowout of the tyres
which can result in a collision with seri-
ous or fatal injury. Vehicle care and Maintenance
8-14
8
OHAE13E1
Page 219 of 258

Bonnet room
In
the bonnet room, the fuse block is located as
shown in the illustration. Press the tab (A) and re-
move the cover. Fuse load capacity
E08404100013
The fuse capacity and the names of electrical sys-
tems
protected by the fuses are indicated on the
fuse block cover. Passenger compartment fuse location table
E08404200014 No. Sym-
bol Electrical system Capaci-
ties
1 Tail lamp (left)
7.5 A
2 Cigarette lighter/Ac-
cessory socket
15 A
3 — ——
4 Starter
7.5 A
5 Audio system amp
20 A
6 — ——
7 Tail lamp (right)
7.5 A
8 Outside rear-view mir-
rors
7.5 A
9 Control unit (Electric
motor unit)
7.5 A
* : Fusible link No. Sym-
bol Electrical system Capaci-
ties
10 Control unit
7.5 A
11 Rear fog lamp
10 A
12 Central door lock
15 A
13 Room lamp
10 A
14 Rear window wiper
15 A
15 Gauge
7.5 A
16 Relay
7.5 A
17 Heated seat
20 A
18 Option
10 A
19 Heated door mirror
7.5 A
20 Windscreen wiper
20 A
21 Reversing lamps
7.5 A
22 Demister
30 A
23 Heater
30 A
24 Auxiliary battery
30 A*
25 Radio
10 A
26 Electronic controlled
unit
15 A
* : Fusible link l
Some
fuses may not be installed on your ve-
hicle, depending on the vehicle model or spec-
ifications. Vehicle care and Maintenance
8-21 8
OHAE13E1
Page 220 of 258

l
The table above shows the main equipment
corresponding to each fuse.
Bonnet room fuse location table E08404300015No. Sym-
bol Electrical system Capaci-
ty
1 — ——
2 Auxiliary battery
30 A*
3 Electric motor switch
40 A*
4 Radiator fan motor
40 A*
5 Electric window con-
trol 40 A
*
6 Brake electric vacuum
pump 30 A
*
7 Electric motor unit con-
trol 15 A
8 Stop lamps 15 A
* : Fusible link No. Sym-
bol Electrical system Capaci-
ty
9 Front fog lamps 15 A
10 Water pump (Electric
motor unit) 15 A
11 Charge 10 A
12 Hazard warning flasher 10 A
13 Horn 10 A
14 Daytime running lamps 10 A
15 Traction battery cool-
ing fan motor 15 A
16 Water pump (Air con-
ditioning) 10 A
17 Headlamp low beam
(right) 20 A
18 Headlamp low beam
(left) 20 A
19 Headlamp high-beam
(right) 10 A
20 Headlamp high-beam
(left) 10 A
* : Fusible link l
Some
fuses may not be installed on your ve-
hicle, depending on the vehicle model or spec-
ifications.
l The table above shows the main equipment
corresponding to each fuse. Identification of fuse
E08404400016 Capacity Colour
7.5 A Brown
10 A Red
15 A Blue
20 A Yellow
30 A Green (fuse type) / Pink (fusible
link type)
40 A Green (fusible link type) Fuse replacement
E08404500017
1. Before
replacing a fuse, always turn off the
electrical circuit concerned and turn the elec-
tric motor switch to the “LOCK” position.
2. Remove the fuse puller (A) from the inside of the fuse cover in the passenger compart-
ment. 3. Referring
to the fuse load capacity table,
check the fuse pertaining to the problem. Vehicle care and Maintenance
8-22
8
OHAE13E1
Page 239 of 258

Electric motor specifications
E01100602458Electric motor model
Y4F1Maximum output
(ECE net)
49 kW/2,500 to
8,000 r/min Maximum torque
180 Nm/0 to
2,000 r/min Maximum 30 minutes
power
(ECE net)
35 kW Low voltage electrical system
E01100802232 Voltage
12 V Auxiliary bat-
tery Type (JIS) 34B19L (S)
Capacity (5HR) 27Ah Specifications
9-05 9
OHAE13E1
Page 245 of 258

A
Accessory (Installation) 04
Accessory socket 6-36
Active stability control (ASC)
5-18
Additional equipment 8-20
Air conditioning Important operation tips for the air condition-
ing 6-09
Air purifier 6-09
Airbag 3-20
Antenna 6-30
Anti-lock brake system (ABS) 5-15 Warning lamp 5-16
Assist grips 6-41
Audio Error codes 6-26
Handling of compact discs 6-29
LW/MW/FM electronic tuning radio with CD
player 6-10
Auxiliary battery 8-12 Specification 9-05
Auxiliary battery charge warning lamp 4-10
BBasic knowledge for charging 1-04
Battery
Auxiliary battery
8-12
Auxiliary battery charge warning lamp 4-10
Discharged battery (Emergency starting) 7-02
Disposal information for used batteries 05
Traction battery 02
Bonnet 8-07
Brake assist system 5-15
Brake Anti-lock brake 5-15
Braking 5-14 Fluid 8-11,9-08
Parking brake 5-03
Warning lamp 4-09
Bulb capacity
8-23C Capacities 9-08
Card holder 6-36,6-39
Cargo loads 5-20
Central door locks 2-06
Charging indicator
4-09
Charging Quick charging 1-12
Regular charging 1-08
Child restraint 3-11
Child-protection rear doors 2-07
Cleaning Exterior of your vehicle 8-03
Interior of your vehicle 8-02
Plastic, vinyl leather, etc. 8-02
Clock 6-31
Cold Cautions and actions to deal with intense
cold 08
Combination headlamps and dipper switch 4-11
Coolant 8-09,9-08
Cruising range 03,9-07
Cruising range indicator 4-03,4-06
Cup holder 6-40
D Daytime running lamps 4-13
Bulb capacity
8-24
Replacement 8-31
Demister (rear window) 4-18
Digital clock 6-31
Dimensions 9-03 Dipper (High/Low beam change) 4-13
Door ajar warning lamp 4-10
Doors
Central door locks 2-06
Child-protection
2-07
Lock and unlock 2-05
Driving the vehicle 5-11
Driving, alcohol and drugs 5-02
E Economical driving 5-02
Electric motor switch
5-07
Electric motor unit Warning lamp 4-10
Electric motor Number 9-02
Specifications 9-05
Electric power steering system (EPS) 5-17
Electric window control 2-09 Driver’s switches 2-09
Lock switch 2-09
Passenger’s switches 2-09
Timer function 2-10
Electronic immobilizer (Anti-theft starting sys-
tem) 2-02
Emergency starting 7-02
Energy level gauge 4-06
Energy usage indicator 4-03
Error codes 6-26
EV charging cable 1-05
Exterior and interior lamp operation 8-19
F Fluid capacities and lubricants 9-08
Fluid
Brake fluid 8-11,9-08
Coolant 8-09 Alphabetical index
1
OHAE13E1