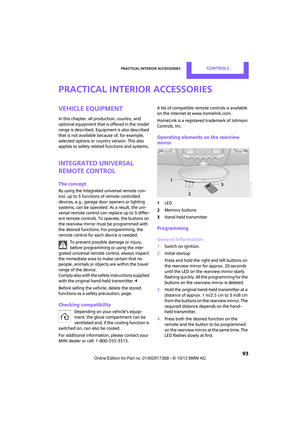
Page 97 of 275

CONTROLSPractical interior accessories
96
Calibrating the digital compass
The digital compass must be calibrated in the
following situations:
>The incorrect cardinal direction is displayed.
> The direction that is displayed does not
change even though the driving direction
changes.
> Not all cardinal directions are displayed.
Procedure
1.Make sure that there are no large metal
objects or overhead power lines near your
vehicle, and that you have enough space to
drive in circles.
2. Set the compass zone th at currently applies.
3. Press the setting button approx. 6-7 seconds
to call up C. Then drive in a complete circle at
a maximum speed of 4 mph/7 km/h.
If the calibration is successful, the C will be
replaced by the directions.
Setting right/left-hand drive
Your digital compass is already set to right-hand
drive or left-hand drive at the factory, depend-
ing upon your vehicle.
Setting the language
You can set the language on the display:
Press the setting button for approx. 12-13 sec-
onds. Briefly press the setting button again to
switch between English "E" and German "O".
The setting is automatically stored after approx.
10 seconds.
00320051004F004C00510048000300280047004C0057004C005200510003
Page 98 of 275

Practical interior accessoriesCONTROLS
97
Glove compartment
Opening
Pull the handle to open the cover.
The light in the glove compartment comes on.
Closing
Fold cover up.To prevent injury in the event of an acci-
dent, close the glove compartment after
use while the vehicle is being driven. <
Ventilation
Depending on your vehicle's equipment, the
glove compartment can be ventilated and, if the
cooling function is switched on, can also be
cooled.
Opening
Rotate the switch in the direction of the arrow.
Closing
Rotate the switch in the opposite direction of the
arrow until it is in the vertical position. Depending on the temperature setting of the air
conditioner or the automatic climate control,
high temperatures may result in the glove com-
partment.
USB interface for data transfer
For the updating of navi
gation data, refer to
page 118 on USB media via the USB interface in
the glove box.
Observe the following when connecting:
> Do not forcibly connect the plug to the USB
interface.
> Do not connect devices such as fans or
lamps to the USB interface.
> Do not connect USB hard drives.
> Do not use the USB interface to recharge
external devices.
Connection for external
audio device
You can connect an external audio device such
as a CD or MP3 player an d play audio tracks over
the vehicle's speaker system, refer to the Enter-
tainment chapter starting on page 153.
Center armrest
The center armrest between the front seats con-
tains either a compartment or the cover for the
snap-in adapter, see page 174.
In the center armrest between the back seats,
there is a storage compartment.
In addition, do not position high accessory parts
directly on the center armrest on the rail; other-
wise they could be damaged when the center
armrest is opened or closed.
00320051004F004C00510048000300280047004C0057004C005200510003
Page 99 of 275

CONTROLSPractical interior accessories
98
Center armrest front
Opening
Press the button, arrow, and lift the cover.
Center armrest rear
Removing
The center armrest in the rear can be removed
to increase the amount of storage room.
1.Turn handwheel counterclockwise until it
reaches the stop, arrow 1.
2. Push center armrest in the base plate gently
towards the back, arrow 2.
3. Raise the armrest in front and swing out.
Installing
1.Insert center armrest in the back into the
rear recess of the base plate, arrow 1.
2. Push to rear and swing down in front,
arrow 2.
3. Push center armrest in the base plate for-
ward.
4. Tighten handwheel by turning clockwise.
Ensure that the center armrest engages properly
when it is installed; ot herwise, it may be dam-
aged, for example, during braking maneuvers.
Storage compartments
Do not put any unsecured objects into the
interior of the vehicle; otherwise these
may endanger the occupant s, e.g., during brak-
ing and evasive maneuvers. <
Do not use the instrument panel as a shelf,
for example with non-slip mats; other-
wise, it could be damaged. <
In the vehicle interior
Depending on your vehicle's equipment, you
will find storage compartments in the front and
rear doors and in the center console.
Pockets
are provided on the backrest rear pan-
els of the front seats.
00320051004F004C00510048000300280047004C0057004C005200510003
Page 100 of 275

Practical interior accessoriesCONTROLS
99
Center Rail
Various accessory parts can be attached to the
Center Rail and installe d in different positions.
Do not use accessory parts near the hand
brake; otherwise these could be damaged
when the hand brake lever is operated. <
Smartphone holder
The upper part of the smartphone holder can be
rotated by 360°.
When installing in the front of the rail, make sure
that there is sufficient space, e.g., away from the
seat; otherwise, damage may be caused when
rotating.
1. Pull the lever 1 up to unlock the mounts.
2. First install the smartp hone on the Center
Rail with the mounts 2.
3. To secure, push lever 1 down. Ensure that
the lever can lock it properly.
When connecting a smartphone to the USB
audio interface, see page 154, guide the con-
nection cable under the smartphone holder.
Base plate
On the base plate, vari ous accessories can be
attached, such as cup holders, holders for sun-
glasses and cell phone holders.
Inserting base plate
The lever 3 can be locked in three positions.
0 Locking
1 Sliding along the rail
2 Inserting base plate
For inserting, move th e lever into position2.
Sliding and locking
1. Push lever 3 into position 1.
2. Slide the base plate.
3. Push lever 3 down into position 0.
Make sure not to press the lever beyond the
resistance point.
The base plate is fixed in position.
Lock the base plate in place before driv-
ing; otherwise, injuries may result in the
event of an accident. <
Example: cupholder
Put cupholder in the back between the rear
seats and push in.
Installing cupholder
1.Lock base plate in plac e if necessary, refer to
Sliding and locking.
2. Pull the lever 6 up to unlock the mounts.
00320051004F004C00510048000300280047004C0057004C005200510003
Page 101 of 275

CONTROLSPractical interior accessories
100
3.First insert the cupholder into the front
mounts 4 and then snap it into the rear
mounts 5.
Make sure th at the lever6 is situated
opposite the mount 4.<
Clothes hooks
There are clothes hooks on the grab handles in
the rear passenger compartment.
Items of clothing hung from the hooks
must not obstruct the driver's view. Do not
hang heavy objects from the hooks; otherwise,
they could endanger the ca r's occupants, e.g. in
case of heavy braking or sudden swerving. <
In the cargo area
Depending on your vehicle's equipment, you
have the following storage options:
>Storage compartment under the flat load
floor
> Bag holder on the support for the cargo area
cover
Cupholders and ashtray
Cupholders
Use lightweight, nonbreakable containers
and do not transport hot beverages. Oth-
erwise, there is an increased risk of injury in the
event of an accident. <
Do not push unsuitable containers forcibly
into the cupholder. Otherwise, you may
damage it. <
Additional cupholders can be attached to the
Center Rail in the rear passenger compartment.
Ashtray
The ashtray is located in one of the cupholders in
the center console.
Emptying
Remove the entire ashtray.
Lighter
With the engine running or the ignition switched
on, press in the cigarette lighter.
The lighter can be pulled out as soon as it pops
back out.
00320051004F004C00510048000300280047004C0057004C005200510003
Page 102 of 275

Practical interior accessoriesCONTROLS
101
Hold or touch the hot cigarette lighter by
the knob only. Holding or touching it in
other areas could result in burns.
When leaving the car, always remove the key so
that children cannot operate the cigarette
lighter and burn themselves. <
Connecting electrical
appliances
In your MINI, when the engine is running or if the
ignition is switched on, you can use electrical
devices such as flashlights, car vacuum cleaners,
etc., up to approx. 140 watts at 12 volts, as long
as one of the following sockets is available.
Avoid damaging the sockets by attempting to
insert plugs of unsui table shape or size.
Do not connect battery chargers to the
sockets installed in the vehicle at the fac-
tory; otherwise you may cause damage to the
vehicle. <
Place the cigarette lighter or charger
socket cover back in position after use;
otherwise, items that fall into the cigarette
lighter socket or char ger socket can cause a
short circuit. <
Cigarette lighter socket
Remove the lighter or cover from the socket.
Sockets
In the rear passenger compartment
Pull out the cover.
In the cargo area
MINI Countryman:
Pull out the cover.
MINI Paceman:
Pull out the cover.
00320051004F004C00510048000300280047004C0057004C005200510003
Page 103 of 275
Drive Me.
00320051004F004C00510048000300280047004C0057004C005200510003
Page 104 of 275
AT A GLANCE
CONTROLS
NAVIGATION
Entertainment
COMMUNICATIONS
MOBILITY
REFERENCE DRIVING TIPS
00320051004F004C00510048000300280047004C0057004C005200510003