2013 MERCEDES-BENZ SLS-CLASS interior lights
[x] Cancel search: interior lightsPage 8 of 286

Problems with cooling with air
dehumidification
............................ 105
Problem with the rear window
defroster ........................................ 107
Refrigerant ..................................... 280
Setting the air distribution .............105
Setting the airflow .........................106
Setting the air vents ......................108
Setting the temperature ................105
Switching air-recirculation mode
on/off ............................................ 107
Switching on/off ........................... 104
Switching the MONO function on/
off .................................................. 106
Switching the rear window
defroster on/off ............................ 107
Cockpit
Overview .......................................... 26
see Instrument cluster
COMAND
see separate operating instructions
Combination switch ............................94
Consumption statistics (on-board
computer) .......................................... 148
Convenience closing feature ..............75
Convenience opening feature ............75
see Opening/closing the side
windows (all)
Coolant
Display message ............................ 173
Coolant (engine)
Checking the level .........................216
Important safety notes ..................280
Temperature (on-board computer) .157
Cooling
see Climate control
Crash-responsive emergency
lighting ................................................. 96
Cruise control Cruise control lever .......................135
Deactivating ................................... 136
Display message ............................ 176
Driving system ............................... 134
Function/notes ............................. 134
Important safety notes ..................134
LIM indicator lamp .........................135Setting a speed
.............................. 135
Storing and maintaining current
speed ............................................ .135
Cup holder
Center console .............................. 198
Important safety notes ..................198
Cup holders
see Cup holder
Curb weight
see Technical data
Customer Assistance Center (CAC) ...22
Customer Relations Department .......22 D
Dashboard see Cockpit
see Instrument cluster
Data
see Technical data
Daytime running lamps
Display message ............................ 171
Switching on/off (on-board
computer) ...................................... 154
Switching on/off (switch) ................92
Dealerships
see Qualified specialist workshop
Declarations of conformity ................. 21
Delayed switch-off Exterior lighting (on-board
computer) ...................................... 155
Interior lighting .............................. 155
Diagnostics connection ......................21
Digital speedometer .........................149
Display (cleaning instructions) ........225
Display messages ASSYST PLUS service interval
displa y........................................... 217
Calling up (on-board computer) .....160
Driving systems ............................. 176
Engine ............................................ 172
Hiding (on-board computer) ...........160
Lights ............................................ .169
Safety systems .............................. 166
Service interval displa y.................. 217
SmartKey ....................................... 181
Tires ............................................... 177
Vehicle .......................................... .180 6
IndexProCarManuals.com
Page 12 of 286

L
Lamps see Warning and indicator lamps
Lap time (RACETIMER) ......................157
License plate lamp Changing bulbs ................................ 97
Display message ............................ 171
Lights
Activating/deactivating the
interior lighting delayed switch-off .155
Automatic headlamp mode ..............92
Display message ............................ 169
Driving abroad ................................. 92
Hazard warning lamps .....................94
High beam flasher ............................ 94
High-beam headlamps .....................94
Light switch ..................................... 92
Low-beam headlamps ......................93
Parking lamps .................................. 93
Standing lamps ................................ 94
Switching the daytime running
lamps on/off (on-board
computer) ...................................... 154
Switching the daytime running
lamps on/off (switch) ......................92
Switching the exterior lighting
delayed switch-off on/off (on-
board computer) ............................ 155
Switching the surround lighting
on/off (on-board computer) ..........155
Turn signals ..................................... 94
see Changing bulbs
see Lights
LIM indicator lamp
Cruise control ................................ 135
Locking
see Central locking
Locking (doors)
Automatic ........................................ 69
Emergency locking ........................... 70
From inside (central locking
button) ............................................. 68
Locking centrally
see Central locking
Locking verification signal (on-
board computer) ............................... 156Low-beam headlamps
Display message ............................ 170
Setting for driving abroad
(symmetrical) ................................... 92
Switching on/off .............................. 93 M
M+S tires ............................................ 251
Malfunction message see Display messages
Manual drive program ......................123
Matte finish (cleaning
instructions) ...................................... 222
mbrace Call priority .................................... 205
Display message ............................ 169
Downloading destinations
(COMAND) ..................................... 205
Emergency call .............................. 202
Important safety notes ..................201
Locating a stolen vehicle ...............206
MB info call button ........................204
Remote vehicle locking ..................205
Roadside Assistance button ..........203
Search & Send ............................... 205
Self-test ......................................... 201
System .......................................... 201
Mechanical key
Function/notes ................................ 63
Locking vehicle ................................ 70
Unlocking the driver's door ..............69
Memory card (audio) .........................151
Memory function ................................. 89
Message memory (on-board
computer) .......................................... 160
Messages see Display messages
Mirrors
see Exterior mirrors
see Rear-view mirror
see Vanity mirror
Mobile phone
Menu (on-board computer) ............152
Modifying the programming
(SmartKey) ........................................... 6310
IndexProCarManuals.com
Page 38 of 286
Useful information
i This Operator's Manual describes all
models and all standard and optional
equipment of your vehicle available at the
time of publication of the Operator's
Manual. Country-specific differences are
possible. Please note that your vehicle may
not be equipped with all features
described. This also applies to safety-
related systems and functions.
i Please read the information on qualified
specialist workshops (Y page 22).Occupant safety
Introduction
In this section, you will learn the most
important facts about the restraint system
components of the vehicle.
The restraint system consists of:
R seat belts
R child restraint systems
Additional protection is provided by:
R SRS (Supplemental Restraint System)
R air bag system components with:
-PASSENGER AIR BAG OFF indicator lamp
- front-passenger seat with Occupant
Classification System (OCS)
The different air bag systems work
independently of each other. The protective
functions of the system work in conjunction
with each other. Not all air bags are deployed
in an accident. G
WARNING
Modifications to or work improperly
conducted on restraint system components
or their wiring, as well as tampering with
interconnected electronic systems, can lead
to the restraint systems no longer functioning
as intended.
Air bags or Emergency Tensioning Devices
(ETDs), for example, could deploy inadvertently or fail to deploy in accidents
although the deceleration threshold for air
bag deployment is exceeded. Therefore,
never modify the restraint systems. Do not
tamper with electronic components or their
software.
i See "Children in the vehicle"
(Y page 51) for more information on
infants and children traveling with you in
the vehicle and restraints for infants and
children. SRS (Supplemental Restraint System)
Introduction SRS reduces the risk of occupants coming
into contact with the vehicle's interior in the
event of an accident. It can also reduce the
effect of the forces to which occupants are
subjected during an accident.
SRS consists of:
R
6 SRS warning lamp
R air bags
R air bag control unit (with crash sensors)
R Emergency Tensioning Devices
R seat belt force limiters
SRS warning lamp SRS functions are checked regularly when
you switch on the ignition and when the
engine is running. Therefore, malfunctions
can be detected in good time.
The
6 SRS warning lamp in the instrument
cluster lights up when the ignition is switched
on. It goes out no later than a few seconds
after the engine is started. 36
Occupant safetySafety
ProCarManuals.com
Page 49 of 286
Exiting in an emergency (Coupe only)
If the vehicle is lying on its roof after an
accident, the hinge fasteners of the gullwing
doors are released pyrotechnically. You will
hear a bang if this is the case. After the
fasteners have been released, the doors are
forced outwards. Simultaneously, the door
locks are unlocked. The 6SRS warning
lamp lights up.
i The hinge fasteners are only released
when the control unit recognizes that
certain conditions have been fulfilled, e.g.
when the vehicle is in a stabilized position
on its roof.
The doors can then be moved from the
inside/outside by pulling the door handle. Seat belts
Important safety notes The use of infant or child restraints is required
by law in all 50 states, the District of
Columbia, the U.S. territories and all
Canadian provinces.
Even where this is not the case, all vehicle
occupants should have their seat belts
fastened when the vehicle is in motion.
i See "Children in the vehicle"
(Y page 51) for further information on
infants and children traveling in the vehicle
as well as on child restraint systems. G
WARNING
Always fasten your seat belt before driving off.
Always make sure your passenger is properly
restrained. You and your passenger should
always wear seat belts.
Failure to wear and properly fasten and
position your seat belt considerably increases
your risk of injuries and their likely severity in
an accident.
If you are ever in an accident, your injuries
could be considerably more severe if you have
not fastened your seat belt correctly. If you do not fasten your seat belt, you are much more
likely to collide with parts of the vehicle
interior or be ejected from it. This may result
in serious or fatal injury.
In the same crash, the possibility of serious or
fatal injury is considerably reduced if you wear
your seat belt properly. The air bags can only
offer the intended protection if the occupants
are wearing their seat belts properly.
G
WARNING
Never ride in a moving vehicle with the seat
backrest in an excessively reclined position as
this can be dangerous. You could slide under
the seat belt in a collision. If you slide under
it, the seat belt would apply force at the
abdomen or neck. That could cause serious
or even fatal injuries. The seat backrest and
seat belt provide the best restraint when the
wearer is in a position that is as upright as
possible and the seat belt is properly
positioned on the body. G
WARNING
Never let more people ride in the vehicle than
there are seat belts available. Make sure
everyone riding in the vehicle is correctly
restrained with a separate seat belt. Never
use a seat belt for more than one person at a
time. G
WARNING
Damaged seat belts or seat belts that have
been subjected to stress in an accident must
be replaced and their anchoring points must
also be checked.
Only use seat belts which have been approved
by Mercedes-Benz.
Do not make any modifications to the seat
belts. This can lead to unintended activation
of the ETDs or to their failure to activate when
necessary.
Do not bleach or dye seat belts as this may
severely weaken them. In a crash they may
not be able to provide adequate protection. Occupant safety
47Safety
Z
ProCarManuals.com
Page 89 of 286

Position of the steering wheel for
driving The steering wheel is moved to the last
selected position when:
R the driver's door is closed.
R you press the Start/Stop button once.
When you close the driver's door with the
ignition switched on, the steering wheel is
also automatically moved to the previously
set position.
The last position of the steering wheel is
stored after each manual setting or when you
store the setting with the memory function
(Y page 89).
Crash-responsive EASY-EXIT feature If the crash-responsive EASY-EXIT feature is
triggered in an accident, the steering column
will move upwards when the driver's door is
opened. This occurs irrespective of the
position of the SmartKey in the ignition lock.
This makes it easier to exit the vehicle and
rescue the occupants.
The crash-responsive EASY-EXIT feature is
only operational if the EASY-EXIT/ENTRY
feature is activated in the on-board computer. Mirrors
Rear-view mirror
X
Anti-glare mode: flick anti-glare
switch :forwards or back. Exterior mirrors
Adjusting the exterior mirrors G
WARNING
Exercise care when using the passenger-side
exterior rear view mirror. The mirror surface
is convex (outwardly curved surface for a
wider field of view). Objects in mirror are
closer than they appear. Check your interior
rear view mirror and glance over your
shoulder before changing lanes.
The convex exterior mirrors provide a larger
field of vision.
The exterior mirrors are heated automatically
if the rear window defroster is switched on
and the outside temperature is low. Mirror
heating lasts up to 10 minutes.
i You can also heat up the exterior mirrors
manually by switching on the rear window
defroster. X
Select SmartKey position 1or 2with the
Start/Stop button.
X Press button :for the left-hand exterior
mirror or button ;for the right-hand
exterior mirror.
The indicator lamp in the corresponding
button lights up in red.
The indicator lamp goes out again after
some time. You can adjust the selected
mirror using adjustment button =as long
as the indicator lamp is lit.
X Press adjustment button =up, down, or
to the left or right until you have adjusted Mirrors
87Seats, steering wheel and mirrors Z
ProCarManuals.com
Page 93 of 286
Useful information
..............................92
Exterior lighting .................................. 92
Interior lighting ................................... 95
Replacing bulbs ................................... 96
Windshield wipers .............................. 97 91Lights and windshield wipers
ProCarManuals.com
Page 97 of 286
The hazard warning lamps automatically
switch on if:
R
an air bag is deployed
R the vehicle decelerates rapidly from a
speed of more than 45 mph (70 km/h) and
comes to a standstill.
X To switch on the hazard warning lamps:
press button :.
All turn signals flash. If you now switch on
a turn signal using the combination switch,
only the turn signal lamp on the
corresponding side of the vehicle will flash.
X To switch off the hazard warning
lamps: press button :.
The hazard warning lamps switch off
automatically if the vehicle exceeds a speed
of 6 mph(10 km/h) again after a full brake
application.
i The hazard warning lamps still operate if
the ignition is switched off. Headlamp cleaning system
The headlamps are cleaned automatically if
the "Wipe with washer fluid" function is
operated five times (Y page 97) while the
lights are on and the engine is running. When
you switch off the ignition, the automatic
headlamp cleaning system is reset and
counting is resumed from 0. Headlamps fogged up on the inside
The headlamps may fog up on the inside if
there is high atmospheric humidity.
X Drive with the headlamps switched on.
The level of moisture diminishes,
depending on the length of the journey and
the weather conditions (humidity and
temperature).
If the level of moisture does not diminish:
X Have the headlamps checked at a qualified
specialist workshop. Interior lighting
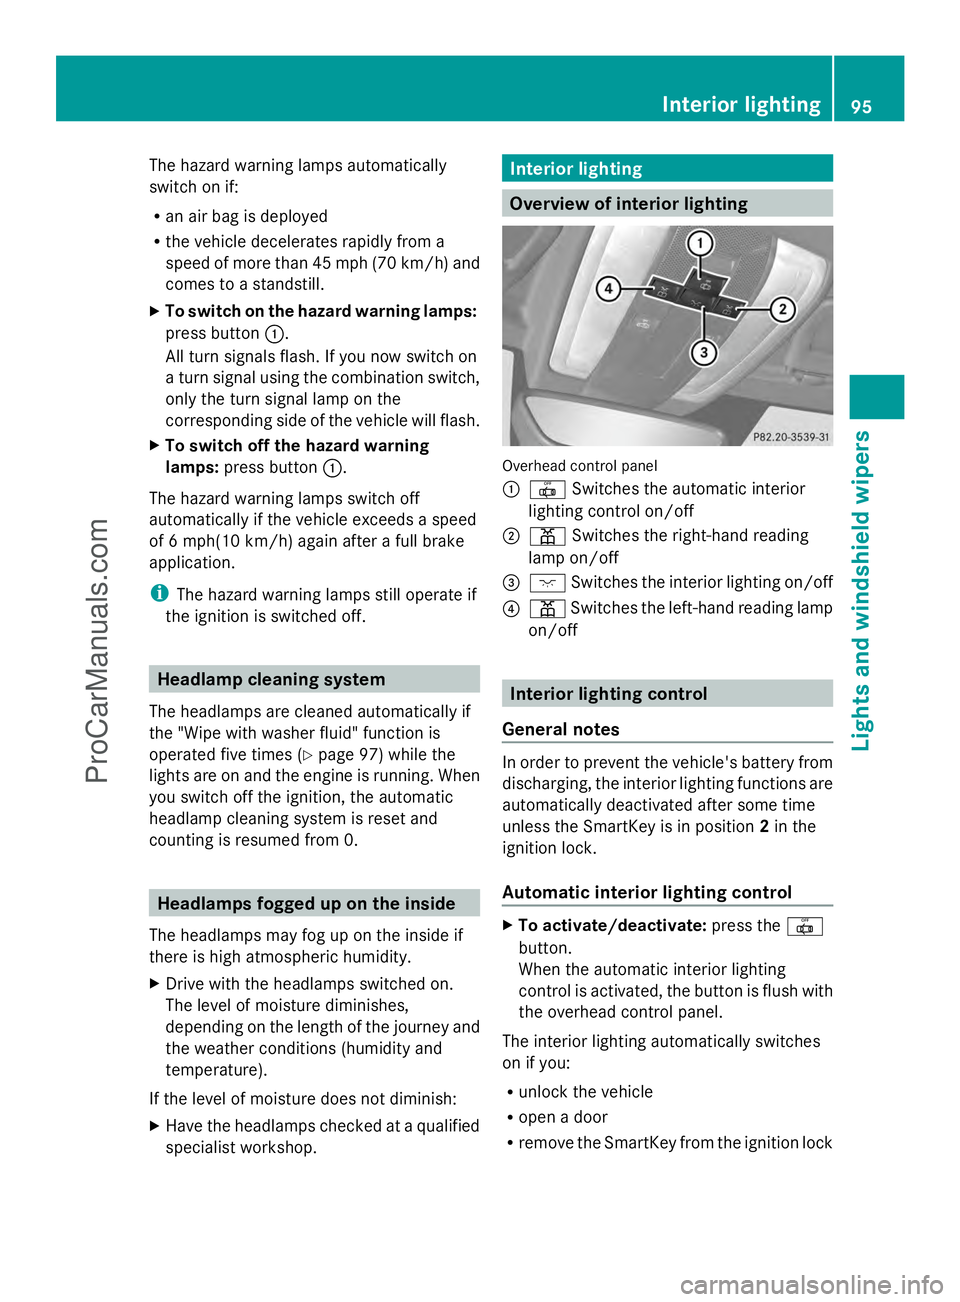
Overview of interior lighting
Overhead control panel
:
| Switches the automatic interior
lighting control on/off
; p Switches the right-hand reading
lamp on/off
= c Switches the interior lighting on/off
? p Switches the left-hand reading lamp
on/off Interior lighting control
General notes In order to prevent the vehicle's battery from
discharging, the interior lighting functions are
automatically deactivated after some time
unless the SmartKey is in position
2in the
ignition lock.
Automatic interior lighting control X
To activate/deactivate: press the|
button.
When the automatic interior lighting
control is activated, the button is flush with
the overhead control panel.
The interior lighting automatically switches
on if you:
R unlock the vehicle
R open a door
R remove the SmartKey from the ignition lock Interior lighting
95Lights and windshield wipers Z
ProCarManuals.com
Page 98 of 286
The interior light is activated for a short while
when the SmartKey is removed from the
ignition lock. You can activate this delayed
switch-off using the on-board computer
(Y page 155).
Manual interior lighting control X
To switch the interior lighting on/off:
press the cbutton.
X To switch the reading lamps on/off:
press the pbutton. Crash-responsive emergency lighting
The interior lighting is activated automatically
if the vehicle is involved in an accident.
X To switch off the crash-responsive
emergency lighting: press the hazard
warning lamp button.
or
X Lock and then unlock the vehicle using the
key. Replacing bulbs
Important safety notes
Xenon bulbs G
DANGER
Xenon bulbs carry a high voltage. You can get
an electric shock if you remove the cover of
the Xenon bulb and touch the electrical
contacts. There is a risk of fatal injury.
Never touch the parts or the electrical
contacts of the Xenon bulb. Always have work
on the Xenon bulbs carried out at a qualified
specialist workshop.
If your vehicle is equipped with Xenon bulbs,
you can recognize this by the following: the
cone of light from the Xenon bulbs moves
from the top to the bottom and back again
when you start the engine. For this to be observed, the lights must be switched on
before starting the engine.
Bulbs and lamps are an important aspect of
vehicle safety. You must therefore make sure
that these function correctly at all times.
Have the headlamp setting checked regularly.
Other bulbs
G
WARNING
Bulbs, lamps and connectors can get very hot
when operating. If you change a bulb, you
could burn yourself on these components.
There is a risk of injury.
Allow these components to cool down before
changing a bulb.
There are bulbs other than the Xenon bulbs
that you cannot replace. Replace only the
bulbs listed (Y page 97). Have the bulbs that
you cannot replace yourself changed at a
qualified specialist workshop.
If you require assistance changing bulbs,
consult a qualified specialist workshop.
Do not touch the glass tube of new bulbs with
your bare hands. Even minor contamination
can burn into the glass surface and reduce
the service life of the bulbs. Always use a lint-
free cloth or only touch the base of the bulb
when installing.
Only use bulbs of the correct type.
If the new bulb still does not light up, consult
a qualified specialist workshop.
Bulbs and lamps are an important aspect of
vehicle safety. You must therefore make sure
that these function correctly at all times.
Have the headlamp setting checked regularly. Changing the front bulbs
You cannot replace the bulbs at the front
yourself. Contact a qualified specialist
workshop which has the necessary specialist
knowledge and tools to carry out the work
required. Mercedes-Benz recommends that 96
Replacing bulbsLights and windshield wipers
ProCarManuals.com