2013 MERCEDES-BENZ SLS-CLASS key
[x] Cancel search: keyPage 127 of 286
clean water. Seek medical assistance
without delay.
R If fuel is swallowed, seek medical
assistance without delay. Do not induce
vomiting.
R Immediately change out of clothing which
has come into contact with fuel. G
WARNING
Electrostatic buildup can create sparks and
ignite fuel vapors. There is a risk of fire and
explosion.
Touch the vehicle body immediately before
opening the fuel filler cap. Any existing
electrostatic buildup is thereby discharged.
! Do not use diesel to refuel vehicles with a
gasoline engine. Do not switch on the
ignition if you accidentally refuel with the
wrong fuel. Otherwise, the fuel will enter
the fuel system. Even small amounts of the
wrong fuel could result in damage to the
fuel system and the engine. The repair
costs are high. Notify a qualified specialist
workshop and have the fuel tank and fuel
lines drained completely.
! Overfilling the fuel tank could damage the
fuel system.
! Take care not to spill any fuel on painted
surfaces. You could otherwise damage the
paintwork.
! Use a filter when refueling from a fuel can.
Otherwise, the fuel lines and/or injection
system could be blocked by particles from
the fuel can.
If you overfill the fuel tank, fuel could spray
out when the fuel pump nozzle is removed.
Further information on fuel and on fuel grades
can be found in the "Fuel" section
(Y page 277). Refueling
Fuel filler flap When you open or close the vehicle with the
SmartKey, the fuel filler flap is automatically
unlocked or locked.
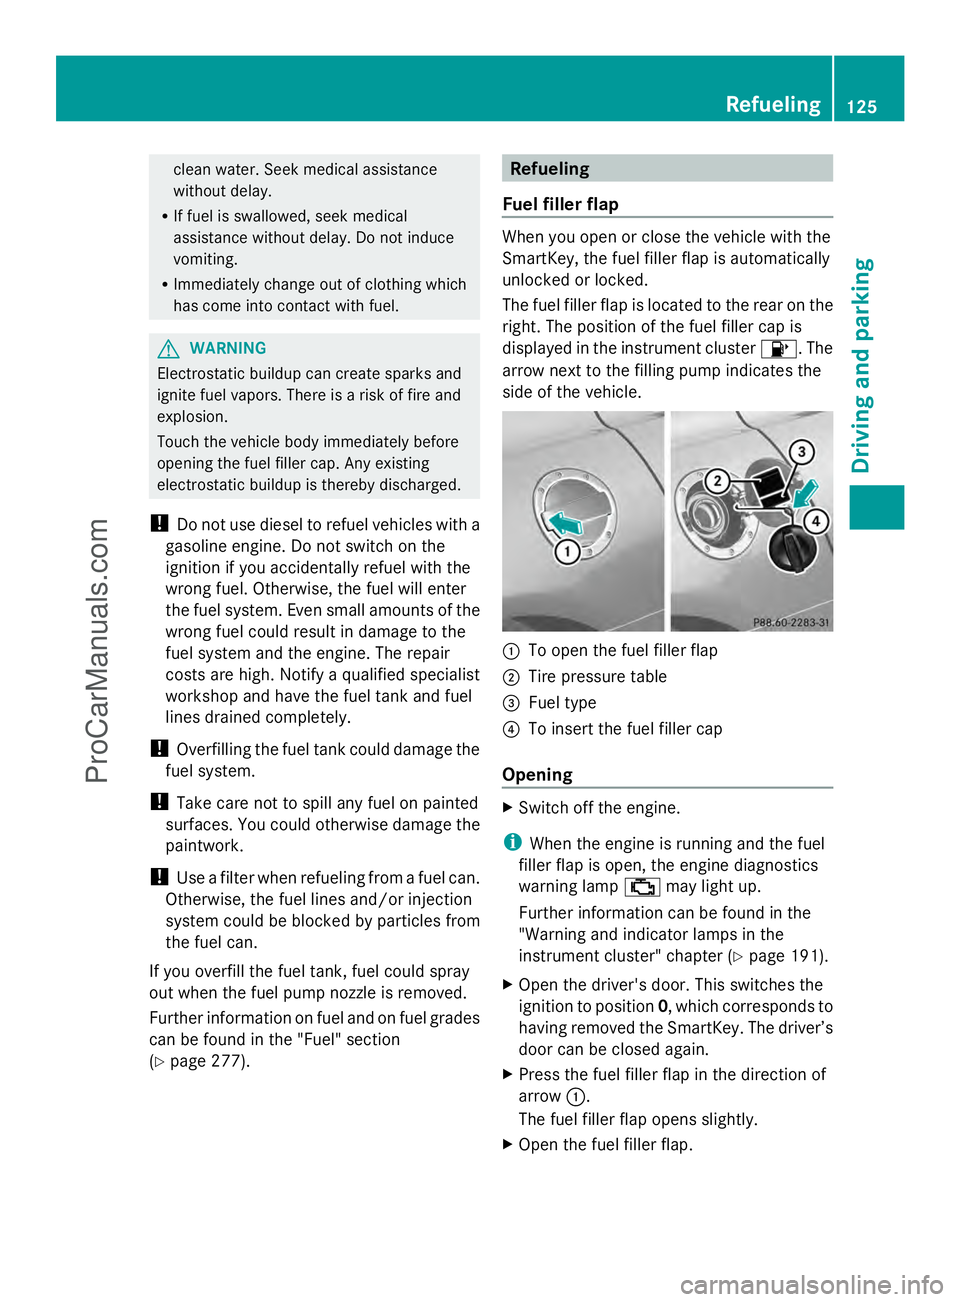
The fuel filler flap is located to the rear on the
right. The position of the fuel filler cap is
displayed in the instrument cluster
8. The
arrow next to the filling pump indicates the
side of the vehicle. :
To open the fuel filler flap
; Tire pressure table
= Fuel type
? To insert the fuel filler cap
Opening X
Switch off the engine.
i When the engine is running and the fuel
filler flap is open, the engine diagnostics
warning lamp ;may light up.
Further information can be found in the
"Warning and indicator lamps in the
instrument cluster" chapter ( Ypage 191).
X Open the driver's door. This switches the
ignition to position 0, which corresponds to
having removed the SmartKey. The driver’s
door can be closed again.
X Press the fuel filler flap in the direction of
arrow :.
The fuel filler flap opens slightly.
X Open the fuel filler flap. Refueling
125Driving and parking Z
ProCarManuals.com
Page 129 of 286
Problems with fuel and the fuel tank
Problem Possible causes/consequences and
M
MSolutions Fuel is leaking from the
vehicle.
G
Risk of explosion or fire
The fuel line or the fuel tank is defective.
X Set the Start/Stop button to key position 0immediately.
X Do not restart the engine under any circumstances.
X Consult a qualified specialist workshop. The fuel filler flap
cannot be opened. The fuel filler flap is not unlocked.
or
The SmartKey battery is discharged.
X
Unlock the vehicle (Y page 67).
or
X Unlock the vehicle using the mechanical key (Y page 69).The fuel filler flap is unlocked, but the opening mechanism is
jammed.
X
Consult a qualified specialist workshop. Parking
Important safety notes
G
WARNING
If flammable materials such as leaves, grass
or twigs are exposed to prolonged contact to
parts of the exhaust system that heat up, they
could ignite. There is a risk of fire.
Park the vehicle so that no flammable
materials come into contact with parts of the
vehicle which are hot. Take particular care not
to park on dry grassland or harvested grain
fields. G
WARNING
If you leave children unsupervised in the
vehicle, they could set it in motion by, for
example:
R releasing the parking brake
R shifting the automatic transmission out of
the parking position P
R starting the engine. They could also operate the vehicle's
equipment. There is a risk of an accident and
injury.
When leaving the vehicle, always take the
SmartKey with you and lock the vehicle. Never
leave children unsupervised in the vehicle.
! If the engine speed is too high or if the
vehicle is rolling, do not shift the
transmission directly from Dto R, from R
to Dor directly to P.
Do not open the driver's door while the
vehicle is in motion. At low speeds in
transmission position Dor R, park position
P is otherwise engaged automatically.
The transmission could be damaged.
! Always secure the vehicle correctly
against rolling away. Otherwise, the vehicle
or its drivetrain could be damaged. Parking
127Driving and parking Z
ProCarManuals.com
Page 130 of 286
To ensure that the vehicle is secured against
rolling away unintentionally:
R the electric parking brake must be applied.
R the transmission must be in position P.
R the SmartKey must be in position 0in the
ignition lock and then removed from the
ignition lock, or the Start/Stop button must
be pressed.
R on steep uphill or downhill gradients, turn
the front wheels towards the curb.
R on steep uphill or downhill gradients, the
front axle of an empty vehicle must be
secured, for example with a wheel chock.
R on steep uphill or downhill gradients, the
rear axle of a laden vehicle must be
additionally secured, for example with a
wheel chock. Switching off the engine
Important safety notes G
WARNING
When the engine is switched off, the
transmission shifts into neutral position N.
The vehicle may roll away. There is a risk of
an accident.
After switching off the engine, always switch
to parking position P. Prevent the parked
vehicle from rolling away by applying the
parking brake.
! Do not open the driver's door while the
vehicle is in motion. At low speeds in
transmission position Dor R, park position
P is otherwise engaged automatically. This
can damage the transmission.
i Observe the display messages in the
instrument cluster.
AMG SPEEDSHIFT DCT 7-speed sports
transmission X
Shift the transmission to Pwith the button
in the center console. Using the Start/Stop button
X
Press the Start/Stop button (Y page 113).
The engine stops and all the indicator
lamps in the instrument cluster go out.
X Apply the electric parking brake.
i If you switch the engine off with the
transmission in position Ror D, the
transmission automatically shifts to N.
If you move the E-SELECT lever to Nbefore
switching off the engine, the transmission
remains for approximately 30 minutes
in N.
If you open the driver's or front-passenger
door during this period, the transmission
automatically shifts to P.
i The engine can be turned off while the
vehicle is in motion by pressing and holding
the Start/Stop button for about three
seconds.
Using the SmartKey
! Do not remove the SmartKey while the
vehicle is in motion. At low speeds, park
position Pwill otherwise be engaged
automatically.
Do not open the driver's door while the
vehicle is in motion. At low speeds,
transmission position Pis engaged
automatically.
This can damage the transmission.
X Turn the SmartKey to position 0in the
ignition lock and remove it.
The parking lock is activated.
X Apply the electric parking brake.
i If you move the E-SELECT lever to N
before switching off the engine, the
transmission remains for approximately
30 minutes in N. If you open the driver's or
front-passenger door during this period,
the transmission automatically shifts to P.128
ParkingDriving and parking
ProCarManuals.com
Page 131 of 286
The transmission remains in
Nif:
R the SmartKey is in the ignition lock and
R you use the E-SELECT lever to shift the
transmission to Nbefore switching the
engine off
This still applies if you open the driver's or
front-passenger door.
Further information on transmission
position Nwhen operating with a SmartKey
is available in the "Car wash" section
(Y page 219). Electric parking brake
General notes G
WARNING
If you leave children unsupervised in the
vehicle, they could set it in motion by, for
example:
R releasing the parking brake
R shifting the automatic transmission out of
the parking position P
R starting the engine.
They could also operate the vehicle's
equipment. There is a risk of an accident and
injury.
When leaving the vehicle, always take the
SmartKey with you and lock the vehicle. Never
leave children unsupervised in the vehicle. Applying/releasing manually
X
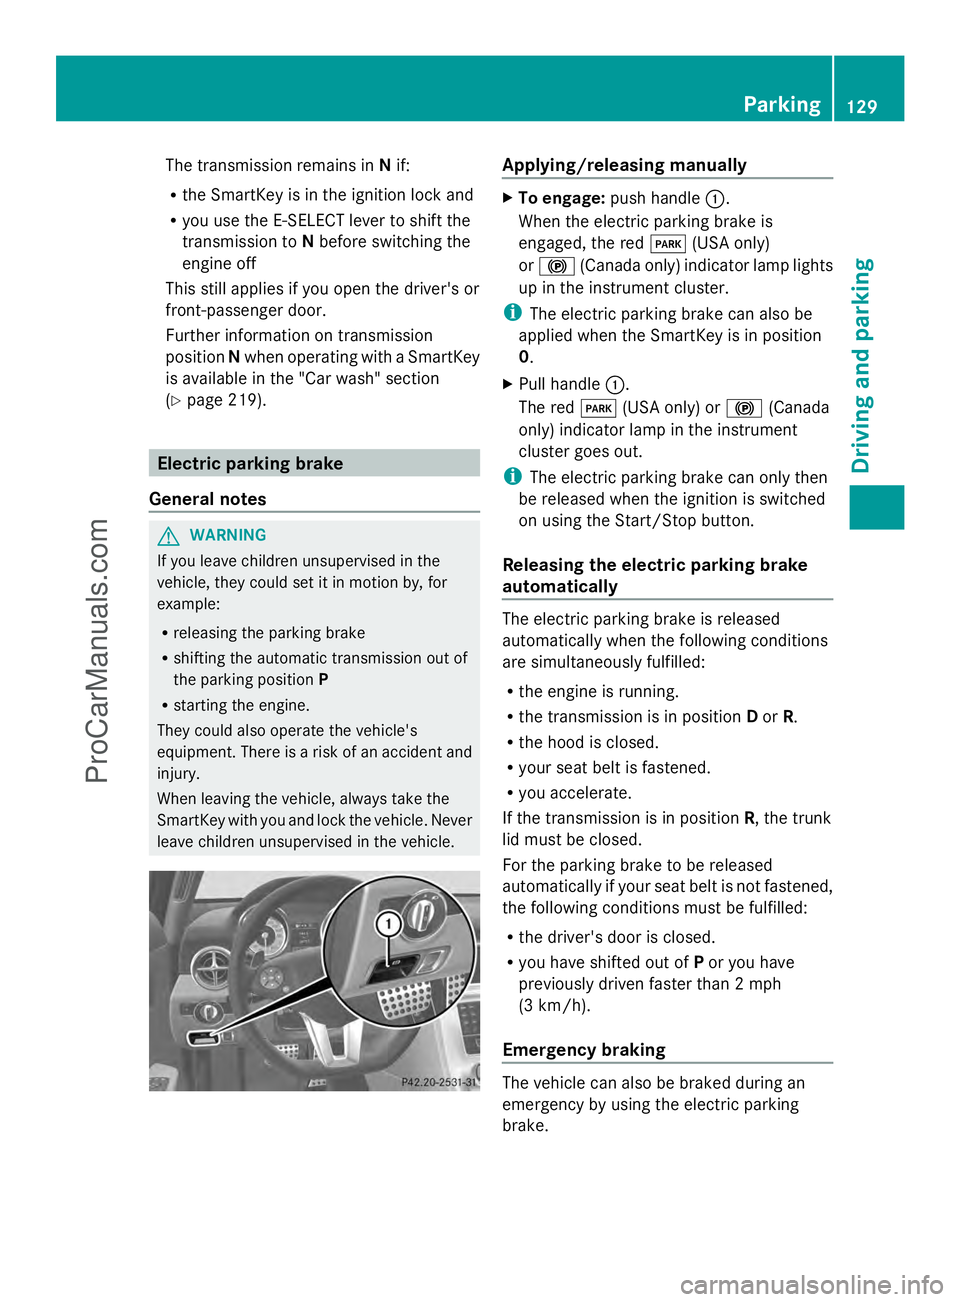
To engage: push handle :.
When the electric parking brake is
engaged, the red F(USA only)
or ! (Canada only) indicator lamp lights
up in the instrument cluster.
i The electric parking brake can also be
applied when the SmartKey is in position
0.
X Pull handle :.
The red F(USA only) or !(Canada
only) indicator lamp in the instrument
cluster goes out.
i The electric parking brake can only then
be released when the ignition is switched
on using the Start/Stop button.
Releasing the electric parking brake
automatically The electric parking brake is released
automatically when the following conditions
are simultaneously fulfilled:
R
the engine is running.
R the transmission is in position Dor R.
R the hood is closed.
R your seat belt is fastened.
R you accelerate.
If the transmission is in position R, the trunk
lid must be closed.
For the parking brake to be released
automatically if your seat belt is not fastened,
the following conditions must be fulfilled:
R the driver's door is closed.
R you have shifted out of Por you have
previously driven faster than 2 mph
(3 km/h).
Emergency braking The vehicle can also be braked during an
emergency by using the electric parking
brake. Parking
129Driving and parking Z
ProCarManuals.com
Page 134 of 286
Wet roads
If you have driven for a long time in heavy rain
without braking, there may be a delayed
reaction from the brakes when braking for the
first time. This may also occur after the
vehicle has been washed or driven through
deep water.
You have to depress the brake pedal more
firmly. Maintain a greater distance from the
vehicle in front.
After driving on a wet road or having the
vehicle washed, brake firmly while paying
attention to the traffic conditions. This will
warm up the brake discs, thereby drying them
more quickly and protecting them against
corrosion.
Limited braking performance on salt-
treated roads If you drive on salted roads, a layer of salt
residue may form on the brake discs and
brake pads. This can result in a significantly
longer braking distance.
R Brake occasionally to remove any possible
salt residue. Make sure that you do not
endanger other road users when doing so.
R Carefully depress the brake pedal and the
beginning and end of a journey.
R Maintain a greater distance to the vehicle
ahead.
Servicing the brakes !
If the red brake warning lamp lights up in
the instrument cluster and you hear a
warning tone while the engine is running,
the brake fluid level may be too low.
Observe additional warning messages in
the multifunction display.
The brake fluid level may be too low due to
brake pad wear or leaking brake lines.
Have the brake system checked
immediately. This work should be carried
out at an authorized Mercedes-Benz
Center. !
As the ESP ®
system operates
automatically, the engine and the ignition
must be switched off (the SmartKey must
be in position 0or 1in the ignition lock or
the Start/Stop button must be in position
0 or 1) if:
R the electric parking brake is tested using
a brake dynamometer.
R the vehicle is towed with one axle raised.
Braking triggered automatically by ESP ®
may seriously damage the brake system.
All checks and maintenance work on the
brake system must be carried out at a
qualified specialist workshop. Have this work
carried out at an authorized Mercedes-Benz
Center.
Have the brake pads replaced and the brake
fluid renewed at a qualified specialist
workshop, e.g. an authorized Mercedes-Benz
Center.
If the brake system has only been subject to
moderate loads, you should test the
functionality of your brakes at regular
intervals. To do so, press firmly on the brake
pedal when driving at a high speed. This
improves the grip of the brake pads.
You can find a description of Brake Assist
(BAS) on ( Ypage 55).
Mercedes-Benz recommends that you only
have brake pads/linings installed on your
vehicle which have been approved for
Mercedes-Benz vehicles or which correspond
to an equivalent quality standard. Brake
pads/linings which have not been approved
for Mercedes-Benz vehicles or which are not
of an equivalent quality could affect your
vehicle's operating safety.
Mercedes-Benz recommends that you only
use brake fluid that has been specially
approved for your vehicle by Mercedes-Benz,
or which corresponds to an equivalent quality
standard. Brake fluid which has not been
approved for Mercedes-Benz vehicles or
which is not of an equivalent quality could
affect your vehicle's operating safety. 132
Driving tipsDriving and parking
ProCarManuals.com
Page 143 of 286

View through the camera
The area behind the vehicle is displayed as a
mirror image, as in the rear view mirror.
! Objects not at ground level may appear to
be further away than they actually are, e.g.:
R the bumper of a parked vehicle
R the drawbar of a trailer
R the ball coupling of a trailer tow hitch
R the rear section of an HGV
R a slanted post
Use the guidelines only for orientation.
Approach objects no further than the
bottom-most guideline.
The rear view camera may show a distorted
view of obstacles, show them incorrectly or
not at all. The rear view camera does not show
objects in the following positions:
R very close to the rear bumper
R under the rear bumper
R in the area immediately above the tailgate
handle
Activating the rear view camera X
Make sure that key position 2has been
selected with the Start/Stop button.
X Make sure that the "rear view camera"
function is selected in COMAND (see the separate operating instructions for
COMAND).
X Engage reverse gear.
The COMAND display shows the area
behind the vehicle.
You can also switch off the display of the area
behind the vehicle in the COMAND display. Blind Spot Assist
Important safety notes Blind Spot Assist uses a radar sensor system
to monitor the areas on both sides of your
vehicle. It supports you from speeds of
approximately 20 mph(30 km/h). A warning
display in the exterior mirrors draws your
attention to vehicles detected in the
monitored area. If you then switch on the
corresponding turn signal to change lanes,
you will also receive a visual and audible
collision warning. For this purpose, Blind Spot
Assist uses sensors in the rear bumper.
Blind Spot Assist is only an aid. It may fail to
detect some vehicles and is no substitute for
attentive driving.
G
WARNING
Blind Spot Assist does not react to:
R vehicles overtaken too closely on the side,
placing them in the blind spot area
R vehicles approaching and driving by with a
speed difference of more than 6.8 mph
(11 km/h)
As a result, Blind Spot Assist may not give
warnings in such situations. There is a risk of
an accident.
Always observe the traffic conditions
carefully, and maintain a safe lateral distance.
i USA only:
This device has been approved by the FCC
as a "Vehicular Radar System". The radar
sensor is intended for use in an automotive
radar system only. Removing, tampering
with, or altering the device will void any Driving systems
141Driving and parking Z
ProCarManuals.com
Page 145 of 286
vehicle enters the blind spot monitoring
range from behind or from the side. When you
overtake a vehicle, the warning only occurs if
the difference in speed is less than
7 mph(12 km/h).
The yellow indicator lamp goes out if reverse
gear is engaged. In this event, Blind Spot
Assist is no longer active.
The brightness of the indicator/warning
lamps is adjusted automatically according to
the ambient light.
Collision warning If a vehicle is detected in the monitoring range
of Blind Spot Assist and you switch on the
corresponding turn signal, a double warning
tone sounds. Red warning lamp :flashes. If
the turn signal remains on, vehicles detected
are indicated by the flashing of red warning
lamp :. There are no further warning tones.
Switching on Blind Spot Assist X
Make sure that Blind Spot Assist
(Y page 153) is activated in the on-board
computer.
X Ensure that key position 2has been
selected with the Start/Stop button.
Warning lamps :in the exterior mirrors
light up red for approximately
1.5 seconds and then turn yellow. Driving systems
143Driving and parking Z
ProCarManuals.com
Page 149 of 286
Outside temperature display
G
WARNING
The outside temperature indicator is not
designed to serve as an ice-warning device
and is therefore unsuitable for that purpose.
Indicated temperatures just above the
freezing point do not guarantee that the road
surface is free of ice. The road may still be icy,
especially in wooded areas or on bridges.
The outside temperature display is in the
multifunction display (Y page 147).
Changes in the outside temperature are
displayed after a short delay. Operating the on-board computer
The on-board computer is activated as soon
as you turn the SmartKey to position 1in the
ignition lock.
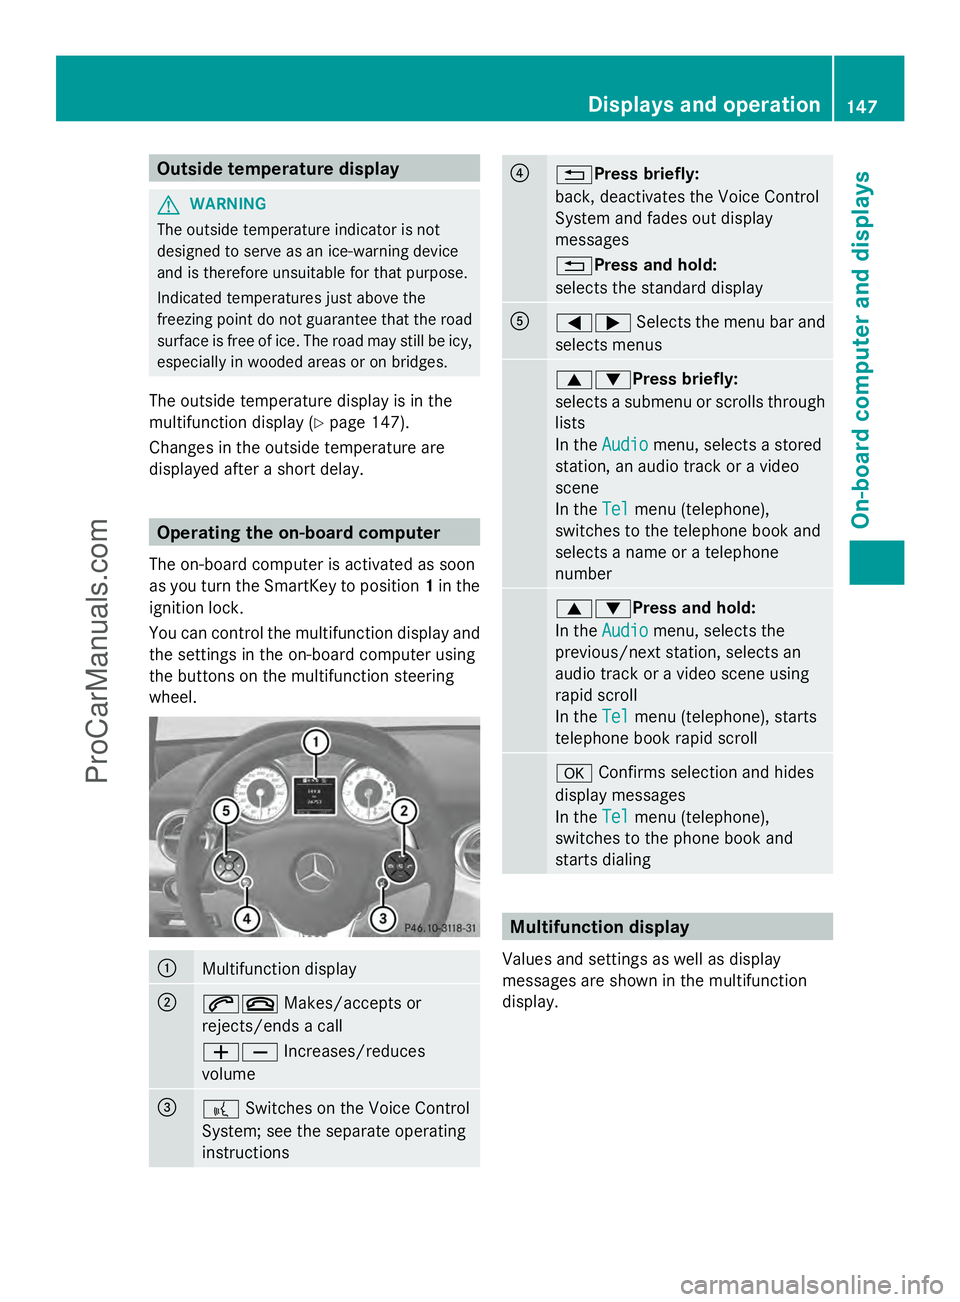
You can control the multifunction display and
the settings in the on-board computer using
the buttons on the multifunction steering
wheel. :
Multifunction display
;
6~
Makes/accepts or
rejects/ends a call
WX Increases/reduces
volume =
?
Switches on the Voice Control
System; see the separate operating
instructions ?
%Press briefly:
back, deactivates the Voice Control
System and fades out display
messages
%Press and hold:
selects the standard display
A
=;
Selects the menu bar and
selects menus 9:Press briefly:
selects a submenu or scrolls through
lists
In the
Audio Audio menu, selects a stored
station, an audio track or a video
scene
In the Tel Telmenu (telephone),
switches to the telephone book and
selects a name or a telephone
number 9:Press and hold:
In the
Audio Audio menu, selects the
previous/next station, selects an
audio track or a video scene using
rapid scroll
In the Tel Telmenu (telephone), starts
telephone book rapid scroll a
Confirms selection and hides
display messages
In the Tel
Tel menu (telephone),
switches to the phone book and
starts dialing Multifunction display
Values and settings as well as display
messages are shown in the multifunction
display. Displays and operation
147On-board computer and displays Z
ProCarManuals.com