2013 MERCEDES-BENZ SLS-CLASS engine
[x] Cancel search: enginePage 141 of 286
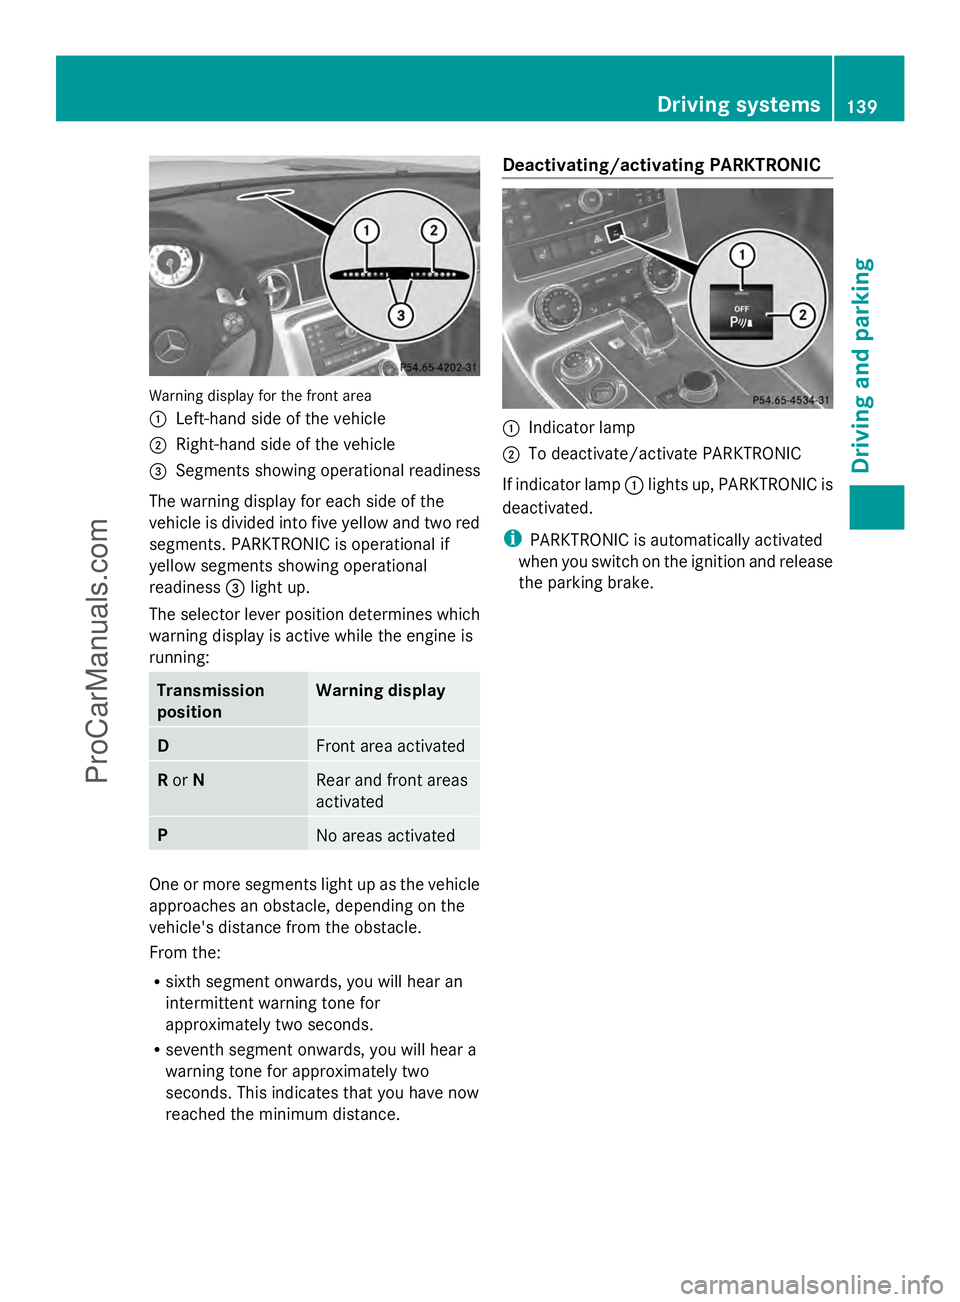
Warning display for the front area
:
Left-hand side of the vehicle
; Right-hand side of the vehicle
= Segments showing operational readiness
The warning display for each side of the
vehicle is divided into five yellow and two red
segments. PARKTRONIC is operational if
yellow segments showing operational
readiness =light up.
The selector lever position determines which
warning display is active while the engine is
running: Transmission
position Warning display
D
Front area activated
R
or N Rear and front areas
activated
P
No areas activated
One or more segments light up as the vehicle
approaches an obstacle, depending on the
vehicle's distance from the obstacle.
From the:
R sixth segment onwards, you will hear an
intermittent warning tone for
approximately two seconds.
R seventh segment onwards, you will hear a
warning tone for approximately two
seconds. This indicates that you have now
reached the minimum distance. Deactivating/activating PARKTRONIC
:
Indicator lamp
; To deactivate/activate PARKTRONIC
If indicator lamp :lights up, PARKTRONIC is
deactivated.
i PARKTRONIC is automatically activated
when you switch on the ignition and release
the parking brake. Driving systems
139Driving and parking Z
ProCarManuals.com
Page 148 of 286

Useful information
i This Operator's Manual describes all
models and all standard and optional
equipment of your vehicle available at the
time of publication of the Operator's
Manual. Country-specific differences are
possible. Please note that your vehicle may
not be equipped with all features
described. This also applies to safety-
related systems and functions.
i Please read the information on qualified
specialist workshops (Y page 22).Important safety notes
You will find an illustration of the instrument
cluster in the "At a glance" section
(Y page 27). G
WARNING
A driver's attention to the road and traffic
conditions must always be his/her primary
focus when driving.
For your safety and the safety of others,
selecting features through the multifunction
steering wheel should only be done by the
driver when traffic and road conditions permit
it to be done safely.
Bear in mind that at a speed of just 30 mph
(approximately 50 km/h ), your vehicle is
covering a distance of 44 feet (approximately
14 m) every second. G
WARNING
No messages will be displayed if either the
instrument cluster or the multifunction
display is inoperative.
As a result, you will not be able to see
information about your driving conditions,
such as
R speed
R outside temperature
R warning/indicator lamps R
malfunction/warning messages
R failure of any systems
Driving characteristics may be impaired.
If you must continue to drive, do so with added
caution. Contact an authorized Mercedes-
Benz Center as soon as possible. G
WARNING
Malfunction and warning messages are only
indicated for certain systems and are
intentionally not very detailed. The
malfunction and warning messages are
simply a reminder with respect to the
operation of certain systems. They do not
replace the owner's and/or driver's
responsibility to maintain the vehicle's
operating safety. Have all required
maintenance and safety checks performed on
the vehicle. Bring the vehicle to an authorized
Mercedes-Benz Center to address the
malfunction and warning messages. Displays and operation
Engine oil temperature display
The engine oil temperature gauge is in the
instrument cluster on the right-hand side.
Under normal operating conditions, the
temperature may rise to 140 †.
The transmission fluid temperature and the
coolant temperature are displayed in the
AMG menu (Y page 157). Tachometer
The red band in the tachometer indicates the
engine's overrevving range.
! Do not drive in the overrevving range, as
this could damage the engine.
The fuel supply is interrupted to protect the
engine when the red band is reached. 146
Displays and operationOn-board computer and displays
ProCarManuals.com
Page 156 of 286
R
the digital speedometer in the AMG
AMGmenu
R the navigation instructions in the Navi
Navi
menu
R cruise control
X Press the =or; button on the
steering wheel to select the Settings
Settings
menu.
X Press the :or9 button to select the
INST. CLUSTER
INST. CLUSTER submenu.
X Press ato confirm.
X Press the :or9 button to select the
Display Unit Speed-/Odometer:
Display Unit Speed-/Odometer:
function.
You will see the selected setting: km kmor
miles
miles .
X Press the abutton to save the setting.
Permanent display for outside
temperature or additional speedometer
The Permanent display: Outside Permanent display: Outside
Temperature/Speedometer
Temperature/Speedometer allows you to
choose whether the multifunction display
shows the outside temperature or the speed
at the bottom right. The unit used in the
additional speedometer depends on the
display unit set (Y page 153).
X Press the =or; button on the
steering wheel to select the Settings
Settings
menu.
X Press the :or9 button to select the
INST. CLUSTER
INST. CLUSTER submenu.
X Press the abutton to confirm.
X Press the :or9 button to select the
Permanent display
Permanent display function.
You will see the selected setting [km/h]
[km/h]or
Dig. speedom [mph]
Dig. speedom [mph] oroutside
outside
temperature
temperature .
X Press the abutton to save the setting.
Lights
Switching the daytime running lamps on/
off
This function is not available in Canada. If you have activated the
Daytime
Daytime Running Running
Lights
Lights function and the light switch is in the
à orc position, the daytime running
lamps are switched on automatically when
the engine is running. If it is dark, the low-
beam headlamps switch on automatically.
In the dark, the following also light up:
R the low-beam headlamps
R the standing lamps
R the tail lamps
R the license plate lamp
R the side marker lamps
X Press the =or; button on the
steering wheel to select the Settings
Settings
menu.
X Press the :or9 button to select the
LIGHTS LIGHTS submenu.
X Press the abutton to confirm.
X Press the :or9 button to select the
Daytime Running Lights
Daytime Running Lights function.
You will see the selected setting: Enabled
Enabled
or Disabled
Disabled .
X Press the abutton to save the setting.
Setting the brightness for the display and
switches
You can use the Brightness display/ Brightness display/
switches
switches function to set the brightness of
the multifunction display and the switches in
the vehicle.
X Press the =or; button on the
steering wheel to select the Settings Settings
menu.
X Press the :or9 button to select the
Light
Light submenu.
X Press the abutton to confirm.
X Press the :or9 button to select the
Brightness Display/Switches:
Brightness Display/Switches:
function.
You see the selected setting Level Levelwith a
value of between 0 and 100. 154
Displays and operationOn-boa
rdcompu ter and displays
ProCarManuals.com
Page 157 of 286
X
Press the abutton to save the setting.
X Press the :or9 button to increase
or decrease the brightness.
Activating/deactivating surround
lighting and exterior lighting delayed
switch-off
The Locator lighting
Locator lighting function allows you
to set whether the exterior lighting should
come on when it is dark:
R for 40 seconds after unlocking the vehicle
with the SmartKey
The exterior lighting switches off if you
open the driver’s door.
R for 15 seconds after switching off the
engine and closing the doors
If the engine is switched off and then none
of the doors are opened, or if an open door
is not closed, the exterior lighting goes out
after 60 seconds.
If you activate the Locator Lighting
Locator Lighting
function, the following light up:
R the parking lamps
R the low-beam headlamps
R the license plate lamp
R the surround lighting in the exterior mirrors
X Press the =or; button on the
steering wheel to select the Settings
Settings
menu.
X Press the :or9 button to select the
Light
Light submenu.
X Press the abutton to confirm.
X Press the :or9 button to select the
Locator Lighting
Locator Lighting function.
You will see the selected setting: on onor
off
off.
X Press the abutton to save the setting. Deactivating the delayed switch-off
temporarily:
X
Select key position 0with the Start/Stop
button before leaving the vehicle.
X Select key position 2and then key position
0 again with the Start/Stop button
The delayed switch-off is deactivated.
Delayed switch-off is reactivated the next
time you start the engine.
Activating/deactivating the interior
lighting delayed switch-off
If you select key position 0with the Start/
Stop button when the Light. Delay
Light. Delay
function is activated, the interior lighting
lights up for approximately 20 seconds if it is
dark.
X Press the =or; button on the
steering wheel to select the Settings
Settings
menu.
X Press the :or9 button to select the
Light Light submenu.
X Press the abutton to confirm.
X Press the :or9 button to select the
Interior lighting delay sw. off
Interior lighting delay sw. off
function.
You will see the selected setting: Enabled Enabled
or Disabled
Disabled .
X Press the abutton to save the setting.
Vehicle
Activating/deactivating the automatic
door locking mechanism
If you select the Automatic Door Lock: Automatic Door Lock:
function, the vehicle is centrally locked above
a speed of around 9 mph(15 km/h).
i For further information on the automatic
locking feature, see (Y page 69).
X Press the =or; button on the
steering wheel to select the Settings
Settings
menu.
X Press the :or9 button to select the
Vehicle Vehicle submenu.
X Press the abutton to confirm. Displays and operation
155On-board computer and displays Z
ProCarManuals.com
Page 159 of 286

X
Press the =or; button on the
steering wheel to select the Settings
Settings
menu.
X Press the :or9 button to select the
Factory Settings
Factory Settings submenu.
X Press ato confirm.
The Reset All Settings?
Reset All Settings? message
appears.
X Press the :or9 button to select
Yes
Yes orNo
No.
X Press the abutton to confirm the
selection.
If you have selected Yes
Yes, the multifunction
display shows a confirmation message.
AMG menu AMG displays
X
Press =or; on the steering wheel
to select the AMG AMGmenu. :
Digital speedometer
; Engine oil temperature
= Coolant temperature
? Transmission fluid temperature
If the engine oil temperature is below 80 †
or if the transmission fluid temperature is
below 60 †, the corresponding temperature
gauge flashes. Avoid driving at full engine
output during this time.
SETUP
SETUP displays the drive program, the AMG
adaptive sport suspension system setting
and the selected traction assist. X
Press =or; on the steering wheel
to select the AMG
AMG menu.
X Press the 9button repeatedly until
SETUP is displayed.
or
X Press the AMG button on the center
console. :
Drive program (C/S/S+/M)
; ESP ®
mode (ON ON/SportSport Handling Handling Mode
Mode/
OFF
OFF)
= AMG adaptive sport suspension system
setting (COMFORT COMFORT /SPORTSPORT /SPORT +SPORT +)
RACETIMER
Displaying and starting RACETIMER G
WARNING
The RACETIMER feature is only for use on
roads and in conditions where high speed
driving is permitted. Racing on public roads is
prohibited under all circumstances. The driver
is and must always remain responsible for
following posted speed limits.
You can use the RACETIMER to store lap
times.
X Press =or; on the steering wheel
to select the AMG
AMG menu.
X Press the 9button repeatedly until the
RACETIMER is shown.
i If the RACETIMER is selected, the =
and ; buttons are inoperative. Displays and operation
157On-board computer and displays Z
ProCarManuals.com
Page 160 of 286
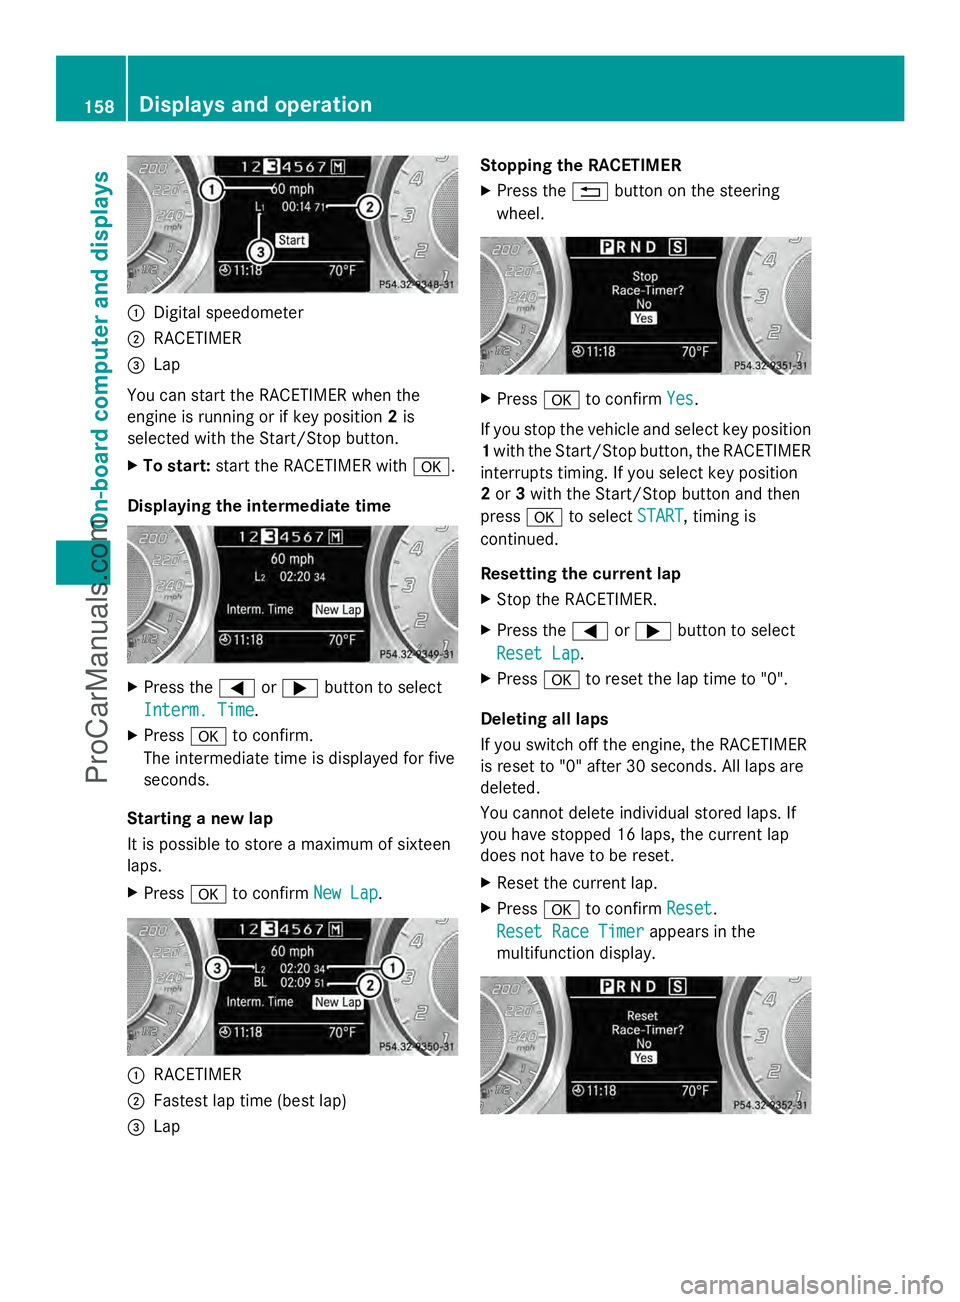
:
Digital speedometer
; RACETIMER
= Lap
You can start the RACETIMER when the
engine is running or if key position 2is
selected with the Start/Stop button.
X To start: start the RACETIMER with a.
Displaying the intermediate time X
Press the =or; button to select
Interm. Time Interm. Time.
X Press ato confirm.
The intermediate time is displayed for five
seconds.
Starting a new lap
It is possible to store a maximum of sixteen
laps.
X Press ato confirm New Lap New Lap. :
RACETIMER
; Fastest lap time (best lap)
= Lap Stopping the RACETIMER
X Press the %button on the steering
wheel. X
Press ato confirm Yes
Yes.
If you stop the vehicle and select key position
1 with the Start/Stop button, the RACETIMER
interrupts timing. If you select key position
2 or 3with the Start/Stop button and then
press ato select START START, timing is
continued.
Resetting the current lap
X Stop the RACETIMER.
X Press the =or; button to select
Reset Lap Reset Lap .
X Press ato reset the lap time to "0".
Deleting all laps
If you switch off the engine, the RACETIMER
is reset to "0" after 30 seconds. All laps are
deleted.
You cannot delete individual stored laps. If
you have stopped 16 laps, the current lap
does not have to be reset.
X Reset the current lap.
X Press ato confirm Reset
Reset .
Reset Race Timer Reset Race Timer appears in the
multifunction display. 158
Displays and operationOn-boa
rdcompu ter and displays
ProCarManuals.com
Page 166 of 286
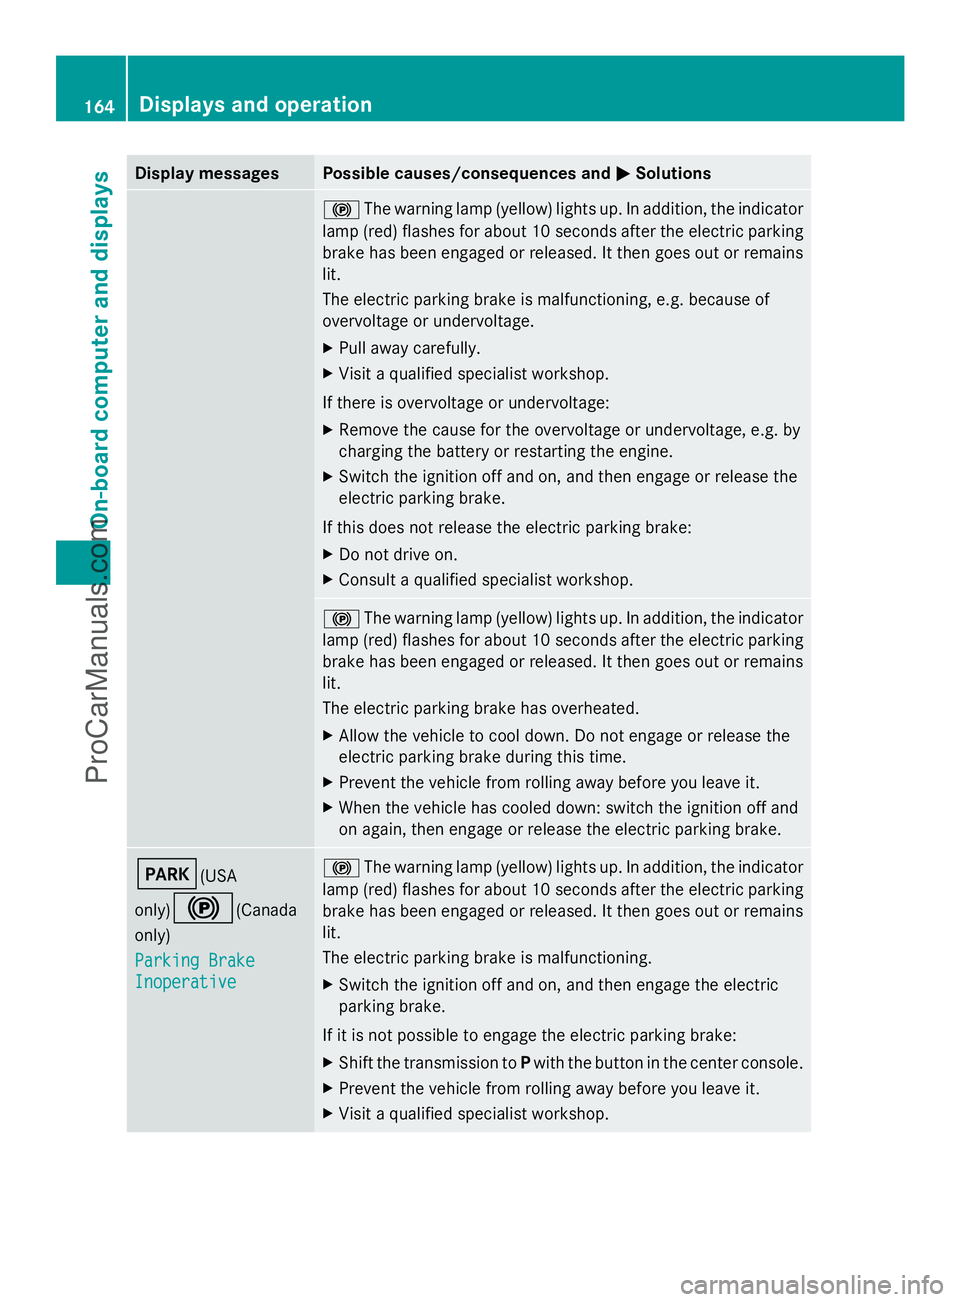
Display messages Possible causes/consequences and
M
MSolutions !
The warning lamp (yellow) lights up. In addition, the indicator
lamp (red) flashes for about 10 seconds after the electric parking
brake has been engaged or released. It then goes out or remains
lit.
The electric parking brake is malfunctioning, e.g. because of
overvoltage or undervoltage.
X Pull away carefully.
X Visit a qualified specialist workshop.
If there is overvoltage or undervoltage:
X Remove the cause for the overvoltage or undervoltage, e.g. by
charging the battery or restarting the engine.
X Switch the ignition off and on, and then engage or release the
electric parking brake.
If this does not release the electric parking brake:
X Do not drive on.
X Consult a qualified specialist workshop. !
The warning lamp (yellow) lights up. In addition, the indicator
lamp (red) flashes for about 10 seconds after the electric parking
brake has been engaged or released. It then goes out or remains
lit.
The electric parking brake has overheated.
X Allow the vehicle to cool down. Do not engage or release the
electric parking brake during this time.
X Prevent the vehicle from rolling away before you leave it.
X When the vehicle has cooled down: switch the ignition off and
on again, then engage or release the electric parking brake. F(USA
only)
!(Canada
only)
Parking Brake Parking Brake
Inoperative Inoperative !
The warning lamp (yellow) lights up. In addition, the indicator
lamp (red) flashes for about 10 seconds after the electric parking
brake has been engaged or released. It then goes out or remains
lit.
The electric parking brake is malfunctioning.
X Switch the ignition off and on, and then engage the electric
parking brake.
If it is not possible to engage the electric parking brake:
X Shift the transmission to Pwith the button in the center console.
X Prevent the vehicle from rolling away before you leave it.
X Visit a qualified specialist workshop. 164
Displays and operationOn-board compu
ter and displays
ProCarManuals.com
Page 167 of 286
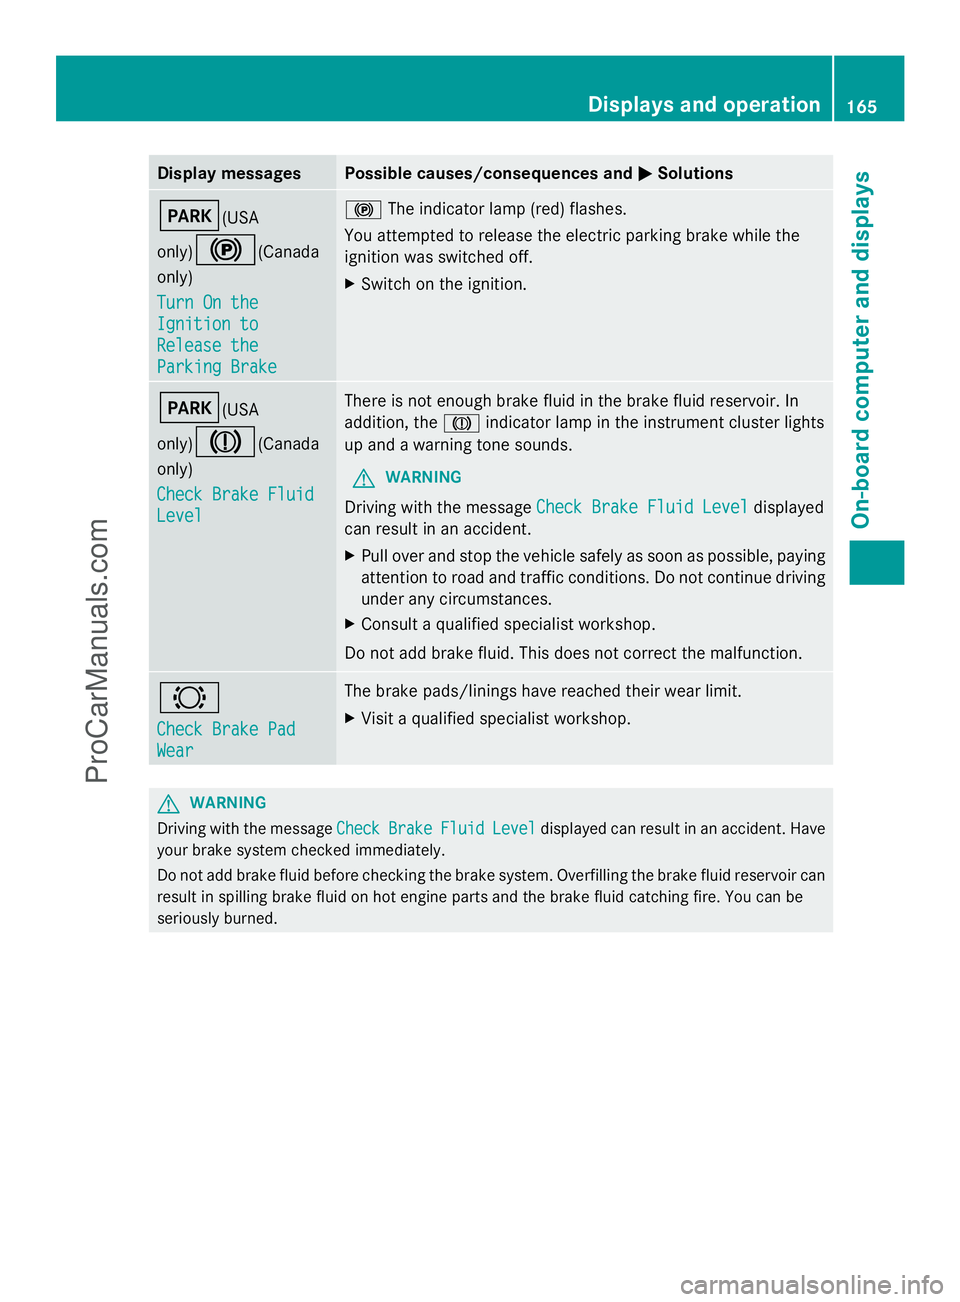
Display messages Possible causes/consequences and
M
MSolutions F(USA
only)
!(Canada
only)
Turn On the Turn On the
Ignition to Ignition to
Release the Release the
Parking Brake Parking Brake !
The indicator lamp (red) flashes.
You attempted to release the electric parking brake while the
ignition was switched off.
X Switch on the ignition. F(USA
only)
J(Canada
only)
Check Brake Fluid Check Brake Fluid
Level Level There is not enough brake fluid in the brake fluid reservoir. In
addition, the
Jindicator lamp in the instrument cluster lights
up and a warning tone sounds.
G WARNING
Driving with the message Check Brake Fluid Level Check Brake Fluid Level displayed
can result in an accident.
X Pull over and stop the vehicle safely as soon as possible, paying
attention to road and traffic conditions. Do not continue driving
under any circumstances.
X Consult a qualified specialist workshop.
Do not add brake fluid. This does not correct the malfunction. #
Check Brake Pad Check Brake Pad
Wear Wear The brake pads/linings have reached their wear limit.
X
Visit a qualified specialist workshop. G
WARNING
Driving with the message Check CheckBrake
BrakeFluid
FluidLevel
Leveldisplayed can result in an accident. Have
your brake system checked immediately.
Do not add brake fluid before checking the brake system. Overfilling the brake fluid reservoir can
result in spilling brake fluid on hot engine parts and the brake fluid catching fire. You can be
seriously burned. Displays and operation
165On-board computer and displays Z
ProCarManuals.com