2013 MERCEDES-BENZ SLS-CLASS engine
[x] Cancel search: enginePage 193 of 286
For your safety, we strongly recommend that you contact an authorized Mercedes-Benz Center
immediately to have the system checked. Otherwise the SRS may not be activated when needed
in an accident, which could result in serious or fatal injury, or it might deploy unexpectedly and
unnecessarily which could also result in injury.
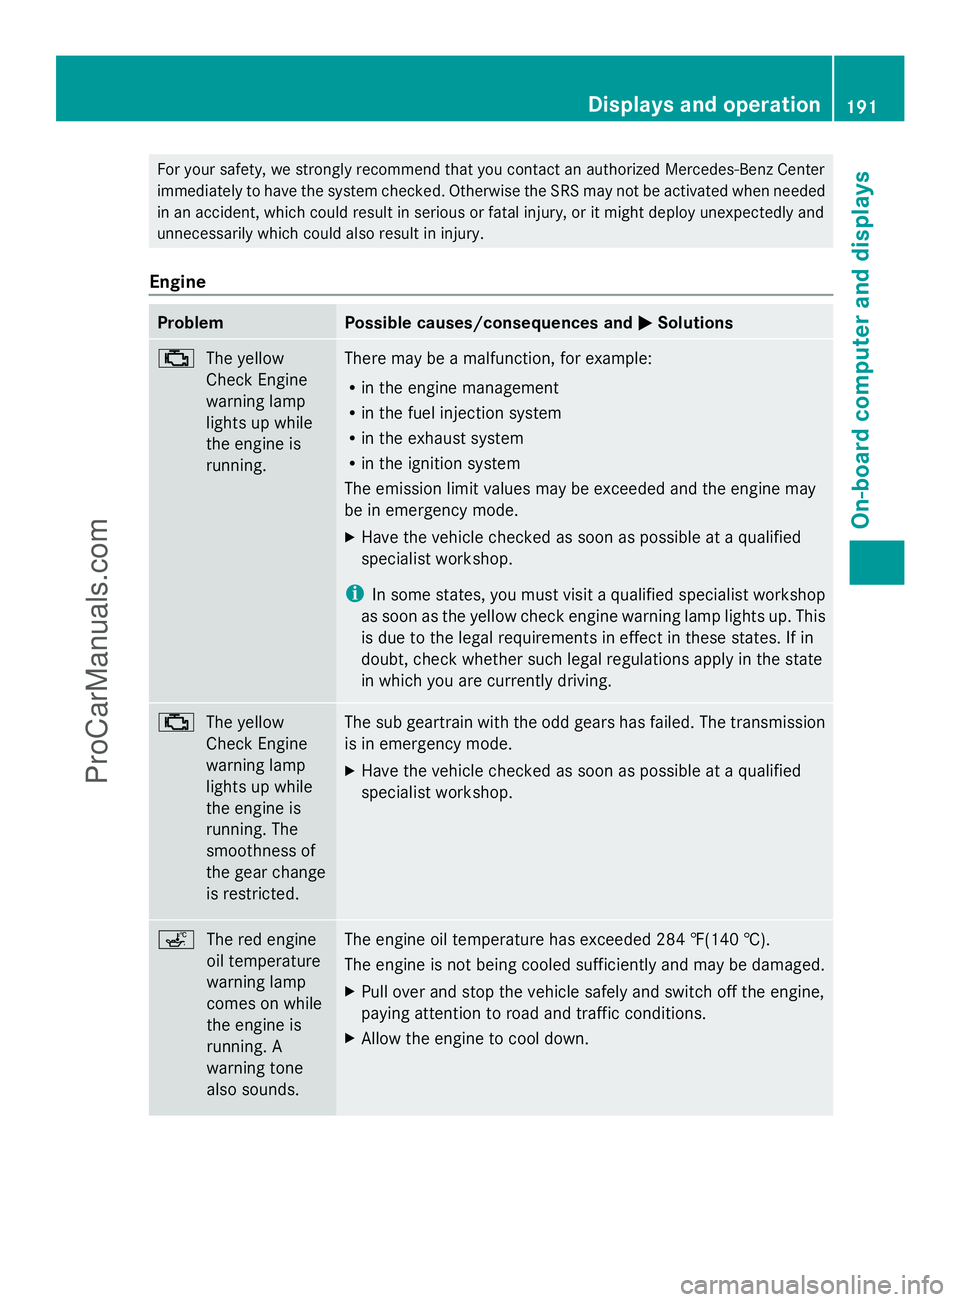
Engine Problem Possible causes/consequences and
M MSolutions ;
The yellow
Check Engine
warning lamp
lights up while
the engine is
running. There may be a malfunction, for example:
R
in the engine management
R in the fuel injection system
R in the exhaust system
R in the ignition system
The emission limit values may be exceeded and the engine may
be in emergency mode.
X Have the vehicle checked as soon as possible at a qualified
specialist workshop.
i In some states, you must visit a qualified specialist workshop
as soon as the yellow check engine warning lamp lights up. This
is due to the legal requirements in effect in these states. If in
doubt, check whether such legal regulations apply in the state
in which you are currently driving. ;
The yellow
Check Engine
warning lamp
lights up while
the engine is
running. The
smoothness of
the gear change
is restricted. The sub geartrain with the odd gears has failed. The transmission
is in emergency mode.
X
Have the vehicle checked as soon as possible at a qualified
specialist workshop. ç
The red engine
oil temperature
warning lamp
comes on while
the engine is
running. A
warning tone
also sounds. The engine oil temperature has exceeded 284 ‡(140 †).
The engine is not being cooled sufficiently and may be damaged.
X
Pull over and stop the vehicle safely and switch off the engine,
paying attention to road and traffic conditions.
X Allow the engine to cool down. Displays and operation
191On-board computer and displays Z
ProCarManuals.com
Page 194 of 286
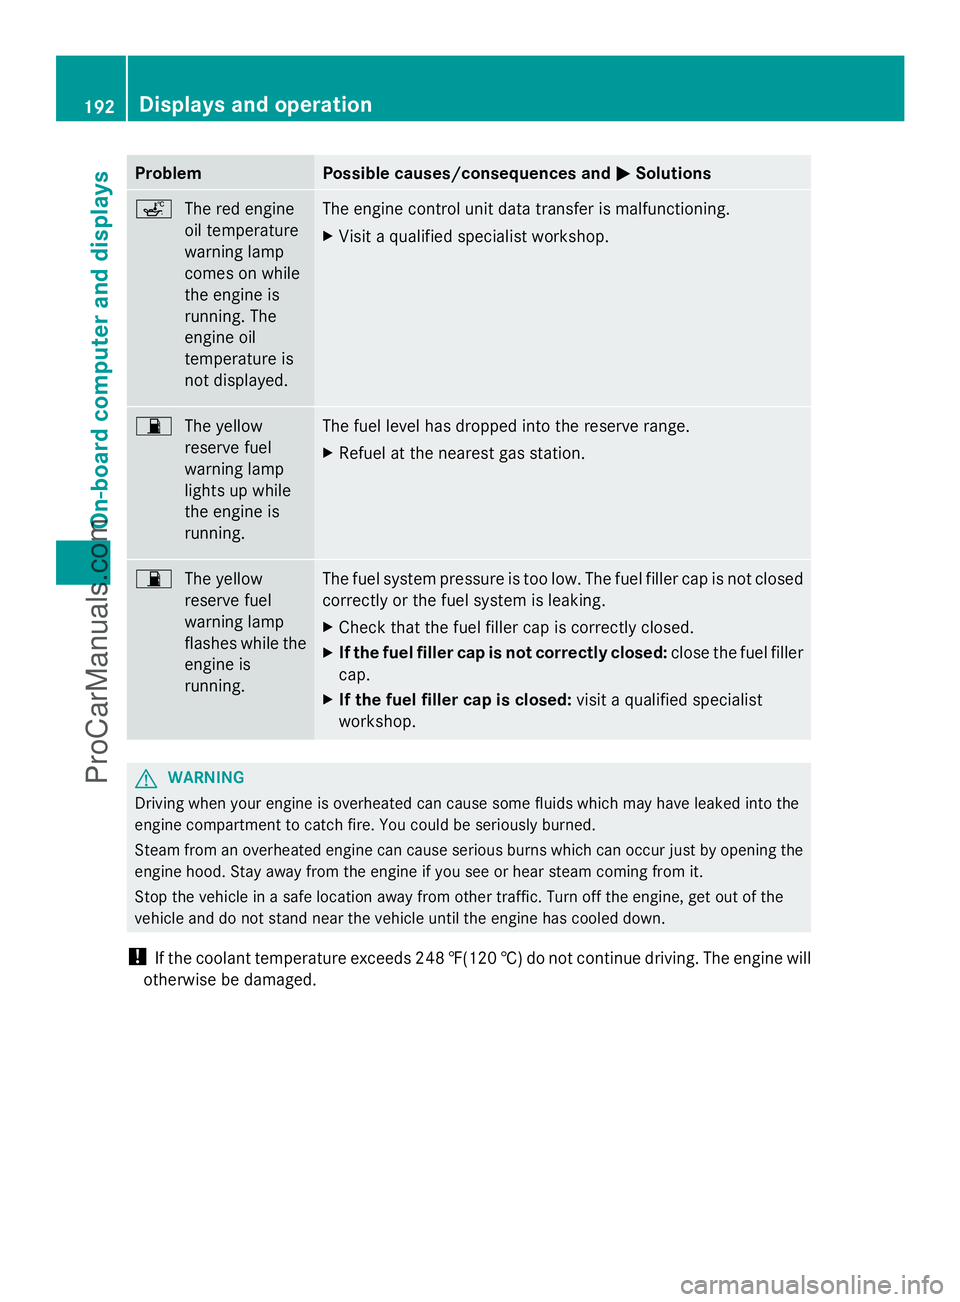
Problem Possible causes/consequences and
M
MSolutions ç
The red engine
oil temperature
warning lamp
comes on while
the engine is
running. The
engine oil
temperature is
not displayed. The engine control unit data transfer is malfunctioning.
X
Visit a qualified specialist workshop. 7
The yellow
reserve fuel
warning lamp
lights up while
the engine is
running. The fuel level has dropped into the reserve range.
X
Refuel at the nearest gas station. 7
The yellow
reserve fuel
warning lamp
flashes while the
engine is
running. The fuel system pressure is too low. The fuel filler cap is not closed
correctly or the fuel system is leaking.
X
Check that the fuel filler cap is correctly closed.
X If the fuel filler cap is not correctly closed: close the fuel filler
cap.
X If the fuel filler cap is closed: visit a qualified specialist
workshop. G
WARNING
Driving when your engine is overheated can cause some fluids which may have leaked into the
engine compartment to catch fire. You could be seriously burned.
Steam from an overheated engine can cause serious burns which can occur just by opening the
engine hood. Stay away from the engine if you see or hear steam coming from it.
Stop the vehicle in a safe location away from other traffic. Turn off the engine, get out of the
vehicle and do not stand near the vehicle until the engine has cooled down.
! If the coolant temperature exceeds 248 ‡(120 †) do not continue driving. The engine will
otherwise be damaged. 192
Displays and operationOn-board computer and displays
ProCarManuals.com
Page 202 of 286
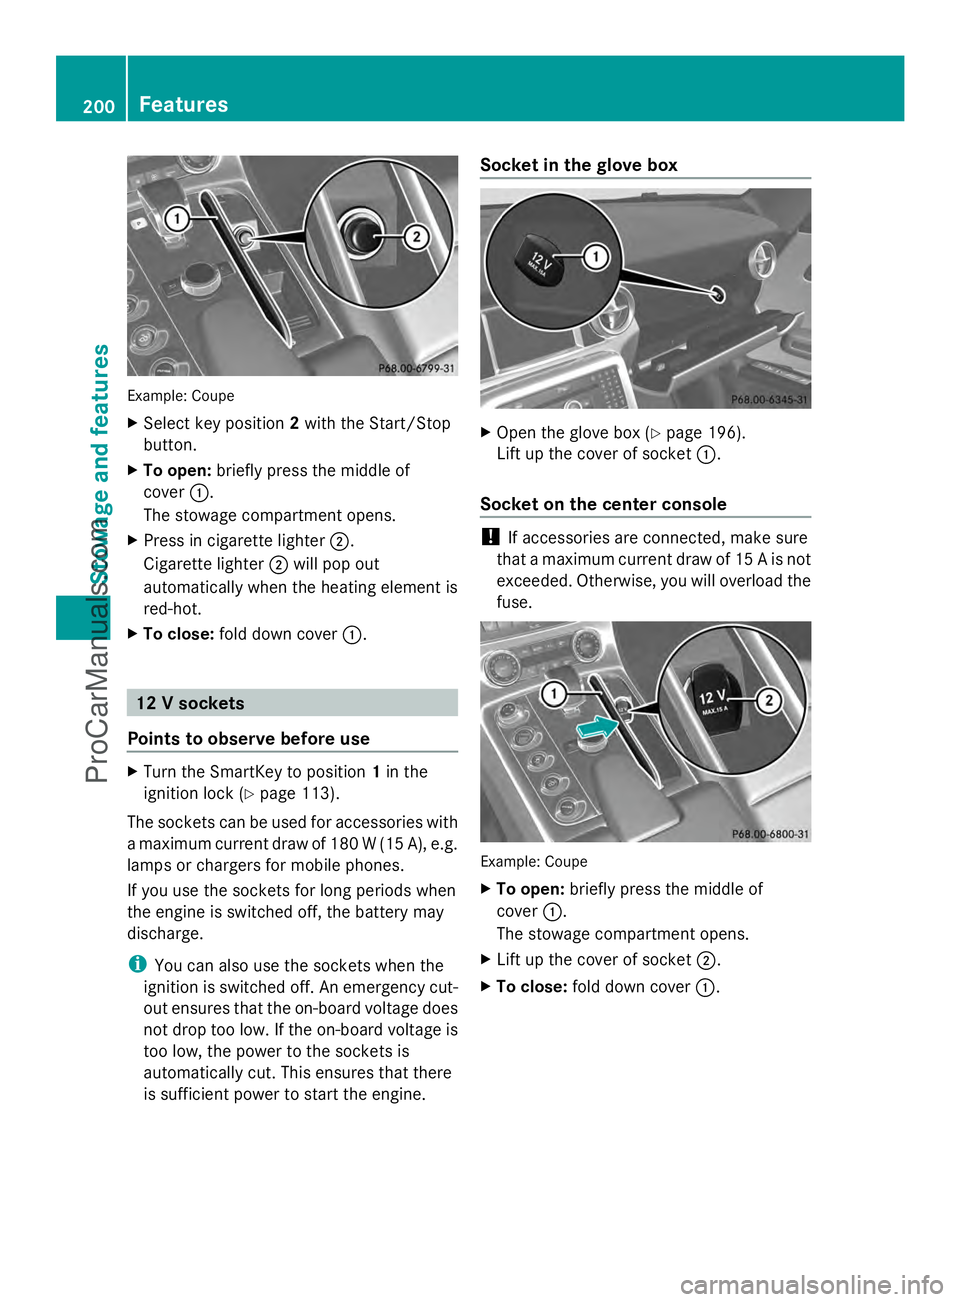
Example: Coupe
X
Select key position 2with the Start/Stop
button.
X To open: briefly press the middle of
cover :.
The stowage compartment opens.
X Press in cigarette lighter ;.
Cigarette lighter ;will pop out
automatically when the heating element is
red-hot.
X To close: fold down cover :. 12 V sockets
Points to observe before use X
Turn the SmartKey to position 1in the
ignition lock (Y page 113).
The sockets can be used for accessories with
a maximum current draw of 180 W (15 A), e.g.
lamps or chargers for mobile phones.
If you use the sockets for long periods when
the engine is switched off, the battery may
discharge.
i You can also use the sockets when the
ignition is switched off. An emergency cut-
out ensures that the on-board voltage does
not drop too low. If the on-board voltage is
too low, the power to the sockets is
automatically cut. This ensures that there
is sufficient power to start the engine. Socket in the glove box
X
Open the glove box (Y page 196).
Lift up the cover of socket :.
Socket on the center console !
If accessories are connected, make sure
that a maximum current draw of 15 A is not
exceeded. Otherwise, you will overload the
fuse. Example: Coupe
X
To open: briefly press the middle of
cover :.
The stowage compartment opens.
X Lift up the cover of socket ;.
X To close: fold down cover :.200
FeaturesSto
wage an d features
ProCarManuals.com
Page 211 of 286
Do not run the engine while programming the
integrated remote control. Inhalation of
exhaust gas is hazardous to your health. All
exhaust gas contains carbon monoxide (CO),
and inhaling it can cause unconsciousness
and possible death. All exhaust gas contains
carbon monoxide (CO), and inhaling it can
cause unconsciousness and possible death.
i Notes about the declaration of conformity
can be found here (Y page 21).
Programming the integrated garage
door opener on the rear-view mirror Programming buttons
G
WARNING
Only press the button on the integrated
garage door opener if there are no persons or
objects present within the sweep of the
garage door. Persons could otherwise be
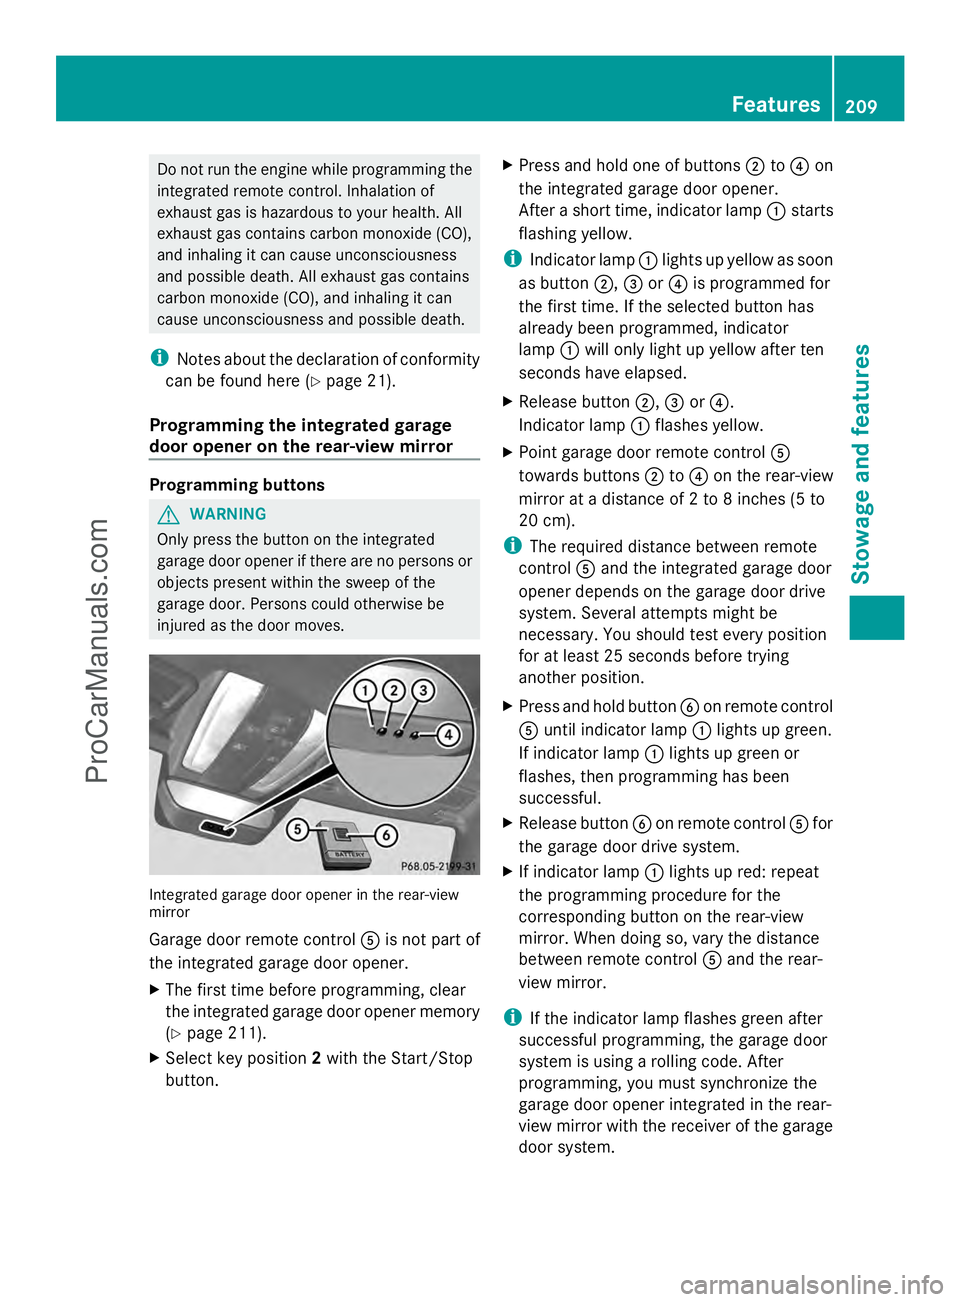
injured as the door moves. Integrated garage door opener in the rear-view
mirror
Garage door remote control
Ais not part of
the integrated garage door opener.
X The first time before programming, clear
the integrated garage door opener memory
(Y page 211).
X Select key position 2with the Start/Stop
button. X
Press and hold one of buttons ;to? on
the integrated garage door opener.
After a short time, indicator lamp :starts
flashing yellow.
i Indicator lamp :lights up yellow as soon
as button ;,=or? is programmed for
the first time. If the selected button has
already been programmed, indicator
lamp :will only light up yellow after ten
seconds have elapsed.
X Release button ;,=or?.
Indicator lamp :flashes yellow.
X Point garage door remote control A
towards buttons ;to? on the rear-view
mirror at a distance of 2 to 8 inches (5 to
20 cm).
i The required distance between remote
control Aand the integrated garage door
opener depends on the garage door drive
system. Several attempts might be
necessary. You should test every position
for at least 25 seconds before trying
another position.
X Press and hold button Bon remote control
A until indicator lamp :lights up green.
If indicator lamp :lights up green or
flashes, then programming has been
successful.
X Release button Bon remote control Afor
the garage door drive system.
X If indicator lamp :lights up red: repeat
the programming procedure for the
corresponding button on the rear-view
mirror. When doing so, vary the distance
between remote control Aand the rear-
view mirror.
i If the indicator lamp flashes green after
successful programming, the garage door
system is using a rolling code. After
programming, you must synchronize the
garage door opener integrated in the rear-
view mirror with the receiver of the garage
door system. Features
209Stowage an d features Z
ProCarManuals.com
Page 215 of 286
Useful information
............................214
Engine compartment ........................214
Maintenance ...................................... 217
Care .................................................... 219 213Maintenance and care
ProCarManuals.com
Page 216 of 286
Useful information
i This Operator's Manual describes all
models and all standard and optional
equipment of your vehicle available at the
time of publication of the Operator's
Manual. Country-specific differences are
possible. Please note that your vehicle may
not be equipped with all features
described. This also applies to safety-
related systems and functions.
i Please read the information on qualified
specialist workshops (Y page 22).Engine compartment
Hood
Important safety notes G
WARNING
If the hood is unlatched, it may open up when
the vehicle is in motion and block your view.
There is a risk of an accident.
Never unlatch the hood while driving. G
WARNING
If the hood is unlatched, it could tip forward
during rapid deceleration of the vehicle and
hit persons or objects within its path. There is
a risk of an accident and injury.
Therefore, always make sure that the hood is
closed and locked completely before driving
off. G
WARNING
When opening and closing the hood, it may
suddenly fall into the closed position. There is
a risk of injury to persons within range of
movement of the hood.
Open and close the hood only when no one is
within its range of movement. G
WARNING
Certain components in the engine
compartment, such as the engine, radiator and parts of the exhaust system, can become
very hot. Working in the engine compartment
poses a risk of injury.
Where possible, let the engine cool down and
touch only the components described in the
following. G
WARNING
Opening the hood when the engine is
overheated or when there is a fire in the
engine compartment could expose you to hot
gases or other service products. There is a
risk of injury.
Let an overheated engine cool down before
opening the hood. If there is a fire in the
engine compartment, keep the hood closed
and contact the fire department. G
WARNING
The engine compartment contains moving
components. Certain components, such as
the radiator fan, may continue to run or start
again suddenly when the ignition is off. There
is a risk of injury.
If you need to do any work inside the engine
compartment,
R switch off the ignition
R never reach into the area where there is a
risk of danger from moving components,
such as the fan rotation area
R keep clothing away from moving parts
Opening the hood G
WARNING
The windshield wipers and wiper linkage
could be set in motion.
When the hood is open, you or others could
be injured by the wiper linkage.
Make sure that the windshield wipers are
switched off. When using KEYLESS-GO, make
sure that no ignition position is selected. All
indicator lamps in the instrument cluster must
be off. 214
Engine compartmentMaintenance and care
ProCarManuals.com
Page 217 of 286
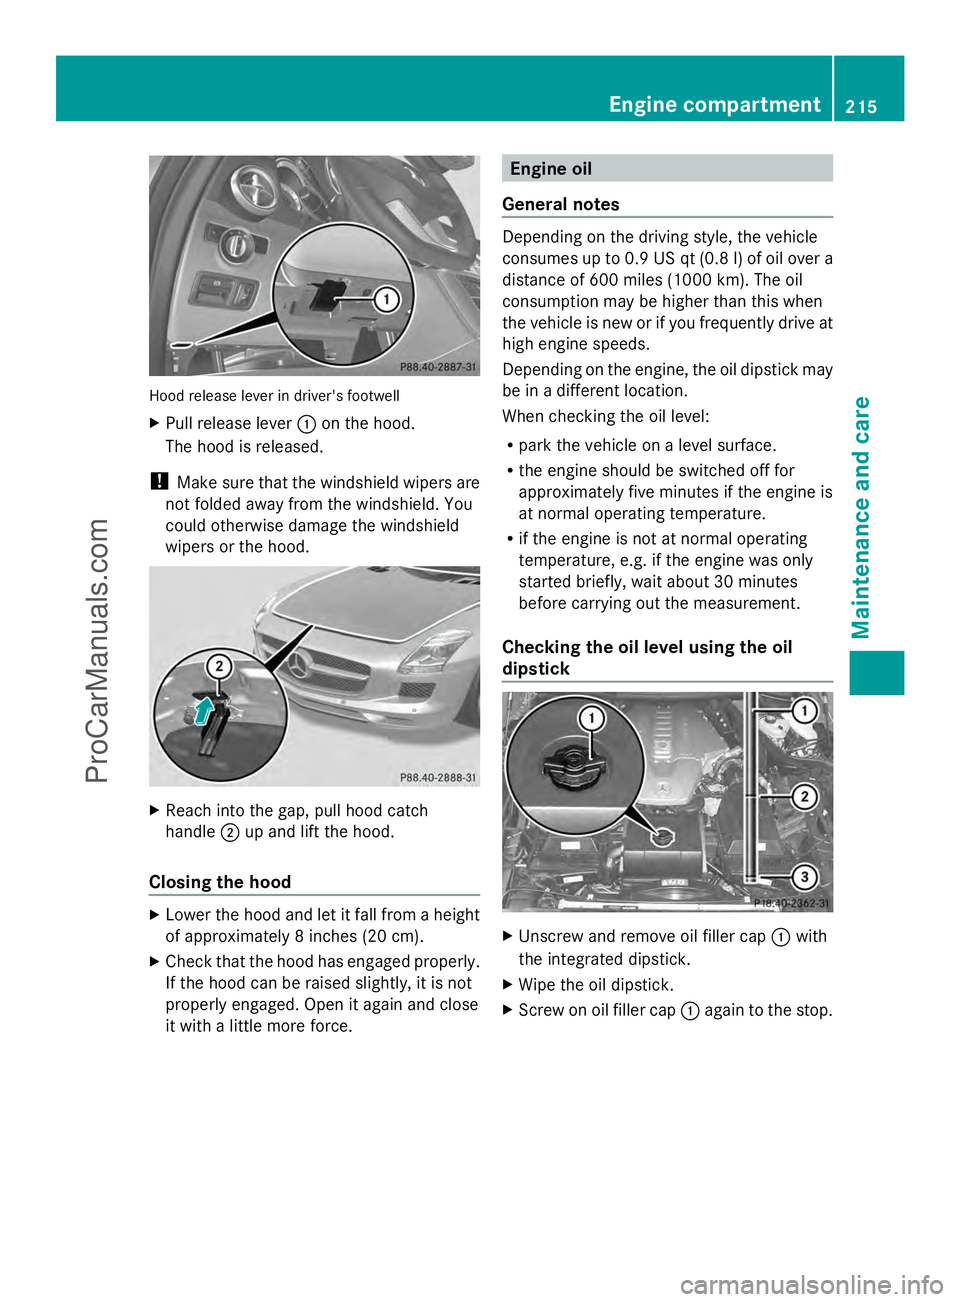
Hood release lever in driver's footwell
X
Pull release lever :on the hood.
The hood is released.
! Make sure that the windshield wipers are
not folded away from the windshield. You
could otherwise damage the windshield
wipers or the hood. X
Reach into the gap, pull hood catch
handle ;up and lift the hood.
Closing the hood X
Lower the hood and let it fall from a height
of approximately 8 inches (20 cm).
X Check that the hood has engaged properly.
If the hood can be raised slightly, it is not
properly engaged. Open it again and close
it with a little more force. Engine oil
General notes Depending on the driving style, the vehicle
consumes up to 0.9 US qt (0.8 l) of oil over a
distance of 600 miles (1000 km). The oil
consumption may be higher than this when
the vehicle is new or if you frequently drive at
high engine speeds.
Depending on the engine, the oil dipstick may
be in a different location.
When checking the oil level:
R
park the vehicle on a level surface.
R the engine should be switched off for
approximately five minutes if the engine is
at normal operating temperature.
R if the engine is not at normal operating
temperature, e.g. if the engine was only
started briefly, wait about 30 minutes
before carrying out the measurement.
Checking the oil level using the oil
dipstick X
Unscrew and remove oil filler cap :with
the integrated dipstick.
X Wipe the oil dipstick.
X Screw on oil filler cap :again to the stop. Engine compartment
215Maintenance and care Z
ProCarManuals.com
Page 218 of 286

X
Unscrew oil filler cap :again and read the
dipstick.
If the level is between MIN mark =and
MAX mark ;, the oil level is correct.
X If the oil level has dropped to MIN mark
= or below, add 1.1 US qt (1.0 liter) of
engine oil.
Adding engine oil G
WARNING
If engine oil comes into contact with hot
components in the engine compartment, it
may ignite. There is a risk of fire and injury.
Make sure that engine oil is not spilled next
to the filler neck. Let the engine cool down
and thoroughly clean the engine oil off the
components before starting the engine. H
Environmental note
When adding oil, take care not to spill any. If
oil enters the soil or waterways, it is harmful
to the environment.
! Only use engine oils and oil filters that
have been approved for vehicles with a
service system. You can obtain a list of the
engine oils and oil filters tested and
approved in accordance with the
Mercedes-Benz Specifications for Service
Products at any Mercedes-Benz Service
center.
Damage to the engine or exhaust system is
caused by the following:
R using engine oils and oil filters that have
not been specifically approved for the
service system
R replacing engine oil and oil filters after
the interval for replacement specified by
the service system has been exceeded
R using engine oil additives.
! Do not add too much oil. adding too much
engine oil can result in damage to the
engine or to the catalytic converter. Have
excess engine oil siphoned off. X
Unscrew and remove oil filler cap :with
the integrated dipstick.
X Add engine oil.
If the oil level is at or under the MIN mark
on the oil dipstick, add 1.1 US qt (1.0 liter)
of engine oil.
X Replace cap :on the filler neck and
tighten clockwise.
Ensure that the cap locks into place
securely.
X Check the oil level again with the oil
dipstick (Y page 215).
You will find further information about engine
oil in the "Technical data" section
(Y page 279). Checking and adding other service
products
Checking coolant level G
WARNING
The engine cooling system is pressurized,
particularly when the engine is warm. When
opening the cap, you could be scalded by hot
coolant spraying out. There is a risk of injury.
Let the engine cool down before opening the
cap. Wear eye and hand protection when
opening the cap. Open the cap slowly half a
turn to allow pressure to escape.
Only check the coolant level when the vehicle
is on a level surface and the engine has cooled
down. 216
Engine compartmentMaintenance and care
ProCarManuals.com