2013 MERCEDES-BENZ SLS-CLASS key battery
[x] Cancel search: key batteryPage 68 of 286
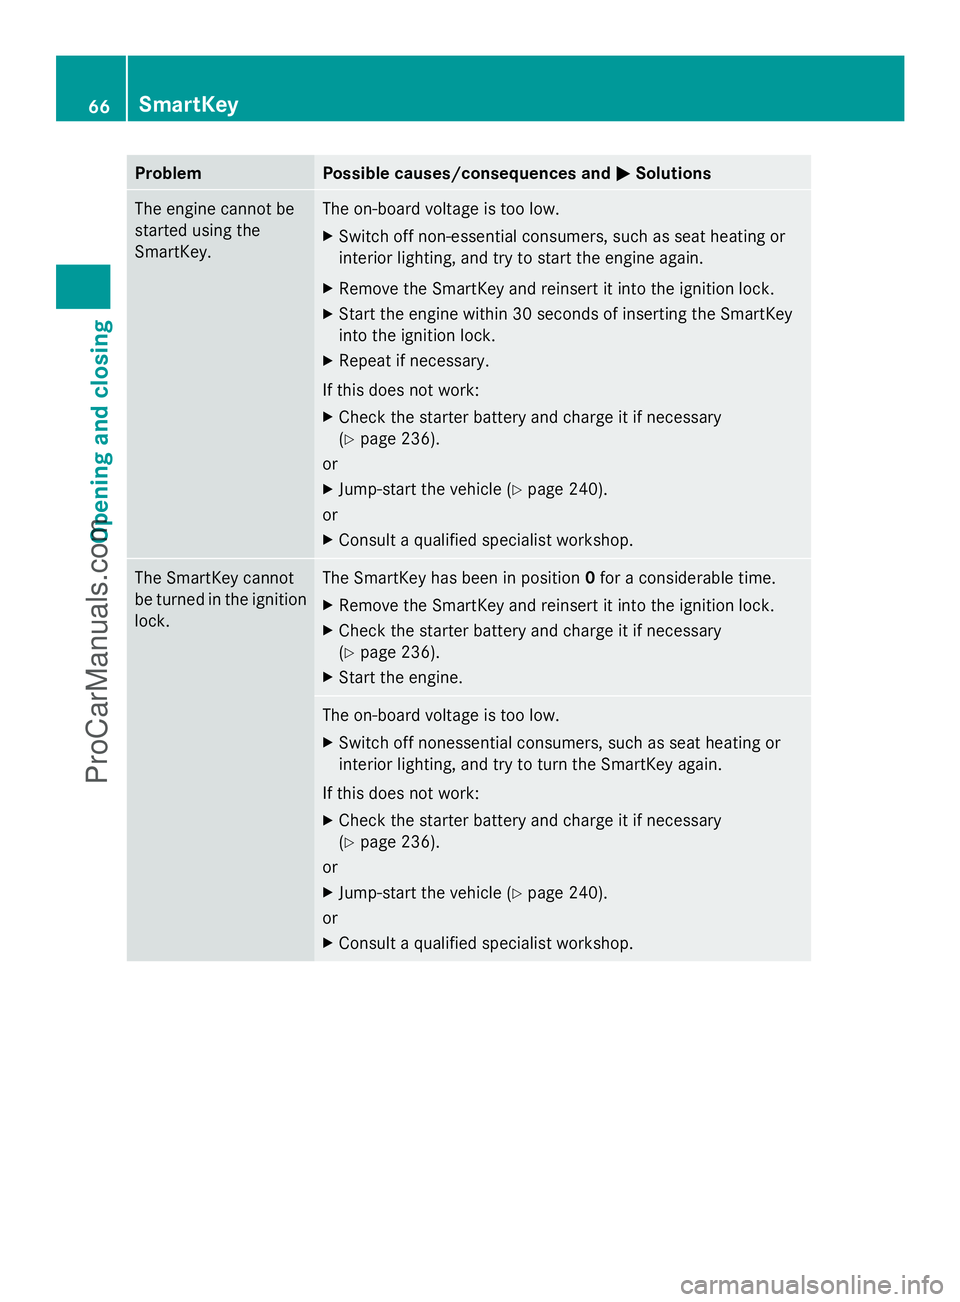
Problem Possible causes/consequences and
M
MSolutions The engine cannot be
started using the
SmartKey. The on-board voltage is too low.
X
Switch off non-essential consumers, such as seat heating or
interior lighting, and try to start the engine again.
X Remove the SmartKey and reinsert it into the ignition lock.
X Start the engine within 30 seconds of inserting the SmartKey
into the ignition lock.
X Repeat if necessary.
If this does not work:
X Check the starter battery and charge it if necessary
(Y page 236).
or
X Jump-start the vehicle (Y page 240).
or
X Consult a qualified specialist workshop. The SmartKey cannot
be turned in the ignition
lock. The SmartKey has been in position
0for a considerable time.
X Remove the SmartKey and reinsert it into the ignition lock.
X Check the starter battery and charge it if necessary
(Y page 236).
X Start the engine. The on-board voltage is too low.
X
Switch off nonessential consumers, such as seat heating or
interior lighting, and try to turn the SmartKey again.
If this does not work:
X Check the starter battery and charge it if necessary
(Y page 236).
or
X Jump-start the vehicle (Y page 240).
or
X Consult a qualified specialist workshop. 66
SmartKeyOpening and closing
ProCarManuals.com
Page 75 of 286
X
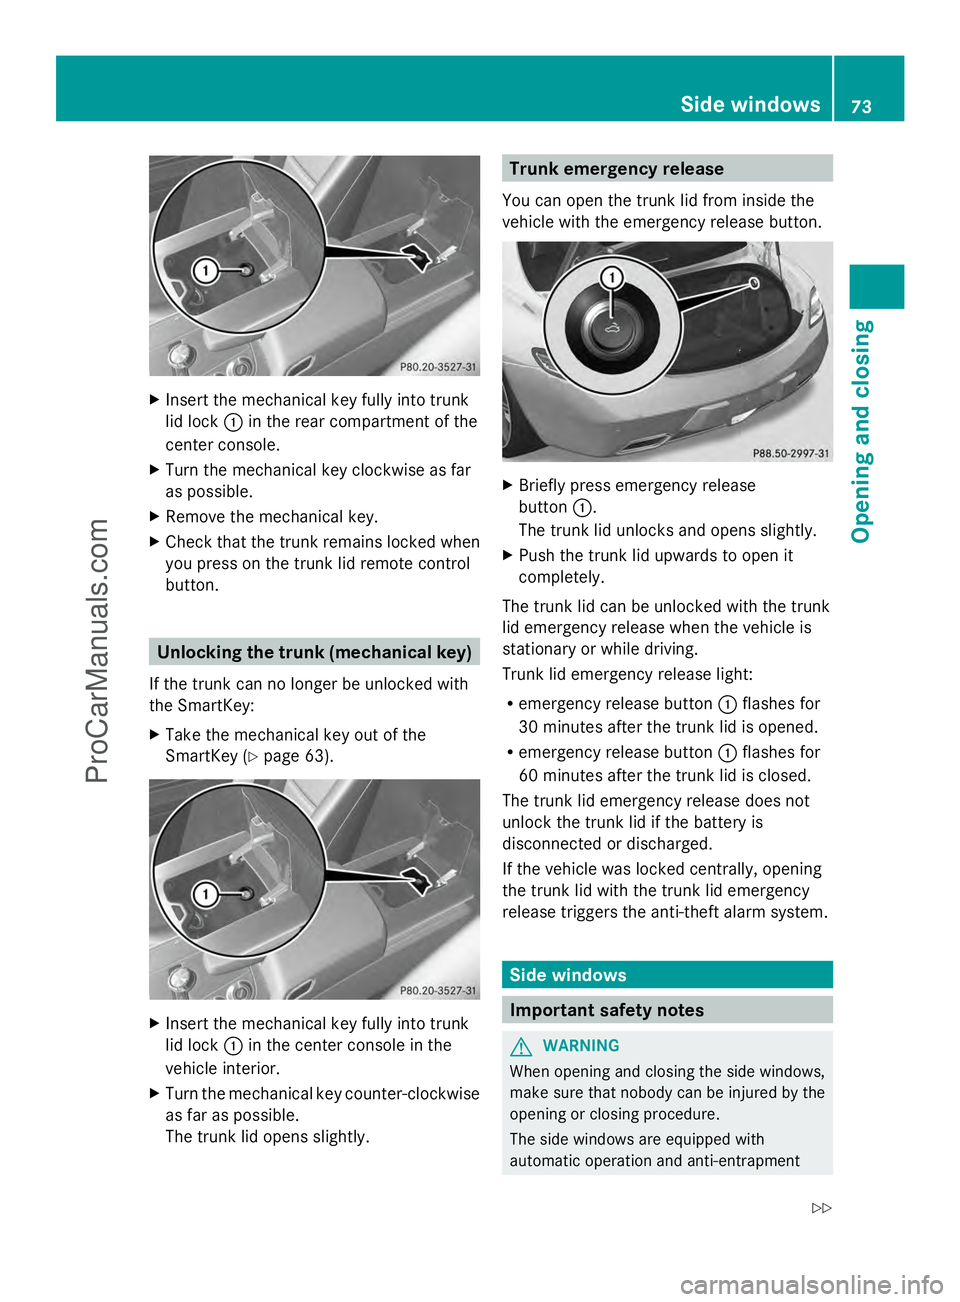
Insert the mechanical key fully into trunk
lid lock :in the rear compartment of the
center console.
X Turn the mechanical key clockwise as far
as possible.
X Remove the mechanical key.
X Check that the trunk remains locked when
you press on the trunk lid remote control
button. Unlocking the trunk (mechanical key)
If the trunk can no longer be unlocked with
the SmartKey:
X Take the mechanical key out of the
SmartKey (Y page 63). X
Insert the mechanical key fully into trunk
lid lock :in the center console in the
vehicle interior.
X Turn the mechanical key counter-clockwise
as far as possible.
The trunk lid opens slightly. Trunk emergency release
You can open the trunk lid from inside the
vehicle with the emergency release button. X
Briefly press emergency release
button :.
The trunk lid unlocks and opens slightly.
X Push the trunk lid upwards to open it
completely.
The trunk lid can be unlocked with the trunk
lid emergency release when the vehicle is
stationary or while driving.
Trunk lid emergency release light:
R emergency release button :flashes for
30 minutes after the trunk lid is opened.
R emergency release button :flashes for
60 minutes after the trunk lid is closed.
The trunk lid emergency release does not
unlock the trunk lid if the battery is
disconnected or discharged.
If the vehicle was locked centrally, opening
the trunk lid with the trunk lid emergency
release triggers the anti-theft alarm system. Side windows
Important safety notes
G
WARNING
When opening and closing the side windows,
make sure that nobody can be injured by the
opening or closing procedure.
The side windows are equipped with
automatic operation and anti-entrapment Side windows
73Opening and closing
Z
ProCarManuals.com
Page 86 of 286
R
clean the seat covers as recommended;
see the "Interior care" section.
R do not transport heavy loads on the
seats. Do not place sharp objects on the
seat cushions, e.g. knives, nails or tools.
The seats should only be occupied by
passengers, if possible.
R when the seat heating is in operation, do
not cover the seats with insulating
materials, e.g. blankets, coats, bags,
seat covers, child seats or booster seats.
! When you move the seats, make sure that
there are no objects in the footwell or
behind the seats. Otherwise, you could
damage the seats and the objects. Seat adjustment
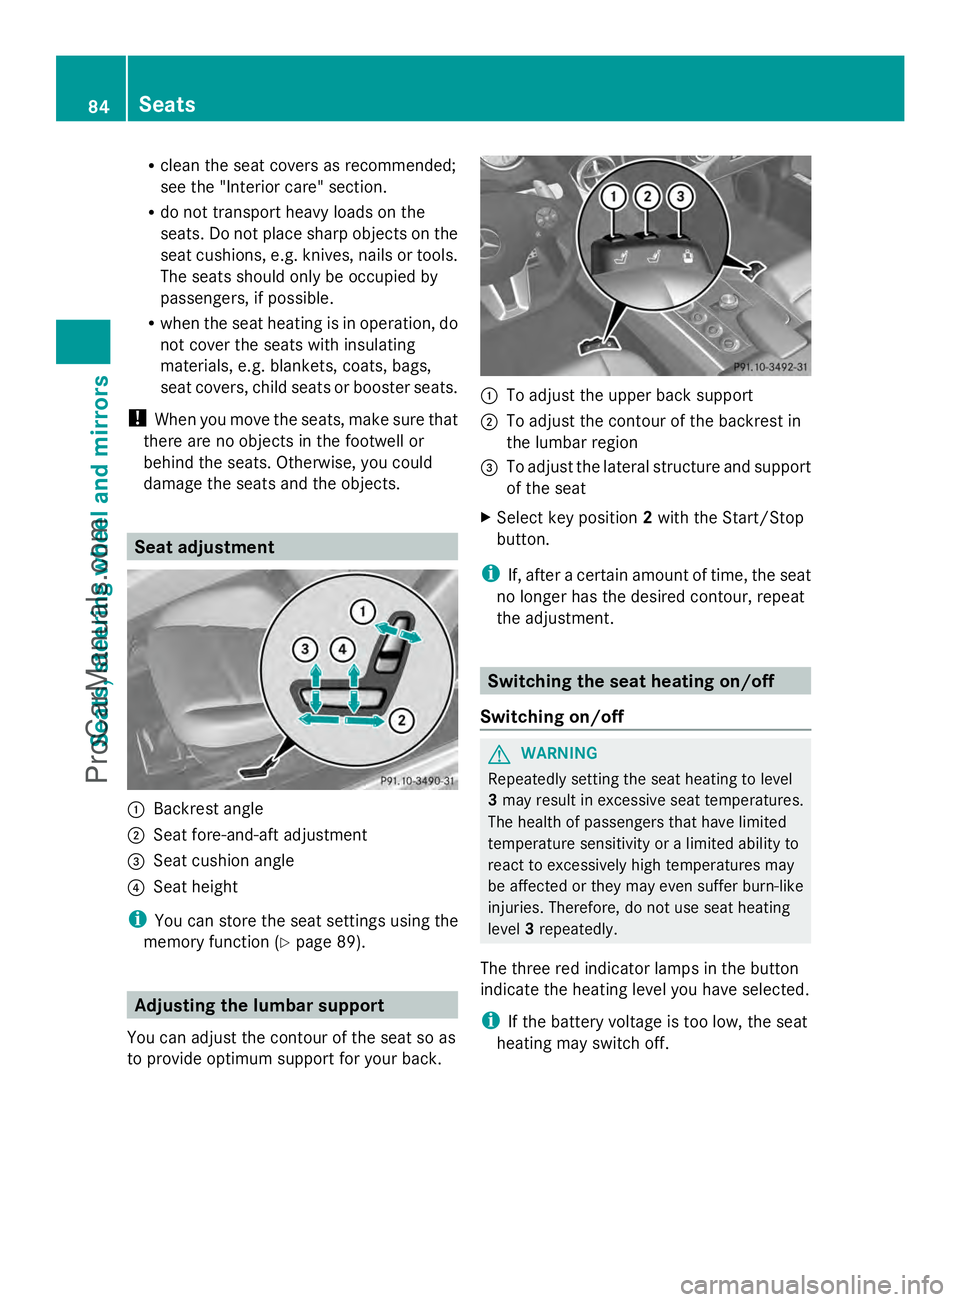
:
Backrest angle
; Seat fore-and-aft adjustment
= Seat cushion angle
? Seat height
i You can store the seat settings using the
memory function (Y page 89).Adjusting the lumbar support
You can adjust the contour of the seat so as
to provide optimum support for your back. :
To adjust the upper back support
; To adjust the contour of the backrest in
the lumbar region
= To adjust the lateral structure and support
of the seat
X Select key position 2with the Start/Stop
button.
i If, after a certain amount of time, the seat
no longer has the desired contour, repeat
the adjustment. Switching the seat heating on/off
Switching on/off G
WARNING
Repeatedly setting the seat heating to level
3 may result in excessive seat temperatures.
The health of passengers that have limited
temperature sensitivity or a limited ability to
react to excessively high temperatures may
be affected or they may even suffer burn-like
injuries. Therefore, do not use seat heating
level 3repeatedly.
The three red indicator lamps in the button
indicate the heating level you have selected.
i If the battery voltage is too low, the seat
heating may switch off. 84
SeatsSeats, steering wheel and mirrors
ProCarManuals.com
Page 87 of 286
The system automatically switches down
from level 3to level 2after approximately five
minutes.
The system automatically switches down
from level 2to level 1after approximately ten
minutes.
The system automatically switches off
approximately 20 minutes after it is set to
level 1.
X Select key position 2with the Start/Stop
button.
X To switch on: press button:repeatedly
until the desired heating level is set.
X To switch off: press button:repeatedly
until all the indicator lamps go out.
Problems with the seat heating The seat heating has switched off
prematurely or cannot be switched on. The
vehicle's electrical system voltage is too low
because too many electrical consumers are
switched on.
X Switch off electrical consumers that you do
not need, such as the rear window
defroster or interior lighting.
Once the battery is sufficiently charged, the
seat heating will switch back on
automatically. AIRSCARF (Roadster)
G
WARNING
Very hot air can flow out of the AIRSCARF
vents in the head restraints when AIRSCARF
is in operation. This can cause burns on
unprotected skin near the AIRSCARF vents.
Make sure that you reduce the heater output
in time.
The AIRSCARF function warms the head and
neck area of vehicle occupants with warm air.
The warm air flows out of the holes in the head
restraints.
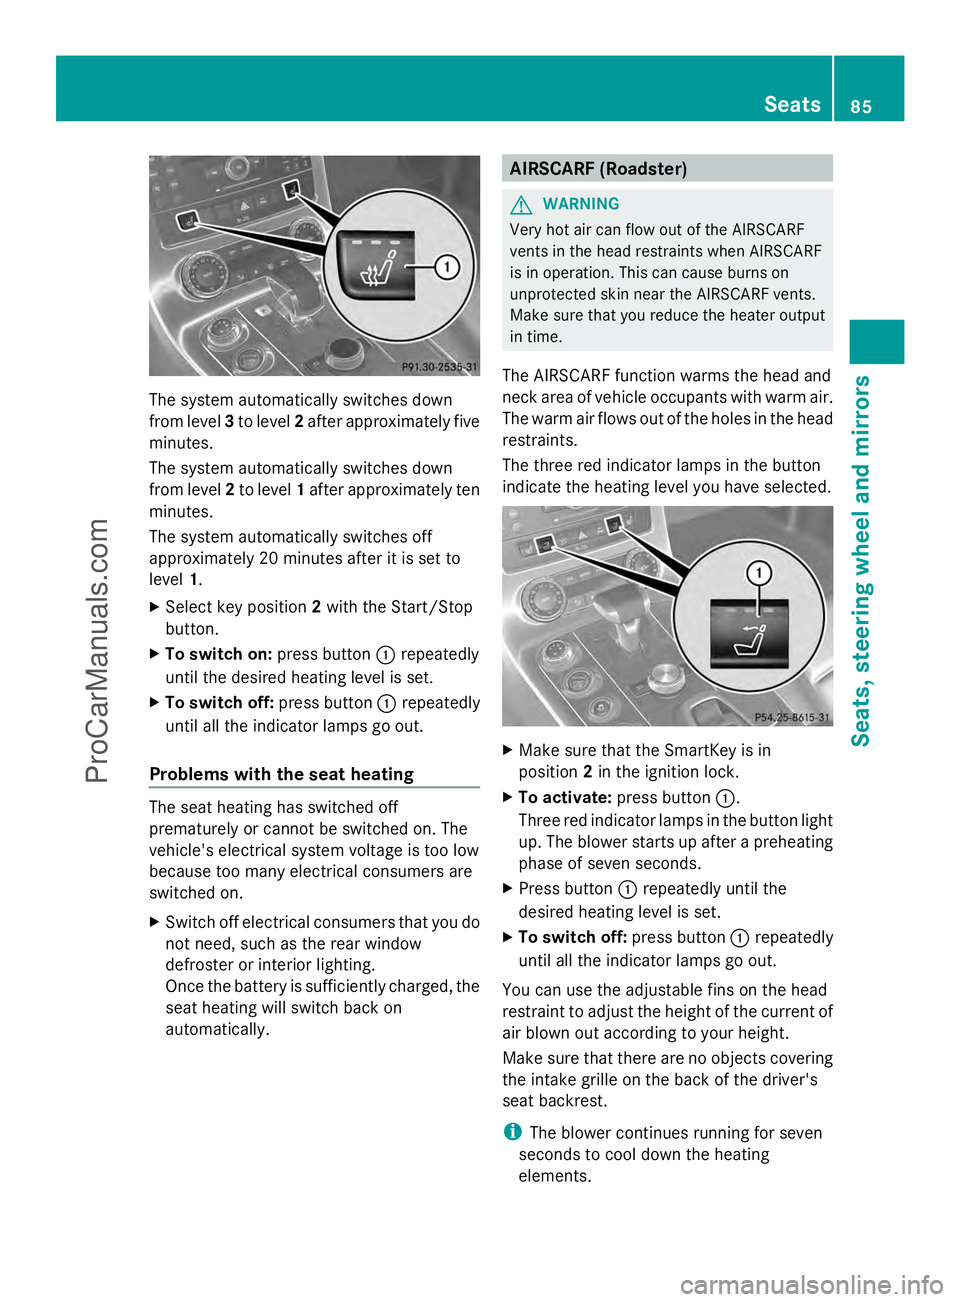
The three red indicator lamps in the button
indicate the heating level you have selected. X
Make sure that the SmartKey is in
position 2in the ignition lock.
X To activate: press button :.
Three red indicator lamps in the button light
up. The blower starts up after a preheating
phase of seven seconds.
X Press button :repeatedly until the
desired heating level is set.
X To switch off: press button:repeatedly
until all the indicator lamps go out.
You can use the adjustable fins on the head
restraint to adjust the height of the current of
air blown out according to your height.
Make sure that there are no objects covering
the intake grille on the back of the driver's
seat backrest.
i The blower continues running for seven
seconds to cool down the heating
elements. Seats
85Seats, steering wheel and mirrors Z
ProCarManuals.com
Page 88 of 286
i
If the battery voltage is too low, AIRSCARF
may switch off. Steering wheel
Important safety notes
G
WARNING
Do not adjust the steering wheel while driving.
Adjusting the steering wheel while driving
could cause the driver to lose control of the
vehicle.
The electrical steering wheel adjustment
feature can be operated at any time.
Therefore, do not leave children unattended
in the vehicle, or with access to an unlocked
vehicle. A child's unsupervised access to a
vehicle could result in an accident and/or
serious personal injury. Adjusting the steering wheel
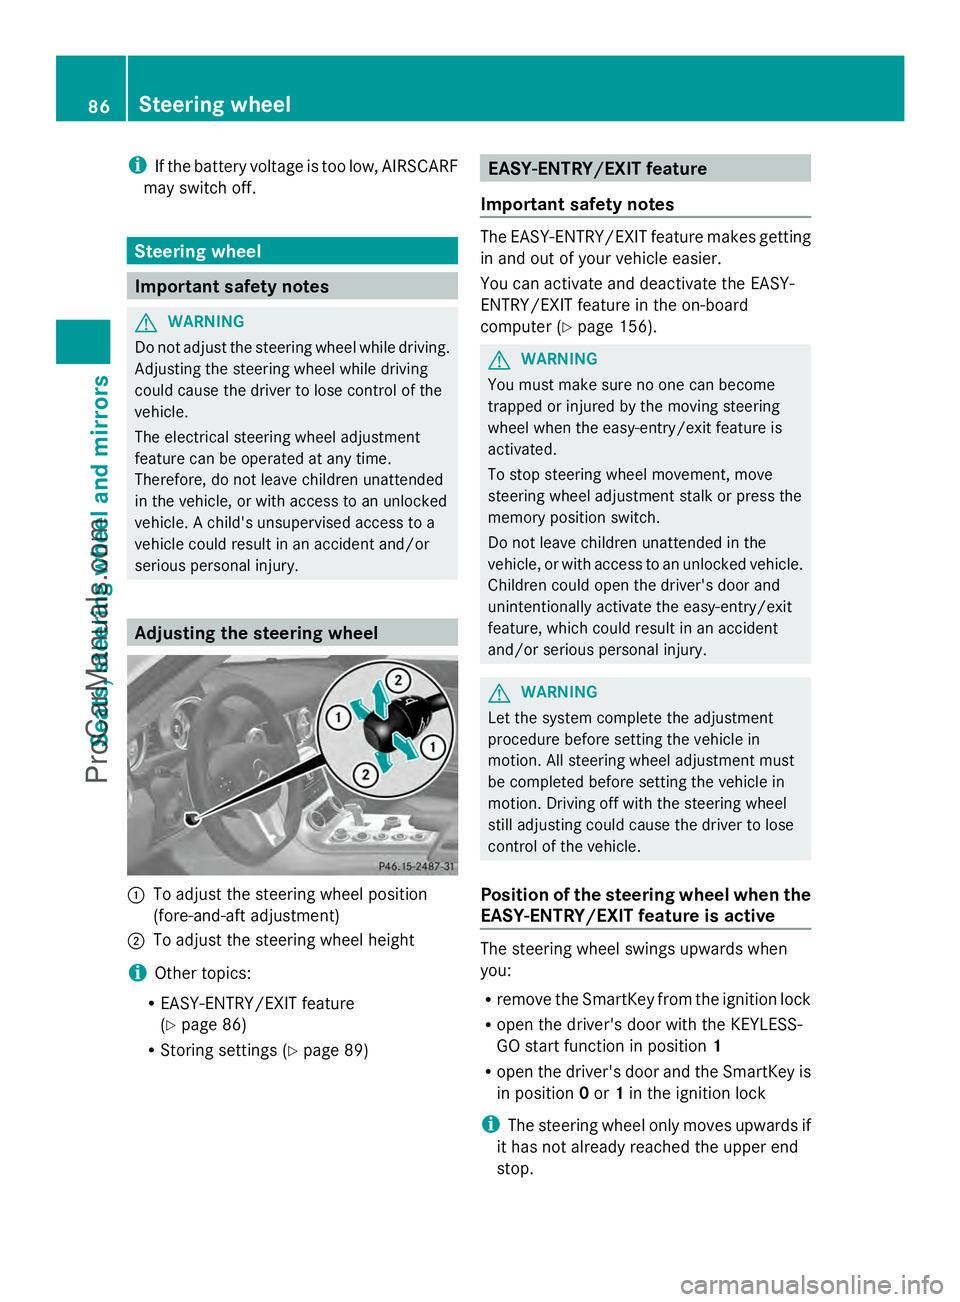
:
To adjust the steering wheel position
(fore-and-aft adjustment)
; To adjust the steering wheel height
i Other topics:
R EASY-ENTRY/EXIT feature
(Y page 86)
R Storing settings (Y page 89) EASY-ENTRY/EXIT feature
Important safety notes The EASY-ENTRY/EXIT feature makes getting
in and out of your vehicle easier.
You can activate and deactivate the EASY-
ENTRY/EXIT feature in the on-board
computer (Y
page 156). G
WARNING
You must make sure no one can become
trapped or injured by the moving steering
wheel when the easy-entry/exit feature is
activated.
To stop steering wheel movement, move
steering wheel adjustment stalk or press the
memory position switch.
Do not leave children unattended in the
vehicle, or with access to an unlocked vehicle.
Children could open the driver's door and
unintentionally activate the easy-entry/exit
feature, which could result in an accident
and/or serious personal injury. G
WARNING
Let the system complete the adjustment
procedure before setting the vehicle in
motion. All steering wheel adjustment must
be completed before setting the vehicle in
motion. Driving off with the steering wheel
still adjusting could cause the driver to lose
control of the vehicle.
Position of the steering wheel when the
EASY-ENTRY/EXIT feature is active The steering wheel swings upwards when
you:
R
remove the SmartKey from the ignition lock
R open the driver's door with the KEYLESS-
GO start function in position 1
R open the driver's door and the SmartKey is
in position 0or 1in the ignition lock
i The steering wheel only moves upwards if
it has not already reached the upper end
stop. 86
Steering wheelSeats, steering wheel and mirrors
ProCarManuals.com
Page 90 of 286

the exterior mirror to the desired position.
You should have a good overview of traffic
conditions.
Folding the exterior mirrors in or out
electrically X
Select SmartKey position 1or 2with the
Start/Stop button.
X Briefly press button ?.
Both exterior mirrors fold in or out.
i Make sure that the exterior mirrors are
always folded out fully while the vehicle is
in motion, as they may otherwise vibrate.
i If you are driving faster than
30 mph (47 km/h ), youcan no longer fold
in the exterior mirrors.
Setting the exterior mirrors If the battery has been disconnected or
completely discharged, the exterior mirrors
must be reset. The exterior mirrors will
otherwise not fold in when you select the
"Fold in mirrors when locking" function in the
on-board computer (Y page 156).
X Select SmartKey position 1using the
Start/Stop button.
X Briefly press button ?.
Folding the exterior mirrors in or out
automatically If the "Fold in mirrors when locking" function
is activated in the on-board computer
(Y page 156): R
the exterior mirrors fold in automatically as
soon as you lock the vehicle from the
outside.
R the exterior mirrors fold out again
automatically as soon as you unlock the
vehicle and then open the driver's or front-
passenger door.
i The mirrors do not fold out if they have
been folded in manually.
Exterior mirror pushed out of position If an exterior mirror has been pushed out of
position, proceed as follows:
X
Vehicles without electrically folding
exterior mirrors: move the exterior mirror
into the correct position manually.
X Vehicles with electrically folding
exterior mirrors: press and hold mirror-
folding button until you hear a click and
then the mirrors engage in position
(Y page 88).
The mirror housing is engaged again and
you can adjust the exterior mirrors as usual
(Y page 87). Automatic anti-glare mirrors
G
WARNING
If incident light from headlamps is prevented
from striking the sensor in the rear-view
mirror, for instance, by luggage piled too high
in the vehicle, the mirror's automatic anti-
glare function will not operate.
Incident light could then blind you. This may
distract you from the traffic conditions and,
as a result, you may cause an accident.
The rear-view mirror and the exterior mirror
on the driver's side automatically go into anti-
glare mode if the following conditions are met
simultaneously:
R the ignition is switched on and
R incident light from headlamps strikes the
sensor in the rear-view mirror. 88
MirrorsSeats, steering wheel and mirrors
ProCarManuals.com
Page 95 of 286

causes of poor visibility due to the weather
conditions such as spray. There is a risk of an
accident.
In such situations, turn the light switch to
L.
The automatic headlamp feature is only an
aid. The driver is responsible for the vehicle's
lighting at all times.
à is the favored light switch setting. The
light setting is automatically selected
according to the brightness of the ambient
light (exception: poor visibility due to weather
conditions such as fog, snow or spray):
R SmartKey in position 1in the ignition lock:
the parking lamps are switched on or off
automatically depending on the brightness
of the ambient light.
R With the engine running: if you have
activated the daytime running lamps
function via the on-board computer, the
daytime running lamps or the low-beam
headlamps and parking lamps are switched
on or off automatically depending on the
brightness of the ambient light.
Only for Canada:
The daytime running lamps improve the
visibility of your vehicle during the day. The
daytime running lamps function is required by
law in Canada. It cannot therefore be
deactivated.
When the engine is running and the vehicle is
stationary: if you move the selector lever from
a drive position to P, the daytime running
lamps/low-beam headlamps go out after
three minutes.
When the engine is running, the vehicle is
stationary and in high ambient light: if you
turn the light switch to T, you turn on the
daytime running lamps and parking lamps.
If the engine is running and you turn the light
switch to L, the manual settings take
precedence over the daytime running lamps.
USA only: The daytime running lamps improve the
visibility of your vehicle during the day. To do
this, the daytime running lamps function must
be switched on using the on-board computer
(Y
page 154).
If the engine is running and you turn the light
switch to TorL, the manual settings
take precedence over the daytime running
lamps.
i In the USA, the daytime running lamps are
deactivated upon delivery from the factory.
X To switch on automatic headlamp
mode: turn the light switch to Ã.
Low-beam headlamps G
WARNING
When the light switch is set to Ã, the low-
beam headlamps may not be switched on
automatically if there is fog, snow or other
causes of poor visibility due to the weather
conditions such as spray. There is a risk of an
accident.
In such situations, turn the light switch to
L.
Even if the light sensor does not detect that
it is dark, the parking lamps and low-beam
headlamps switch on when the ignition is
switched on and the light switch is set to the
L position. This is a particularly useful
function in the event of rain and fog.
X To switch on the low-beam headlamps:
turn the SmartKey in the ignition lock to
position 2or start the engine.
X Turn the light switch to L.
The green Lindicator lamp in the
instrument cluster lights up.
Parking lamps
! If the battery has been excessively
discharged, the parking lamps or standing
lamps are automatically switched off to
enable the next engine start. Always park
your vehicle safely and sufficiently lit
according to legal standards. Avoid the Exterior lighting
93Lights and windshield wipers Z
ProCarManuals.com
Page 97 of 286
The hazard warning lamps automatically
switch on if:
R
an air bag is deployed
R the vehicle decelerates rapidly from a
speed of more than 45 mph (70 km/h) and
comes to a standstill.
X To switch on the hazard warning lamps:
press button :.
All turn signals flash. If you now switch on
a turn signal using the combination switch,
only the turn signal lamp on the
corresponding side of the vehicle will flash.
X To switch off the hazard warning
lamps: press button :.
The hazard warning lamps switch off
automatically if the vehicle exceeds a speed
of 6 mph(10 km/h) again after a full brake
application.
i The hazard warning lamps still operate if
the ignition is switched off. Headlamp cleaning system
The headlamps are cleaned automatically if
the "Wipe with washer fluid" function is
operated five times (Y page 97) while the
lights are on and the engine is running. When
you switch off the ignition, the automatic
headlamp cleaning system is reset and
counting is resumed from 0. Headlamps fogged up on the inside
The headlamps may fog up on the inside if
there is high atmospheric humidity.
X Drive with the headlamps switched on.
The level of moisture diminishes,
depending on the length of the journey and
the weather conditions (humidity and
temperature).
If the level of moisture does not diminish:
X Have the headlamps checked at a qualified
specialist workshop. Interior lighting
Overview of interior lighting
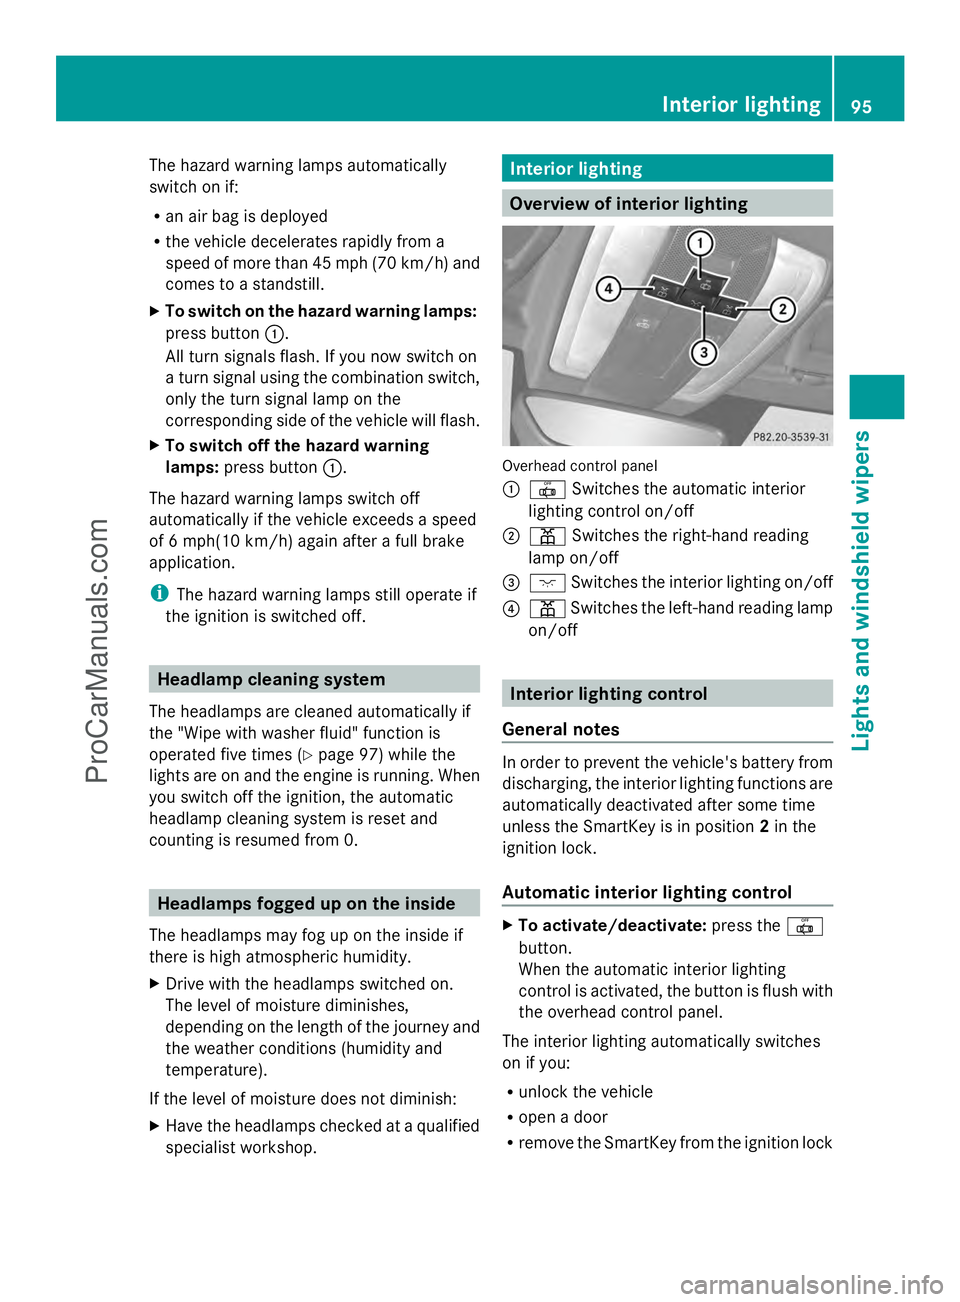
Overhead control panel
:
| Switches the automatic interior
lighting control on/off
; p Switches the right-hand reading
lamp on/off
= c Switches the interior lighting on/off
? p Switches the left-hand reading lamp
on/off Interior lighting control
General notes In order to prevent the vehicle's battery from
discharging, the interior lighting functions are
automatically deactivated after some time
unless the SmartKey is in position
2in the
ignition lock.
Automatic interior lighting control X
To activate/deactivate: press the|
button.
When the automatic interior lighting
control is activated, the button is flush with
the overhead control panel.
The interior lighting automatically switches
on if you:
R unlock the vehicle
R open a door
R remove the SmartKey from the ignition lock Interior lighting
95Lights and windshield wipers Z
ProCarManuals.com