2013 MERCEDES-BENZ SLS-CLASS check engine light
[x] Cancel search: check engine lightPage 97 of 286
The hazard warning lamps automatically
switch on if:
R
an air bag is deployed
R the vehicle decelerates rapidly from a
speed of more than 45 mph (70 km/h) and
comes to a standstill.
X To switch on the hazard warning lamps:
press button :.
All turn signals flash. If you now switch on
a turn signal using the combination switch,
only the turn signal lamp on the
corresponding side of the vehicle will flash.
X To switch off the hazard warning
lamps: press button :.
The hazard warning lamps switch off
automatically if the vehicle exceeds a speed
of 6 mph(10 km/h) again after a full brake
application.
i The hazard warning lamps still operate if
the ignition is switched off. Headlamp cleaning system
The headlamps are cleaned automatically if
the "Wipe with washer fluid" function is
operated five times (Y page 97) while the
lights are on and the engine is running. When
you switch off the ignition, the automatic
headlamp cleaning system is reset and
counting is resumed from 0. Headlamps fogged up on the inside
The headlamps may fog up on the inside if
there is high atmospheric humidity.
X Drive with the headlamps switched on.
The level of moisture diminishes,
depending on the length of the journey and
the weather conditions (humidity and
temperature).
If the level of moisture does not diminish:
X Have the headlamps checked at a qualified
specialist workshop. Interior lighting
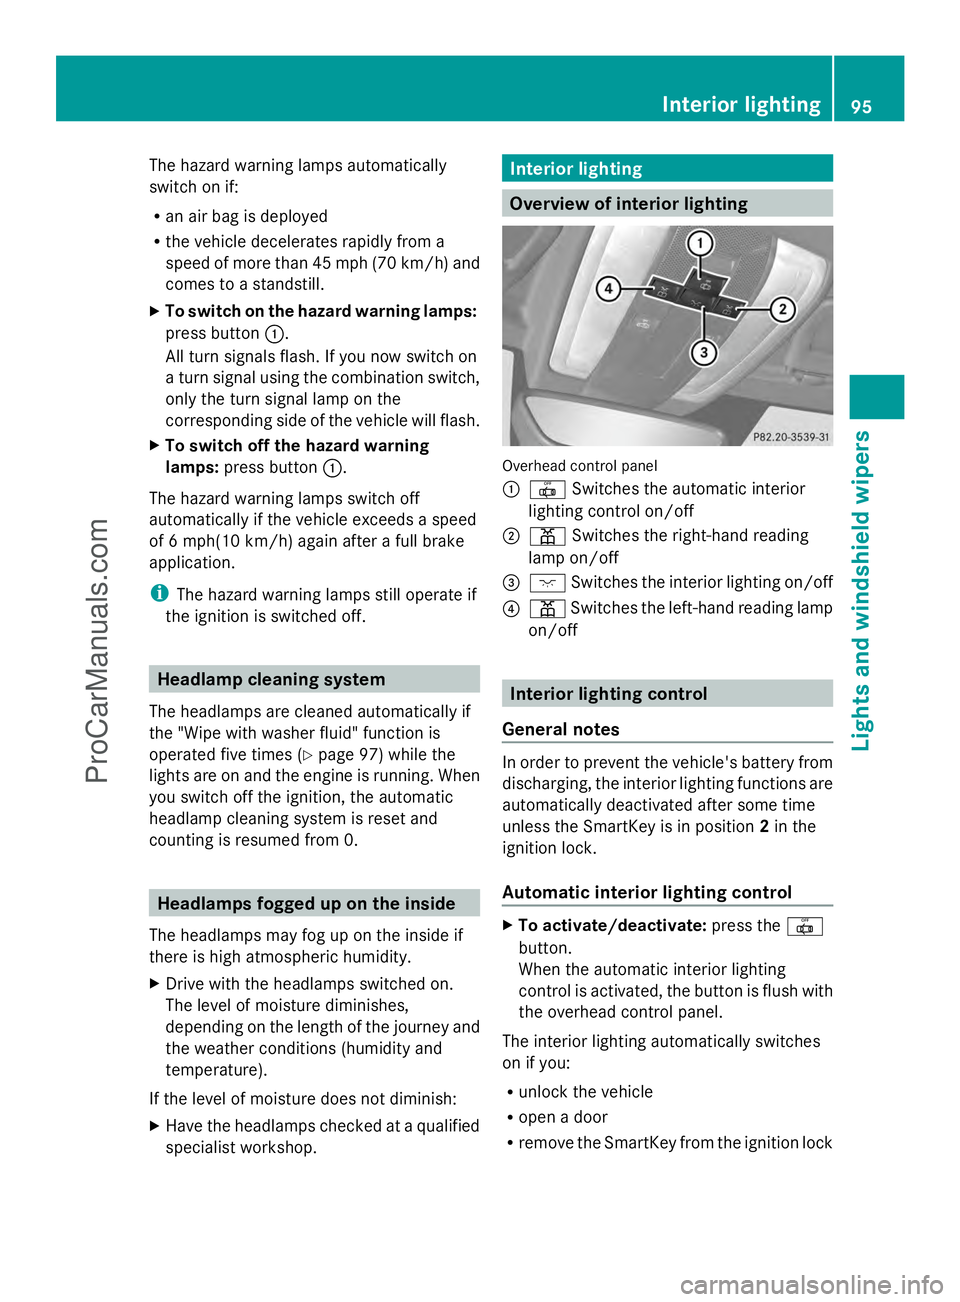
Overview of interior lighting
Overhead control panel
:
| Switches the automatic interior
lighting control on/off
; p Switches the right-hand reading
lamp on/off
= c Switches the interior lighting on/off
? p Switches the left-hand reading lamp
on/off Interior lighting control
General notes In order to prevent the vehicle's battery from
discharging, the interior lighting functions are
automatically deactivated after some time
unless the SmartKey is in position
2in the
ignition lock.
Automatic interior lighting control X
To activate/deactivate: press the|
button.
When the automatic interior lighting
control is activated, the button is flush with
the overhead control panel.
The interior lighting automatically switches
on if you:
R unlock the vehicle
R open a door
R remove the SmartKey from the ignition lock Interior lighting
95Lights and windshield wipers Z
ProCarManuals.com
Page 98 of 286
The interior light is activated for a short while
when the SmartKey is removed from the
ignition lock. You can activate this delayed
switch-off using the on-board computer
(Y page 155).
Manual interior lighting control X
To switch the interior lighting on/off:
press the cbutton.
X To switch the reading lamps on/off:
press the pbutton. Crash-responsive emergency lighting
The interior lighting is activated automatically
if the vehicle is involved in an accident.
X To switch off the crash-responsive
emergency lighting: press the hazard
warning lamp button.
or
X Lock and then unlock the vehicle using the
key. Replacing bulbs
Important safety notes
Xenon bulbs G
DANGER
Xenon bulbs carry a high voltage. You can get
an electric shock if you remove the cover of
the Xenon bulb and touch the electrical
contacts. There is a risk of fatal injury.
Never touch the parts or the electrical
contacts of the Xenon bulb. Always have work
on the Xenon bulbs carried out at a qualified
specialist workshop.
If your vehicle is equipped with Xenon bulbs,
you can recognize this by the following: the
cone of light from the Xenon bulbs moves
from the top to the bottom and back again
when you start the engine. For this to be observed, the lights must be switched on
before starting the engine.
Bulbs and lamps are an important aspect of
vehicle safety. You must therefore make sure
that these function correctly at all times.
Have the headlamp setting checked regularly.
Other bulbs
G
WARNING
Bulbs, lamps and connectors can get very hot
when operating. If you change a bulb, you
could burn yourself on these components.
There is a risk of injury.
Allow these components to cool down before
changing a bulb.
There are bulbs other than the Xenon bulbs
that you cannot replace. Replace only the
bulbs listed (Y page 97). Have the bulbs that
you cannot replace yourself changed at a
qualified specialist workshop.
If you require assistance changing bulbs,
consult a qualified specialist workshop.
Do not touch the glass tube of new bulbs with
your bare hands. Even minor contamination
can burn into the glass surface and reduce
the service life of the bulbs. Always use a lint-
free cloth or only touch the base of the bulb
when installing.
Only use bulbs of the correct type.
If the new bulb still does not light up, consult
a qualified specialist workshop.
Bulbs and lamps are an important aspect of
vehicle safety. You must therefore make sure
that these function correctly at all times.
Have the headlamp setting checked regularly. Changing the front bulbs
You cannot replace the bulbs at the front
yourself. Contact a qualified specialist
workshop which has the necessary specialist
knowledge and tools to carry out the work
required. Mercedes-Benz recommends that 96
Replacing bulbsLights and windshield wipers
ProCarManuals.com
Page 101 of 286
Problems with the windshield wipers
The windshield wipers are obstructed Leaves or snow, for example, may be
obstructing the windshield wiper movement.
The wiper motor has been deactivated.
X Switch off the engine using the Start/Stop
button and open the driver's door.
X Remove the cause of the obstruction.
X Switch the windshield wipers back on.
The windshield wipers are inoperative The windshield wiper drive is malfunctioning.
X Select another wiper speed on the
combination switch.
X Have the windshield wipers checked at a
qualified specialist workshop.
The spray nozzles are misaligned The windshield washer fluid from the spray
nozzles no longer hits the center of the
windshield. The spray nozzles are misaligned.
X Have the spray nozzles adjusted at a
qualified specialist workshop.
The wiper arms are on the windshield The wiper arms have been moved by an
external force.
X Select key position 2(ignition) with the
Start/Stop button.
The wiper arms move back down
automatically. Windshield wipers
99Lights and windshield wipers Z
ProCarManuals.com
Page 134 of 286
Wet roads
If you have driven for a long time in heavy rain
without braking, there may be a delayed
reaction from the brakes when braking for the
first time. This may also occur after the
vehicle has been washed or driven through
deep water.
You have to depress the brake pedal more
firmly. Maintain a greater distance from the
vehicle in front.
After driving on a wet road or having the
vehicle washed, brake firmly while paying
attention to the traffic conditions. This will
warm up the brake discs, thereby drying them
more quickly and protecting them against
corrosion.
Limited braking performance on salt-
treated roads If you drive on salted roads, a layer of salt
residue may form on the brake discs and
brake pads. This can result in a significantly
longer braking distance.
R Brake occasionally to remove any possible
salt residue. Make sure that you do not
endanger other road users when doing so.
R Carefully depress the brake pedal and the
beginning and end of a journey.
R Maintain a greater distance to the vehicle
ahead.
Servicing the brakes !
If the red brake warning lamp lights up in
the instrument cluster and you hear a
warning tone while the engine is running,
the brake fluid level may be too low.
Observe additional warning messages in
the multifunction display.
The brake fluid level may be too low due to
brake pad wear or leaking brake lines.
Have the brake system checked
immediately. This work should be carried
out at an authorized Mercedes-Benz
Center. !
As the ESP ®
system operates
automatically, the engine and the ignition
must be switched off (the SmartKey must
be in position 0or 1in the ignition lock or
the Start/Stop button must be in position
0 or 1) if:
R the electric parking brake is tested using
a brake dynamometer.
R the vehicle is towed with one axle raised.
Braking triggered automatically by ESP ®
may seriously damage the brake system.
All checks and maintenance work on the
brake system must be carried out at a
qualified specialist workshop. Have this work
carried out at an authorized Mercedes-Benz
Center.
Have the brake pads replaced and the brake
fluid renewed at a qualified specialist
workshop, e.g. an authorized Mercedes-Benz
Center.
If the brake system has only been subject to
moderate loads, you should test the
functionality of your brakes at regular
intervals. To do so, press firmly on the brake
pedal when driving at a high speed. This
improves the grip of the brake pads.
You can find a description of Brake Assist
(BAS) on ( Ypage 55).
Mercedes-Benz recommends that you only
have brake pads/linings installed on your
vehicle which have been approved for
Mercedes-Benz vehicles or which correspond
to an equivalent quality standard. Brake
pads/linings which have not been approved
for Mercedes-Benz vehicles or which are not
of an equivalent quality could affect your
vehicle's operating safety.
Mercedes-Benz recommends that you only
use brake fluid that has been specially
approved for your vehicle by Mercedes-Benz,
or which corresponds to an equivalent quality
standard. Brake fluid which has not been
approved for Mercedes-Benz vehicles or
which is not of an equivalent quality could
affect your vehicle's operating safety. 132
Driving tipsDriving and parking
ProCarManuals.com
Page 167 of 286
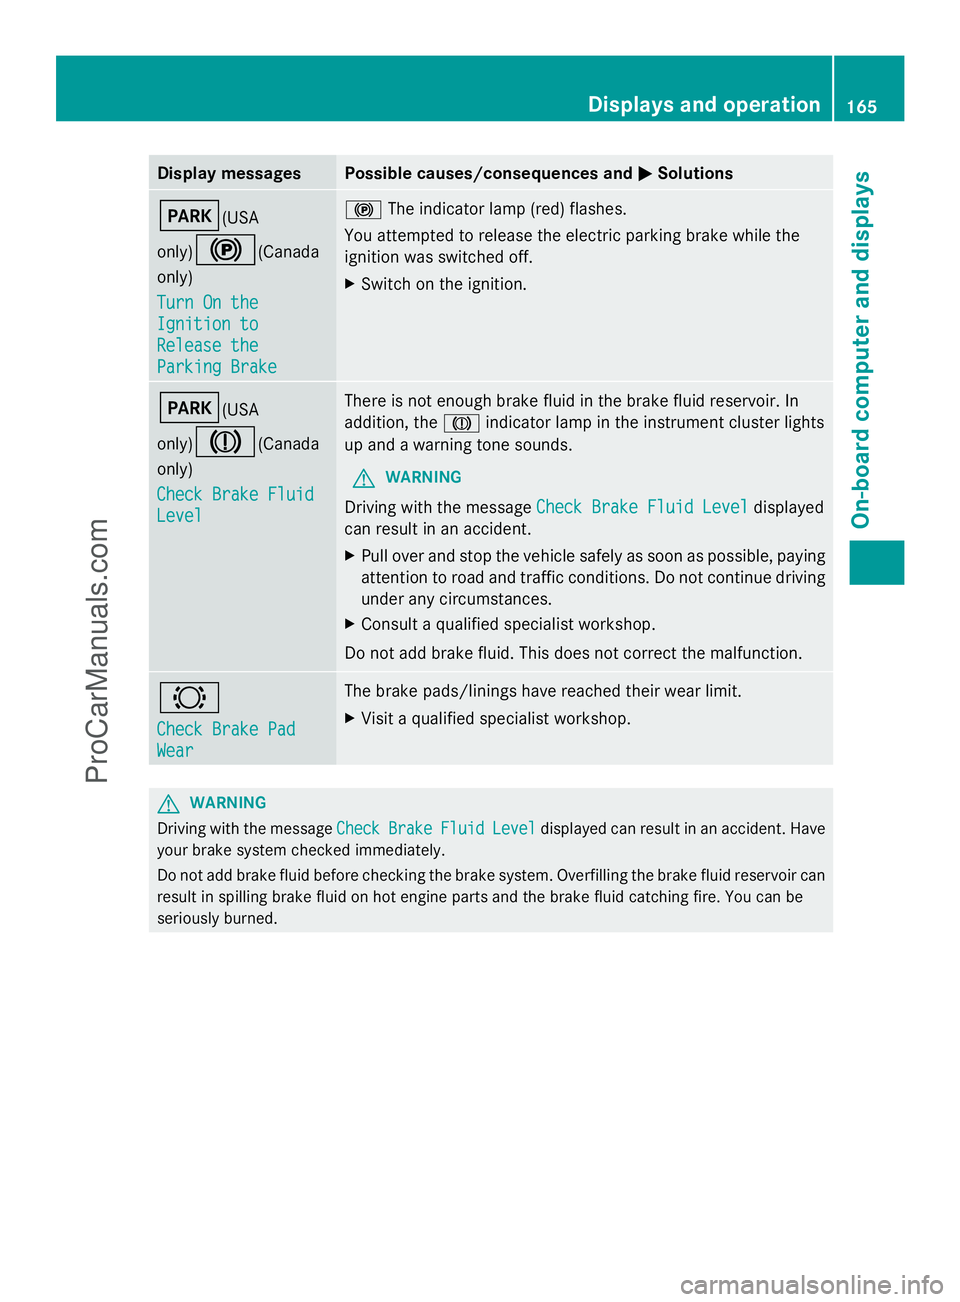
Display messages Possible causes/consequences and
M
MSolutions F(USA
only)
!(Canada
only)
Turn On the Turn On the
Ignition to Ignition to
Release the Release the
Parking Brake Parking Brake !
The indicator lamp (red) flashes.
You attempted to release the electric parking brake while the
ignition was switched off.
X Switch on the ignition. F(USA
only)
J(Canada
only)
Check Brake Fluid Check Brake Fluid
Level Level There is not enough brake fluid in the brake fluid reservoir. In
addition, the
Jindicator lamp in the instrument cluster lights
up and a warning tone sounds.
G WARNING
Driving with the message Check Brake Fluid Level Check Brake Fluid Level displayed
can result in an accident.
X Pull over and stop the vehicle safely as soon as possible, paying
attention to road and traffic conditions. Do not continue driving
under any circumstances.
X Consult a qualified specialist workshop.
Do not add brake fluid. This does not correct the malfunction. #
Check Brake Pad Check Brake Pad
Wear Wear The brake pads/linings have reached their wear limit.
X
Visit a qualified specialist workshop. G
WARNING
Driving with the message Check CheckBrake
BrakeFluid
FluidLevel
Leveldisplayed can result in an accident. Have
your brake system checked immediately.
Do not add brake fluid before checking the brake system. Overfilling the brake fluid reservoir can
result in spilling brake fluid on hot engine parts and the brake fluid catching fire. You can be
seriously burned. Displays and operation
165On-board computer and displays Z
ProCarManuals.com
Page 174 of 286
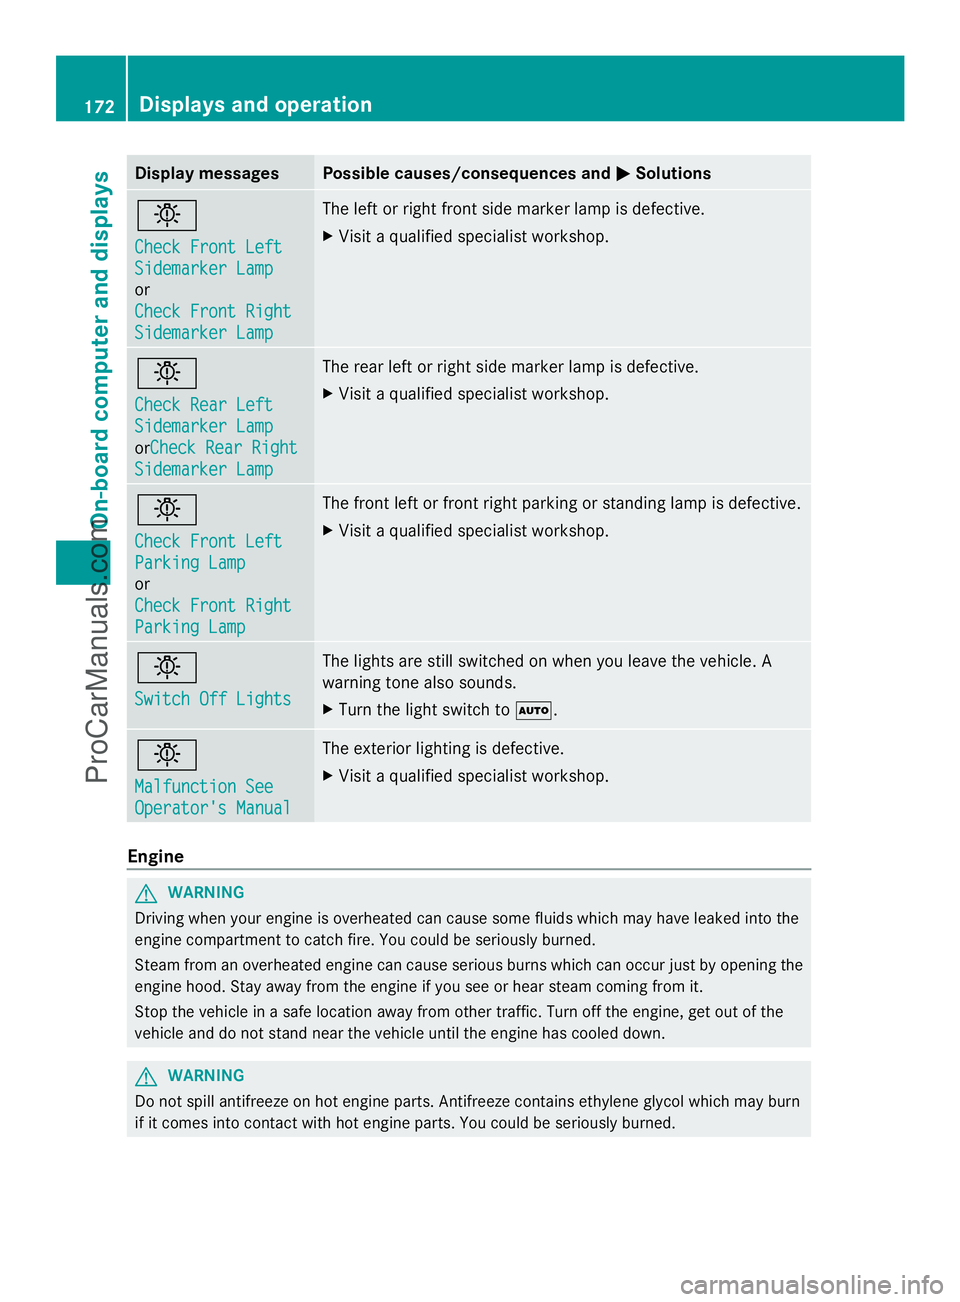
Display messages Possible causes/consequences and
M
MSolutions b
Check Front Left Check Front Left
Sidemarker Lamp Sidemarker Lamp
or
Check Front Right Check Front Right
Sidemarker Lamp Sidemarker Lamp The left or right front side marker lamp is defective.
X
Visit a qualified specialist workshop. b
Check Rear Left Check Rear Left
Sidemarker Lamp Sidemarker Lamp
orCheck Rear Right
Check Rear Right
Sidemarker Lamp Sidemarker Lamp The rear left or right side marker lamp is defective.
X
Visit a qualified specialist workshop. b
Check Front Left Check Front Left
Parking Lamp Parking Lamp
or
Check Front Right Check Front Right
Parking Lamp Parking Lamp The front left or front right parking or standing lamp is defective.
X
Visit a qualified specialist workshop. b
Switch Off Lights Switch Off Lights The lights are still switched on when you leave the vehicle. A
warning tone also sounds.
X
Turn the light switch to Ã.b
Malfunction See Malfunction See
Operator's Manual Operator's Manual The exterior lighting is defective.
X
Visit a qualified specialist workshop. Engine
G
WARNING
Driving when your engine is overheated can cause some fluids which may have leaked into the
engine compartment to catch fire. You could be seriously burned.
Steam from an overheated engine can cause serious burns which can occur just by opening the
engine hood. Stay away from the engine if you see or hear steam coming from it.
Stop the vehicle in a safe location away from other traffic. Turn off the engine, get out of the
vehicle and do not stand near the vehicle until the engine has cooled down. G
WARNING
Do not spill antifreeze on hot engine parts. Antifreeze contains ethylene glycol which may burn
if it comes into contact with hot engine parts. You could be seriously burned. 172
Displays and operationOn-board compu
ter and displays
ProCarManuals.com
Page 175 of 286

Display messages Possible causes/consequences and
M
MSolutions ?
Coolant Low Stop Coolant Low Stop
Vehicle Turn Vehicle Turn
Engine Off Engine Off The coolant is too hot. In addition, the
?warning lamp in the
instrument cluster lights up and a warning tone sounds.
X Pull over and stop the vehicle safely and switch off the engine,
paying attention to road and traffic conditions.
X Make sure that the air supply to the radiator is not blocked, e.g.
by snow, slush or ice.
X Wait until the display message disappears before restarting the
engine. Otherwise, the engine could be damaged.
X Pay attention to the coolant temperature display.
X If the coolant temperature increases again, visit a qualified
specialist workshop immediately.
! If the coolant temperature is over 248 ‡ (120 †), do not
continue driving. The engine will otherwise be damaged. The poly-V-belt may have torn. A warning tone also sounds.
X
Pull over and stop the vehicle safely and switch off the engine,
paying attention to road and traffic conditions.
X Check the poly-V-belt.
X If the poly-V-belt is not damaged: do not start the engine
again until the display message disappears. Otherwise, the
engine could be damaged.
X If the poly-V-belt is torn: do not continue driving. Consult a
qualified specialist workshop. ? The engine fan is defective.
X
At coolant temperatures below 248 ‡ (120 †), drive to the
nearest qualified specialist workshop.
X Avoid subjecting the engine to heavy loads (e.g. driving in
mountainous terrain) and stop-and-go driving. Displays and operation
173On-board computer and displays Z
ProCarManuals.com
Page 179 of 286
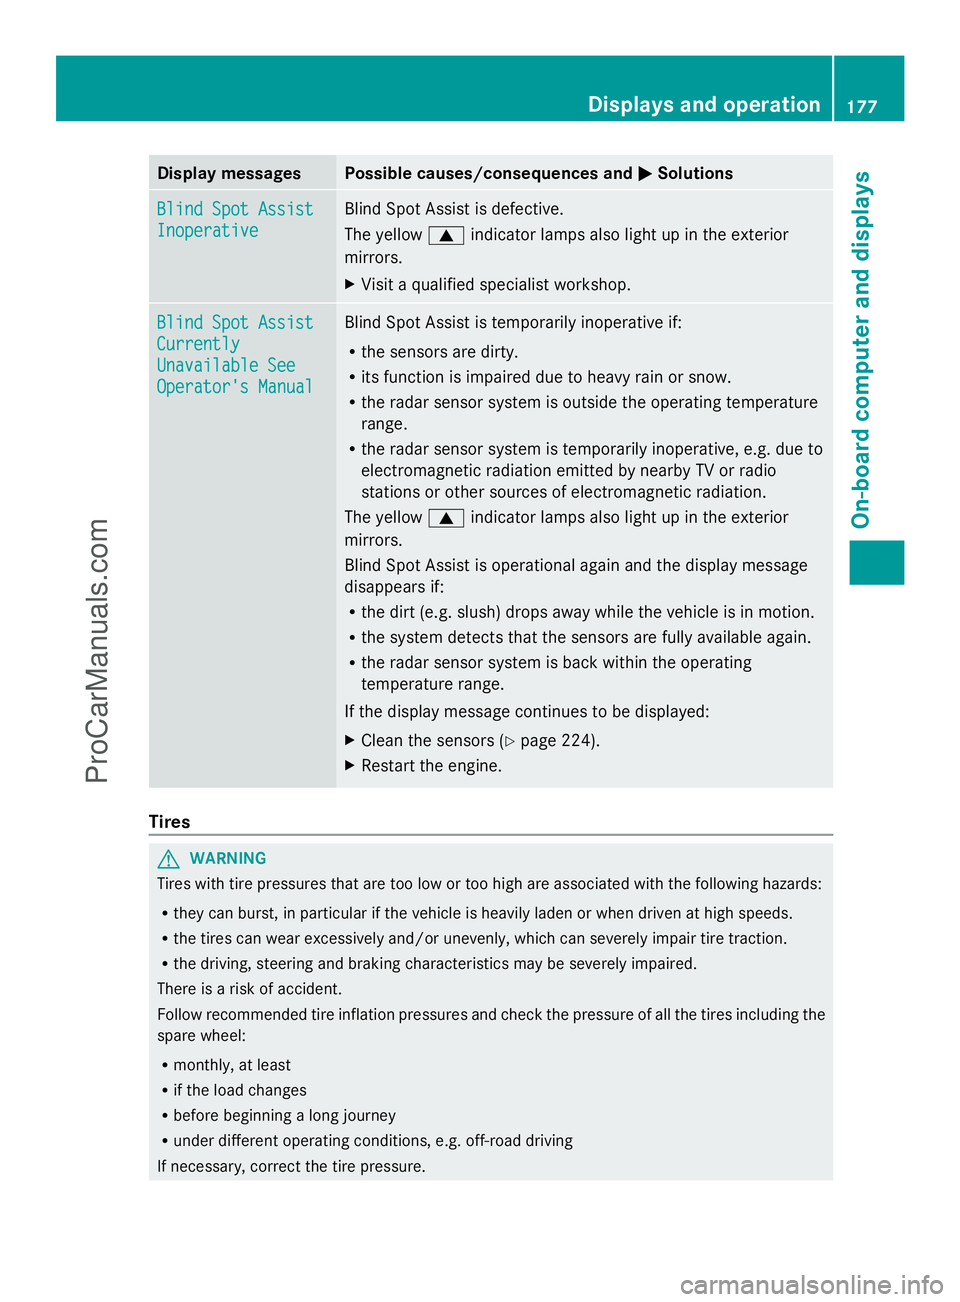
Display messages Possible causes/consequences and
M
MSolutions Blind Spot Assist
Blind Spot Assist
Inoperative Inoperative Blind Spot Assist is defective.
The yellow
9indicator lamps also light up in the exterior
mirrors.
X Visit a qualified specialist workshop. Blind Spot Assist Blind Spot Assist
Currently Currently
Unavailable See Unavailable See
Operator's Manual Operator's Manual Blind Spot Assist is temporarily inoperative if:
R
the sensors are dirty.
R its function is impaired due to heavy rain or snow.
R the radar sensor system is outside the operating temperature
range.
R the radar sensor system is temporarily inoperative, e.g. due to
electromagnetic radiation emitted by nearby TV or radio
stations or other sources of electromagnetic radiation.
The yellow 9indicator lamps also light up in the exterior
mirrors.
Blind Spot Assist is operational again and the display message
disappears if:
R the dirt (e.g. slush) drops away while the vehicle is in motion.
R the system detects that the sensors are fully available again.
R the radar sensor system is back within the operating
temperature range.
If the display message continues to be displayed:
X Clean the sensors (Y page 224).
X Restart the engine. Tires
G
WARNING
Tires with tire pressures that are too low or too high are associated with the following hazards:
R they can burst, in particular if the vehicle is heavily laden or when driven at high speeds.
R the tires can wear excessively and/or unevenly, which can severely impair tire traction.
R the driving, steering and braking characteristics may be severely impaired.
There is a risk of accident.
Follow recommended tire inflation pressures and check the pressure of all the tires including the
spare wheel:
R monthly, at least
R if the load changes
R before beginning a long journey
R under different operating conditions, e.g. off-road driving
If necessary, correct the tire pressure. Displays and operation
177On-board computer and displays Z
ProCarManuals.com