2013 MERCEDES-BENZ SL-CLASS ROADSTER roof rack
[x] Cancel search: roof rackPage 9 of 572

Care
Carpets .......................................... 506
Car wash ........................................
500
Display ........................................... 504
Exterior lights ................................ 503
Gear or selector lever ....................505
Interior ........................................... 504
Matte finish ................................... 502
Notes ............................................. 500
Paint .............................................. 501
Plastic trim .................................... 505
Power washer ................................ 501
Rear view camera .......................... 504
Roof lining ...................................... 506
Seat belt ........................................ 506
Seat cover ..................................... 505
Sensors ......................................... 504
Steering wheel ............................... 505
Tail pipes ....................................... 504
Trim pieces .................................... 505
Washing by hand ........................... 501
Wheels ........................................... 502
Windows ........................................ 503
Wiper blades .................................. 503
Wooden trim .................................. 505
Car pool lanes .................................... 297
Car wash (care) ................................. 500
Category list (music search) ............433
CD Copy protection ............................. 432
Fast forward/fast rewind ............... 428
General information ....................... 432
Inserting ........................................ 421
Mode, switching to ........................ 424
Multisession .................................. 431
Notes on discs ............................... 432
Pause function ............................... 426
Player/changer operation
(COMAND) ..................................... 421
Safety notes .................................. 421
Selecting a media type .................. 426
Selecting a track ............................ 427
Sound settings (balance, bass,
treble) ............................................ 278
CD/DVD
Ejecting (DVD drive) ....................... 423
Inserting (DVD changer) ................421Inserting (single DVD drive)
...........421
Removing (single DVD drive) .......... 421
CD mode
Playback options ........................... 430
CD player/CD changer (on-board
computer)
.......................................... 212
Central locking Automatic locking (on-board
computer) ...................................... 218
Locking/unlocking (SmartKey) ........ 68
Changing bulbs
Important safety notes .................. 116
Overview of bulb types ..................117
Changing direction
Announcement phase .................... 322
Change of direction phase ............. 322
Preparation phase ......................... 322
Changing the character set .............. 284
Channel presets ................................ 413
Characters Changing the character set ............ 282
Changing the language ..................282
Deleting ......................................... 283
Entering ......................................... 283
Entering (address book, phone
book) ............................................. 281
Entering (navigation) ......................283
Moving the cursor .......................... 283
Switching to letters ........................ 282
Children
In the vehicle ................................... 54
Restraint systems ............................ 54
Special seat belt retractor ............... 56
Child seat
LATCH-type (ISOFIX) child seat
anchors ............................................ 56
Cigarette lighter ................................ 480
Cleaning Mirror turn signal ........................... 503
Clear button ....................................... 274
Climate control Automatic climate control (dual-
zone) .............................................. 123
Controlling automatically ...............126
Cooling with air dehumidification ..125
Defrosting the windows ................. 129
Defrosting the windshield .............. 128
Important safety notes .................. 122 Index
7
Page 16 of 572

iPod
®
Alphabetical track selection .......... 450
Connecting to the Media
Interface ........................................ 446
Selecting a category/playlist
.........448
iTunes ®
............................................... 450J
Jack Storage location ............................ 508
Using ............................................. 549
Jump start (engine) ............................. 33
Jump starting (engine) ...................... 516K
Key see SmartKey
KEYLESS-GO
Convenience closing feature ............ 85
Display message ............................ 253
Locking ............................................ 69
Start/Stop button .......................... 135
Starting the engine ........................ 137
Unlocking ......................................... 69
Key positions
KEYLESS-GO .................................. 135
SmartKey ....................................... 135
Kickdown
Driving tips .................................... 147
Manual drive program ....................151
Knee bag .............................................. 41L
Lamps see Warning and indicator lamps
Lane Keeping Assist
see Active Lane Keeping Assist
Lane recommendations
Explanation .................................... 323
Presentation .................................. 323
Lap time (RACETIMER) ......................220
LATCH-type (ISOFIX) child seat
anchors ................................................ 56
License plate lamp (display
message) ............................................ 237Light function, active
Display message ............................ 237
Lighting
see Lights
Lights
Activating/deactivating the
interior lighting delayed switch-off . 218
Active light function .......................113
Automatic headlamp mode ............ 110
Cornering light function .................113
Driving abroad ............................... 108
Fog lamps ...................................... 111
Hazard warning lamps ................... 113
High beam flasher .......................... 112
High-beam headlamps ...................112
Light switch ................................... 108
Low-beam headlamps .................... 109
Parking lamps ................................ 109
Setting the brightness of the
ambient lighting (on-board
computer) ...................................... 216
Setting the color of the ambient
lighting (on-board computer) ......... 217
Standing lamps .............................. 111
Switching Adaptive Highbeam
Assist on/off ................................. 217
Switching the daytime running
lamps on/off (on-board
computer) ...................................... 216
Switching the daytime running
lamps on/off (switch) .................... 109
Switching the exterior lighting
delayed switch-off on/off (on-
board computer) ............................ 217
Switching the surround lighting
on/off (on-board computer) ..........217
Turn signals ................................... 112
see Changing bulbs
see Interior lighting
Light sensor (display message) .......238
Load/eject button ............................. 421
Loading aid (trunk) Raising/lowering the roof .............. 477
Locking
see Central locking 14
Index
Page 92 of 572

X
To remove: unhook net ; from the holder
on the left and right-hand sides and guide
it to the rear until it is completely rolled up.
X Remove trunk partition : from fastening
eyelets = in the side panels.
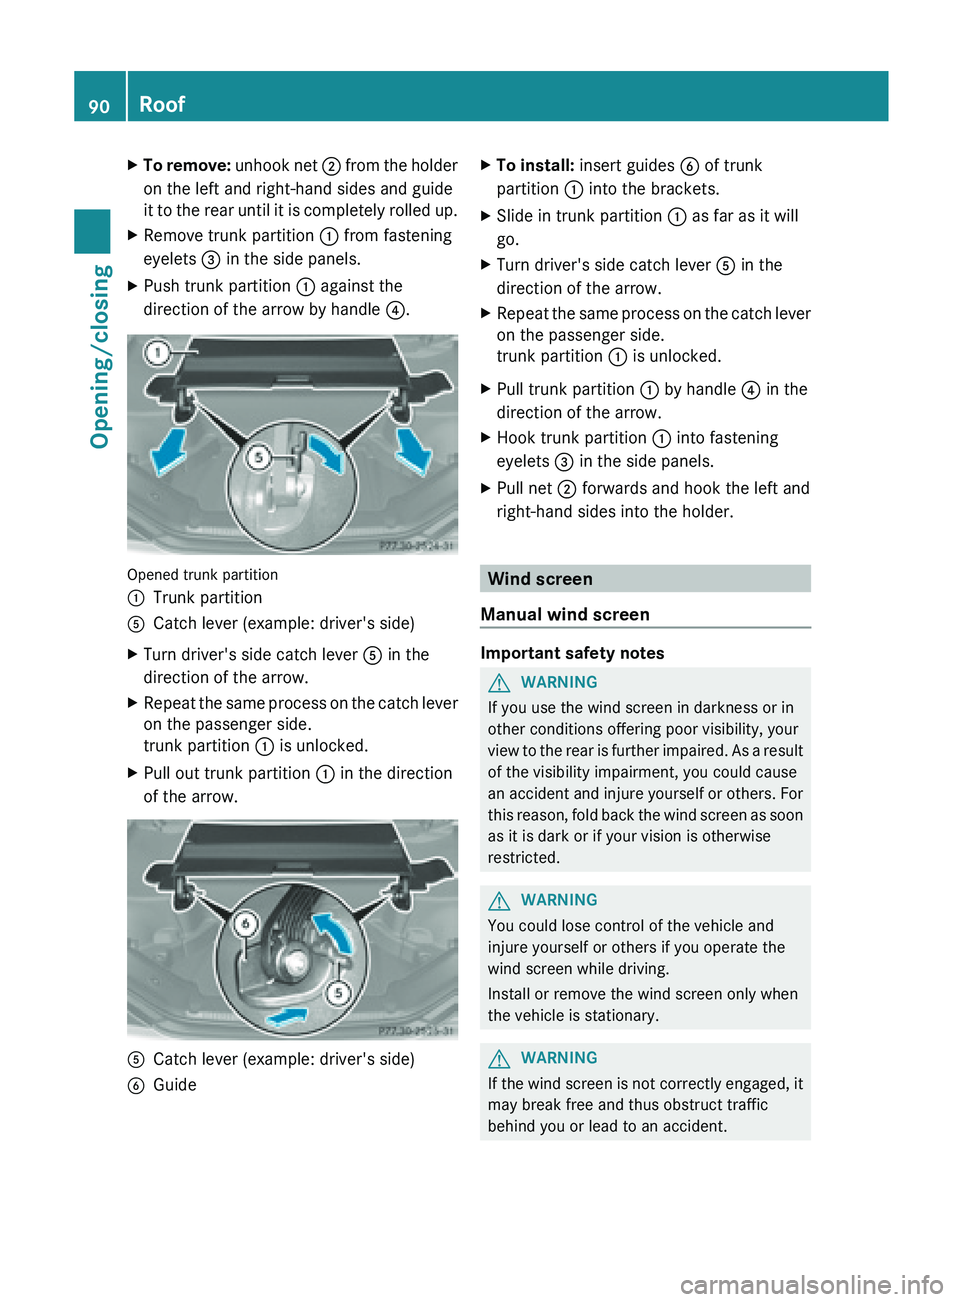
X Push trunk partition : against the
direction of the arrow by handle ?.Opened trunk partition
:
Trunk partition
A Catch lever (example: driver's side)
X Turn driver's side catch lever A in the
direction of the arrow.
X Repeat the same process on the catch lever
on the passenger side.
trunk partition : is unlocked.
X Pull out trunk partition : in the direction
of the arrow. A
Catch lever (example: driver's side)
B Guide X
To install: insert guides B of trunk
partition : into the brackets.
X Slide in trunk partition : as far as it will
go.
X Turn driver's side catch lever A in the
direction of the arrow.
X Repeat the same process on the catch lever
on the passenger side.
trunk partition : is unlocked.
X Pull trunk partition : by handle ? in the
direction of the arrow.
X Hook trunk partition : into fastening
eyelets = in the side panels.
X Pull net ; forwards and hook the left and
right-hand sides into the holder. Wind screen
Manual wind screen Important safety notes
G
WARNING
If you use the wind screen in darkness or in
other conditions offering poor visibility, your
view to
the rear is further impaired. As a result
of the visibility impairment, you could cause
an accident and injure yourself or others. For
this reason, fold back the wind screen as soon
as it is dark or if your vision is otherwise
restricted. G
WARNING
You could lose control of the vehicle and
injure yourself or others if you operate the
wind screen while driving.
Install or remove the wind screen only when
the vehicle is stationary. G
WARNING
If the wind screen is not correctly engaged, it
may break free and thus obstruct traffic
behind you or lead to an accident. 90
Roof
Opening/closing
Page 93 of 572

Each time before driving with the roof down,
check that the wind screen is properly
engaged.
! Install or remove the wind screen only
when the
roof is open. You could otherwise
damage the wind screen or the vehicle
interior.
The wind screen offers protection from the
wind when driving with the roof down.
The wind screen can be installed or removed
from the driver's side or passenger side. We
recommend that a second person assists you
when doing this.
Perform operations involving the wind screen
preferably on the side facing away from
traffic, after you have stopped the vehicle,
paying attention to road and traffic
conditions.
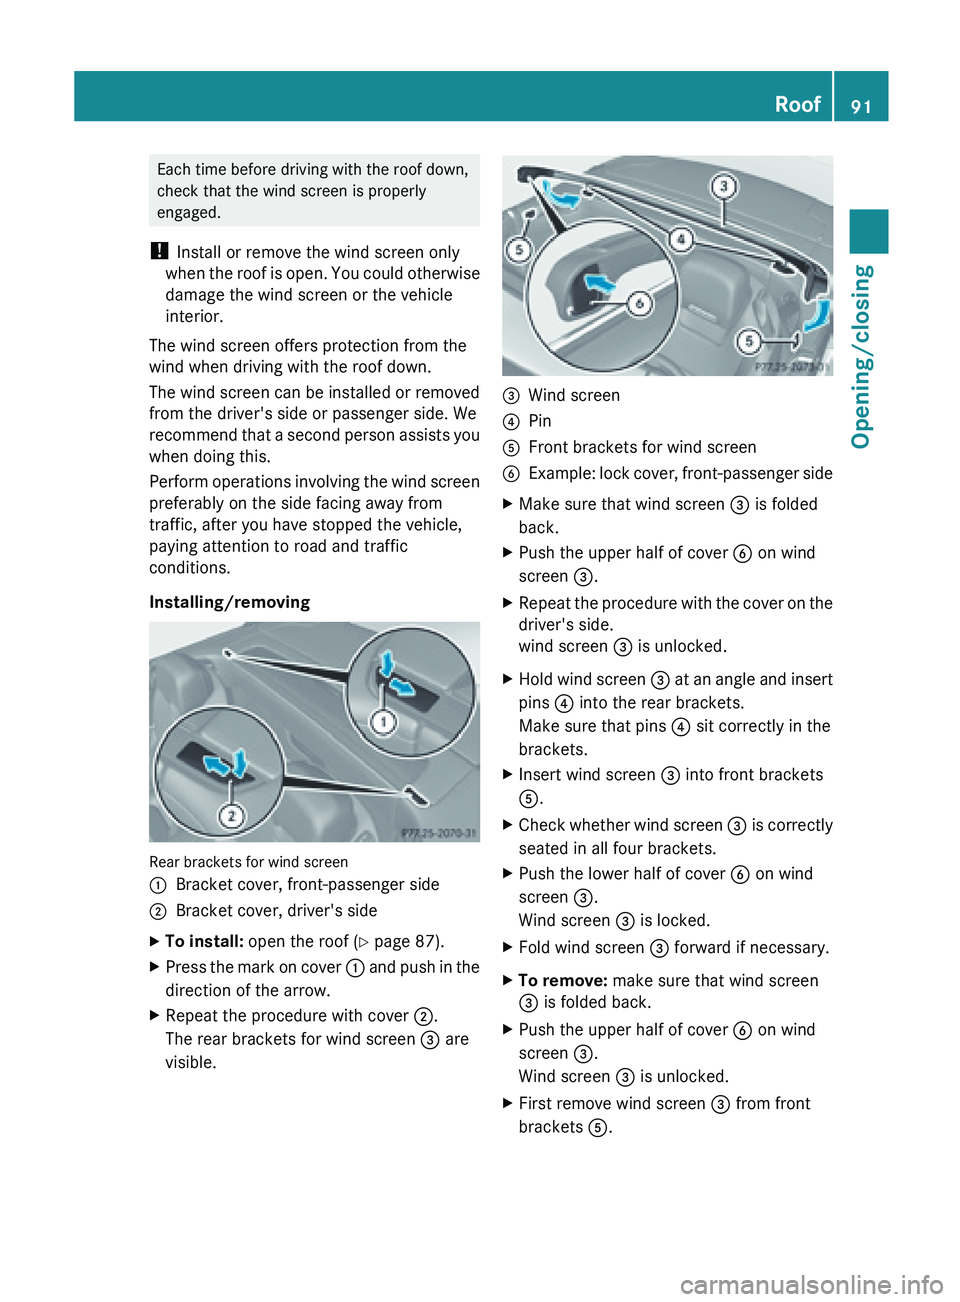
Installing/removing Rear brackets for wind screen
:
Bracket cover, front-passenger side
; Bracket cover, driver's side
X To install:
open the roof (Y page 87).
X Press the mark on cover : and
push in the
direction of the arrow.
X Repeat the procedure with cover ;.
The rear brackets for wind screen = are
visible. =
Wind screen
? Pin
A Front brackets for wind screen
B Example:
lock cover, front-passenger side
X Make sure that wind screen = is folded
back.
X Push the upper half of cover B on wind
screen =.
X Repeat the procedure with the cover on the
driver's side.
wind screen = is unlocked.
X Hold wind screen = at
an angle and insert
pins ? into the rear brackets.
Make sure that pins ? sit correctly in the
brackets.
X Insert wind screen = into front brackets
A.
X Check whether wind screen = is
correctly
seated in all four brackets.
X Push the lower half of cover B on wind
screen =.
Wind screen = is locked.
X Fold wind screen = forward if necessary.
X To remove: make sure that wind screen
= is folded back.
X Push the upper half of cover B on wind
screen =.
Wind screen = is unlocked.
X First remove wind screen = from front
brackets A. Roof
91
Opening/closing Z
Page 94 of 572

X
Hold wind screen = at an angle and then
remove from the rear brackets.
X Slide covers : and ; of the rear brackets
against the direction of the arrow until they
are fully closed.
Electrical wind screen Important safety notes
G
WARNING
If you use the wind screen in darkness or in
other conditions offering poor visibility, your
view to
the rear is further impaired. As a result
of the visibility impairment, you could cause
an accident and injure yourself or others. For
this reason, retract the wind screen as soon
as it is dark or if your vision is otherwise
restricted.
! When extending or retracting the wind
screen, make sure there are no objects on
the rear compartment trim. Otherwise, the
objects could damage the wind screen.
The wind screen offers protection from the
wind when driving with the roof down. The
roof must be fully open before the wind
screen can be extended.
Extending and retracting
X Open the roof (Y page 86).
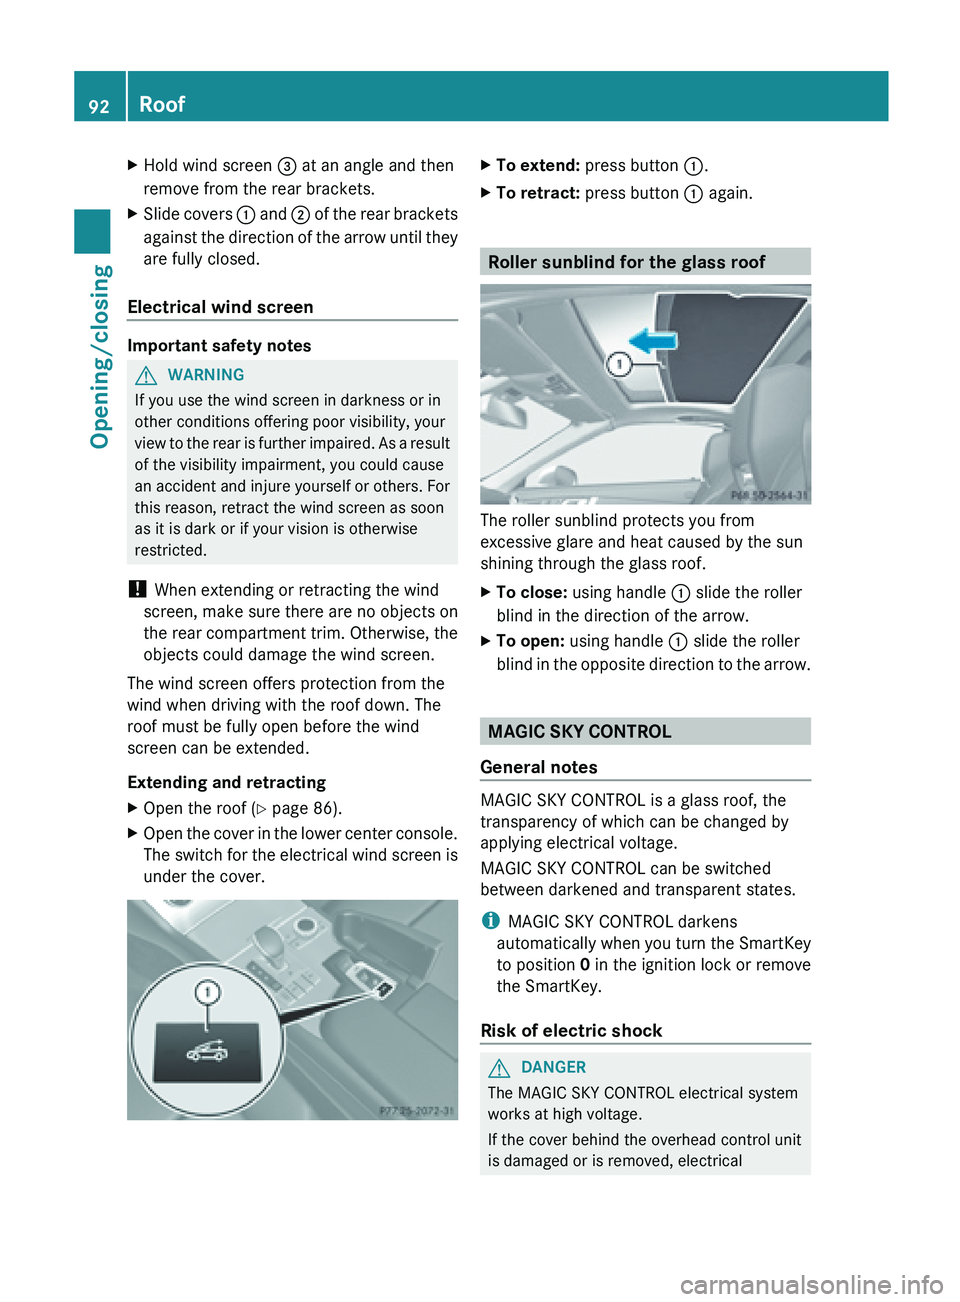
X Open the cover in the lower center console.
The switch
for the electrical wind screen is
under the cover. X
To extend: press button :.
X To retract: press button : again. Roller sunblind for the glass roof
The roller sunblind protects you from
excessive glare and heat caused by the sun
shining through the glass roof.
X
To close: using handle : slide the roller
blind in the direction of the arrow.
X To open: using handle : slide the roller
blind in
the opposite direction to the arrow. MAGIC SKY CONTROL
General notes MAGIC SKY CONTROL is a glass roof, the
transparency of which can be changed by
applying electrical voltage.
MAGIC SKY CONTROL can be switched
between darkened and transparent states.
i
MAGIC SKY CONTROL darkens
automatically when
you turn the SmartKey
to position 0 in the ignition lock or remove
the SmartKey.
Risk of electric shock G
DANGER
The MAGIC SKY CONTROL electrical system
works at high voltage.
If the cover behind the overhead control unit
is damaged or is removed, electrical 92
Roof
Opening/closing
Page 549 of 572

Aspect ratio
Relationship between tire height and tire
width in percent.
Tire pressure
This is pressure inside the tire applying an
outward
force
to each square inch of the tire's
surface. The tire pressure is specified in
pounds per square inch (psi), in kilopascal
(kPa) or in bar. The tire pressure should only
be corrected when the tires are cold.
Cold tire pressure
The tires are cold:
R if the vehicle has been parked without
direct sunlight on the tires for at least three
hours and
R if the vehicle has been driven for less than
1 mile (1.6 km).
Tread
The part of the tire that comes into contact
with the road.
Bead
The tire bead ensures that the tire sits
securely on the wheel. There are several steel
wires in the bead to prevent the tire from
coming loose from the wheel rim.
Sidewall
The part of the tire between the tread and the
bead.
Weight of optional extras
The combined weight of those optional extras
that weigh more than the replaced standard
parts and more than 2.3 kilograms (5 lbs).
These optional extras, such as high-
performance brakes, level control, a roof rack
or a high-performance battery, are not
included in the curb weight and the weight of
the accessories.
TIN (Tire Identification Number)
This is a unique identifier which can be used
by a tire manufacturer to identify tires, for
example for a product recall, and thus identify the purchasers. The TIN is made up of the
manufacturer's identity code, tire size, tire
type code and the manufacturing date.
Load bearing index
The load bearing index (also load index) is a
code
that
contains the maximum load bearing
capacity of a tire.
Traction
Traction is the result of friction between the
tires and the road surface.
Treadwear indicators
Narrow bars (tread wear bars) that are
distributed over the tire tread. If the tire tread
is level with the bars, the wear limit of á in
(1.6 mm) has been reached.
Occupant distribution
The distribution of occupants in a vehicle at
their designated seating positions.
Total load limit
Rated cargo and luggage load plus
68 kilograms (150 lb) multiplied by the
number of seats in the vehicle. Changing a wheel
Flat tire
Information on the procedure in the event of
a flat tire ( Y page 509). You will also find
information on
driving with MOExtended tires
in the event of a flat tire. Interchanging the wheels
G
WARNING
Interchanging the front and rear wheels may
severely impair the driving characteristics if
the wheels
or tires have different dimensions.
The wheel brakes or suspension components
may also be damaged. There is a risk of
accident. Changing a wheel
547
Wheels and tires
Z