2013 MERCEDES-BENZ SL-CLASS ROADSTER mirror
[x] Cancel search: mirrorPage 201 of 572

R
a driving safety system intervenes, e.g.
ESP ®
or PRE-SAFE ®
Brake.
R ESP ®
is switched off.
R a loss of tire pressure or a defective tire is
detected.
Switching on Active Blind Spot Assist X
Make sure that the radar sensor system
(Y page 218) and Active Blind Spot Assist
(Y page 215)
are activated in the on-board
computer.
X Turn the SmartKey to position 2 in the
ignition lock.
Warning lamps : light up red in the
exterior mirrors for approximately
1.5seconds and then turn yellow.
Active Lane Keeping Assist Important safety notes
G
WARNING
Active Lane Keeping Assist does not keep
your vehicle in its lane. It is only an aid and
may detect the lane markings on the road
incorrectly or not at all.
The system may be impaired or may not
function if:
R several or
no lane markings for a single lane
are present.
R there is poor visibility, e.g. due to
insufficient illumination of the road, or due
to snow, rain, fog or spray.
R there is glare, e.g. from oncoming traffic,
the sun, or reflection from other vehicles. R
the windshield is dirty, fogged up or
covered, for instance by a sticker, in the
vicinity of the camera.
R the lane markings are worn away, dark or
covered up, e.g. by dirt or snow.
R the distance to the vehicle in front is too
small and
the lane markings thus cannot be
detected.
R the lane markings on the road are unclear,
e.g. near roadworks.
R the lane markings change quickly, e.g.
lanes branch off, cross one another or
merge.
R the road is narrow and winding.
Active Lane Keeping Assist cannot detect
road and traffic conditions. It is not a
substitute for attentive driving. You are
responsible for the vehicle's speed, braking in
good time, and steering correctly. Always
adapt your driving style to suit the prevailing
road and weather conditions. Always pay
attention to traffic conditions and your
surroundings. Otherwise, you may fail to
recognize dangers in time, cause an accident
and injure yourself and others.
General notes Active Lane Keeping Assist monitors the area
in front of your vehicle by means of a
camera
: at
the top of the windshield. Active
Lane Keeping Assist detects lane markings on
the road and warns you before you leave your
lane unintentionally. If you do not react to the
warning, a lane-correcting application of the Driving systems
199
Driving and parking Z
Page 220 of 572

R
side marker lamps
R surround lighting in the exterior mirrors
Activating/deactivating the interior
lighting delayed switch-off
If you activate the Interior Lighting
Delay function, the interior lighting remains
on for 20seconds after you remove the
SmartKey from the ignition lock.
X Press the = or ; button on the
steering wheel to select the Settings
menu.
X Press the : or 9 button to select the
Lights submenu.
X Press the a button to confirm.
X Press : or 9 to select the
Interior Lighting Delay function.
When the Interior Lighting Delay
function is
activated, the vehicle interior is
displayed in red in the multifunction
display.
X Press the a button to save the setting.
Vehicle submenu Activating/deactivating the automatic
door locking mechanism
X
Press the = or ; button on the
steering wheel to select the Settings
menu.
X Press the : or 9
button to select the
Vehicle submenu.
X Press the a button to confirm.
X Press : or 9 to select the
Automatic Door Lock function.
When the Automatic
Door Lock function
is activated, the vehicle doors are displayed
in red in the multifunction display.
X Press the a button to save the setting.
If you activate the Automatic Door Lock
function, the
vehicle is centrally locked above
a speed of around 9 mph (15 km/h).
For further information on the automatic
locking feature, see ( Y page 76). Activating/deactivating the acoustic
locking verification signal
If
you
switch on the Acoustic Lock function,
an acoustic signal sounds when you lock the
vehicle.
X Press the = or ; button on the
steering wheel to select the Settings
menu.
X Press the : or 9
button to select the
Vehicle submenu.
X Press the a button to confirm.
X Press the :
or 9
button to select the
Acoustic Lock function.
If the Acoustic Lock function is activated,
the & symbol in the multifunction
display lights up red.
X Press the a button to save the setting.
Activating/deactivating the radar sensor
system
X Press the = or ; button on the
steering wheel to select the Sett. menu.
X Press the : or 9
button to select the
Vehicle submenu.
X Press the a button to confirm.
X Press the 9 or : button to select
Radar Sensor (See Oper. Manual).
You will see the selected setting: On or
Off.
X Press the a button to save the setting.
The following systems are switched off when
the radar sensor system is deactivated:
R DISTRONIC PLUS (Y page 164)
R BAS PLUS (
Y page 58)
R PRE-SAFE ®
Brake (Y page 63)
R Active Blind Spot Assist (Y page 195)
i USA only: This device has been approved
by the FCC as a "Vehicular Radar System".
The radar sensor is intended for use in an
automotive radar system only. Removal,
tampering, or altering of the device will void
any warranties, and is not permitted by the 218
Menus and submenus
On-board computer and displays
Page 238 of 572

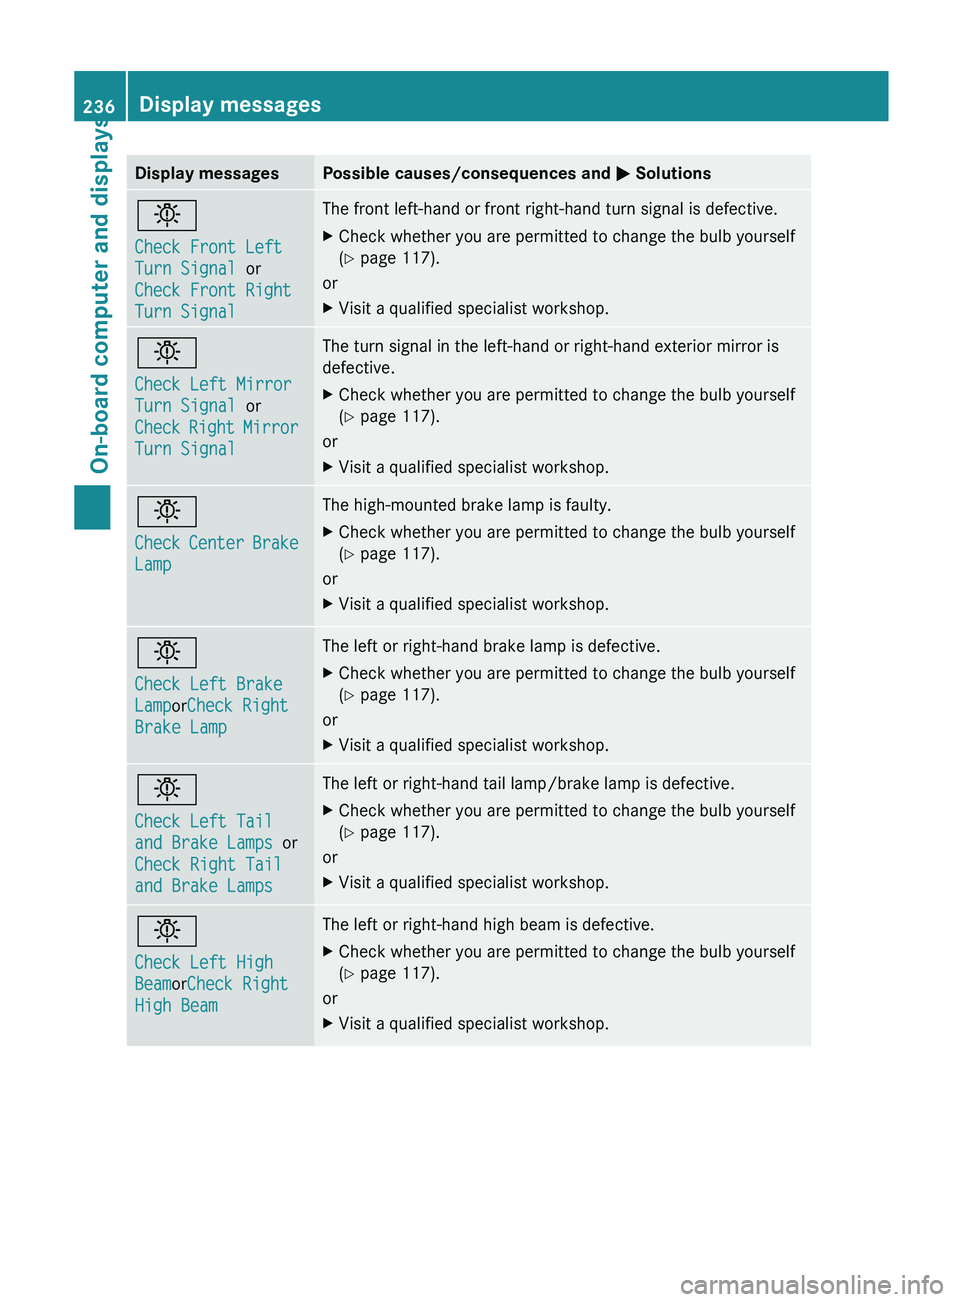
Display messages Possible causes/consequences and
M Solutionsb
Check Front Left
Turn Signal or
Check Front Right
Turn Signal The front left-hand or front right-hand turn signal is defective.
X
Check whether you are permitted to change the bulb yourself
(Y page 117).
or
X Visit a qualified specialist workshop. b
Check Left Mirror
Turn Signal or
Check
Right
Mirror
Turn Signal The turn signal in the left-hand or right-hand exterior mirror is
defective.
X
Check whether you are permitted to change the bulb yourself
(Y page 117).
or
X Visit a qualified specialist workshop. b
Check
Center
Brake
Lamp The high-mounted brake lamp is faulty.
X
Check whether you are permitted to change the bulb yourself
(Y page 117).
or
X Visit a qualified specialist workshop. b
Check Left Brake
LamporCheck Right
Brake Lamp The left or right-hand brake lamp is defective.
X
Check whether you are permitted to change the bulb yourself
(Y page 117).
or
X Visit a qualified specialist workshop. b
Check Left Tail
and Brake Lamps
or
Check Right Tail
and Brake Lamps The left or right-hand tail lamp/brake lamp is defective.
X
Check whether you are permitted to change the bulb yourself
(Y page 117).
or
X Visit a qualified specialist workshop. b
Check Left High
BeamorCheck Right
High Beam The left or right-hand high beam is defective.
X
Check whether you are permitted to change the bulb yourself
(Y page 117).
or
X Visit a qualified specialist workshop.236
Display messages
On-board computer and displays
Page 245 of 572

Display messages Possible causes/consequences and
M SolutionsAct. Lane Keep.
Assist Currently
Unavailable See
Operator's Manual Active Lane Keeping Assist is deactivated and temporarily
inoperative. Possible causes are:
R
the windshield in the camera's field of vision is dirty.
R visibility is impaired due to heavy rain, snow or fog.
R there are no lane markings for a longer period.
R the lane
markings are worn, dark or covered, e.g. by dirt or snow.
If the display message does not disappear:
X Pull over and stop the vehicle safely as soon as possible, paying
attention to road and traffic conditions.
X Secure the vehicle against rolling away ( Y page 154).
X Clean the windshield.
If the system detects that the camera is fully operational, the
display message disappears.
Lane Keeping Assist or Active Lane Keeping Assist is operational
again. Act. Lane Keep.
Assist Inoperative Active Lane Keeping Assist is defective.
X
Visit a qualified specialist workshop. Active Blind Spot
Assist Currently
Unavailable See
Operator's Manual Active Blind Spot Assist is temporarily inoperative. Possible
causes are:
R
the sensors are dirty.
R function is impaired due to heavy rain or snow.
R the radar sensor system is outside the operating temperature
range.
R the radar sensor system is temporarily inoperative, e.g. due to
electromagnetic radiation emitted by nearby TV or radio
stations or other sources of electromagnetic radiation.
The yellow 9 indicator lamps also light up in the exterior
mirrors.
If the display message does not disappear:
X Pull over and stop the vehicle safely as soon as possible, paying
attention to road and traffic conditions.
X Secure the vehicle against rolling away ( Y page 154).
X Clean the sensors ( Y page 504).
X Restart the engine.
If the system detects that the sensors are fully operational, the
display message disappears.
Active Blind Spot Assist is operational again. Display messages
243
On-board computer and displays Z
Page 246 of 572

Display messages Possible causes/consequences and
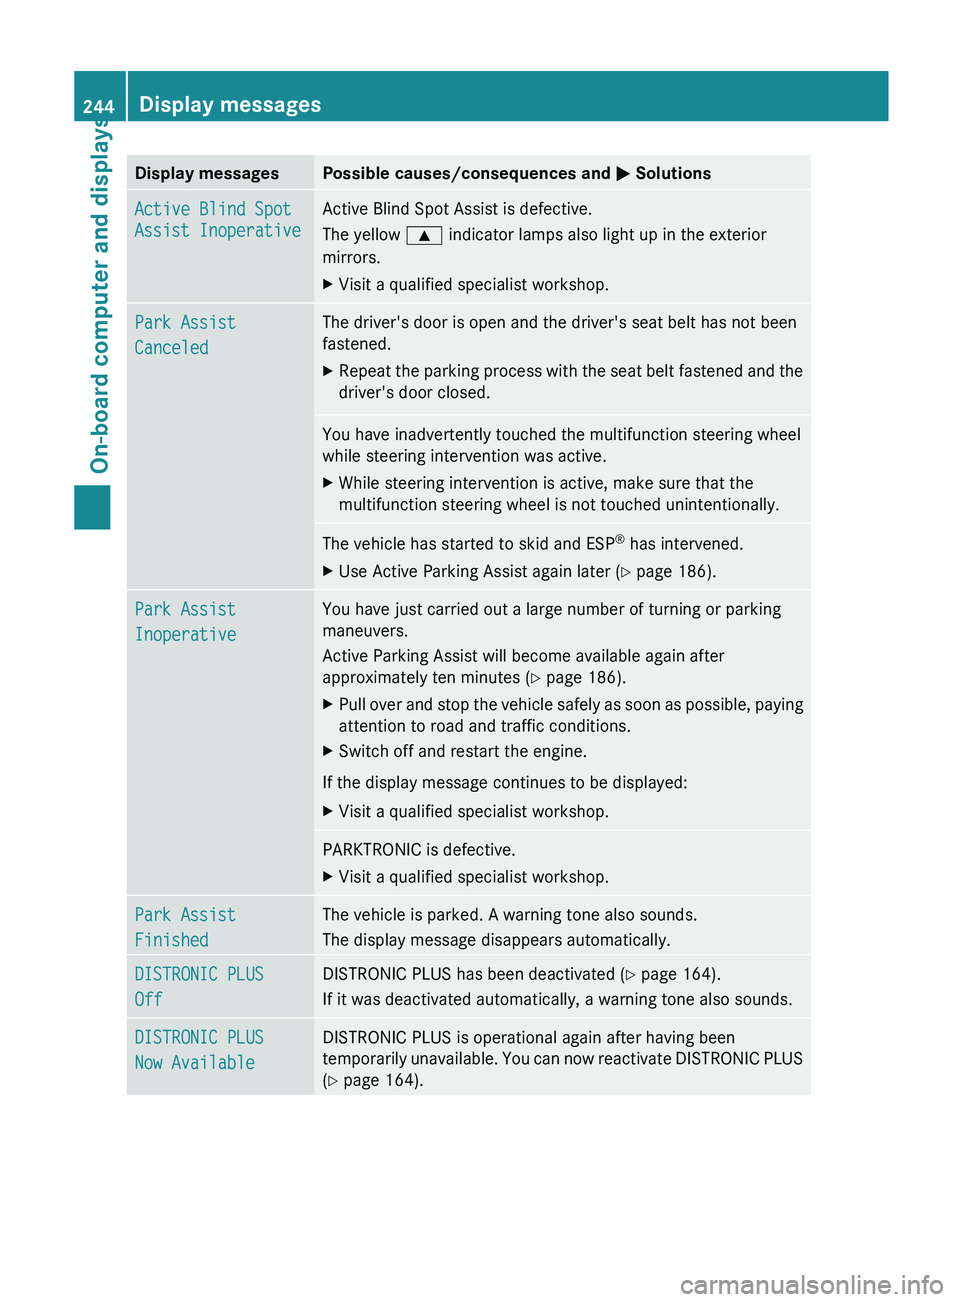
M SolutionsActive Blind Spot
Assist Inoperative Active Blind Spot Assist is defective.
The yellow
9 indicator lamps also light up in the exterior
mirrors.
X Visit a qualified specialist workshop. Park Assist
Canceled The driver's door is open and the driver's seat belt has not been
fastened.
X
Repeat the parking process with the seat belt fastened and the
driver's door closed. You have inadvertently touched the multifunction steering wheel
while steering intervention was active.
X
While steering intervention is active, make sure that the
multifunction steering wheel is not touched unintentionally. The vehicle has started to skid and ESP
®
has intervened.
X Use Active Parking Assist again later (Y page 186). Park Assist
Inoperative You have just carried out a large number of turning or parking
maneuvers.
Active Parking Assist will become available again after
approximately ten minutes (
Y page 186).
X Pull over and stop the vehicle safely as soon as possible, paying
attention to road and traffic conditions.
X Switch off and restart the engine.
If the display message continues to be displayed:
X Visit a qualified specialist workshop. PARKTRONIC is defective.
X
Visit a qualified specialist workshop. Park Assist
Finished The vehicle is parked. A warning tone also sounds.
The display message disappears automatically.
DISTRONIC PLUS
Off DISTRONIC PLUS has been deactivated (
Y page 164).
If it was deactivated automatically, a warning tone also sounds. DISTRONIC PLUS
Now Available DISTRONIC PLUS is operational again after having been
temporarily
unavailable.
You can now reactivate DISTRONIC PLUS
(Y page 164). 244
Display messages
On-board computer and displays
Page 481 of 572

X
To re-install the insert: place the insert in
stowage compartment ;.
X Slide catches : outwards in the direction
of the arrow until they engage.
You can remove the cup holder's rubber mat
for cleaning. Clean with clear, lukewarm
water only. Bottle holder
G
WARNING
Do not transport heavy, sharp-edged, or
fragile bottles in the bottle holder.
In the event of an accident, the bottle holder
cannot secure a bottle sufficiently. You and/
or vehicle occupants could be injured. X
To open: open the stowage compartment
(Y page 476).
X To remove the insert: slide catches :
inwards in the direction of the arrow.
X Lift bottle holder insert ; up and remove.
X To re-install the insert: place
insert ; in
the stowage compartment.
X Slide catches : outwards in the direction
of the arrow until they engage.
The bottle holder does not secure the bottles;
it merely prevents them from tipping over. Sun visors
Overview G
WARNING
Do not use the vanity mirror while driving.
Keep the vanity mirrors in the sun visors
closed while the vehicle is in motion.
Reflected glare
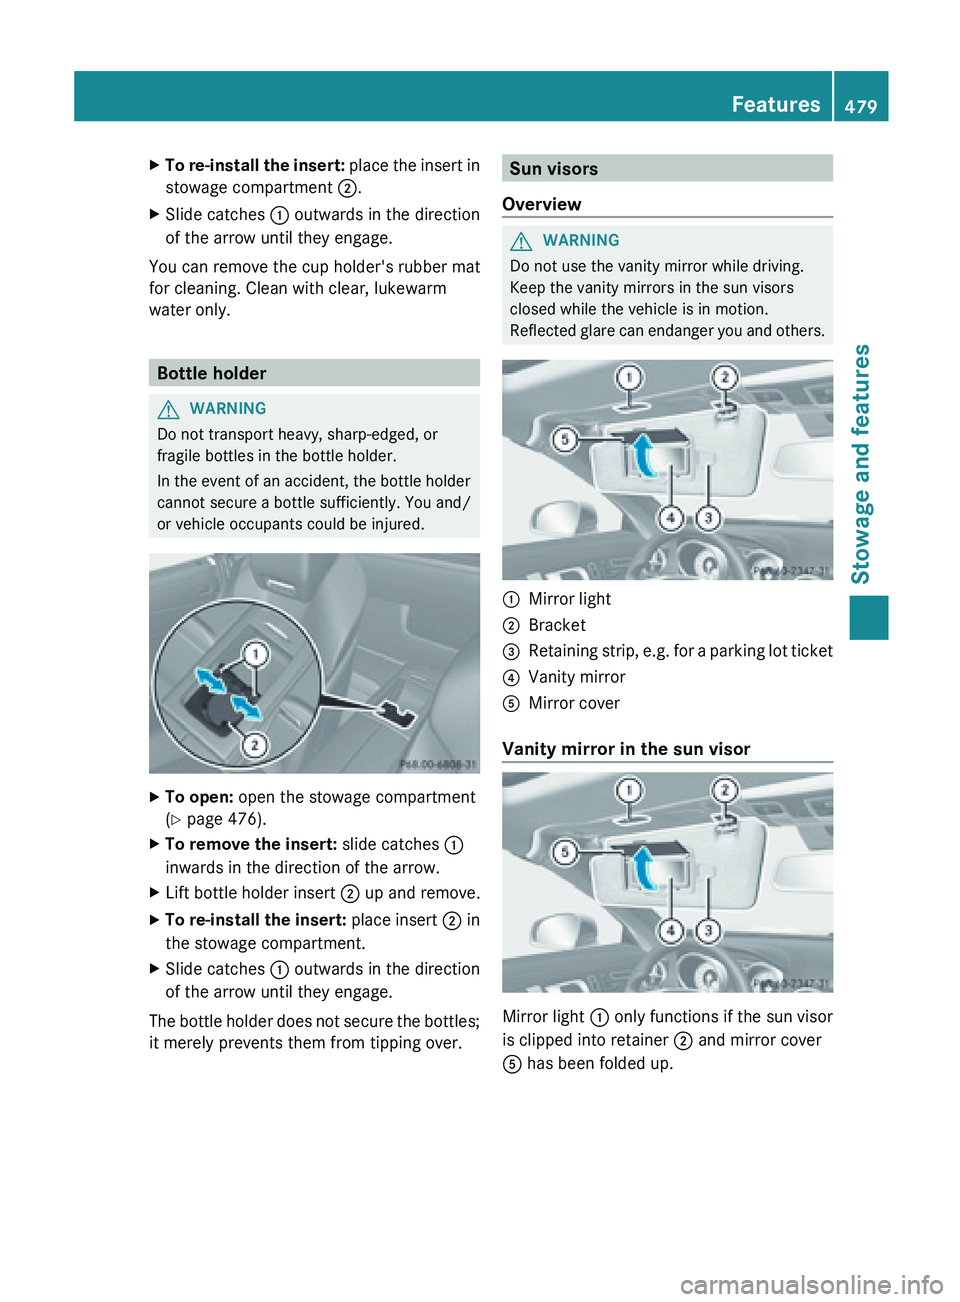
can endanger you and others. :
Mirror light
; Bracket
= Retaining strip, e.g. for a parking lot ticket
? Vanity mirror
A Mirror cover
Vanity mirror in the sun visor Mirror light : only functions if the sun visor
is clipped into retainer
; and mirror cover
A has been folded up. Features
479
Stowage and features Z
Page 484 of 572

operator, make sure people and objects are
out of the way of the device to prevent
potential harm or damage. When
programming
a
garage door opener, the door
moves up or down. When programming a gate
operator, the gate opens or closes.
Do not use the integrated remote control with
any garage door opener that lacks safety stop
and reverse features as required by U.S.
federal safety standards (this includes any
garage door opener model manufactured
before April 1, 1982). A garage door that
cannot detect an object - signaling the door
to stop and reverse - does not meet current
U.S. federal safety standards.
When programming a garage door opener,
park vehicle outside the garage.
Do not run the engine while programming the
integrated remote control. Inhalation of
exhaust gas is hazardous to your health. All
exhaust gas contains carbon monoxide (CO),
and inhaling it can cause unconsciousness
and possible death. All exhaust gas contains
carbon monoxide (CO), and inhaling it can
cause unconsciousness and possible death.
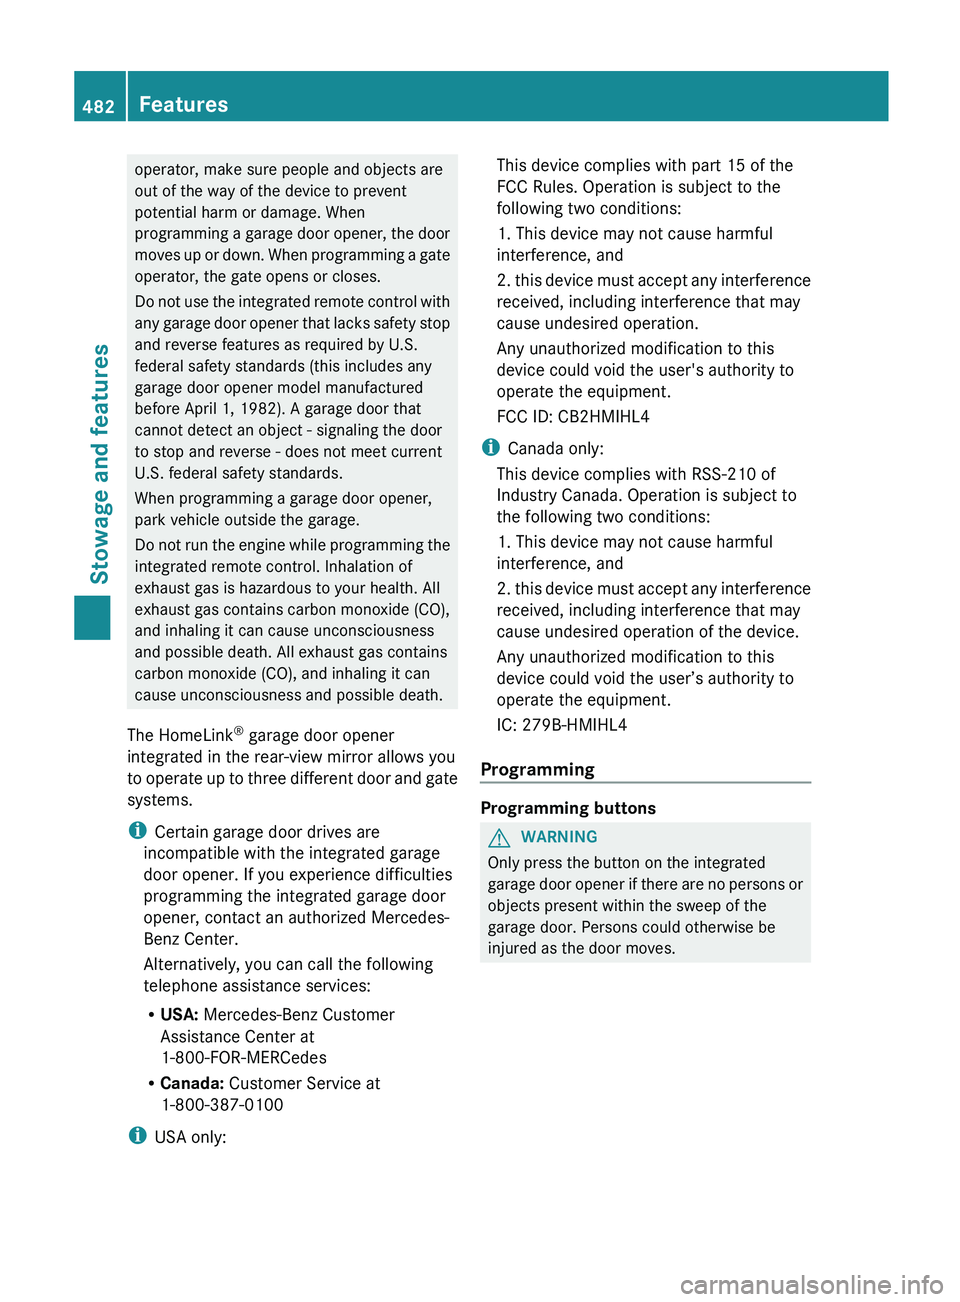
The HomeLink ®
garage door opener
integrated in the rear-view mirror allows you
to operate up to three different door and gate
systems.
i Certain garage door drives are
incompatible with the integrated garage
door opener. If you experience difficulties
programming the integrated garage door
opener, contact an authorized Mercedes-
Benz Center.
Alternatively, you can call the following
telephone assistance services:
R USA: Mercedes-Benz Customer
Assistance Center at
1-800-FOR-MERCedes
R Canada: Customer Service at
1-800-387-0100
i USA only: This device complies with part 15 of the
FCC Rules. Operation is subject to the
following two conditions:
1. This device may not cause harmful
interference, and
2.
this
device must accept any interference
received, including interference that may
cause undesired operation.
Any unauthorized modification to this
device could void the user's authority to
operate the equipment.
FCC ID: CB2HMIHL4
i Canada only:
This device complies with RSS-210 of
Industry Canada. Operation is subject to
the following two conditions:
1. This device may not cause harmful
interference, and
2. this device must accept any interference
received, including interference that may
cause undesired operation of the device.
Any unauthorized modification to this
device could void the user’s authority to
operate the equipment.
IC: 279B-HMIHL4
Programming Programming buttons
G
WARNING
Only press the button on the integrated
garage door
opener if there are no persons or
objects present within the sweep of the
garage door. Persons could otherwise be
injured as the door moves. 482
Features
Stowage and features
Page 485 of 572

Integrated garage door opener on the rear-view
mirror
Garage door remote control
A is not part of
the integrated garage door opener.
X Before programming for the first time, clear
the memory of the integrated garage door
opener (Y page 485).
X Turn the SmartKey to position 2 in the
ignition lock.
X Press and hold one of the buttons ;
to ? on the integrated garage door
opener.
After a
short time, indicator lamp : starts
flashing yellow.
i Indicator lamp : flashes yellow
immediately the first time button ;, =
or ? is
programmed. If the selected button
has already been programmed, indicator
lamp : will only start flashing yellow at a
rate of once a second after ten seconds
have elapsed.
X Release button ;, = or ?.
X Point garage door remote control A
towards buttons ; to ? on the rear-view
mirror at a distance of 2 to 8 inches (5 to
20 cm).
i The required distance between remote
control A
and the integrated garage door
opener depends on the garage door drive
system. Several attempts might be
necessary. You should test every position
for at least 25 seconds before trying
another position. X
Press and hold button B on
remote control
A until indicator lamp : lights up green.
If indicator lamp : lights up green or
flashes, then programming has been
successful.
X Release button ;, = or ? on the
integrated garage door opener and button
B on garage door remote control A.
If indicator lamp : lights up red:
X Repeat the programming procedure for the
corresponding button on the rear-view
mirror. When doing so, vary the distance
between remote control A and the rear-
view mirror.
i If the indicator lamp flashes green after
successful programming, the garage door
system is
operating on a rolling code. After
programming, you must synchronize the
garage door opener integrated in the rear-
view mirror with the receiver of the garage
door system.
Synchronizing the rolling code
Your vehicle must be within reach of the
garage door or exterior gate drive. Make sure
that neither your vehicle nor any persons/
objects are present within the sweep of the
door or gate.
Observe the safety notes when performing
the rolling code synchronization
(Y page 481).
X Turn the SmartKey to position 2 in the
ignition lock.
X Press the programming button of the door
or gate drive (see the door or gate drive
operating instructions, e.g. under
"Programming of additional remote
controls"). Features
483
Stowage and features Z