2013 MERCEDES-BENZ SL-CLASS ROADSTER warning
[x] Cancel search: warningPage 380 of 572
X
Select Delete and press W to confirm.
A deletion prompt appears.
X Select Yes or No and press W to confirm.
If you select Yes, the text message is
deleted.
If you
select No, the process will be aborted.
i This delete function is not supported by
all mobile phones. The Delete failed
message appears. Using the address book
Introduction G
WARNING
Always focus your attention on the traffic
conditions.
Before starting the journey, familiarize
yourself with the address book functions.
Only use COMAND if road and traffic
conditions permit. You could otherwise
become involved in an accident in which you
or others could be injured.
The address book organizes and stores
entries which are entered from different
sources (mobile phone, memory card, USB
storage device, COMAND telephone book,
navigation system).
You can
use these entries to make telephone
calls and for navigation.
i Number of contacts in the address
book: the address book can store a total of
4000 contacts.
1500 entries each are reserved in the
address book for:
R contacts from the mobile phone
R contacts that you create in COMAND or
import from other sources
The remaining 1,000 entries are assigned
by COMAND as necessary.
i Display of mobile phone contacts:
contacts downloaded from the mobile
phone remain in the address book even if you disconnect the mobile phone from
COMAND. Contacts that have previously
been
available
can be displayed as soon as
the mobile phone is reconnected.
COMAND downloads the contacts again so
that any new contacts that have been
added to the mobile phone can be
displayed.
Once you connect a new mobile phone to
COMAND, all contacts in the address book
from the previous mobile phone are
replaced by those from the new mobile
phone.
Address book entries remain stored when
the mobile phone is disconnected. For this
reason, delete your personal data using the
reset function before selling your vehicle,
for example ( Y page 294).
Calling up the address book Using the function button:
X
Press the % function button.
You see
either the telephone basic menu or
the address book, depending on which was
last active.
X If the telephone basic menu is displayed,
press the % function button again.
Using the telephone basic menu:
X With the telephone basic menu shown,
select Phone by sliding VZ the COMAND
controller and press W to confirm.
X Select Address Book from the menu and
press W to confirm. 378
Telephone
COMAND
Page 398 of 572
X
To change the map scale: as soon as you
turn cVd the COMAND controller, the
scale bar appears.
X Turn cVd until the desired scale is set.
i The data is downloaded again from the
server for these functions. This can delay
the display of the weather map.
Showing/hiding the
menu in the weather
map
X To show: press W
the COMAND controller
in the weather map.
X To hide: slide up ZV the COMAND
controller.
Switching to the weather information
display in the map
X Display the menu on the weather map
(Y page 396).
X Select View by turning cVd the COMAND
controller and press W to confirm. Weather
characteristic Display on the map
Hazard Icons Displays warnings,
calling up legend
(Y page 396)
Radar Map Displays the rain radar as
a colored area on the
map, calling up legend
(Y page 396)
Atmospheric
Pressure Displays air pressure
with isobars and as a
colored area on the map
Temperatures Displays the
temperatures
Cloud Cover Displays the clouds
Winds Displays wind direction
with an arrow and wind
speed with coloring i
The hazard icon display is preset in the
factory. This presetting can be changed in
the Options menu (Y page 398).
X Select a weather characteristic by turning
cVd the COMAND controller and press
W to confirm.
The # dot indicates which weather
characteristic is
currently displayed on the
map. You can select one weather
characteristic at a time.
Legend
X Display the menu on the weather map
(Y page 396).
X Select View by turning cVd the COMAND
controller and press W to confirm.
X Select Legend and press W to confirm.
The legend
is displayed in accordance with
the currently selected weather
characteristic.
X To return to the information chart:
display the menu in the weather map
(Y page 396)
X Select Display Weather and press W to
confirm.
Memory functions Storing a location in the memory
You can save locations that are called up
frequently in ten preset positions (0, 1 – 9).
X
Select the location ( Y page 394).
X Press and hold a number key.
When the location is saved, the number of
the selected
preset comes before the name
of the place in the caption.
Selecting a location from the memory
X Quick select: when the weather display
(COMAND) is switched on and an entry is
available, press a number key, e.g. l.
The information
chart appears and displays
the weather information. 396
Online and Internet functions
COMAND
Page 423 of 572
X
Select Sat Radio in the submenu bar by
turning cVd the COMAND controller and
press W to confirm.
X Select Service and press W to confirm.
The provider's details appear.
X To return to the SatRadio main display:
slide XVY the COMAND controller.
Channel list updates
When receiving
a new channel list, the display
shows the Updating Channels...
message.
The station last selected is switched to mute
until the update has been completed.
Satellite radio mode is not available during
this process.
Once the update has been completed, the
satellite radio main menu appears. The
station last selected is played.
Sound settings
Information on sound settings ( Y page 278).Audio CD/DVD and MP3 mode
Important safety notes G
WARNING
COMAND is classified as a Class 1 laser
product. Never open the housing. There is a
risk of
damage to the eyes due to exposure to
invisible laser radiation if you open the casing,
or if the casing is faulty or damaged.
COMAND does not contain any parts that can
be serviced by the user. For safety reasons,
all maintenance work must be carried out by
qualified aftersales technicians. G
WARNING
Only when the vehicle is stationary should
you:
R insert a data carrier
R eject a disc There is a risk of being distracted from the
road and traffic conditions if you insert or
eject a disc while the vehicle is in motion.
Inserting/ejecting CDs/DVDs Notes
If the CD/DVD has a printed side, this must
face upwards when the CD/DVD is inserted.
If
neither
side is printed, the side to be played
should face downwards. The system may not
be able to play CDs/DVDs with copy
protection.
i If a medium contains other files in
addition to music files, the loading time
before the first track starts to play may be
longer.
Inserting a disc into the single DVD drive
X Press the 8 eject button.
If there is a disc already inserted, it will be
ejected.
X Take the disc out of the slot.
X Insert a disc into the slot.
If the disc is correctly inserted and is a
suitable disc,
it is drawn in by the drive and
played.
Ejecting a disc from the single DVD drive
X Press the 8 eject button.
X Take the disc out of the slot.
If you
do not take the disc out of the slot, it
is drawn in again automatically after a short
while and reloaded.
Inserting discs into the DVD changer
The DVD changer has a fixed magazine with
six trays.
X To insert a CD/DVD into the magazine
tray: press the V load/eject button.
A menu shows the current load status of
the magazine trays. The last tray selected
is identified by a red digit. Audio
421
COMAND Z
Page 453 of 572

X
Select an option and press W to confirm.
The following options are available:
R Normal Track Sequence
Normal track sequence: you hear the
tracks in
their normal order (e.g. numerical
or alphabetical).
R Random Medium
All the tracks on the medium are played in
random order.
R Random Track List
The tracks in the currently active category
or folder, including any subfolders, are
played in random order.
i For MP3 players, the random playlists
offer a maximum of 300 tracks chosen at
random.
MP3 player instructions General notes
Up to 30,000 tracks per medium are
supported.
You can speed up some functions and
improve the search results by:
R
making sure the names of tracks, albums
and artists, for example, are written the
same way
R labeling albums
featuring various artists as
“compilations”
i Multiple entries of tracks in playlists are
filtered out for some players.
Data formats
MP3 and WMA are supported as data formats
with fixed and variable bit rates (up to
320 kbits/s).
Special notes about MP3 players
Up to eight directory levels with up to 1,000
tracks per directory are supported.
Do not use USB extension leads or adapters.
They can impair functionality. i
DRM (Digital Rights Management)
protected files are not supported by the
Media Interface. Audio AUX mode
Notes on audio AUX mode You can connect an external audio source
(AUX) to COMAND. You will find the
necessary socket in the center console
stowage compartment.
If COMAND is equipped with a Media
Interface, external audio sources are
connected using the cable set provided. An
AUX
socket
is not provided. The connections
for the Media Interface are located in the
stowage compartment in the center console.
i You will find further information online at
http://www.mbusa-mobile.com.
Alternatively, call the Mercedes-Benz
Customer Assistance Center at
1-800-FOR-MERCedes (1-800-367-6372)
(for USA) or Customer Relations at
1-800-387-0100 (for Canada).
Activating audio AUX mode G
WARNING
External audio sources may have different
volumes, which can mean that system
messages such
as traffic announcements and
navigation system announcements are much
louder. If necessary, please deactivate the
system messages or adjust their volume
manually.
When you connect an external audio source,
audio AUX is not selected automatically.
X Select Audio in the main function bar by
sliding ZV and
turning cVd the COMAND
controller and press W to confirm.
If AUX mode was the last mode selected, it
will now be active. Audio
451
COMAND Z
Page 455 of 572
Basic settings
Adjusting the brightness, contrast or
color X
In DVD video or video AUX mode, press
W the COMAND controller and show the
menu.
X Select DVD-Video by sliding VÆ and
turning cVd the COMAND controller and
press W to confirm.
A menu appears.
X Select Brightness, Contrast or
Color
by
turning cVd the COMAND controller and
press W to confirm.
Changing the picture format X
Press
W the COMAND controller to show
the menu.
X Select DVD-Video by sliding VÆ and
cVd turning the COMAND controller and
press W to confirm.
A menu appears.
X Select 16:9 Optimized, 4:3 or
Widescreen and press W to confirm.
The dot in front of the entry indicates the
currently selected format.
X Select a setting by turning cVd the
COMAND controller and press W to
confirm. Video DVD mode
Safety notes G
WARNING
COMAND is classified as a Class 1 laser
product. Never open the housing. There is a
risk of
damage to the eyes due to exposure to
invisible laser radiation if you open the casing,
or if the casing is faulty or damaged.
COMAND does not contain any parts that can
be serviced by the user. For safety reasons, all maintenance work must be carried out by
qualified aftersales technicians.
G
WARNING
Only when the vehicle is stationary should
you:
R load a disc
R eject a disc
There is a risk of being distracted from the
road and
traffic conditions if this is done while
the vehicle is in motion.
Notes on discs !
Do not
affix stickers or labels to the discs.
They could peel off and damage COMAND.
Stickers can cause the disc to bend, which
can result in read errors and disc
recognition problems.
! COMAND is designed to play discs that
comply with the EN 60908 standard.
Therefore, you can only use discs with a
maximum thickness of 1.3 mm.
If you insert thicker discs, e.g. those that
contain data on both sides (DVD on one
side and audio data on the other), they
cannot be ejected and can damage the
device.
Only use round discs with a diameter of
12 cm. Do not use discs with a diameter of
8 cm, even with an adapter.
Playback problems may occur when playing
copied discs. There are a large variety of
discs, DVD authoring software, writing
software and writers available. This variety
means that there is no guarantee that the
system will be able to play discs that you have
copied yourself.
DVD playback conditions If
video DVDs do not conform to the NTSC or
PAL TV standards, they may create picture,
sound or other problems during playback. Video
453
COMAND Z
Page 460 of 572
X
Select the Back (to movie) menu item in
the menu and press W to confirm.
Setting the language and audio format This function is not available on all DVDs. If it
is available, you can set the DVD menu
language, the audio language or the audio
format.
The
number of settings is determined
by the DVD content. It is possible that the
settings may also be accessed in the DVD
menu (Y page 457).
X Show the DVD menu (Y page 457).
X In full-screen mode, press W the
COMAND
controller to show the menu.
X Select DVD-Video in the menu by turning
cVd the COMAND controller and press
W to confirm.
X Select DVD Functions and press W to
confirm.
X Select Menu Language or Audio
Language and press W to confirm.
In both cases, a menu appears after a few
seconds. The # dot in front of an entry
indicates the currently selected language.
X Select a setting by turning cVd the
COMAND controller and press W to
confirm.
Subtitles and camera angle These functions are not available on all DVDs.
The
number
of subtitle languages and camera
angles available depends on the content of
the DVD. It is possible that the settings may
also be accessed in the DVD menu
(Y page 457).
X Activate the DVD menu (Y page 457).
X Select DVD-Video in the menu by turning
cVd the COMAND controller and press
W to confirm.
X Select DVD Functions and press W to
confirm. X
Select Subtitles or Camera Angle and
press W to confirm.
In both
cases, a menu appears. The # dot
in front of an entry indicates the current
setting.
X Select a setting by turning cVd the
COMAND controller and press W to
confirm.
Interactive content DVDs can contain interactive content (e.g. a
video game). In a video game, for example,
you may be able to influence events by
selecting
and
triggering actions. The type and
number of actions depend on the DVD.
X Select an action by sliding ZVÆ or XVY
the
COMAND controller and press W to
execute it.
A menu appears and the first entry,
Select, is highlighted.
X Press W the COMAND controller. AUX video mode
Connecting external video sources G
WARNING
External video sources may have different
volumes, which can mean that system
messages such
as traffic announcements and
navigation system announcements are much
louder. If necessary, please deactivate the
system messages or adjust their volume
manually.
If your vehicle is equipped with Media
Interface, you can connect an external video
source (AUX video) ( Y page 445).
The 1/8 inch audio/video jacks are in the
center console stowage compartment.
i In vehicles with a rear view camera, the
AUX video jack cannot be used for external
video sources. 458
Video
COMAND
Page 461 of 572
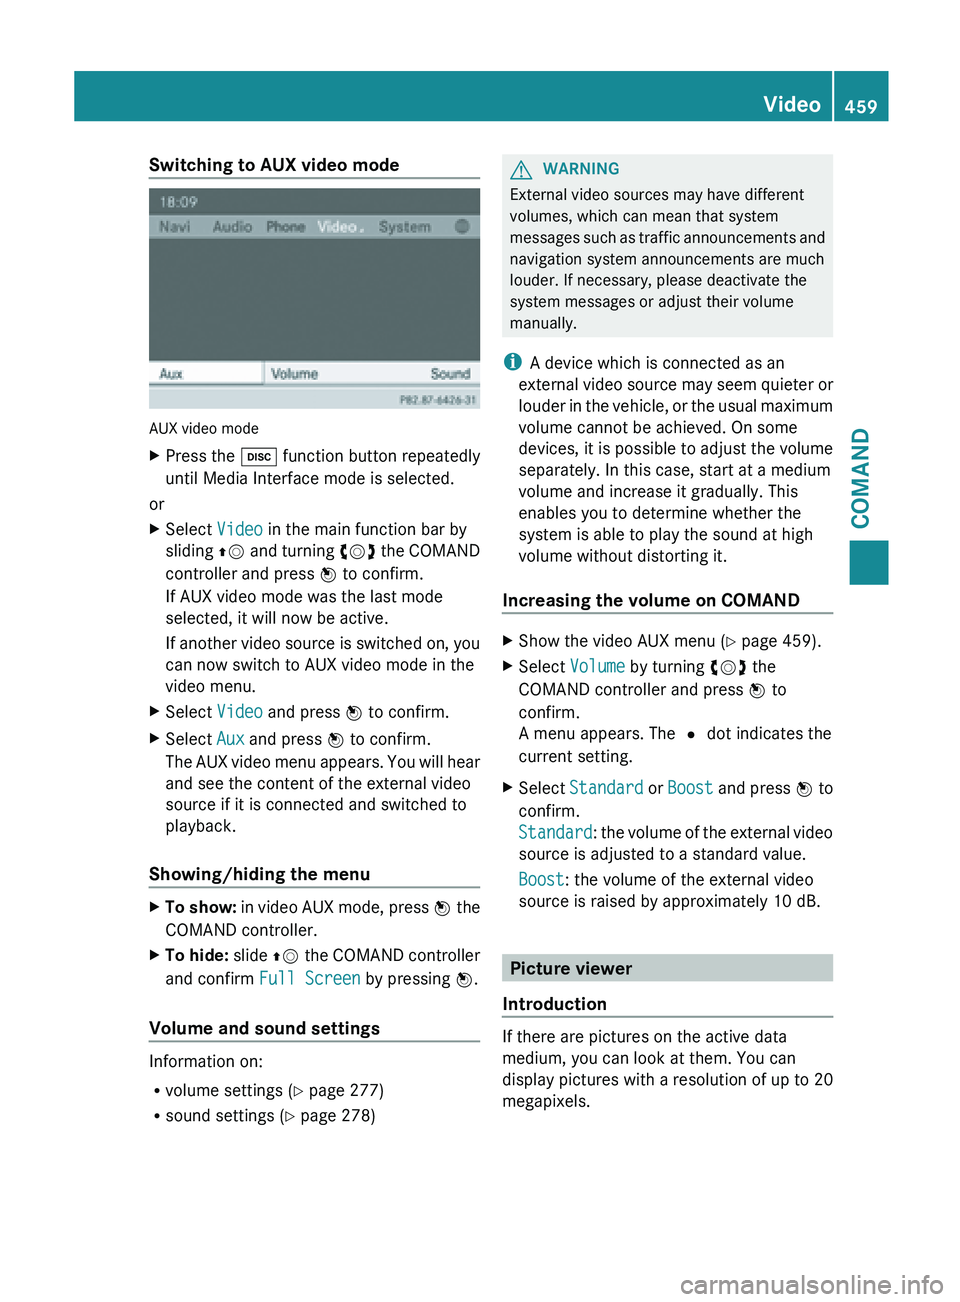
Switching to AUX video mode
AUX video mode
X
Press the h function button repeatedly
until Media Interface mode is selected.
or
X Select Video in the main function bar by
sliding ZV and
turning cVd the COMAND
controller and press W to confirm.
If AUX video mode was the last mode
selected, it will now be active.
If another video source is switched on, you
can now switch to AUX video mode in the
video menu.
X Select Video and press W to confirm.
X Select Aux and press W to confirm.
The AUX
video menu appears. You will hear
and see the content of the external video
source if it is connected and switched to
playback.
Showing/hiding the menu X
To show:
in video AUX mode, press W
the
COMAND controller.
X To hide: slide ZV the
COMAND controller
and confirm Full Screen by pressing W.
Volume and sound settings Information on:
R
volume settings (Y page 277)
R sound settings (Y page 278) G
WARNING
External video sources may have different
volumes, which can mean that system
messages such
as traffic announcements and
navigation system announcements are much
louder. If necessary, please deactivate the
system messages or adjust their volume
manually.
i A device which is connected as an
external video source may seem quieter or
louder in the vehicle, or the usual maximum
volume cannot be achieved. On some
devices, it is possible to adjust the volume
separately. In this case, start at a medium
volume and increase it gradually. This
enables you to determine whether the
system is able to play the sound at high
volume without distorting it.
Increasing the volume on COMAND X
Show the video AUX menu (Y page 459).
X Select Volume by turning cVd the
COMAND controller and press W to
confirm.
A menu appears. The # dot indicates the
current setting.
X Select Standard or Boost and
press W to
confirm.
Standard: the volume of the external video
source is adjusted to a standard value.
Boost: the volume of the external video
source is raised by approximately 10 dB. Picture viewer
Introduction If there are pictures on the active data
medium, you can look at them. You can
display pictures with a resolution of up to 20
megapixels. Video
459
COMAND Z
Page 476 of 572
Useful information
i This Operator's Manual describes all
models and all standard and optional
equipment of your vehicle available at the
time of publication of the Operator's
Manual. Country-specific differences are
possible. Please
note that your vehicle may
not be equipped with all features
described. This also applies to safety-
related systems and functions.
i Read the information on qualified
specialist workshops: ( Y page 31).Stowage areas
Stowage space
Important safety notes G
WARNING
To
help avoid personal injury during a collision
or sudden maneuver, exercise care when
storing objects in the vehicle. Put luggage or
cargo in the trunk if possible.
Do not pile luggage or cargo higher than the
seat backrests.
Keep compartment lids closed. This will help
to prevent stored objects from being thrown
about and injuring vehicle occupants during
R braking
R vehicle maneuvers
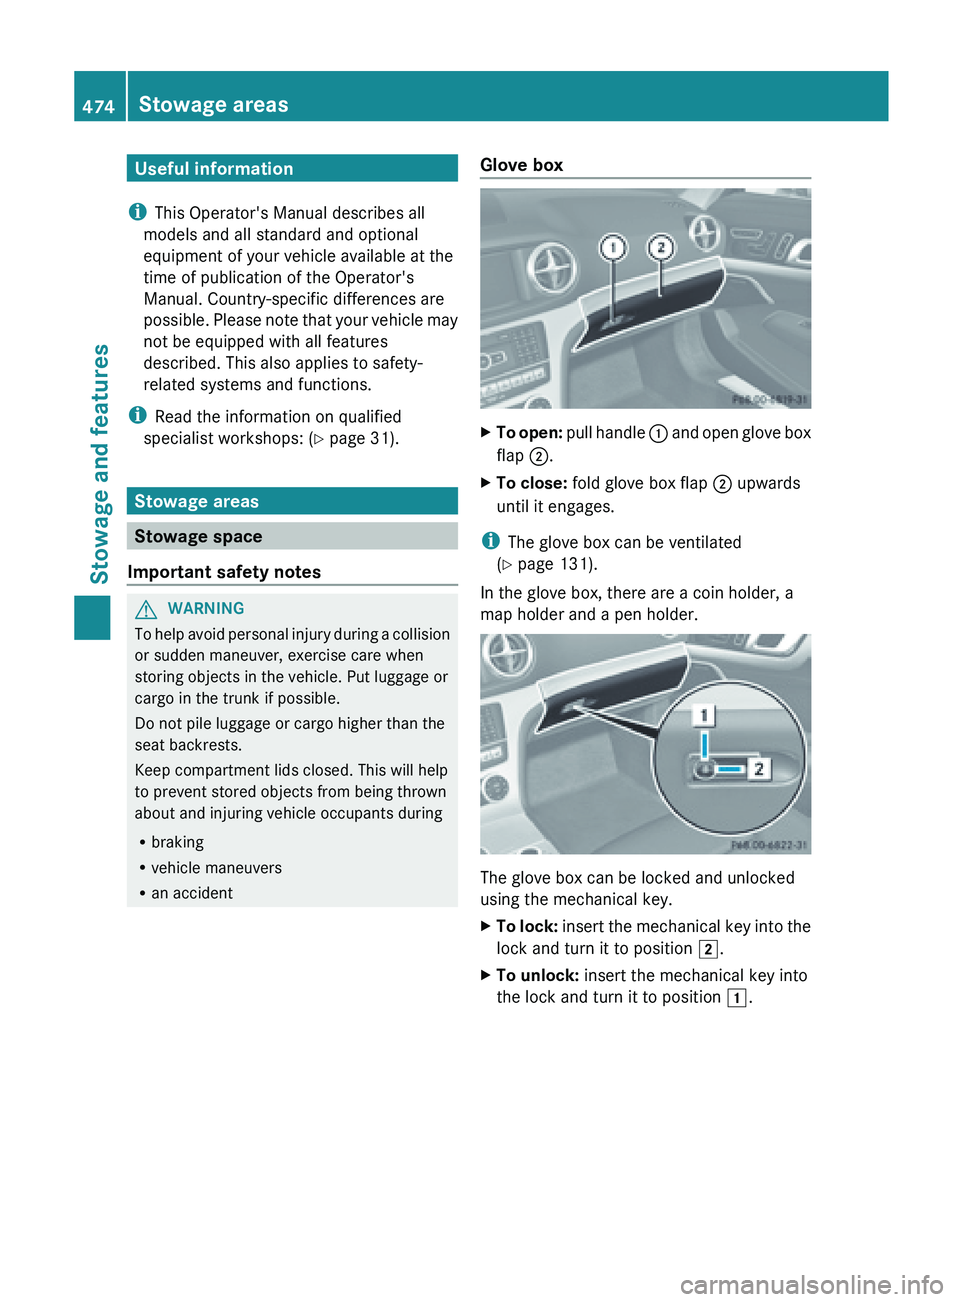
R an accident Glove box X
To open:
pull handle :
and open glove box
flap ;.
X To close: fold glove box flap ; upwards
until it engages.
i The glove box can be ventilated
(Y page 131).
In the glove box, there are a coin holder, a
map holder and a pen holder. The glove box can be locked and unlocked
using the mechanical key.
X
To
lock:
insert the mechanical key into the
lock and turn it to position 2
.
X To unlock: insert the mechanical key into
the lock and turn it to position 1.474
Stowage areas
Stowage and features