Page 106 of 458

years old and under mus
tbe seated and
properly secured in an appropriately sized
child restraint system or booster seat
recommended for the size and weight of the
child. For additional information, see the
"Children in the vehicle" section.
Ac hild's risk of serious or fatal injuries is
significantly increased if the child restraints
are not properly secured in the vehicle and/
or the child is not properly secured in the child
restraint.
! To avoid damage to the seats and the seat
heating, observe the following information:
R keep liquids from spilling on the seats. If
liquid is spilled on the seats, dry them as
soon as possible.
R if the seat covers are damp or wet, do not
switch on the seat heating. The seat
heating should also not be used to dry
the seats.
R clean the seat covers as recommended;
see "Interior care".
R do not transport heavy loads on the
seats. Do not place sharp objects on the
seat cushions, e.g. knives, nails or tools.
The seats should only be occupied by
passengers, if possible.
R when the seat heating is in operation, do
not cover the seats with insulating
materials, e.g. blankets, coats, bags,
seat covers, child seats or booster seats.
! Make sure that there are no objects in the
footwell or behind the seats when resetting
the seats. There is a risk that the seats
and/or the objects could be damaged.
i It is not possible to remove the head
restraints from the front seats. The rear-
compartmenth ead restraints, however,
can be removed (Y page 106).
For more information, contact a qualified
specialist workshop. i
Further related subjects:
R Important safety notes on air bags
(Y page 44)
R Cargo compartment enlargement
(folding down the rear bench seat)
(Y page 335)
R Securing children in the vehicle
(Y page 60) Adjusting the seats electrically
0002
Head restraint height
0003 Seat cushion angle
001F Seat height
001E Seat fore-and-aft adjustment
001C Backrest angle
i Vehicles with memory function: if PRE-
SAFE ®
has been triggered, the front-
passenger seat will be moved to a better
position if it was previously in an
unfavorable position.
i You can store the seat settings using the
memory function (Y page 116). Adjusting the head restraints
General notes Pay attention to the important safety notes
(Y
page 103).
Do not rotate the head restraints of the front
and rear seats. Otherwise, you cannot adjust 104
SeatsSeats, steering wheel and mirrors
Page 107 of 458

the height and angle of the head restraints to
the correct position.
Adjusting the head restraints manually Adjusting the head restraint height
X
To raise: pull the head restraint up to the
desired position.
X To lower: press release catch 0002in the
directio nofthe arrow and push the head
restraint down to the desired position.
Adjusting the fore/aft position of the
head restraint With this function you can adjust the distance
between the head restraint and the back of
the seat occupant's head.
X To adjust forwards: pull the head restraint
forwards in the direction of the arrow until
it engages. There are several notches.
X To move backwards: press and hold
release button 0002and push the head
restraint backwards.
X When the head restraint is in the desired
position, release the button and make sure
that the head restraint is engaged in
position.
i Adjust the head restraint so that the back
of your head is as close to the head
restraint as possible.
Adjusting the head restraints
electrically X
To adjust the head restraint height: slide
the switch for head restraint adjustment
(Y page 104) up or down in the direction of
the arrow.
Adjusting the luxury head restraints X
To adjust the side bolsters of the head
restraint: push or pull right and/or left-
hand side bolster 0002into the desired
position.
X To adjust the fore/aft position of the
head restraint: push or pull the head
restraint in the direction of arrow 0003.
i Adjust the head restraint so that the back
of your head is as close to the head
restraint as possible. Seats
105Seats, steering wheel and mirrors Z
Page 108 of 458

Rear seat head restraints
Adjusting the rear seat head restraint
height
X
Once the head restraint is fully lowered,
press release catch 0002.
X To raise: pull the head restraint up to the
desired position.
X To lower: press release catch 0002and push
the head restraint dow nuntil it is in the
desired position.
Removing and installing the rear seat
head restraints X
To remove: pull the head restraint up to
the stop.
X Press release catch 0002and pull the head
restraint ou tofthe guides.
X To re-install: insert the head restraint so
that the notches on the bar are on the left
when viewed in the direction of travel.
X Push the head restraint down until you hear
it engage in position. Adjusting the angle of the rear seat
backrests
You can adjust the angle of the backrests in
the second row of seats. There are ten detent
positions to choose from.
X
Pull the left or right release lever 0003
upwards in the direction of the arrow until
the relevant backrest 0002is fully released.
X Pull the backrest 0002forwards in the
direction of the arrow and allow it to
engage.
X To ensure that the backrest has engaged,
lean firmly against backrest 0002. Adjusting the multicontour seat
You can set the multicontour seat using
COMAND. See the separate COMAND
Operating Instructions. 106
SeatsSeats, steering wheel and mirrors
Page 109 of 458
Adjusting the 4-way lumbar support
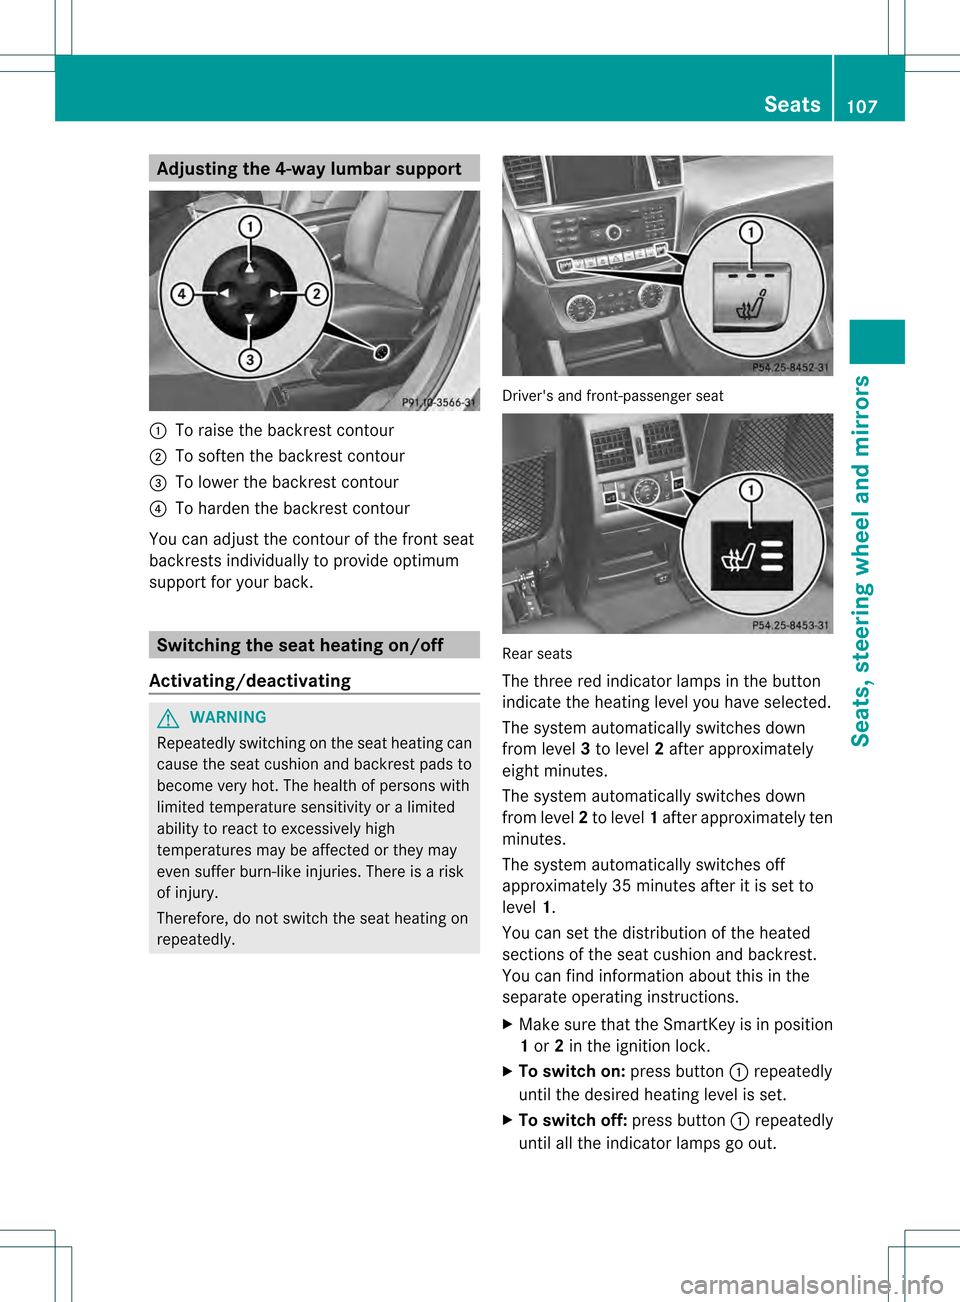
0002
To raise the backrest contour
0003 To soften the backrest contour
001F To lower the backrest contour
001E To harden the backrest contour
You can adjust the contour of the front seat
backrests individually to provide optimum
support for your back. Switching the sea
theating on/off
Activating/deactivating G
WARNING
Repeatedly switching on the seat heating can
cause the seat cushion and backres tpads to
become very hot .The health of persons with
limited temperature sensitivity or a limited
ability to react to excessively high
temperatures may be affected or they may
even suffer burn-like injuries. There is a risk
of injury.
Therefore, do not switch the seat heating on
repeatedly. Driver's and front-passenger seat
Rear seats
The three red indicator lamps in the button
indicate the heating level you have selected.
The system automatically switches down
from level
3to level 2after approximately
eight minutes.
The system automatically switches down
from level 2to level 1after approximately ten
minutes.
The system automatically switches off
approximately 35 minutes after it is set to
level 1.
You can set the distribution of the heated
sections of the seat cushion and backrest.
You can find information about this in the
separate operating instructions.
X Make sure that the SmartKey is in position
1or 2in the ignition lock.
X To switch on: press button0002repeatedly
until the desired heating level is set.
X To switch off: press button0002repeatedly
until all the indicator lamps go out. Seats
107Seats, steering wheel and mirrors Z
Page 110 of 458
i
If the battery voltage is too low, the seat
heating may switch off. 108
SeatsSeats, steering wheel and mirrors
Page 111 of 458
Problems with the seat heating
Problem Possible causes/consequences and
0001 Solutions
The seat heating has
switched off
prematurely or cannot
be switched on. The on-board voltage is too low because too many electrical
consumers are switched on.
X
Switch off electrical consumers that you do not need, such as
the rear window defroster or interior lighting.
Once the battery is sufficiently charged, the seat heating will
switch back on automatically. Switching the seat ventilation on/off
Activating/deactivating The three blue indicator lamps in the buttons
indicate the ventilation level you have
selected.
X Make sure that the SmartKey is in position
2 in the ignition lock.
X To switch on: press button0002repeatedly
until the desired ventilation level is set.
X To switch off: press button0002repeatedly
until all the indicator lamps go out.
i If the battery voltage is too low, the seat
ventilation may switch off.
i You can open the side windows and the
sliding sunroof using the "Convenience
opening" feature (Y page 93). The seat
ventilation of the driver's seat
automatically switches to the highest level. Seats
109Seats, steering wheel and mirrors Z
Page 112 of 458

Problems with the seat ventilation
Problem Possible causes/consequences and
0001 Solutions
The seat ventilation has
switched off
prematurely or cannot
be switched on. The on-board voltage is too low because too many electrical
consumers are switched on.
X
Switch off electrical consumers that you do not need, such as
the rear window defroster or interior lighting.
Once the battery is sufficiently charged, the seat ventilation will
switch back on automatically. Steering wheel
Important safety notes
G
WARNING
You could lose control of your vehicle if you
do the following while driving:
R adjust the driver's seat, head restraint,
steering wheel or mirrors
R fasten the seat belt
There is a risk of an accident.
Adjust the driver's seat, head restraint,
steering wheel and mirror and fasten your
seat belt before starting the engine. G
WARNING
Children could injure themselves if they
adjust the steering wheel. There is a risk of
injury.
When leaving the vehicle, always take the
SmartKey with you and lock the vehicle. Never
leave children unsupervised in the vehicle. Adjusting the steering wheel
manually
G
WARNING
If the steering wheel is unlocked while the
vehicle is in motion, it could change position
unexpectedly. This could cause you to lose
control of the vehicle. There is a risk of an
accident. Before starting off, make sure the steering
wheel is locked. Never unlock the steering
wheel while the vehicle is in motion.
0002
Release lever
0003 To adjust the steering wheel height
001F To adjust the steering wheel position
(fore-and-aft adjustment)
X Push release lever 0002down completely.
The steering column is unlocked.
X Adjust the steering wheel to the desired
position.
X Push release lever 0002up completely.
The steering column is locked.
X Check if the steering column is locked.
When doing so, try to push the steering
wheel up or down or try to move it in the
fore-and-aft direction. 110
Steering wheelSeats, steering wheel and mirrors
Page 113 of 458
Adjusting the steering wheel
electrically
0002
To adjust the steering wheel height
0003 To adjust the steering wheel position
(fore-and-aft adjustment)
The steering wheel can also be adjusted when
the SmartKey is removed from the ignition
lock.
i Further related subjects:
R EASY-ENTRY/EXIT feature
(Y page 112)
R Storing settings (Y page 116) Steering wheel heating
Activating/deactivating X
Make sure that the SmartKey is in position
2 in the ignition lock.
X To switch on/off: turn the lever in the
direction of arrow 0002or0003.
Indicato rlamp 001Flights up or goes out. Vehicles without KEYLESS-GO
:when you
remove the SmartKey from the ignition lock,
the steering wheel heating is deactivated.
Vehicles with KEYLESS-GO: when you switch
off the ignition and open the driver's door, the
steering wheel heating is deactivated. Steering wheel
111Seats, steering wheel and mirrors Z