2013 MERCEDES-BENZ GLK-CLASS SUV change time
[x] Cancel search: change timePage 80 of 380
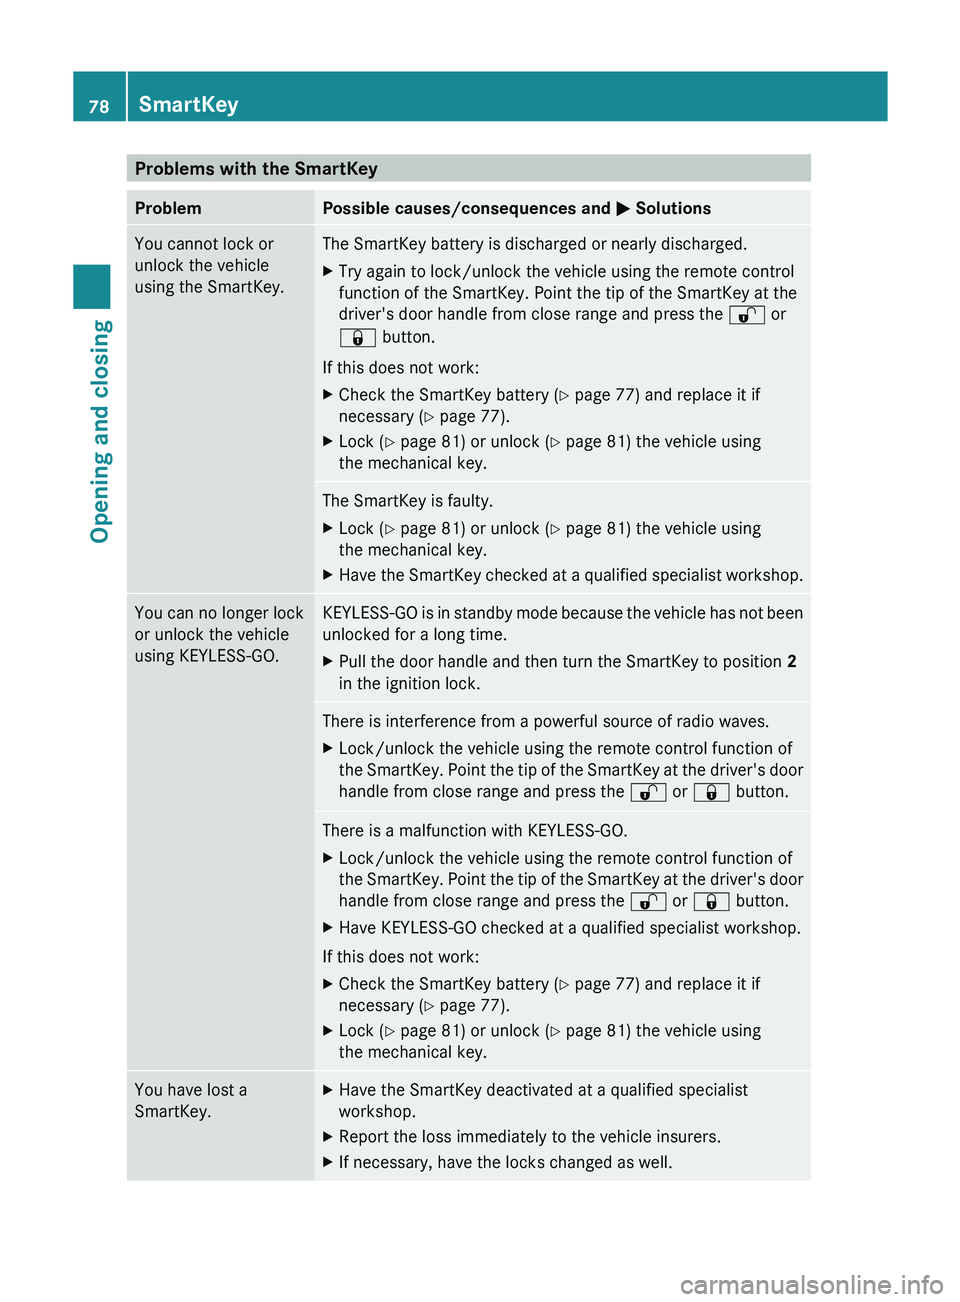
Problems with the SmartKey
Problem Possible causes/consequences and
0050 SolutionsYou cannot lock or
unlock the vehicle
using the SmartKey. The SmartKey battery is discharged or nearly discharged.
X
Try again to lock/unlock the vehicle using the remote control
function of the SmartKey. Point the tip of the SmartKey at the
driver's door handle from close range and press the 0036 or
0037 button.
If this does not work:
X Check the SmartKey battery (Y page 77) and replace it if
necessary ( Y page 77).
X Lock ( Y page 81) or unlock ( Y page 81) the vehicle using
the mechanical key. The SmartKey is faulty.
X
Lock ( Y page 81) or unlock ( Y page 81) the vehicle using
the mechanical key.
X Have the SmartKey checked at a qualified specialist workshop. You can no longer lock
or unlock the vehicle
using KEYLESS-GO. KEYLESS-GO is in standby mode because the vehicle has not been
unlocked for a long time.
X
Pull the door handle and then turn the SmartKey to position 2
in the ignition lock. There is interference from a powerful source of radio waves.
X
Lock/unlock the vehicle using the remote control function of
the SmartKey. Point the tip
of the SmartKey at the driver's door
handle from close range and press the 0036 or 0037 button.There is a malfunction with KEYLESS-GO.
X
Lock/unlock the vehicle using the remote control function of
the SmartKey. Point the tip
of the SmartKey at the driver's door
handle from close range and press the 0036 or 0037 button.
X Have KEYLESS-GO checked at a qualified specialist workshop.
If this does not work:
X Check the SmartKey battery (Y page 77) and replace it if
necessary ( Y page 77).
X Lock ( Y page 81) or unlock ( Y page 81) the vehicle using
the mechanical key. You have lost a
SmartKey. X
Have the SmartKey deactivated at a qualified specialist
workshop.
X Report the loss immediately to the vehicle insurers.
X If necessary, have the locks changed as well.78
SmartKey
Opening and closing
Page 116 of 380

The active light function is a system that
moves the headlamps according to the
steering movements of the front wheels. In
this way, relevant areas remain illuminated
while driving. This allows you to recognize
pedestrians, cyclists and animals.
Active:
when the lights are switched on. Cornering light function
The cornering light function improves the
illumination of the road over a wide angle in
the direction you are
turning,
enabling better
visibility in tight bends, for example. The
cornering light function can only be activated
when the low-beam headlamps are switched
on.
Active:
R if you are driving at speeds below
25mph (40 km/h) and switch on the turn
signal or turn the steering wheel.
R if you are driving at speeds between
25 mph (40 km/h) and 45 mph (70 km/h)
and turn the steering wheel.
Not active: if you are driving at speeds above
25 mph (40 km/h) or switch off the turn
signals or turn the steering wheel to the
straight-ahead position.
The cornering light function may remain lit for
a short time, but is automatically switched off
after no more than three minutes. Adaptive Highbeam Assist
G
WARNING
Adaptive Highbeam Assist does not recognize
road users:
R who have no lights, e.g. pedestrians
R who have poor lighting, e.g. cyclists
R whose lighting is blocked, e.g. by a barrier
In very rare cases, Adaptive
Highbeam Assist
may fail too recognize other road users that
have lights, or may recognize them too late.
In this or similar situations, the automatic
high-beam headlamps will not be deactivated
or activated regardless. There is a risk of an
accident.
Always carefully observe the traffic conditions
and switch off the high-beam headlamps in
good time.
You can use this function to set the
headlamps to change between low beam and
high beam automatically. The system
recognizes vehicles with their lights on, either
approaching from the opposite direction or
traveling in front of your vehicle, and
consequently switches the headlamps from
high beam to low beam.
The system automatically adapts the low-
beam headlamp range depending on the
distance to the other vehicle. Once the
system no longer detects any other vehicles,
it reactivates the high-beam headlamps.
The system's optical sensor is located behind
the windshield near the overhead control
panel. 114
Exterior lighting
Lights and windshield wipers
Page 119 of 380
observed, the lights must be switched on
before starting the engine.
Bulbs and lamps are an important aspect of
vehicle safety. You must
therefore
make sure
that these function correctly at all times.
Have the headlamp setting checked regularly.
Other bulbs G
WARNING
Bulbs, lamps and connectors can get very hot
when operating. If you change a bulb, you
could burn yourself on these components.
There is a risk of injury.
Allow these components to cool
down before
changing a bulb.
There are bulbs other than the Xenon bulbs
that you cannot replace. Replace only the
bulbs listed (Y page 117). Have the bulbs that
you cannot replace yourself changed at a
qualified specialist workshop.
If you require assistance changing bulbs,
consult a qualified specialist workshop.
Do not touch the glass tube of new bulbs with
your bare hands. Even minor contamination
can burn into the glass surface and reduce
the service life of the bulbs. Always use a lint-
free cloth or only touch the base of the bulb
when installing.
Only use bulbs of the correct type.
If the new bulb still does not light up, consult
a qualified specialist workshop.
Bulbs and lamps are an important aspect of
vehicle safety. You must therefore make sure
that these function correctly at all times.
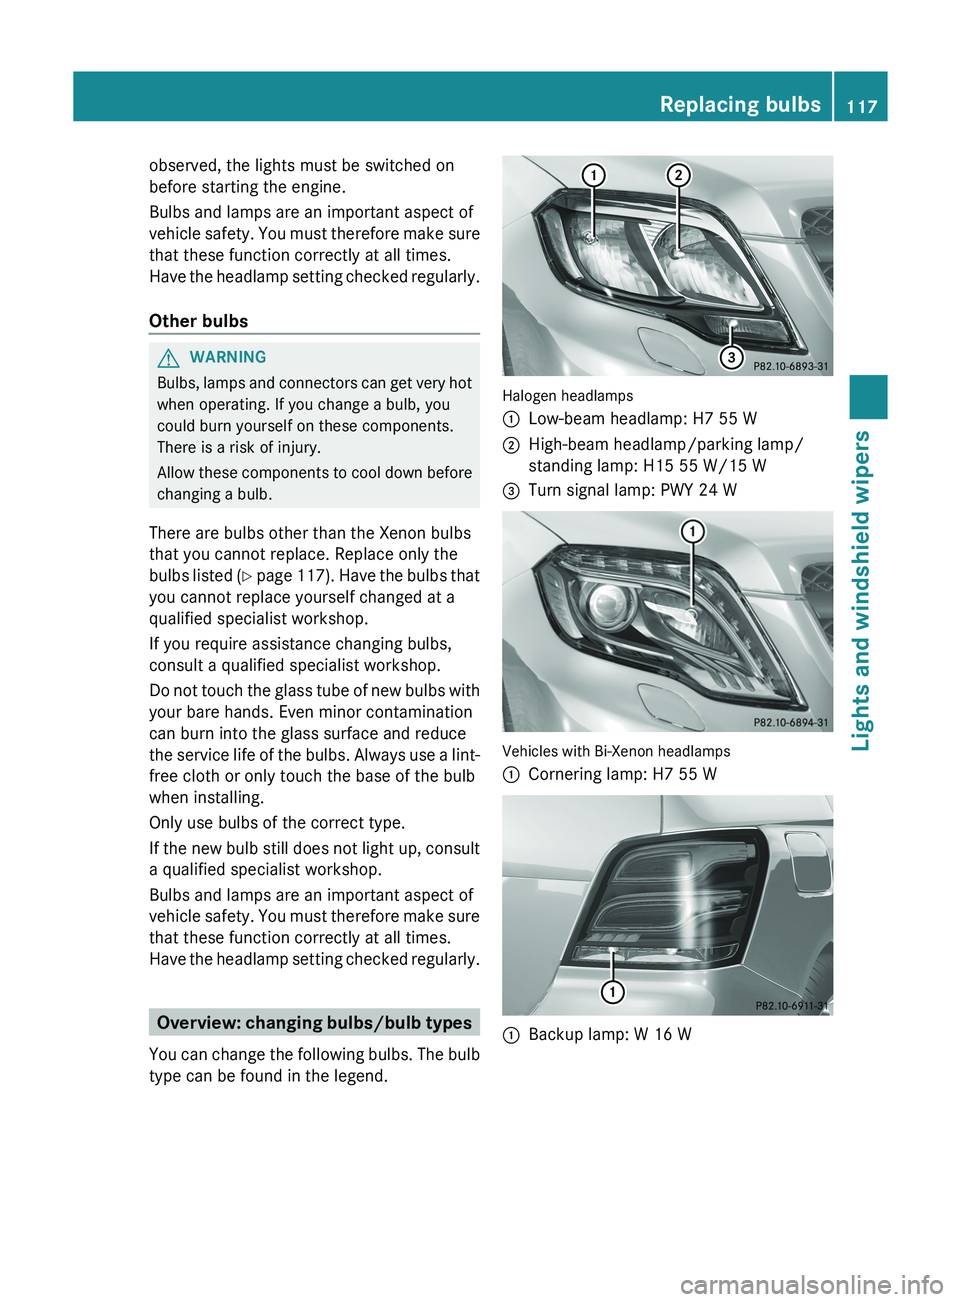
Have the headlamp setting checked regularly. Overview: changing bulbs/bulb types
You can change
the following
bulbs. The bulb
type can be found in the legend. Halogen headlamps
0043
Low-beam headlamp: H7 55 W
0044 High-beam headlamp/parking lamp/
standing lamp: H15 55 W/15 W
0087 Turn signal lamp: PWY 24 W Vehicles with Bi-Xenon headlamps
0043
Cornering lamp: H7 55 W 0043
Backup lamp: W 16 W Replacing bulbs
117
Lights and windshield wipers Z
Page 142 of 380
Useful information
i This Operator's Manual describes all
models and all standard and optional
equipment of your vehicle available at the
time of publication of the Operator's
Manual. Country-specific differences are
possible. Please note that your
vehicle may
not be equipped with all features
described. This also applies to safety-
related systems and functions.
i Read the information on qualified
specialist workshops: ( Y page 27).Notes on breaking-in a new vehicle
Important safety notes
New and replaced brake pads and discs only
reach their optimum braking effect after
several hundred kilometers of driving.
Compensate for this by applying
greater force
to the brake pedal. The first 1,000miles (1,500 km)
The more you look after
the engine when it is
new, the more satisfied you will be with its
performance in the future.
R You should therefore drive at varying
vehicle and engine speeds for the first
1,000 miles (1,500 km).
R Ideally, for the first 1,000 miles (1,500 km),
drive in program E.
R Avoid heavy loads, e.g. driving at full
throttle, during this period.
R Change gear in good time, before the
tachometer needle is 00C3 of the way to the
red area of the tachometer.
R Do not manually shift to a lower gear to
brake the vehicle. R
If possible, do not depress the accelerator
pedal past the point of resistance
(kickdown).
R Only select shift ranges 3, 2 or 1 when
driving slowly, e.g. in mountainous terrain.
After 1,000 miles (1,500 km), you can
increase the engine speed gradually and
accelerate the vehicle to full speed.
i You should also observe these notes on
breaking in if the
engine or parts of the drive
train on your vehicle have been replaced.
i Always observe the respective speed
limits. Driving
Important safety notes
G
WARNING
Objects in the driver's footwell can restrict the
pedal travel or obstruct a depressed pedal.
The operating and road safety of the vehicle
is jeopardized. There is a risk of an accident.
Make sure that all objects in the vehicle are
stowed correctly, and that they cannot enter
the driver's footwell. Install the floormats
securely and as specified in order to ensure
sufficient clearance for the pedals.
Do not use
loose floormats. G
WARNING
Unsuitable footwear can hinder correct usage
of the pedals, e.g.:
R shoes with thick soles
R shoes with high heels
R slippers
There is a risk of an accident.
Wear suitable footwear to ensure correct
usage of the pedals. G
WARNING
If you switch off the ignition while driving,
safety-relevant functions are only available
with limitations, or not at
all. This could affect,140
Driving
Driving and parking
Page 145 of 380
is a risk of fatal injury. Therefore never leave
the engine running in enclosed spaces
without sufficient ventilation.
G
WARNING
Flammable materials introduced through
environmental influence or by animals can
ignite if in contact with
the exhaust system or
parts of the engine that heat up. There is a risk
of fire.
Carry out regular checks to make sure that
there are no flammable foreign materials in
the engine compartment or in the exhaust
system.
! Do not depress the accelerator pedal
when starting the engine.
General notes i
Vehicles with a gasoline engine: the
catalytic converter is preheated for up to
30 seconds after a cold
start. The sound of
the engine may change during this time.
Automatic transmission X
Shift the transmission to position P.
The transmission position display in the
multifunction display shows P.
i You can also start the engine when the
transmission is in position N.
Starting procedure with the SmartKey i
To start the engine using the SmartKey
instead of KEYLESS-GO, pull the Start/
Stop button out of the ignition lock.
X To start a gasoline engine: turn the
SmartKey to position 3 in the ignition lock (Y page 141) and release it as soon as the
engine is running.
X To start a diesel engine: turn the
SmartKey to position 2 in the ignition lock
(Y page 141).
The 0028 preglow indicator lamp in the
instrument cluster lights up.
X When the 0028 preglow indicator lamp
goes out, turn the SmartKey to position
3(Y page 141) and release
it as soon as the
engine is running.
i You can start the engine
without preglow
if the engine is warm.
Using KEYLESS-GO to start the engine You can start the engine if a valid SmartKey
with the integrated KEYLESS-GO function is
in the vehicle. Always take
the SmartKey with
you when leaving the vehicle, even if you only
leave it for a short time. Pay attention to the
important safety notes.
i The Start/Stop button can be used to
start the vehicle without inserting the
SmartKey into the ignition lock. The Start/
Stop button must be inserted in the ignition
lock and the SmartKey must be in the
vehicle.
X Depress the brake pedal and keep it
depressed.
X Press the Start/Stop button once
(Y page 141).
The engine starts. Pulling away
Automatic transmission G
WARNING
If the engine speed is above the idling speed
and you engage transmission position D or
R, the vehicle could pull
away suddenly. There
is a risk of an accident. Driving
143
Driving and parking
Z
Page 160 of 380

DEF (BlueTEC vehicles only)
Important notes on use To function properly, BlueTEC exhaust gas
aftertreatment must be operated with the
reducing agent DEF. Adding
DEF
is one of the
tasks performed during maintenance. Under
normal operating conditions, a tank of DEF
lasts until the next service due date.
When the supply of DEF is almost used up,
the Check Additive See Operator's
Manual message is shown in the
multifunction display.
When the DEF supply drops to a minimum, the
Remaining Starts: 16 message is shown
in the multifunction display.
If the Remaining Starts: 16 message
appears in the multifunction display, you can
start the engine another 16 times. If DEF is
not refilled, you will subsequently be unable
to start the engine . Refill the DEF tank with
around 1 gal (3.8 l) of DEF or have the DEF
tank refilled at a qualified specialist
workshop.
Use the special DEF refill bottle when adding
DEF between maintenance intervals. Contact
a qualified specialist workshop with any
questions or, if necessary, contact Roadside
Assistance ( Y page 24).
If the outside temperature is below 12 ‡
(00FC11 †) it may be difficult to top up. If DEF is
frozen and there is an active warning
indicator, it may not be possible to add DEF.
Park the vehicle in a warmer place, e.g. in a
garage, until DEF has become fluid again. It
will then be possible to add DEF again.
Alternatively, have the DEF tank refilled at a
qualified specialist workshop.
Further information about BlueTEC exhaust
gas aftertreatment and DEF is available at any
authorized Mercedes-Benz Center. Important safety notes on the refilling
procedure DEF is a water-soluble fluid for the exhaust
gas aftertreatment of diesel engines. It is:
R
not poisonous
R colorless and odorless
R not flammable
When you open the DEF container, small
amounts of ammonia vapor may
be released.
Ammonia vapors have a pungent odor and are
particularly irritating to the skin, to mucous
membranes and to the eyes. You may
experience a burning sensation in your eyes,
nose and throat. Coughing and watering of
the eyes are possible.
Do not inhale ammonia vapors. Fill the DEF
tank only in well-ventilated areas.
DEF must not come into contact with your
skin, eyes or clothing and must not be
swallowed. Keep DEF away from children.
If you or other persons come into contact with
DEF, observe the following:
R Rinse DEF from your skin immediately with
soap and water.
R If DEF comes into contact with your eyes,
immediately rinse them thoroughly with
clean water. Seek medical assistance
without delay.
R If DEF has been swallowed, rinse your
mouth out immediately. Drink plenty of
water. Seek medical assistance without
delay.
R Change out of clothing contaminated with
DEF immediately.
! Only use DEF in accordance with
ISO 22241. Do not mix any additives with
DEF, and do not dilute DEF with water. This
may destroy the BlueTEC exhaust gas
aftertreatment system.
! Rinse surfaces that have come into
contact with DEF immediately with water or
remove DEF using a damp cloth and cold
water. If the DEF has already crystallized,
use a sponge and cold water to clean it. DEF 158
Refueling
Driving and parking
Page 165 of 380
Certain engine systems are designed to keep
the level of poisonous
components
in exhaust
fumes within legal limits.
These systems only work at peak efficiency if
they are serviced exactly in accordance with
the manufacturer's specifications. For this
reason, all work on the engine must be carried
out by qualified and authorized Mercedes-
Benz technicians.
The engine settings must not be changed
under any circumstances. Furthermore, all
specific service work must be carried out at
regular intervals and in accordance with the
Mercedes-Benz service requirements. Details
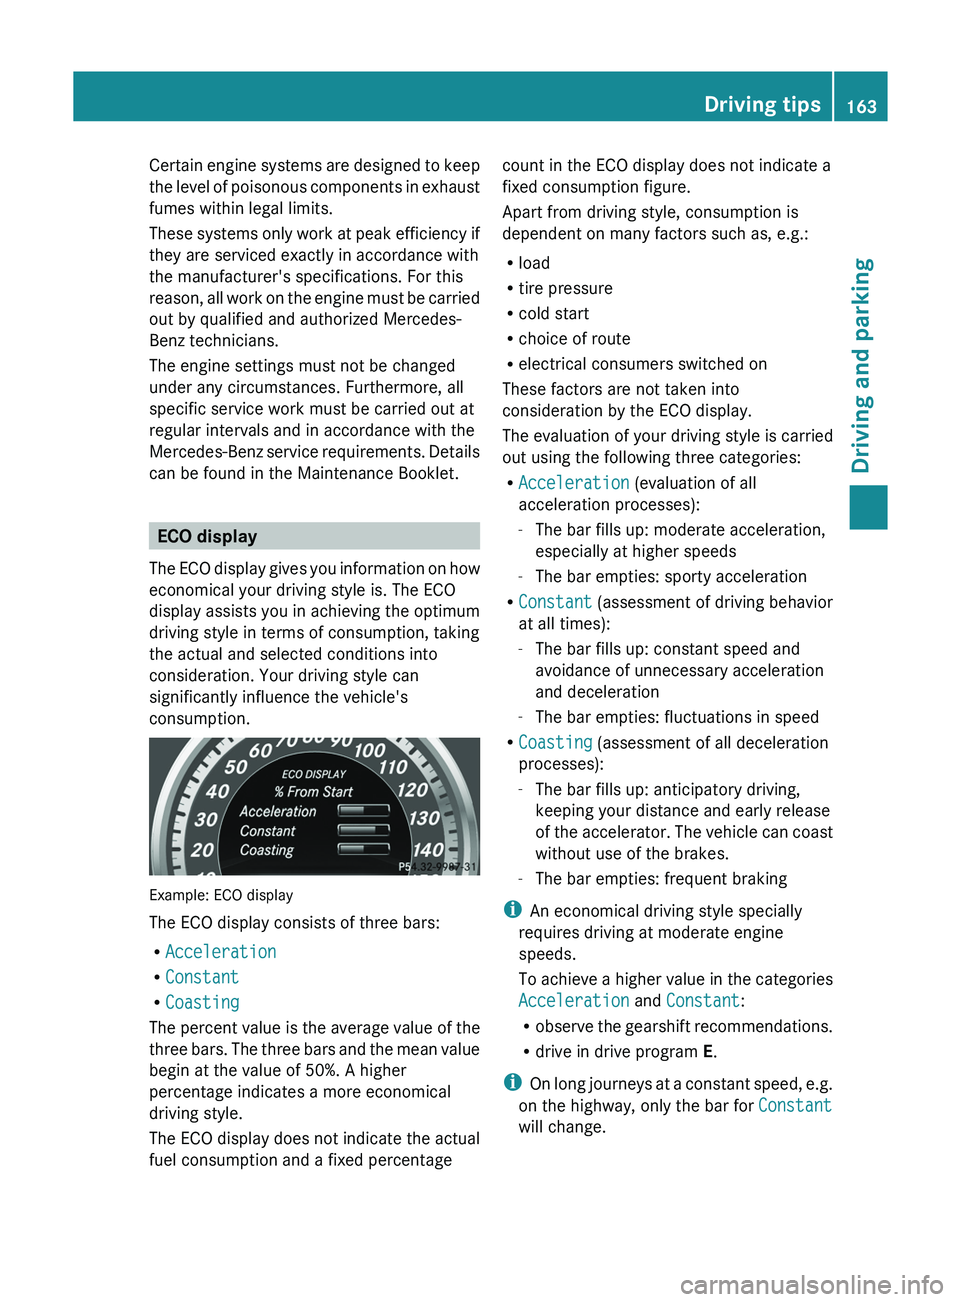
can be found in the Maintenance Booklet. ECO display
The ECO display gives you
information on how
economical your driving style is. The ECO
display assists you in achieving the optimum
driving style in terms of consumption, taking
the actual and selected conditions into
consideration. Your driving style can
significantly influence the vehicle's
consumption. Example: ECO display
The ECO display consists of three bars:
R
Acceleration
R Constant
R Coasting
The percent value is the
average value of the
three bars. The three bars and the mean value
begin at the value of 50%. A higher
percentage indicates a more economical
driving style.
The ECO display does not indicate the actual
fuel consumption and a fixed percentage count in the ECO display does not indicate a
fixed consumption figure.
Apart from driving style, consumption is
dependent on many factors such as, e.g.:
R
load
R tire pressure
R cold start
R choice of route
R electrical consumers switched on
These factors are not taken into
consideration by the ECO display.
The evaluation of your driving
style is carried
out using the following three categories:
R Acceleration (evaluation of all
acceleration processes):
-The bar fills up: moderate acceleration,
especially at higher speeds
- The bar empties: sporty acceleration
R Constant (assessment of driving behavior
at all times):
-The bar fills up: constant speed and
avoidance of unnecessary acceleration
and deceleration
- The bar empties: fluctuations in speed
R Coasting (assessment of all deceleration
processes):
-The bar fills up: anticipatory driving,
keeping your distance and early release
of the accelerator. The vehicle can coast
without use of the brakes.
- The bar empties: frequent braking
i An economical driving style specially
requires driving at moderate engine
speeds.
To achieve a higher value in the categories
Acceleration and Constant:
R observe the gearshift recommendations.
R drive in drive program E.
i On long journeys at a constant speed, e.g.
on the highway, only the bar for Constant
will change. Driving tips
163
Driving and parking Z
Page 166 of 380
i
The ECO display summaries the driving
characteristics from the start of
the journey
to its completion. For this reason, the bars
change dynamically at the beginning of the
journey. On longer journeys, there are
fewer changes. For more dynamic changes,
carry out a manual reset.
Further information on the ECO display
(Y page 220). Brakes
Important safety notes G
WARNING
If you shift down on a slippery road surface in
an attempt to increase the engine's braking
effect, the drive wheels could lose their grip.
There is an increased danger of skidding and
accidents.
Do not shift down for additional engine
braking on a slippery road surface.
Downhill gradients !
On long and steep gradients, you must
reduce the load on the brakes by shifting
early to a lower gear.
This allows you to take
advantage of the engine braking effect and
helps avoid overheating and excessive
wear of the brakes.
When you take advantage of the engine
braking effect, a drive wheel may not turn
for some time, e.g. on a slippery road
surface. This could cause damage to the
drive train. This type of damage is not
covered by the Mercedes-Benz warranty.
Heavy and light loads G
WARNING
If you rest your foot on the brake pedal while
driving, the braking system can
overheat. This
increases the stopping distance and can even
cause the braking system to fail. There is a
risk of an accident. Never use the brake pedal as a footrest. Never
depress the brake pedal and the accelerator
pedal at the same time.
! Depressing the brake pedal constantly
results in excessive and premature
wear to
the brake pads.
If the brakes have been subjected to a heavy
load, do not stop the vehicle immediately.
Drive on for a short while. This allows the
airflow to cool the brakes more quickly.
Wet roads If you have driven for a long time in heavy rain
without braking, there may be a delayed
reaction from the brakes
when
braking for the
first time. This may also occur after the
vehicle has been washed.
You have to depress the brake pedal more
firmly. Maintain a greater distance from the
vehicle in front.
After driving on a wet road or having the
vehicle washed, brake firmly while paying
attention to the traffic conditions. This will
warm up the brake discs, thereby drying them
more quickly and protecting them against
corrosion.
Limited braking performance on salt-
treated roads If you drive on salted roads, a layer of salt
residue may form on the brake discs and
brake pads. This can result in a significantly
longer braking distance.
R
Brake occasionally
to remove
any
possible
salt residue. Make sure that you do not
endanger other road users when doing so.
R Carefully depress the brake pedal and the
beginning and end of a journey.
R Maintain a greater distance to the vehicle
ahead.164
Driving tips
Driving and parking