2013 MERCEDES-BENZ GLA SUV boot
[x] Cancel search: bootPage 9 of 401

BAS (Brake Assist System)
................. 73
Battery (key)
Checking .......................................... 88
Important safety notes .................... 88
Replacing ......................................... 89
Battery (vehicle)
Charging ........................................ 340
Display message ............................ 273
Important safety notes .................. 338
Jump starting ................................. 342
Belt
see Seat belts
Belt tensioner
Activation ......................................... 57
Blind Spot Assist
Activating/deactivating ................. 245
Display message ............................ 276
Notes/function .............................. 222
Trailer towing ................................. 224
Bonnet
Active bonnet (pedestrian protec-tion) ............................................... 316
Closing ........................................... 318
Display message ............................ 285
Important safety notes .................. 316
Opening ......................................... 317
Boot
see Tailgate
Boot load (maximum) ........................ 391
Brake Assist
see BAS (Brake Assist System)
Brake fluid
Display message ............................ 261
Notes ............................................. 390
Brake lamps
Adaptive ........................................... 76
Changing bulb s.............................. 131
Display message ............................ 269
Brakes
ABS .................................................. 72
Adaptive Brake Assist ...................... 74
BAS .................................................. 73
Brake fluid (notes) ......................... 390
Display message ............................ 255
Driving tips .................................... 183
HOLD function ............................... 201
Important safety notes .................. 183
Parking brake ................................ 180 Warning lamp ................................. 289
Breakdown
see Flat tyre
see Towing away/tow-starting
Bulbs
see Replacing bulbs C
Calling up a fault see Display messages
Capacities (technical data) ............... 384
Car
see Vehicle
Car wash (care) ................................. 323
Care
Automatic car wash ....................... 323
Carpets .......................................... 329
Display ........................................... 328
Exhaust pipe .................................. 327
Exterior lighting ............................. 326
Gear or selector lever .................... 328
High-pressure cleaner .................... 324
Interior ........................................... 328
Matt paintwork .............................. 325
Notes ............................................. 323
Paint .............................................. 325
Plastic trim .................................... 328
Reversing camera .......................... 327
Roof lining ...................................... 329
Seat belt ........................................ 329
Seat cove r..................................... 328
Sensors ......................................... 326
Steering wheel ............................... 328
Trim pieces .................................... 328
Washing by hand ........................... 324
Wheels ........................................... 324
Windows ........................................ 325
Wiper blades .................................. 326
Wooden trim .................................. 328
Central locking
Automatic locking (on-board com-
puter) ............................................. 249
Locking/unlocking (key) .................. 87
Centre console
Lower section .................................. 37
Upper section .................................. 36 6
Index
Page 23 of 401
Reached (TIREFIT) .......................... 337
Recommended ..............................
.356
Tyre pressure loss warning
General notes ................................ 357
Important safety notes .................. 357
Restarting ...................................... 358
Tyre pressure monitor
Checking the tyre pressure elec-
tronically ........................................ 359
Function/notes ............................ .358
General notes ................................ 358
Important safety notes .................. 358
Radio type approval for the tyre
pressure monitor ........................... 361
Restarting ...................................... 360
Warning lamp ................................. 298
Warning message .......................... 360
Tyres
Changing a wheel .......................... 361
Checking ........................................ 353
Direction of rotatio n...................... 362
Display message ............................ 280
Important safety notes .................. 352
M+S tyres ...................................... 354
MOExtended tyre s......................... 354
Replacing ....................................... 361
Service life ..................................... 353
Storing ........................................... 362
Summer tyres ........................ 184, 354
Tyre size (data ).............................. 366
Tyre tread ...................................... 353
Wheel and tyre combinations ........ 368
see Flat tyre U
Unlocking Emergency unlocking ....................... 93
From inside the vehicle (central
unlocking button) ............................. 92 V
Vanity mirror (in sun visor) .............. 309
Variable SPEEDTRONIC
see SPEEDTRONIC
Vehicle
Correct use ...................................... 25
Data acquisition ............................... 26 Electronics ..................................... 382
Equipment ....................................... 23
Implied warranty .............................. 26
Individual settings .......................... 245
Leaving parked up ......................... 181
Locking (in an emergency) ............... 94
Locking (key) ................................... 87
Lowering ........................................ 365
Pulling away ................................... 160
Raising ........................................... 363
Registration ..................................... 25
Securing from rolling away ............ 363
Tow-starting ................................... 344
Towing away .................................. 344
Transporting .................................. 347
Unlocking (in an emergency) ........... 93
Unlocking (key) ................................ 87
Vehicle data ................................... 391
Vehicle data
Boot load (maximum) ..................... 391
Roof load (maximum) ..................... 391
Vehicle data (off-road driving)
Approach/departure angle ............ 393
Maximum gradient climbing abil-
ity .................................................. 393
Maximum water depth ................... 392
Vehicle dimensions ........................... 391
Vehicle emergency locking ................ 94
Vehicle identification number
see VIN
Vehicle identification plate .............. 384
Vehicle maintenance
see ASSYST PLUS
Vehicle tool kit .................................. 333
Video (DVD) ........................................ 241
Video DVD (on-board computer) ...... 241
VIN ...................................................... 384 W
Warning and indicator lamps ABS ................................................ 289
Brakes ........................................... 289
Distance warning signal ................. 297
ESP® ............................................. 291
ESP® OFF ...................................... 292
Fuel tank ........................................ 295
LIM (cruise control) ........................ 189 20
Index
Page 231 of 401
R
Maintain a greater distance from the vehi-
cle in front than when driving without a
trailer.
R Avoid braking abruptly. If possible, brake
gently at first to allow the trailer to run on.
Then, increase the braking force rapidly.
R The values given for gradient-climbing
capabilities from a standstill refer to sea
level. When driving in mountainous areas,
note that the power output of the engine,
and consequently the vehicle's gradient-
climbing capability, decrease with increas-
ing altitude. Folding out the ball coupling
G
WARNING
If you release the ball coupling or it does not
engage correctly when folding in, it will swing out. Within pivoting range of the ball coupling,
there is an increased risk of an accident and
injury.
Only release the ball coupling if the pivoting
range is unobstructed. Always make sure that the ball coupling engages when folding in.
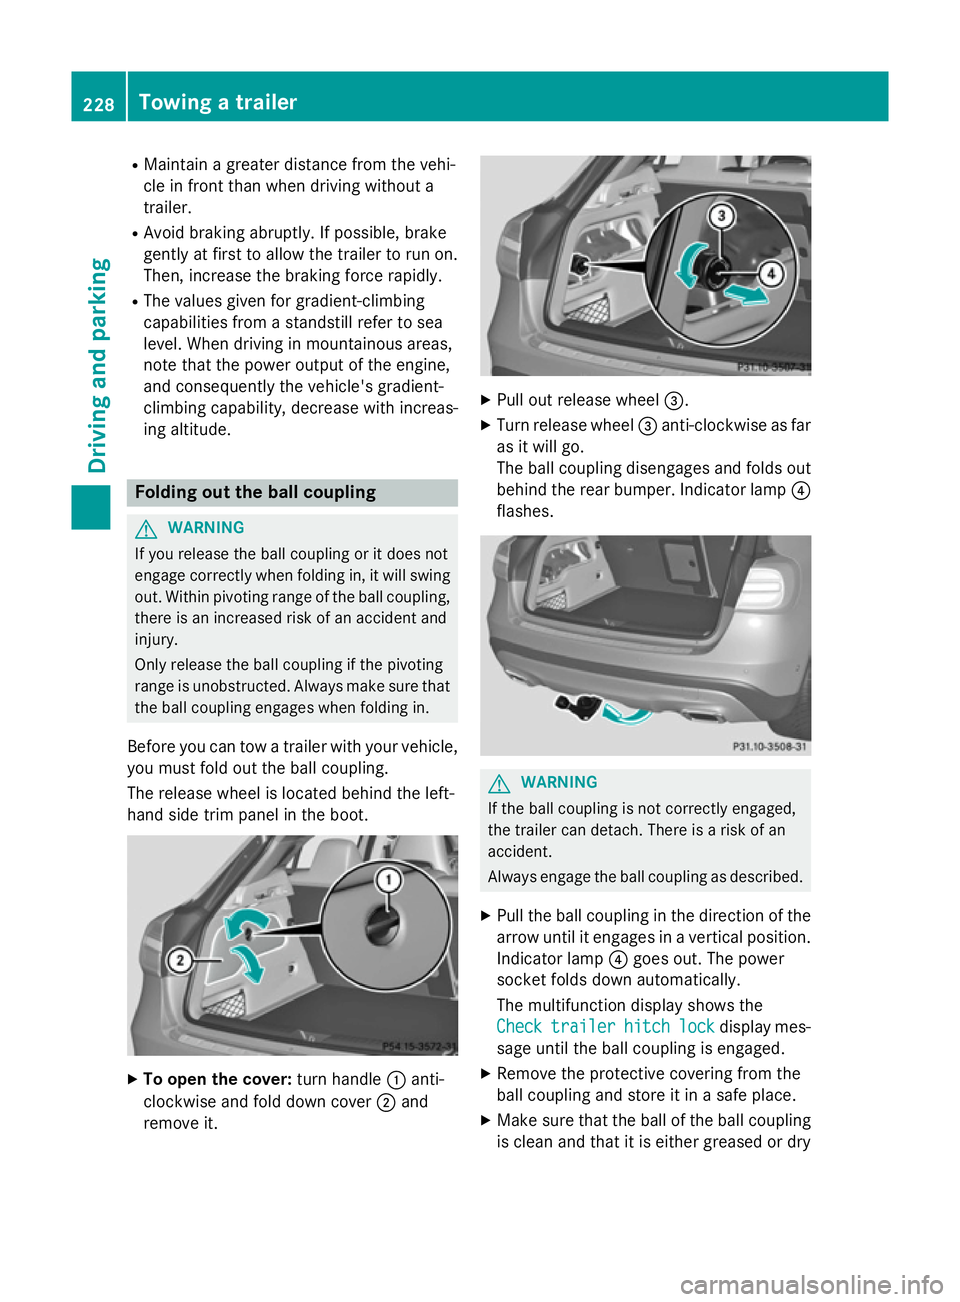
Before you can tow a trailer with your vehicle, you must fold out the ball coupling.
The release wheel is located behind the left-
hand side trim panel in the boot. X
To open the cover: turn handle:anti-
clockwise and fold down cover ;and
remove it. X
Pull out release wheel =.
X Turn release wheel =anti-clockwise as far
as it will go.
The ball coupling disengages and folds out
behind the rear bumper. Indicator lamp ?
flashes. G
WARNING
If the ball coupling is not correctly engaged,
the trailer can detach. There is a risk of an
accident.
Always engage the ball coupling as described.
X Pull the ball coupling in the direction of the
arrow until it engages in a vertical position.
Indicator lamp ?goes out. The power
socket folds down automatically.
The multifunction display shows the
Check Check trailer
trailer hitch
hitchlock
lockdisplay mes-
sage until the ball coupling is engaged.
X Remove the protective covering from the
ball coupling and store it in a safe place.
X Make sure that the ball of the ball coupling
is clean and that it is either greased or dry 228
Towing a trailerDriving and parking
Page 232 of 401
(grease free), depending on the instruc-
tions for the trailer.
Coupling up a trailer
X Make sure that the transmission is in posi-
tion P.
X Apply the electric parking brake.
X Position the trailer level behind the vehicle.
X Couple up the trailer.
X Establish the electric connection between
the vehicle and the trailer.
X Check that the trailer lighting system is
working.
A trailer that is connected is recognised
only when the electrical connection is
established correctly and when the lighting system is working properly. The function of
other systems, such as ESP ®
or PARK-
TRONIC also depends on this. Uncoupling a trailer
G
WARNING
If you uncouple a trailer with an engaged over- run brake, you could trap your hand between
the vehicle and the trailer drawbar. This poses a risk of injury.
Do not uncouple a trailer with an engaged
overrun brake.
! Do not disconnect a trailer with an
engaged overrun brake. Otherwise, your
vehicle could be damaged by the rebound- ing of the overrun brake.
! Remove the installed adapter cable
before folding in the ball coupling. Other-
wise, damage may occur to the rear
bumper and the adapter cable.
X Make sure that the transmission is in posi-
tion P.
X Apply the electric parking brake. X
Secure the trailer against rolling away.
X Remove the trailer cable and decouple the
trailer. Folding in the ball coupling
G
WARNING
If you release the ball coupling or it does not
engage correctly when folding in, it will swing out. Within pivoting range of the ball coupling,
there is an increased risk of an accident and
injury.
Only release the ball coupling if the pivoting
range is unobstructed. Always make sure that the ball coupling engages when folding in.
X Fold the ball coupling back in if you are not
using the trailer tow hitch.
X Place the protective covering on the ball
coupling.
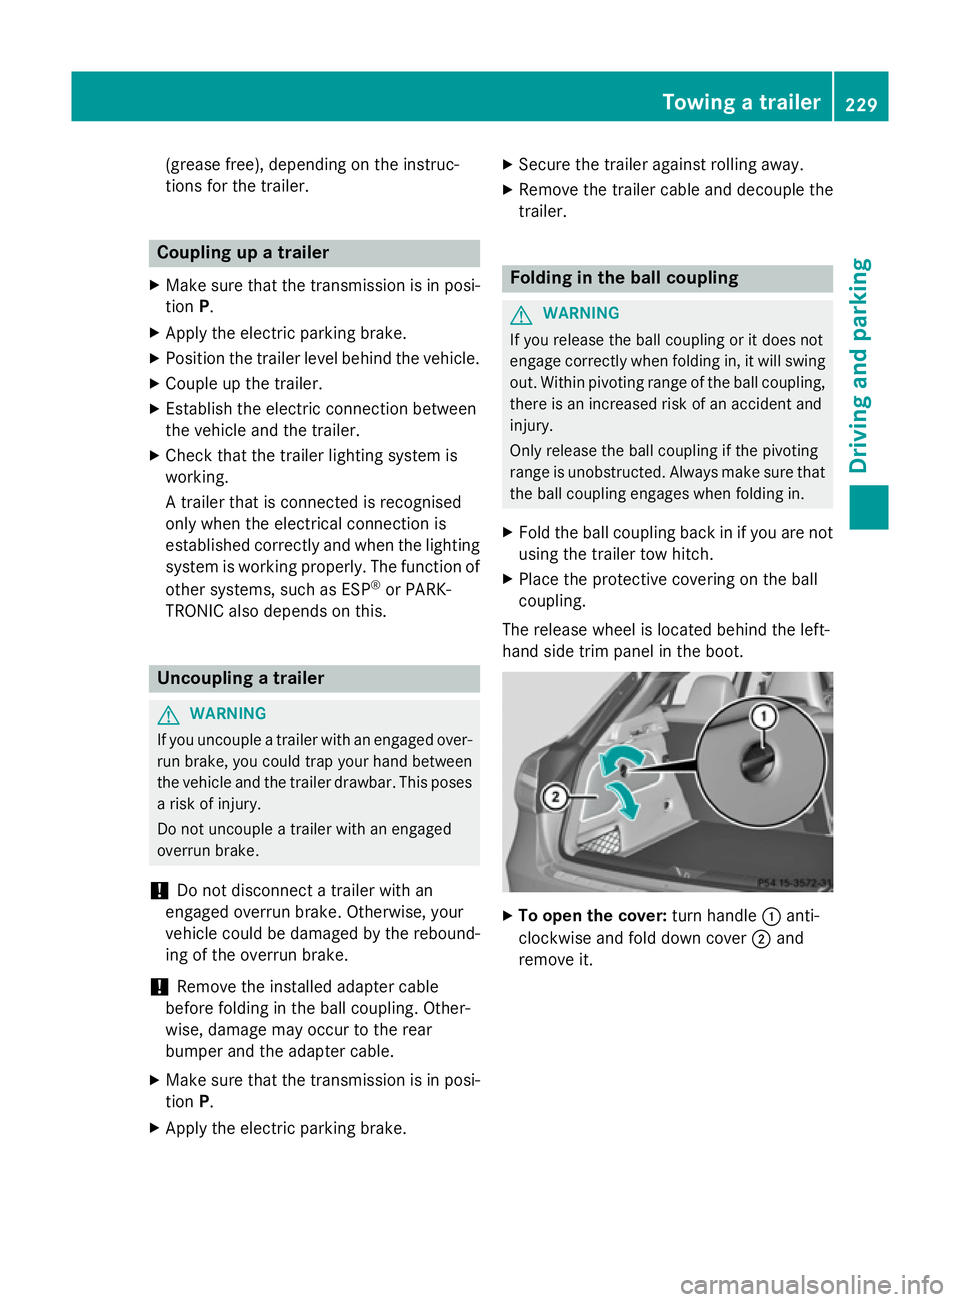
The release wheel is located behind the left-
hand side trim panel in the boot. X
To open the cover: turn handle:anti-
clockwise and fold down cover ;and
remove it. Towing a trailer
229Driving and parking Z
Page 307 of 401
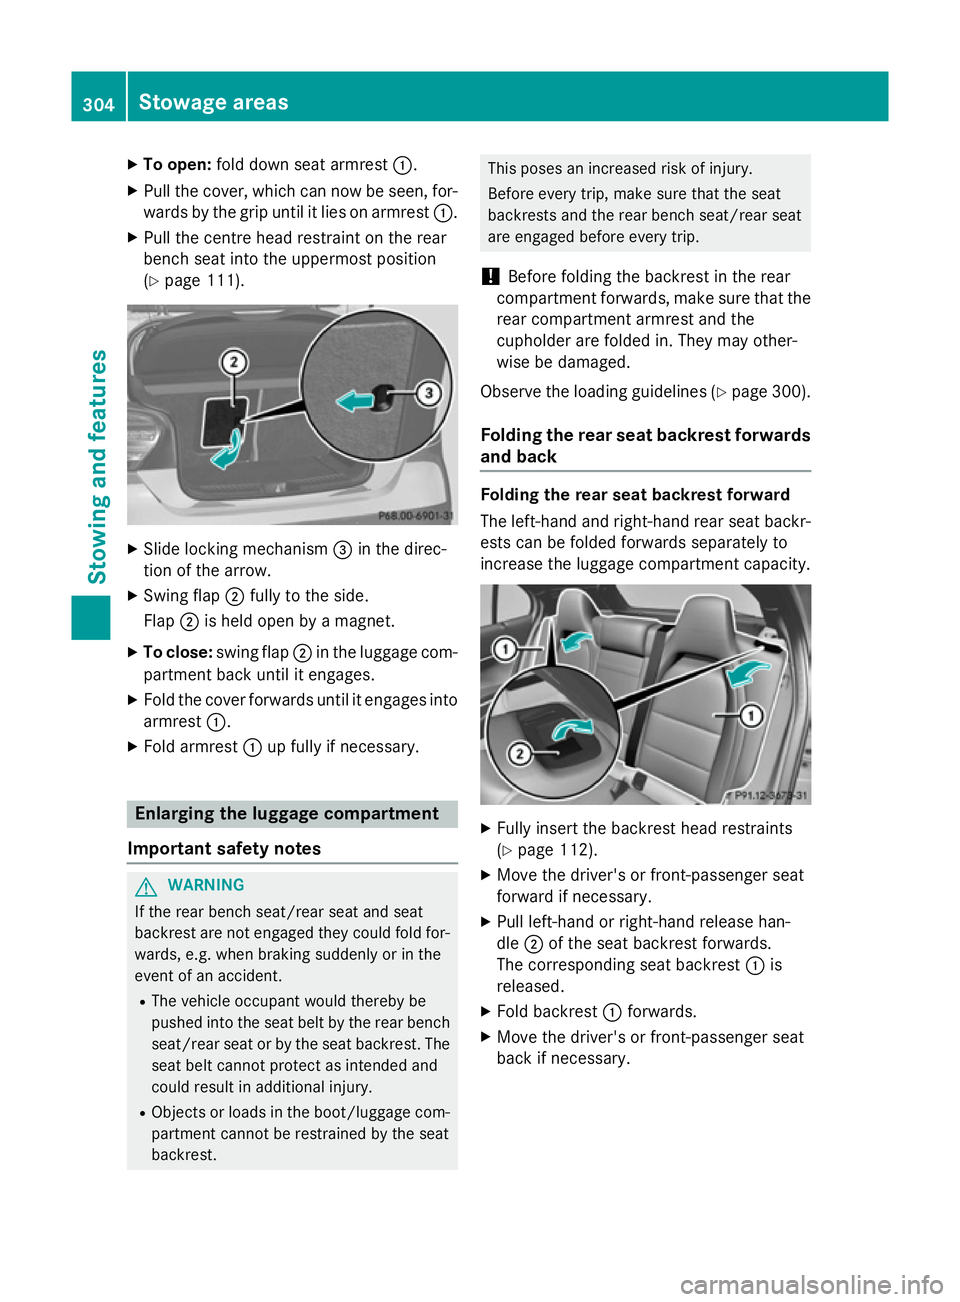
X
To open: fold down seat armrest :.
X Pull the cover, which can now be seen, for-
wards by the grip until it lies on armrest :.
X Pull the centre head restraint on the rear
bench seat into the uppermost position
(Y page 111). X
Slide locking mechanism =in the direc-
tion of the arrow.
X Swing flap ;fully to the side.
Flap ;is held open by a magnet.
X To close: swing flap ;in the luggage com-
partment back until it engages.
X Fold the cover forwards until it engages into
armrest :.
X Fold armrest :up fully if necessary. Enlarging the luggage compartment
Important safety notes G
WARNING
If the rear bench seat/rear seat and seat
backrest are not engaged they could fold for- wards, e.g. when braking suddenly or in the
event of an accident.
R The vehicle occupant would thereby be
pushed into the seat belt by the rear bench
seat/rear seat or by the seat backrest. The
seat belt cannot protect as intended and
could result in additional injury.
R Objects or loads in the boot/luggage com-
partment cannot be restrained by the seat
backrest. This poses an increased risk of injury.
Before every trip, make sure that the seat
backrests and the rear bench seat/rear seat
are engaged before every trip.
! Before folding the backrest in the rear
compartment forwards, make sure that the
rear compartment armrest and the
cupholder are folded in. They may other-
wise be damaged.
Observe the loading guidelines (Y page 300).
Folding the rear seat backrest forwards and back Folding the rear seat backrest forward
The left-hand and right-hand rear seat backr-
ests can be folded forwards separately to
increase the luggage compartment capacity. X
Fully insert the backrest head restraints
(Y page 112).
X Move the driver's or front-passenger seat
forward if necessary.
X Pull left-hand or right-hand release han-
dle ;of the seat backrest forwards.
The corresponding seat backrest :is
released.
X Fold backrest :forwards.
X Move the driver's or front-passenger seat
back if necessary. 304
Stowage areasSto
wing an d features
Page 381 of 401
General notes
i Apart from some country-specific var-
iants, vehicles are not equipped with an
emergency spare wheel. Emergency spare
wheels are specific to the vehicle. For more information on which emergency spare
wheels are approved for your vehicle, con-
sult a qualified specialist workshop.
You should regularly check the pressure of all
your tyres, including the emergency spare
wheel, particularly prior to long trips, and cor- rect the pressure as necessary (Y page 356).
The value on the wheel or as given in the
"Wheels and tyres" section (Y page 379) is
valid.
i If you are driving with the collapsible
emergency spare wheel fitted, the tyre
pressure loss warning system or the tyre
pressure monitor cannot function reliably.
Only restart the tyre pressure loss warning system/tyre pressure monitor when the
defective wheel has been replaced with a
new wheel.
Vehicles with tyre pressure monitor:
after mounting an emergency spare wheel,
the system may still display the tyre pres-
sure of the removed wheel for a few
minutes. The value displayed for the moun-
ted emergency spare wheel is not the same as the current tyre pressure of the emer-
gency spare wheel.
An emergency spare wheel may also be fitted against the direction of rotation. Observe the
time restriction on use as well as the speed
limitation specified on the emergency spare
wheel.
Replace the tyres after six years at the latest, regardless of wear. This also applies to the
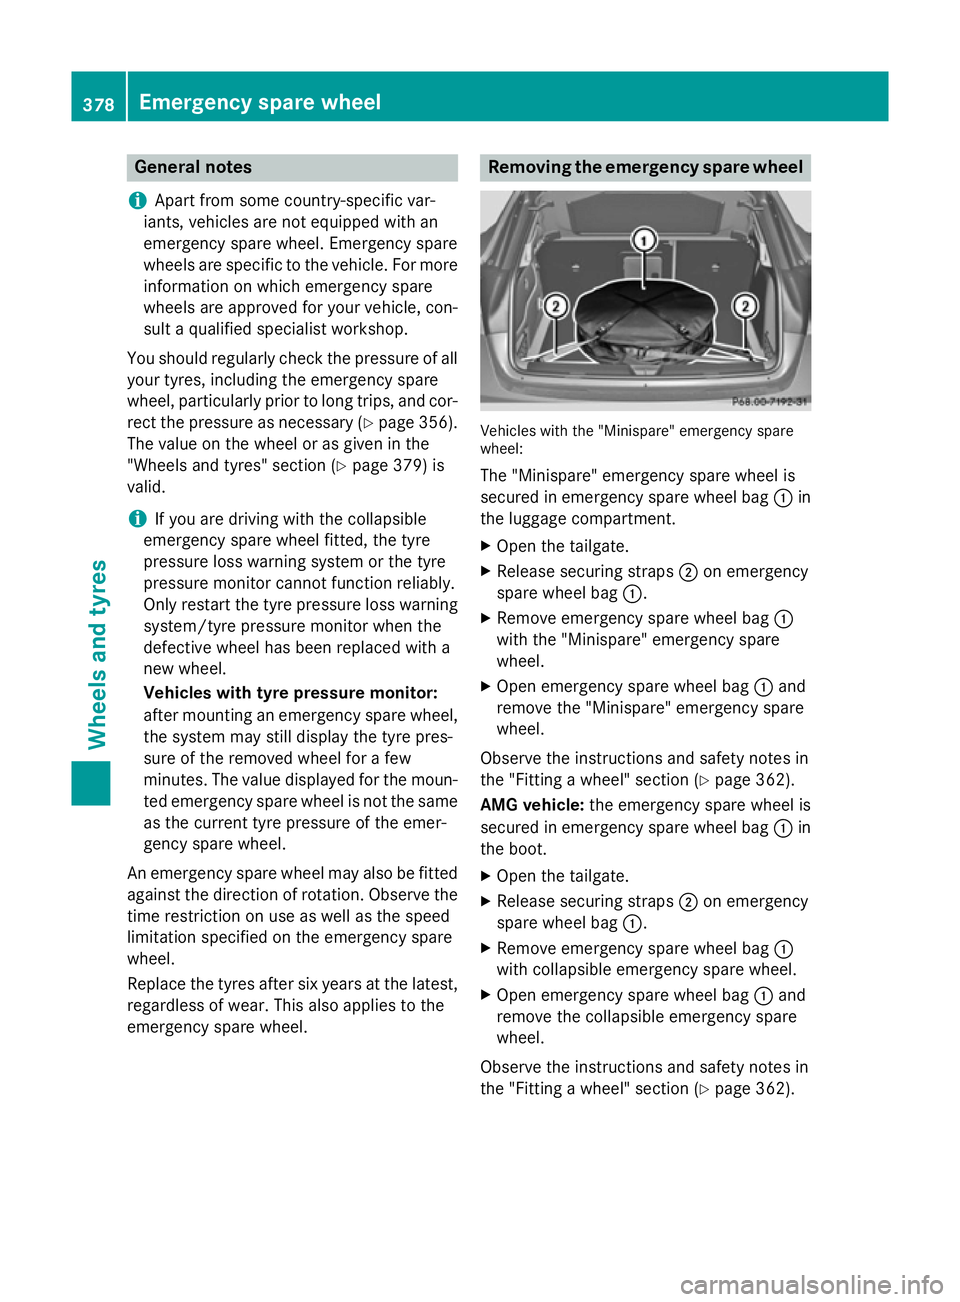
emergency spare wheel. Removing the emergency spare wheel
Vehicles with the "Minispare" emergency spare
wheel:
The "Minispare" emergency spare wheel is
secured in emergency spare wheel bag :in
the luggage compartment.
X Open the tailgate.
X Release securing straps ;on emergency
spare wheel bag :.
X Remove emergency spare wheel bag :
with the "Minispare" emergency spare
wheel.
X Open emergency spare wheel bag :and
remove the "Minispare" emergency spare
wheel.
Observe the instructions and safety notes in
the "Fitting a wheel" section (Y page 362).
AMG vehicle: the emergency spare wheel is
secured in emergency spare wheel bag :in
the boot.
X Open the tailgate.
X Release securing straps ;on emergency
spare wheel bag :.
X Remove emergency spare wheel bag :
with collapsible emergency spare wheel.
X Open emergency spare wheel bag :and
remove the collapsible emergency spare
wheel.
Observe the instructions and safety notes in
the "Fitting a wheel" section (Y page 362).378
Emergency spare wheelWheels and tyres
Page 395 of 401

R
vehicle-specific weight information can be
found on the vehicle identification plate
(Y page 384).
R only for certain countries: you can find vehi-
cle-specific vehicle data in the COC docu-
ments (Certificate of Conformity). These
documents are delivered with your vehicle. Dimensions and weights
Model
: :
Maxi- mum
head- room ;
;
Opening height AMG vehicles
1866 mm 2019 mm
All other models
1876 mm 2045 mm
Missing values were not available at the time
of going to print. AMG vehicles
Vehicle length
4445 mm
Vehicle width including
exterior mirrors
2022 mm
Vehicle width excluding
exterior mirrors
1805 mm
Vehicle height
1479 mm
Wheelbase
2699 mm
Maximum roof load
100 kg All other models
Vehicle length
4417 mm
Vehicle width including
exterior mirrors
2022 mm
Vehicle width excluding
exterior mirrors
1804 mm
Vehicle height
1494 mm
Wheelbase
2699 mm
Model Maximum roof
load GLA 180
GLA 180 CDI
All other models
75 kg
Model Maximum boot
load GLA 180
GLA 180 CDI
All other models
100 kg
Vehicle data for off-road driving
Maximum water depth
! The water depth must not exceed the
specified value. Note that the permissible
water depth is less in flowing water. 392
Vehicle data for off-road drivingTechnical data