2013 MERCEDES-BENZ GLA SUV seat memory
[x] Cancel search: seat memoryPage 14 of 401
Resetting ......................................
.116
Storing settings (memory func-
tion) ............................................... 117 F
Fault message see Display messages
Filler cap
see Fuel filler flap
Fire extinguisher ............................... 333
First-aid kit ......................................... 332
Fitting a wheel
Fitting a wheel ............................... 365
Lowering the vehicle ..................... .365
Preparing the vehicle ..................... 362
Raising the vehicle ......................... 363
Removing a wheel .......................... 365
Securing the vehicle against roll-
ing away ........................................ 363
Flat tyre
MOExtended tyres ......................... 334
Preparing the vehicle ..................... 334
TIREFIT kit ...................................... 335
see Emergency spare wheel
Floormat ............................................. 313
Foglamps
Extended range .............................. 125
Switching on/off ........................... 121
Frequencies
Mobile phone ................................. 382
Two-way radio ................................ 382
Front foglamps
Display message ............................ 270
Front-passenger front airbag deac-
tivation system
Display message ............................ 267
Operation ......................................... 52
Problems ......................................... 56
System self-test ............................... 54
Front-passenger seat
Folding the backrest forward/
back ............................................... 303
Fuel
Additives ........................................ 387
Consumption information .............. 388
Consumption statistics .................. 237 Displaying the current consump-
tion ................................................ 238
Displaying the range .....................
.238
E10 ................................................ 385
Fuel gauge ....................................... 32
Grade (petrol) ................................ 385
Important safety notes .................. 385
Low outside temperatures ............. 388
Notes for AMG vehicles ................. 386
Problem (malfunction) ................... 178
Quality (diesel )............................... 387
Refuelling ....................................... 175
Tank content/reserve fue l............. 385
Fuel filler flap
Opening ......................................... 176
Fuel filter (white display message) .. 274
Fuel level
Calling up the range (on-board
computer) ...................................... 238
Gauge .............................................. 32
Fuel reserve
see Fuel
Fuel tank
Capacity ........................................ 385
Problem (malfunction) ................... 178
Fuses
Allocation chart ............................. 349
Before changing ............................. 349
Fuse box in the engine compart-
ment .............................................. 349
Fuse box in the front-passenger
footwell .......................................... 349
Important safety notes .................. 348 G
Gear indicator (on-board com-
puter) .................................................. 251
Gear or selector lever (cleaning
instructions) ...................................... 328
Gearshift program
SETUP (on-board computer) .......... 251
Genuine Mercedes-Benz parts ........... 22
Glove compartment .......................... 301 Index
11
Page 20 of 401

Roller sunblind
Opening/closing ............................ 104
Panorama sliding sunroof .............. 103
Roof carrier ........................................ 307
Roof lining and carpets (cleaning
instructions) ...................................... 329
Roof load (maximum) ........................ 391
Route (navigation)
see Route guidance (navigation)
Route guidance (navigation) ............ 239S
Safety Automatic front-passenger front
airbag deactivation system .............. 51
Child restraint systems .................... 60
Children in the vehicle ..................... 59
Safety system
see Driving safety systems
Seat
Adjusting (Performance Seat) ........ 113
Seat belt
Correct usage .................................. 46
Switching belt adjustment on/off
(on-board computer) ...................... 250
Seat belts
Adjusting the driver's and front-
passenger seat bel t......................... 47
Adjusting the height ......................... 46
Cleaning ......................................... 329
Display message ............................ 263
Fastening ......................................... 46
Important safety guidelines ............. 44
Introduction ..................................... 44
Rear seat belt status indicator ......... 48
Releasing ......................................... 47
Warning lamp ................................. 288
Warning lamp (function) ................... 47
Seats
Adjusting (electrically) ................... 110
Adjusting (manually) ...................... 110
Adjusting the 4-way lumbar sup-
port ................................................ 112
Adjusting the head restraint .......... 111
Cleaning the cover ......................... 328
Correct driver's seat position ........ 108
Important safety notes .................. 109 Seat heating problem .................... 114
Storing settings (memory func-
tion) ............................................... 117
Switching seat heating on/of
f....... 113
Sensors (cleaning instructions) ....... 326
Service
see ASSYST PLUS
Service Centre
see Qualified specialist workshop
Service menu (on-board com-
puter) .................................................. 245
Service products
Brake fluid ..................................... 390
Coolant (engine) ............................ 390
Engine oil ....................................... 388
Fuel ................................................ 385
Important safety notes .................. 384
Washer fluid ................................... 391
Setting the air distribution ............... 145
Setting the airflow ............................ 145
Settings
Factory (on-board computer) ......... 251
On-board compute r....................... 245
SETUP (on-board computer) ............. 251
Shifting to neutral (manual trans-
mission) ............................................. 167
Side lamps
Switching on/of f........................... 122
Side windows
Convenience closing ........................ 99
Convenience opening ...................... 99
Important safety notes .................... 98
Opening/closing .............................. 98
Problem (malfunction) ................... 101
Resetting ....................................... 100
Sidebag ................................................ 50
Sliding sunroof
see Panorama sliding sunroof
Snow chains ...................................... 355
Socket
Luggage compartment ................... 312
Points to observe before use ......... 311
Sockets
Centre console .............................. 311
Rear compartment ......................... 311
Specialist workshop ............................ 25
Spectacles compartment ................. 301 Index
17
Page 62 of 401
PRE-SAFE
®
(anticipatory occupant
protection)
Introduction In certain hazardous situations, PRE-SAFE
®
takes pre-emptive measures to protect the
vehicle occupants.
Important safety notes !
Make sure that there are no objects in the
footwell or behind the seats. There is a risk that the seats and/or the objects could be
damaged when PRE-SAFE ®
is activated.
Although your vehicle is equipped with PRE-
SAFE ®
, the possibility of injury in the event of
an accident cannot be ruled out. Always
adapt your driving style to suit the prevailing
road and weather conditions and maintain a
safe distance from the vehicle in front. Drive
carefully.
Function PRE-SAFE
®
intervenes:
R in emergency braking situations, e.g. when
BAS is activated.
R in critical driving situations, e.g. when phys-
ical limits are exceeded and the vehicle
understeers or oversteers severely.
R on vehicles with DISTRONIC PLUS: when
adaptive Brake Assist intervenes power-
fully.
PRE-SAFE ®
takes the following measures
depending on the hazardous situation detec-
ted:
R the front seat belts are pre-tensioned.
R if the vehicle skids, the panorama sliding
sunroof is completely closed and the side
windows are closed so that only a small gap
remains.
R vehicles with the memory function: the
front-passenger seat is adjusted if it is in an
unfavourable position. If the hazardous situation passes without
resulting in an accident, PRE-SAFE
®
slackens
the belt pre-tensioning. All settings made by
PRE-SAFE ®
can then be reversed.
If the seat belt pre-tensioning does not
decrease:
X Move the backrest or seat back slightly
when the vehicle is stationary.
Seat belt pre-tensioning is reduced and the
locking mechanism is released.
The seat-belt adjustment is an integral part of
the PRE-SAFE ®
convenience function. Fur-
ther information can be found under "Seat
belt adjustment" (Y page 47). Automatic measures after an acci-
dent
Immediately after an accident, the following
measures are implemented, depending on
the type and severity of the impact:
R by activating the hazard warning lamps
R the emergency lighting is activated
R the vehicle doors are unlocked
R the front side windows are lowered
R the engine is switched off Children in the vehicle
Important safety notes
Accident statistics show that children
secured in the rear seats are safer than chil-
dren secured in the front-passenger seat. For
this reason, Mercedes-Benz strongly advises
that you install a child restraint system on a
rear seat. Children are generally better pro-
tected there.
If a child younger than 12 years old and under 1.50 m in height is travelling in the vehicle:
R always secure the child in a child restraint
system suitable for Mercedes-Benz vehi-
cles. The child restraint system must be Children in the vehicle
59Safety Z
Page 110 of 401
Useful information
............................108
Correct driver's seat position ..........108
Seats .................................................. 109
Steering wheel .................................. 114
Mirrors ............................................... 115
Memory functions .............................117 107Seats, steering wheel and mirrors
Page 112 of 401
The seat belt should:
R fit snugly across your body.
R be routed across the middle of your
shoulder.
R be routed across your hips in the pelvic
area.
X Before starting off, adjust the rear-view mir-
ror and the exterior mirrors (Y page 115)
so that you have a good view of road and
traffic conditions.
X Vehicles with a memory function: save
the seat and exterior mirror settings
(Y page 117). Seats
Important safety notes
G
WARNING
If children adjust the seats, they could
become trapped, especially if they are unat-
tended. There is a risk of injury.
When leaving the vehicle, always take the key with you and lock the vehicle. Never leave
children unattended in the vehicle. G
WARNING
You could lose control of the vehicle while
driving if you:
R adjust the driver's seat, steering wheel or
mirrors
R fasten the seat belt
There is a risk of an accident.
Adjust the driver's seat, head restraint, steer-
ing wheel and mirrors and fasten your seat
belt before starting the engine. G
WARNING
If you adjust the seat height carelessly, you or other vehicle occupants could be trapped andthereby injured. Children in particular could
accidentally press the electrical seat adjust-
ment buttons and become trapped. There is a
risk of injury. While moving the seats, make sure that your
hands or other body parts do not get under the
lever assembly of the seat adjustment sys-
tem. G
WARNING
When adjusting a seat, you or another vehicle occupant could become trapped by the guiderail of the seat, for instance. There is a risk of
injury.
Make sure that no one has any part of their
body within the sweep of the seat when
adjusting it. G
WARNING
The seat belt does not offer the intended level of protection if you have not moved the back-
rest to an almost vertical position. When brak-
ing or in the event of an accident, you could
slide underneath the seat belt and sustain
abdomen or neck injuries, for example. This
poses an increased risk of injury or even fatal injury.
Adjust the seat properly before beginning
your journey. Always ensure that the backrest
is in an almost vertical position and that the
shoulder section of your seatbelt is routed
across the centre of your shoulder. G
WARNING
The head restraints cannot provide the inten-
ded protection unless they are fitted and
adjusted correctly. There is an increased risk of injury to the head and neck in the event of
an accident or sudden braking, for example.
Always drive with the head restraints fitted.
Ensure that the centre of the head restraints
support the back of each vehicle occupant's
head at eye level before driving off. Seats
109Seats, steering wheel and mirrors Z
Page 113 of 401
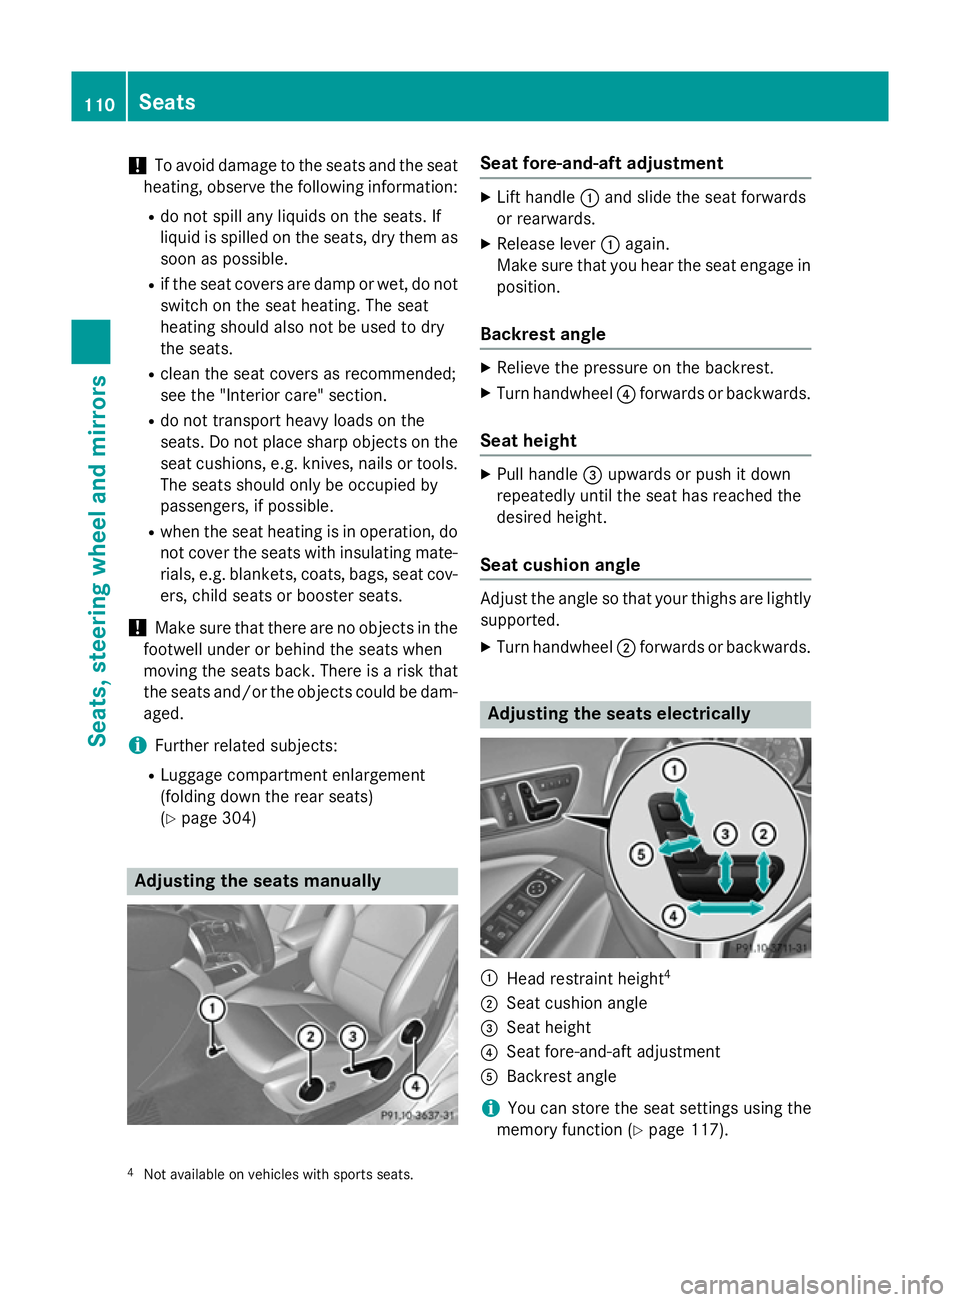
!
To avoid damage to the seats and the seat
heating, observe the following information:
R do not spill any liquids on the seats. If
liquid is spilled on the seats, dry them as soon as possible.
R if the seat covers are damp or wet, do not
switch on the seat heating. The seat
heating should also not be used to dry
the seats.
R clean the seat covers as recommended;
see the "Interior care" section.
R do not transport heavy loads on the
seats. Do not place sharp objects on the seat cushions, e.g. knives, nails or tools.
The seats should only be occupied by
passengers, if possible.
R when the seat heating is in operation, do
not cover the seats with insulating mate- rials, e.g. blankets, coats, bags, seat cov-
ers, child seats or booster seats.
! Make sure that there are no objects in the
footwell under or behind the seats when
moving the seats back. There is a risk that
the seats and/or the objects could be dam-
aged.
i Further related subjects:
R Luggage compartment enlargement
(folding down the rear seats)
(Y page 304) Adjusting the seats manually Seat fore-and-aft adjustment
X
Lift handle :and slide the seat forwards
or rearwards.
X Release lever :again.
Make sure that you hear the seat engage in
position.
Backrest angle X
Relieve the pressure on the backrest.
X Turn handwheel ?forwards or backwards.
Seat height X
Pull handle =upwards or push it down
repeatedly until the seat has reached the
desired height.
Seat cushion angle Adjust the angle so that your thighs are lightly
supported.
X Turn handwheel ;forwards or backwards. Adjusting the seats electrically
:
Head restraint height 4
; Seat cushion angle
= Seat height
? Seat fore-and-aft adjustment
A Backrest angle
i You can store the seat settings using the
memory function (Y page 117).
4 Not available on vehicles with sports seats. 110
SeatsSeats, steering wheel and mirrors
Page 119 of 401

i
Make sure that the exterior mirrors are
always folded out fully while driving. They
could otherwise vibrate.
i If you are driving faster than 47 km/h, you
can no longer fold in the exterior mirrors.
Resetting the exterior mirrors If the battery has been disconnected or com-
pletely discharged, the exterior mirrors must
be reset. The exterior mirrors will otherwise
not fold in when you select the "Fold in mir-
rors when locking" function in the on-board
computer (Y page 250).
X Turn the key to position 1in the ignition
lock (Y page 159).
X Briefly press button :.
Folding the exterior mirrors in/out
automatically If the "Fold in mirrors when locking" function
is activated in the on-board computer
(Y page 250):
R the exterior mirrors fold in automatically as
soon as you lock the vehicle from the out-
side
R the exterior mirrors fold out again automat-
ically as soon as you unlock the vehicle and
then open the driver's or front-passenger
door.
i If the exterior mirrors have been folded in
manually, they do not fold out.
Exterior mirror pushed out of position If an exterior mirror has been pushed out of
position (forwards or backwards), proceed as
follows:
X Vehicles without electrically folding
exterior mirrors: move the exterior mirror
into the correct position manually.
X Vehicles with electrically folding exte-
rior mirrors: press and hold mirror-folding button (Y
page 115) until you hear a click
and then the mirror engage in position.
The mirror housing is engaged again and
you can adjust the exterior mirrors as usual
(Y page 115). Automatic anti-dazzle mirrors
The "Automatic anti-dazzle mirrors" function
is only available if the vehicle is equipped with
the "Mirror package".
The rear-view mirror and the exterior mirror
on the driver's side automatically go into anti- dazzle mode if:
R the ignition is switched on and
R incident light from headlamps strikes the
sensor in the rear-view mirror
The mirrors do not go into anti-dazzle mode if reverse gear is engaged or if the interior light-
ing is switched on. Parking position of the exterior mirror
on the front-passenger side
General notes The "Parking position for the exterior mirror
on the front-passenger side" function is only
available if the vehicle is equipped with the
"Memory package".
Setting and storing the parking position Using reverse gear
You can set the front-passenger side exterior
mirror so that you can see the rear wheel on
that side as soon as you engage reverse gear. You can store this position. 116
MirrorsSeats, steering wheel and mirrors
Page 120 of 401

X
Make sure that the vehicle is stationary.
X Turn the key to position 2in the ignition
lock (Y page 159).
X Press button ;for the exterior mirror on
the front-passenger side.
X Engage reverse gear.
The exterior mirror on the front-passenger
side moves to the preset parking position.
X Use adjustment button =to adjust the
exterior mirror. You should see the rear
wheel and the kerb in the exterior mirror.
The parking position is stored.
i If you shift the transmission to another
position, the exterior mirror on the front-
passenger side returns to the driving posi-
tion.
Using the memory button
You can set the front-passenger side exterior
mirror so that you can see the rear wheel on
that side as soon as you engage reverse gear. This setting can be stored using memory but-
ton M?.
X Make sure that the vehicle is stationary.
X Turn the key to position 2in the ignition
lock (Y page 159).
X Press button ;for the exterior mirror on
the front-passenger side.
X Use adjustment button =to adjust the
exterior mirror. You should see the rear
wheel and the kerb in the exterior mirror. X
Press memory button M? and one of the
arrows on adjustment button =within
three seconds.
The parking position is stored if the exterior
mirror does not move.
X If the mirror moves out of position, repeat
the steps.
Calling up a stored parking position set- ting X
Turn the key to position 2in the ignition
lock (Y page 159).
X Adjust the exterior mirror on the front-
passenger side with the corresponding but-
ton (Y page 115).
X Engage reverse gear.
The exterior mirror on the front-passenger
side moves to the stored parking position.
The exterior mirror on the front-passenger
side moves back to its original position:
R as soon as you exceed a speed of
15 km/h
R about ten seconds after you have disen-
gaged reverse gear
R if you press button :for the exterior mir-
ror on the driver's side Memory functions
Storing settings
G
WARNING
If you use the memory function on the driver's side while driving, the adjustments could
cause you to lose control of the vehicle. There
is a risk of an accident.
Only use the memory function on the driver's
side while the vehicle is stationary. G
WARNING
If the memory function adjusts the seat, you
and other vehicle occupants – particularly
children – could become trapped. There is a
risk of injury. Memory functions
117Seats, steering wheel and mirrors
Z