2013 MERCEDES-BENZ GLA SUV towing
[x] Cancel search: towingPage 64 of 401

Always fit child restraint systems properly,
even if they are not being used. Make sure
that you observe the child restraint system
manufacturer's installation instructions.
You will find further information on stowing
objects, luggage or loads under "Loading
guidelines" . G
WARNING
Child restraint systems or their securing sys-
tems that have been damaged or subjected to a load in an accident cannot perform their
intended protective function. In the event of
an accident, sharp braking or a sudden
change in direction, the child may not be held securely. There is an increased risk of serious
or even fatal injuries.
Immediately replace child restraint systems
that have been damaged or subjected to a
load in an accident. Have the child restraint
securing systems checked in a qualified spe-
cialist workshop before fitting a child restraint
system again.
If it is absolutely necessary to carry a child on the front-passenger seat, be sure to observe
the information on "Child restraint systems
on the front-passenger seat" (Y page 63).
Observe the warning labels in the vehicle inte-
rior and on the child restraint system.
i It is advisable to use Mercedes-Benz care
products to clean child restraint systems
recommended by Mercedes-Benz. You can obtain information about this at any
Mercedes-Benz Service Centre. ISOFIX child seat securing system
G
WARNING
ISOFIX child restraint systems do not offer
sufficient protective effect for children whose weight is greater than 22 kg who are securedusing the safety belt integrated in the child
restraint system. The child could, for example, not be restrained correctly in the event of an accident. This poses an increased risk of
injury or even fatal injury.
If the child weighs more than 22 kg, only use
ISOFIX child restraint systems with which the
child is also secured with the vehicle seat belt. Also secure the child restraint system with the Top Tether belt, if available.
When fitting a child restraint system, be sure
to observe the manufacturer's installation
and operating instructions and the instruc-
tions for correct use of the child restraint sys- tem (Y page 64).
Before every trip, make sure that the ISOFIX
child restraint system is engaged correctly in both ISOFIX securing rings.
! When fitting the child restraint system,
make sure that the seat belt for the centre seat does not get trapped. Otherwise, the
seat belt could be damaged. :
ISOFIX securing rings
X Install the ISOFIX child restraint system on
both ISOFIX securing rings :.
ISOFIX is a standardised securing system for
specially designed child restraint systems on
the rear seats. ISOFIX securing rings :for
two ISOFIX child restraint systems are fitted
on the left and right of the rear seats.
Secure child restraint systems without an
ISOFIX child seat securing system using the
seat belts in the vehicle. When fitting a child
restraint system, be sure to observe the man-
ufacturer's installation and operating instruc-
tions and the instructions for correct use of
the child restraint system (Y page 64). Children in the vehicle
61Safety Z
Page 80 of 401

ESP
®
monitors driving stability and traction,
i.e. power transmission between the tyres
and the road surface.
If ESP ®
detects that the vehicle is deviating
from the direction desired by the driver, one
or more wheels are braked to stabilise the
vehicle. The engine output is also modified to keep the vehicle on the desired course within
physical limits. ESP ®
assists the driver when
pulling away on wet or slippery roads. ESP ®
can also stabilise the vehicle during braking.
ETS/4ETS (Electronic Traction System) i
Observe the "Important safety notes" sec-
tion (Y page 72).
ETS/4ETS traction control is part of ESP ®
.
ETS brakes the drive wheels individually if
they spin. This enables you to pull away and
accelerate on slippery surfaces, for example
if the road surface is slippery on one side. In
addition, more drive torque is transferred to
the wheel or wheels with traction.
ETS remains active when you deactivate
ESP ®
.
Off-road 4ETS (Electronic Traction Sys-
tem) A 4ETS system specifically suited to off-road
terrain is activated automatically once the off-
road program is activated (Y page 205).
Important safety notes G
WARNING
If ESP ®
is malfunctioning, ESP ®
is unable to
stabilise the vehicle. In addition, other driving
safety systems are switched off. This increa-
ses the risk of skidding and an accident.
Drive on carefully. Have ESP ®
checked at a
qualified specialist workshop.
! When testing the electric parking brake
on a braking dynamometer, switch off the
ignition. Application of the brakes by ESP ®
may otherwise destroy the brake system. !
Vehicles with 4MATIC: switch off the igni-
tion when the electric parking brake is
being tested using a dynamometer.
Application of the brakes by ESP ®
may oth-
erwise destroy the brake system.
! Vehicles with 4MATIC: function or per-
formance tests may only be carried out on
a 2-axle dynamometer. Before operating
the vehicle on such a dynamometer, please
consult a qualified specialist workshop.
You could otherwise damage the drive train
or the brake system.
! Do not tow vehicles with 4MATIC with the
front or rear axle raised.
Vehicles without 4MATIC: when towing your
vehicle with the front axle raised, it is impor-
tant that you observe the notes on ESP ®
(Y page 346).
Vehicles with 4MATIC: when towing your
vehicle with both axles on the ground, it is
important that you observe the notes on ESP ®
(Y page 347).
ESP ®
is deactivated if the åESP®
OFF
warning lamp in the instrument cluster lights up continuously when the engine is running.
If the ÷ ESP®
warning lamp and the å
ESP ®
OFF warning lamp are lit continuously,
ESP ®
is not available due to a malfunction.
Observe the information on warning lamps
(Y page 291) and display messages which
may be shown in the instrument cluster
(Y page 255).
i Only use wheels with the recommended
tyre sizes. Only then will ESP ®
function
properly.
Characteristics of ESP ® General notes
If the
÷ ESP warning lamp goes out before
beginning the journey, ESP ®
is automatically
active.
If ESP ®
intervenes, the ÷ESP®
warning
lamp flashes in the instrument cluster. Driving safety systems
77Safety Z
Page 125 of 401
X
Press the Nbutton.
The green Nindicator lamp in the instru-
ment cluster lights up.
X To switch off the front foglamps: press
the N button.
The green Nindicator lamp in the instru-
ment cluster goes out.
Only vehicles with front foglamps are equip-
ped with the "Foglamps" function; for how to operate the foglamps on vehicles with the
Intelligent Light System (Y page 125).
Rear foglamp
The rear foglamp improves the visibility of
your vehicle in heavy fog for the following
traffic. Please observe the country-specific
laws on the use of rear foglamps.
X To switch on the rear foglamp: turn the
key in the ignition lock to position 2or start
the engine.
X Turn the light switch to LorÃ.
X Press the Rbutton.
The yellow Rindicator lamp in the
instrument cluster lights up.
X To switch off the rear foglamp: press the
R button.
The yellow Rindicator lamp in the
instrument cluster goes out.
Side lamps ! If the battery has been excessively dis-
charged, the side lamps or parking lamps
are automatically switched off to enable
the next engine start. Always park your
vehicle safely and sufficiently lit according
to legal standards. Avoid the continuous
use of the Tside lamps for several
hours. If possible, switch on the Xright
or the Wleft parking lamp.
X To switch on: turn the light switch to T.
The green Tindicator lamp in the instru-
ment cluster lights up. Side lamps
Switching on the side lamps ensures that the
corresponding side of the vehicle is illumina-
ted.
X To switch on the side lamps: the key is
not in the ignition lock or it is in position 0.
X Turn the light switch to W(left-hand side
of the vehicle) or X(right-hand side of
the vehicle).
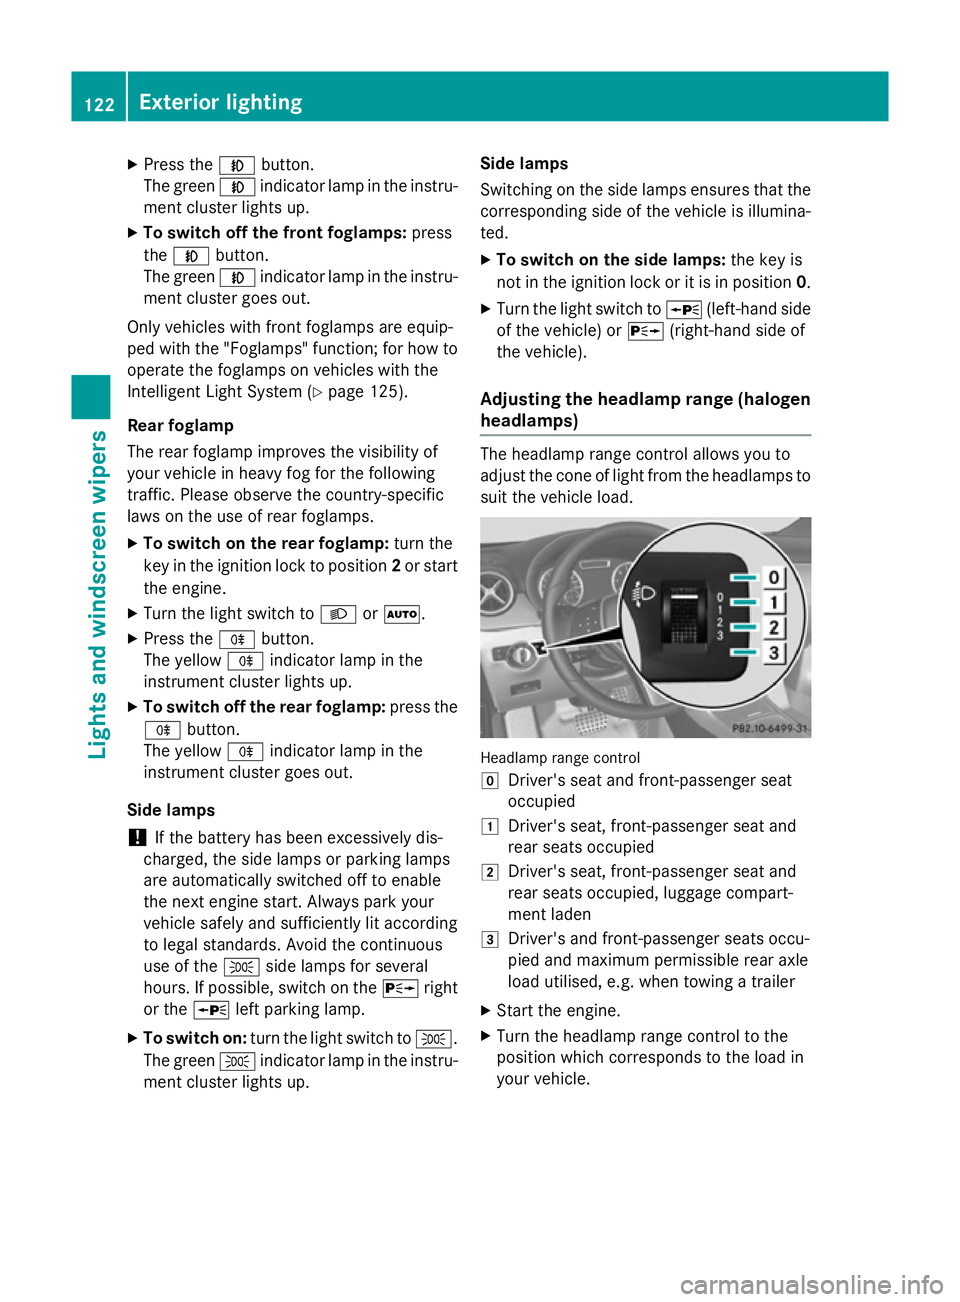
Adjusting the headlamp range (halogen headlamps) The headlamp range control allows you to
adjust the cone of light from the headlamps to suit the vehicle load. Headlamp range control
g
Driver's seat and front-passenger seat
occupied
1 Driver's seat, front-passenger seat and
rear seats occupied
2 Driver's seat, front-passenger seat and
rear seats occupied, luggage compart-
ment laden
3 Driver's and front-passenger seats occu-
pied and maximum permissible rear axle
load utilised, e.g. when towing a trailer
X Start the engine.
X Turn the headlamp range control to the
position which corresponds to the load in
your vehicle. 122
Exterior lightingLights and windscreen wipers
Page 160 of 401
Useful information
............................158
Running-in notes ............................... 158
Driving ............................................... 158
Manual transmission ........................166
Automatic transmission ...................167
Refuelling ........................................... 175
Parking ............................................... 179
Driving tips ........................................ 182
Driving systems ................................ 188
Towing a trailer ................................. 225 157Driving and parking
Page 169 of 401
Problem
Possible causes/consequences and
M
MSolutions Vehicles with a petrol
engine:
the engine is not run-
ning smoothly and is
misfiring. There is a malfunction in the engine electronics or in a mechanical
component of the engine management system.
X Only depress the accelerator pedal slightly.
Otherwise, non-combusted fuel may get into the catalytic con-
verter and damage it.
X Have the cause rectified immediately at a qualified specialist
workshop. The coolant tempera-
ture display is showing
more than 120 †. The
coolant warning lamp
may also be on and a
warning tone may
sound. The coolant level is too low. The coolant is too hot and the engine
is no longer being cooled sufficiently.
X Stop as soon as possible and allow the engine and the coolant to
cool down.
X Check the coolant level (Y page 320). Observe the warning
notes as you do so and top up the coolant if necessary. If the coolant level is correct, the engine radiator fan may be faulty.
The coolant is too hot and the engine is no longer being cooled
sufficiently.
X If the coolant temperature is below 120 †, you can continue
driving to the nearest qualified specialist workshop.
X Avoid heavy loads on the engine as you do so, e.g. driving in
mountainous terrain and stop-start traffic. Manual transmission
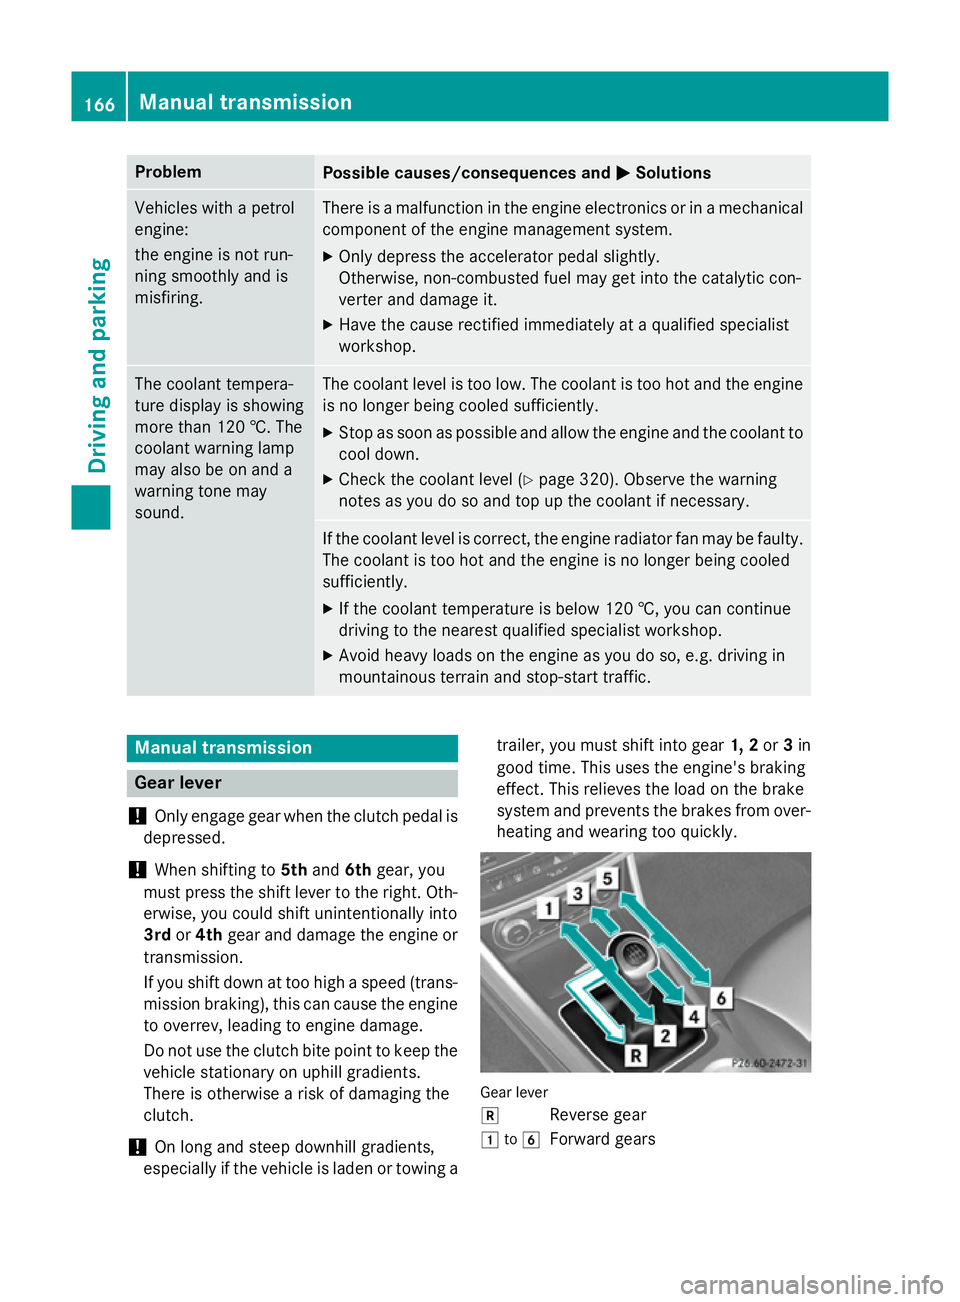
Gear lever
! Only engage gear when the clutch pedal is
depressed.
! When shifting to
5thand 6thgear, you
must press the shift lever to the right. Oth- erwise, you could shift unintentionally into
3rd or4th gear and damage the engine or
transmission.
If you shift down at too high a speed (trans-
mission braking), this can cause the engine
to overrev, leading to engine damage.
Do not use the clutch bite point to keep the vehicle stationary on uphill gradients.
There is otherwise a risk of damaging the
clutch.
! On long and steep downhill gradients,
especially if the vehicle is laden or towing a trailer, you must shift into gear
1, 2or3in
good time. This uses the engine's braking
effect. This relieves the load on the brake
system and prevents the brakes from over-
heating and wearing too quickly. Gear lever
k
Reverse gear
1 to6
Forward gears 166
Manual transmissionDriving and parking
Page 174 of 401
Towing a trailer
The GLA 45 AMG 4MATIC model cannot be
used to tow a trailer.
X Drive in the middle of the engine speed
range on uphill gradients.
X Depending on the uphill or downhill gradi-
ent, select a lower gear (Y page 183), even
if cruise control, DISTRONIC PLUS, or
SPEEDTRONIC are activated. Program selector button
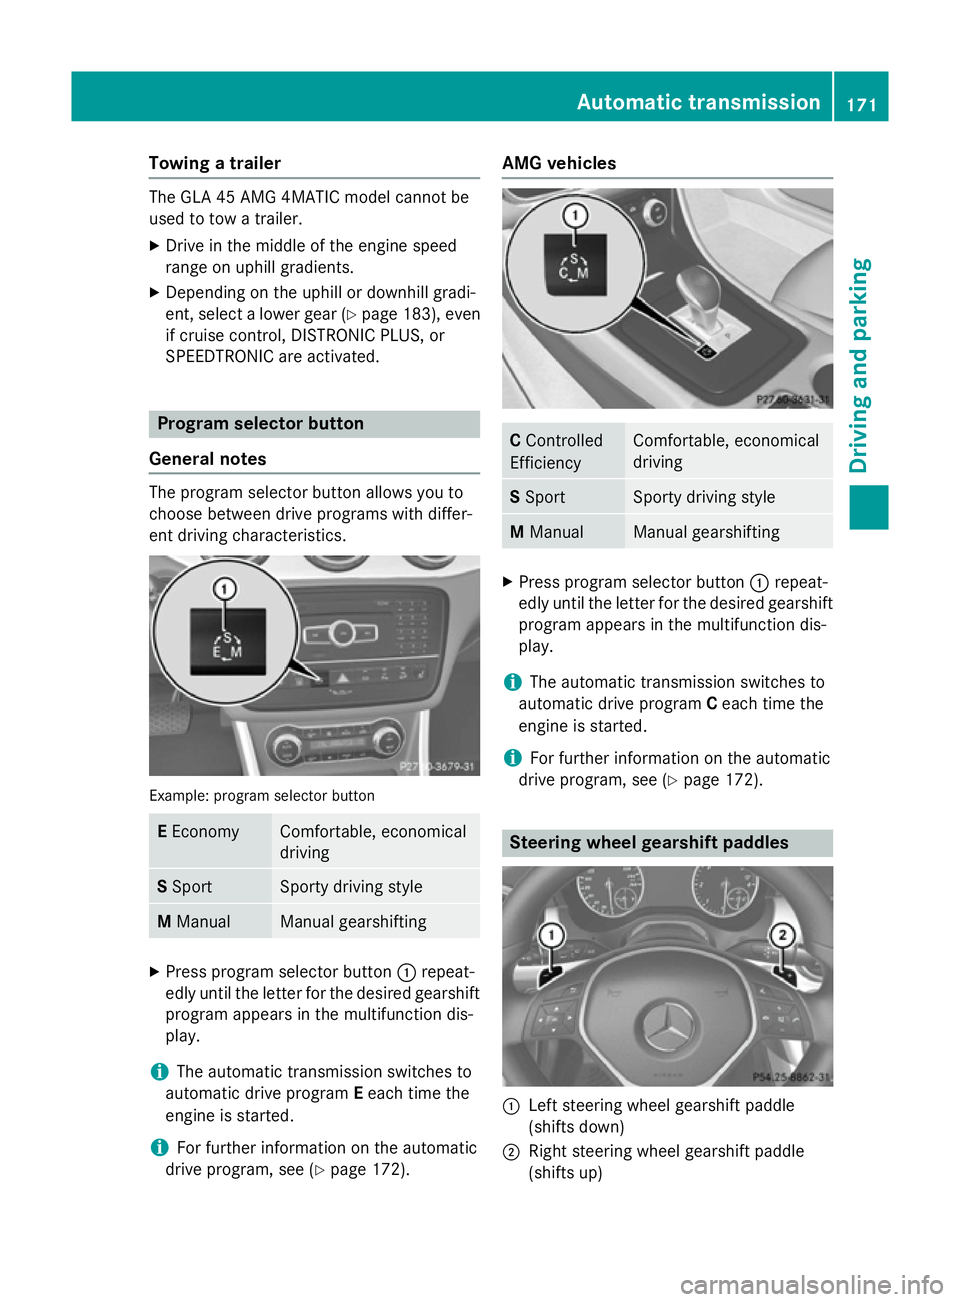
General notes The program selector button allows you to
choose between drive programs with differ-
ent driving characteristics. Example: program selector button
E
Economy Comfortable, economical
driving
S
Sport Sporty driving style
M
Manual Manual gearshifting
X
Press program selector button :repeat-
edly until the letter for the desired gearshift program appears in the multifunction dis-
play.
i The automatic transmission switches to
automatic drive program Eeach time the
engine is started.
i For further information on the automatic
drive program, see (Y page 172). AMG vehicles
C
Controlled
Efficiency Comfortable, economical
driving
S
Sport Sporty driving style
M
Manual Manual gearshifting
X
Press program selector button :repeat-
edly until the letter for the desired gearshift program appears in the multifunction dis-
play.
i The automatic transmission switches to
automatic drive program Ceach time the
engine is started.
i For further information on the automatic
drive program, see (Y page 172). Steering wheel gearshift paddles
:
Left steering wheel gearshift paddle
(shifts down)
; Right steering wheel gearshift paddle
(shifts up) Automatic transmission
171Driving and parking Z
Page 186 of 401

R
observe the gearshift recommendation.
R drive the vehicle in drive program E(vehi-
cles with automatic transmission).
i On long journeys at a constant speed, e.g.
on the motorway, only the bar for Constant
Constant
will change.
i The ECO display summarises the driving
characteristics from the start of the journey
to its completion. Therefore, there are
dynamic changes in the bars at the start of a journey. During a prolonged driving time,these changes are smaller. For more
dynamic changes, perform a manual reset.
For further information on the ECO display,
see (Y page 238). Braking
Important safety notes G
WARNING
If you shift down on a slippery road surface in an attempt to increase the engine's braking
effect, the drive wheels could lose their grip.
This increases the risk of skidding and having
an accident.
Do not shift down for additional engine brak-
ing on a slippery road surface.
Downhill gradients Change into a lower gear in good time on long
and steep downhill gradients. Take particular note of this when driving a laden vehicle and
when towing a trailer. For vehicles with auto-
matic transmission, you need to have selec-
ted manual drive program M(Y page 172).
i This also applies if you have activated
cruise control, SPEEDTRONIC or DIS-
TRONIC PLUS.
This will use the braking effect of the engine, so less braking will be required to maintain
vehicle speed. This relieves the load on the
brake system and prevents the brakes from
overheating and wearing too quickly. i
Briefly depressing the accelerator pedal
on downhill gradients while the manual
drive program Mis temporarily activated
(vehicles with automatic transmission): the automatic transmission may switch back to
the last active automatic drive program Eor
S. The automatic transmission may shift to a higher gear. This can reduce the engine's
braking effect.
Heavy and light loads G
WARNING
The braking system can overheat if you leave your foot on the brake pedal while driving.
This increases the braking distance and could
even cause the braking system to fail. There is
a risk of an accident.
Never use the brake pedal as a footrest. Do
not simultaneously depress both the brake
pedal and the accelerator pedal while driving.
! Depressing the brake pedal constantly
results in excessive and premature wear to
the brake pads.
If heavy demands are made on the brakes, do not park the vehicle immediately. Drive on for
a short while. This allows the airflow to cool
the brakes more quickly.
If the brakes have been used only moderately,
you should occasionally test their effective-
ness. To do this, brake more firmly from a
higher speed, paying attention to traffic con-
ditions. This improves the grip of the brakes.
Wet road surfaces If you have driven for a long time in heavy rain
without braking, there may be a delayed reac-
tion from the brakes when braking for the first time. This may also occur after a car wash orafter driving through deep water.
You have to depress the brake pedal more
firmly. Maintain a greater distance from the
vehicle in front.
After driving on a wet road or having the vehi-
cle washed, brake firmly while paying atten- Driving tips
183Driving and parking Z
Page 191 of 401
R
Use the left-hand steering wheel gearshift
paddle to shift to a lower gear appropriate
to the gradient.
R Use the left-hand gearshift paddle to shift
to a lower gear on long and steep downhill
gradients.
i Hill start assist will aid you when pulling
away on a hill.
For further information about hill start
assist, see (Y page 161).
Do not shift into transmission position N
when driving off-road. You could lose control
of the vehicle if you attempt to brake the
vehicle using the service brake. If the gradient
is too steep for your vehicle, back up in
reverse gear.
Always observe the approach/departure
angle values (Y page 393).
Maximum gradient-climbing capability Always observe the maximum gradient climb-
ing ability values (Y page 393).
Hilltops When driving up an uphill gradient, slightly
reduce pressure on the accelerator immedi-
ately before reaching the brow of the hill.
Make use of the vehicle's own impetus to
travel over the brow.
This style of driving prevents:
R the vehicle from lifting off the ground on the
brow of a hill
R the vehicle from travelling too quickly down
the other side.
Driving downhill R
Drive slowly.
R Do not drive at an angle down steep
inclines. Steer into the line of fall and drive
with the front wheels aligned straight. Oth- erwise, the vehicle could slip sideways, tip
and overturn. R
Before tackling steep downhill gradients,
use the left-hand steering wheel gearshift
paddle to shift to a lower gear.
R Activate DSR. If this is not sufficient, brake
gently. When doing so, make sure that the
vehicle is facing in the direction of the line
of fall.
R Check that the brakes are working normally
after a long downhill stretch.
i Off-road ABS is activated when the off-
road program is selected.
At speeds below 30 km/h the front wheels
lock cyclically during braking. The digging-
in effect achieved in the process reduces
the stopping distance when driving off-
road. The steerability of the vehicle is con-
siderably reduced if the wheels lock. Driving systems
Cruise control
General notes Cruise control maintains a constant road
speed for you. It brakes automatically in order
to avoid exceeding the set speed. You must
select a lower gear in good time on long and
steep downhill gradients, especially if the
vehicle is laden or towing a trailer. For vehi-
cles with automatic transmission, you need to have selected manual drive program M
(Y page 172). By doing so, you will make use
of the braking effect of the engine. This
relieves the load on the brake system and
prevents the brakes from overheating and
wearing too quickly.
Use cruise control only if road and traffic con- ditions are appropriate for maintaining a
steady speed for a prolonged period. You canstore any road speed above 30 km/h.
Important safety notes If you fail to adapt your driving style, cruise
control can neither reduce the risk of an acci-
dent nor override the laws of physics. Cruise 188
Driving systemsDriving and parking