2013 MERCEDES-BENZ GL light
[x] Cancel search: lightPage 157 of 454
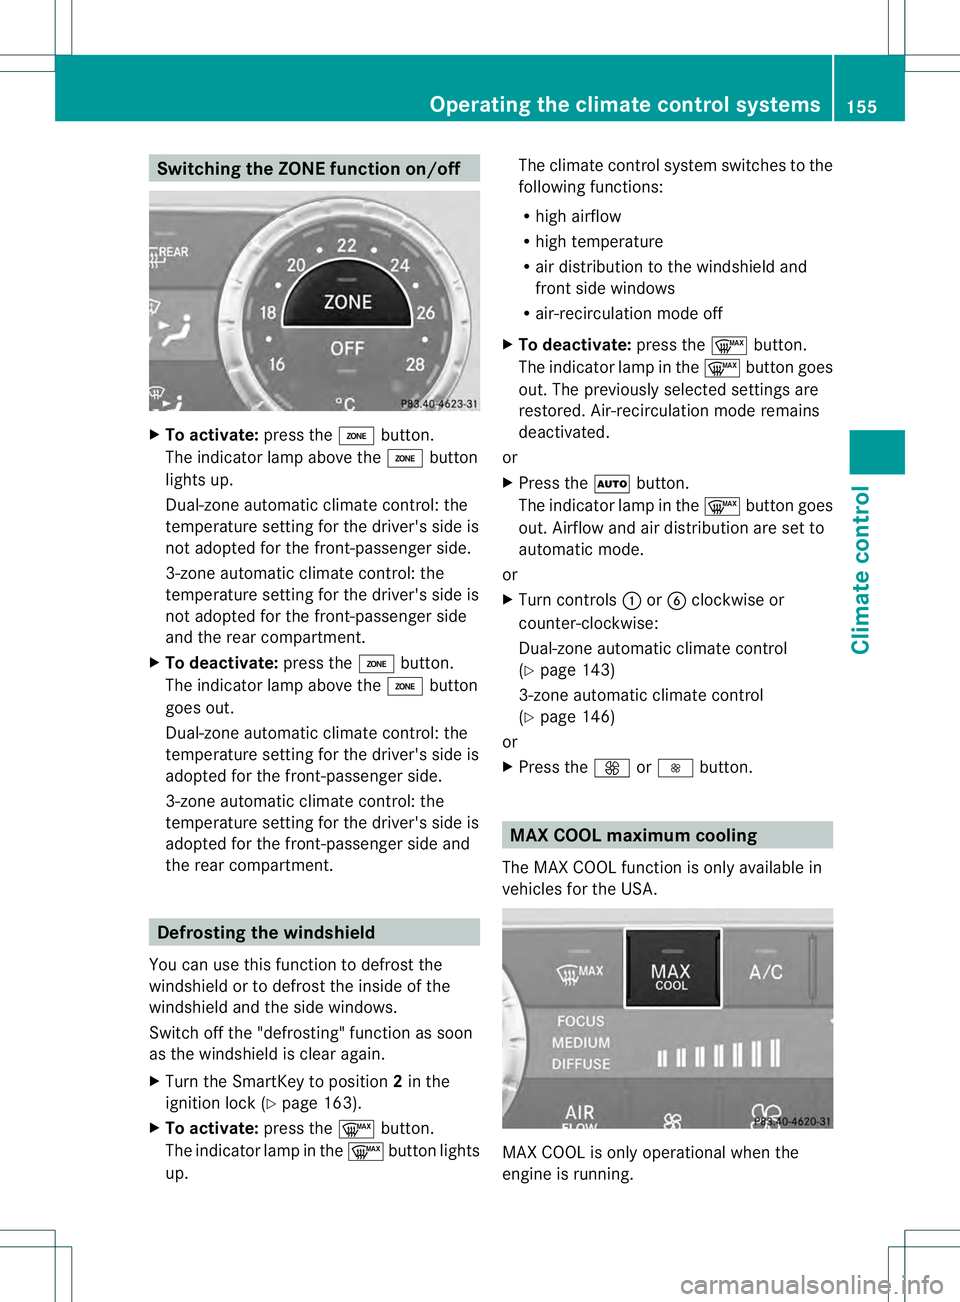
Switching the ZONE function on/off
X
To activate: press the0004button.
The indicator lamp above the 0004button
lights up.
Dual-zone automatic climate control: the
temperature setting for the driver's side is
not adopted for the front-passenger side.
3-zone automatic climate control: the
temperature setting for the driver's side is
not adopted for the front-passenger side
and the rear compartment.
X To deactivate: press the0004button.
The indicator lamp above the 0004button
goes out.
Dual-zone automatic climate control: the
temperature setting for the driver's side is
adopted for the front-passenger side.
3-zone automatic climate control: the
temperature setting for the driver's side is
adopted for the front-passenger side and
the rear compartment. Defrosting the windshield
You can use this function to defrost the
windshield or to defrost the inside of the
windshield and the side windows.
Switch off the "defrosting" function as soon
as the windshield is clear again.
X Turn the SmartKey to position 2in the
ignition lock (Y page 163).
X To activate: press the0009button.
The indicator lamp in the 0009button lights
up. The climate control system switches to the
following functions:
R
high airflow
R high temperature
R air distribution to the windshield and
front side windows
R air-recirculation mode off
X To deactivate: press the0009button.
The indicator lamp in the 0009button goes
out. The previously selected settings are
restored. Air-recirculation mode remains
deactivated.
or
X Press the 0006button.
The indicator lamp in the 0009button goes
out. Airflow and air distribution are set to
automatic mode.
or
X Turn controls 0002or001F clockwise or
counter-clockwise:
Dual-zone automatic climate control
(Y page 143)
3-zone automatic climate control
(Y page 146)
or
X Press the 0019or0018 button. MAX COOL maximum cooling
The MAX COOL function is only available in
vehicles for the USA. MAX COOL is only operational when the
engine is running.Operating the climate control systems
155Climate control
Page 158 of 454

X
To activate: press the0001button.
The indicator lamp in the button lights up.
X To activate: press off-road button 0001
again.
The indicator lamp goes out. The previously
selected settings are restored.
Whe nyou activate MAX COOL, climate
control switches to the following functions:
R maximum cooling
R maximum airflow
R air-recirculation mode on Defrosting the windows
Windows fogged up on the inside X
Activate the 0007/0005 cooling with air
dehumidification function.
X Activate automatic mode 0006.
X If the windows continue to fog up, activate
the defrosting function (Y page 155).
i You should only select this setting until
the windshield is clear again.
Windows fogged up on the outside X
Press the 0017button repeatedly until the
001C or001B symbol appears in the
display.
i You should only select this setting until
the windshield is clear again. Rear window defroster
Activating/deactivating The rear window defroster has a high current
draw. You should therefore switch it off as
soon as the rear window is clear. Otherwise,
the rear window defroster switches off
automatically after several minutes.
If the battery voltage is too low, the rear
window defroster may switch off.
X
Turn the SmartKey to position 2in the
ignition lock (Y page 163).
X Press the 000Dbutton.
The indicator lamp in the 000Dbutton lights
up or goes out. 156
Operating the climate control systemsClimate control
Page 159 of 454

Problems with the rear window defroster
Problem Possible causes/consequences and
0001 Solutions
The rear window
defroster has
deactivated
prematurely or cannot
be activated. The battery has not been sufficiently charged.
X
Switch off any consumers that are not required, e.g. reading
lamps or interior lighting.
When the battery is sufficiently charged, the rear window
defroster is activated again automatically. Activating/deactivating air-
recirculation mode
Points to observe before use You can deactivate the flow of fresh air if
unpleasant odors are enteringt he vehicle
from outside. The air already inside the
vehicle will then be recirculated.
If you switch on air-recirculation mode, the
windows can fog up more quickly, in
particular at low temperatures. Only use air-
recirculation mode briefly to prevent the
windows from fogging up.
Activating/deactivating The operation of air-recirculation mode is the
same for all control panels.
X Turn the SmartKey to position 2in the
ignition lock (Y page 163).
X To activate: press the0016button.
The indicator lamp in the 0016button lights
up.
i In the event of high pollution levels (3-
zone automatic climate control only) or at high outside temperatures, air-
recirculation mode is automatically
activated. When air-recirculation mode is
activated automatically, the indicator lamp
in the
0016button is not lit.
Outside air is added after about
30 minutes.
X To deactivate: press the0016button.
The indicator lamp in the 0016button goes
out.
i Air-recirculation mode deactivates
automatically:
R after approximately five minutes at
outside temperatures below
approximately 41 ‡ (5 †)
R after approximately five minutes if
cooling with air dehumidification is
deactivated
R after approximately 30 minutes at
outside temperatures above
approximately 41 ‡(5 †)if the "Cooling
with air dehumidification" function is
activated Activating/deactivating the residual
heat function
The "residual heat" function is only available
in Canada. Operating the climate control systems
157Climate control
Page 160 of 454

It is possible to make use of the residual heat
of the engine to continue heating the
stationary vehicle for up to 30 minutes after
the engine has been switched off. The heating
time depends on the temperature that has
been set.
X
To activate: press the0003/0005 button.
The indicator lamp in the 0003/0005
button lights up.
i The blower will run at a low speed
regardless of the airflow setting.
i If you activate the residual heat function
at high temperatures, only the ventilation
will be activated. The blower runs at
mediums peed.
X To deactivate: press the0003/0005
button.
The indicator lamp in the 0003/0005
button goes out.
Residual heat is deactivated automatically:
R after approximately 30 minutes
R when the ignition is switched on
R if the battery voltage drops
R when the auxiliary heating is activated Setting the air vents
Important safety notes
G
WARNING
Very hot or very cold air can flow from the air
vents. This could result in burns or frostbite in the immediate vicinity of the air vents. There
is a risk of injury.
Make sure that all vehicle occupants always
maintain a sufficient distance to the air
outlets. If necessary, redirec
tthe airflow to
another area of the vehicle interior.
In order to ensure the direct flow of fresh air
through the air vents into the vehicle interior,
please observe the following notes:
R keep the air inlet grille on the hood and in
the engine compartment on the front-
passenger side free of blockages, such as
ice, snow or leaves.
R never cover the air vents or air intake grilles
in the vehicle interior.
i For virtually draft-free ventilation, adjust
the sliders of the air vents to the center
position. Setting the center air vents
0002
Center air vent, left
0003 Center air vent, right
0021 Center vent thumbwheel, right
0020 Center vent thumbwheel, left
X To open/close: turn thumbwheels 0021
and 0020to the right or left. 158
Setting the air ventsClimate control
Page 166 of 454

The Start/Stop button must be inserted in the
ignition lock and the SmartKey with the
integrated KEYLESS-GO function must be in
the vehicle.
Pressing the Start/Stop button several times
in succession corresponds to the different
key positions in the ignition lock. This is only
the case if you are not depressing the brake
pedal.
If you depress the brake pedal and press the
Start/Stop button, the engine starts
immediately.
The Start/Stop button can be removed from
the ignition lock. Then, you can insert the
SmartKey into the ignition lock.
i
You do not have to remove the Start/Stop
button from the ignition lock when you
leave the vehicle. You should, however,
always take the SmartKey with you when
leaving the vehicle. As long as the
SmartKey is in the vehicle:
R the vehicle can be started using the
Start/Stop button and
R electrically powered equipment can be
operated.
i The engine can be turned off while the
vehicle is in motion by pressing and holding
the Start/Stop button for approximately
three seconds.
Key positions with KEYLESS-GO As soon as the ignition is switched on, all the
indicator lamps in the instrument cluster light
up. If an indicator lamp does not go out after starting the engine or lights up while driving,
see (Y
page 322).
X Insert Start/Stop button 0002into ignition
lock 0003.
i When you insert Start/Stop button 0002
into ignition lock 0003, the system needs
approximately two seconds recognition
time. You can then use Start/Stop
button 0002.
Activating power supply
X If Start/Stop button 0002has not yet been
pressed, this corresponds to the SmartKey
being removed from the ignition.
X Press Start/Stop button 0002once.
The power supply is switched on. You can
now activate the windshield wipers, for
example.
i The power supply is switched off again if:
R the driver's door is opened and
R you press Start/Stop button 0002twice
when in this position.
Switching on the ignition
X Press Start/Stop button 0002twice.
The ignition is switched on.
i The power supply is switched off again if:
R the driver's door is opened and
R you press Start/Stop button 0002once
when in this position. Start/Stop button
0021
USA only
0020 Canada only 164
DrivingDriving and parking
Page 167 of 454

Starting the engine
Important safety notes G
WARNING
If children are left unsupervised in the vehicle,
they could:
R open the doors, thus endangering other
people or road users.
R get out and disrupt traffic.
R operate the vehicle's equipment.
Additionally, children could set the vehicle in
motion if, for example, they:
R release the parking brake.
R shift the automatic transmission out of
parking position P.
R starting the engine.
There is a risk of an accident and injury.
When leaving the vehicle, always take the
SmartKey with you and lock the vehicle. Never
leave children or animals unattended in the
vehicle. Always keep the SmartKey out of
reach of children. G
WARNING
Combustion engines emit poisonous exhaust
gases such as carbon monoxide. Inhaling
these exhaust gases leads to poisoning. There
is a risk of fatal injury. Therefore never leave
the engine running in enclosed spaces
without sufficient ventilation.
i Vehicles with agasoline engine: the
catalytic converter is preheated for up to
30 seconds after a cold start. The sound of
the engine may change during this time.
Automatic transmission X
Shift the transmission to position
P(Y page 169).
The transmission position displa yinthe
multifunction display shows
P(Y page 169).
i You can also start the engine when the
transmission is in position N.Starting procedure with the SmartKey X
To startag asoline engine: turn the
SmartKey to position 3in the ignition lock
(Y page 163) and release it as soon as the
engine is running.
X To start adiesel engine: turn the
SmartKey to position 2in the ignition lock
(Y page 163).
The 0010 preglow indicator lamp in the
instrumen tcluster lights up.
X When the 0010preglow indicator lamp
goes out, tur nthe SmartKey to position
3(Y page 163) and release it as soon as the
engine is running.
i You can start the engine without preglow
if the engine is warm.
Using KEYLESS-GO to startt he engine X
Depress the brake pedal and keep it
depressed.
X To start agasoline engine: press the
Start/Stop button (Y page 163) once.
The engine starts.
X To start adiesel engine: press the Start/
Stop button (Y page 163) once.
Preglow is activated and the engine starts.
i The Start/Stop button can be used to
star tthe vehicle without inserting the
SmartKey into the ignition lock. The Start/
Stop button must be inserted in the ignition
lock and the SmartKey must be in the
vehicle. Pulling away
Automatic transmission G
WARNING
If the engine speed is above the idling speed
and you engage transmission position Dor
R, the vehicle could pull away suddenly. There
is a risk of an accident. Driving
165Driving and parking
Z
Page 170 of 454

Problems with the engine
Problem Possible causes/consequences and
0001 Solutions
The engine does not
start. The starter motor
can be heard. R
There is a malfunction in the engine electronics.
R There is a malfunction in the fuel supply.
X Try to start the engine again (Y page 165). Avoid excessively
long and frequent attempts to start the engine as these will drain
the battery.
If the engine does not start after several attempts:
X Consult a qualified specialist workshop. The engine does not
start. You cannot hear
the starter motor. The on-board voltage is too low because the battery is too weak
or discharged.
X
Jump-start the vehicle (Y page 391).
If the engine does not start despite attempts to jump-start it:
X Consult a qualified specialist workshop. The starter motor was exposed to a thermal load that was too high.
X
Allow the starter motor to cool down for approximately two
minutes.
X Try to start the engine again.
If the engine still does not start:
X Consult a qualified specialist workshop. The engine is not
running smoothly and
is misfiring. There is a malfunction in the engine electronics or in a mechanical
component of the engine management system.
X
Only depress the accelerator pedal slightly.
X Have the cause rectified immediately at a qualified specialist
workshop.
Otherwise, non-combusted fuel may get into the catalytic
converter and damage it. The coolant
temperature gauge
shows a value above
248 ‡ (120 †). The coolant level is too low. The coolant is too hot and the engine
is no longer being cooled sufficiently.
X
Stop as soon as possible and allow the engine and the coolant
to cool down.
X Check the coolant level (Y page 369). Observe the warning
notes as you do so and add coolant if necessary. 168
DrivingDriving and parking
Page 181 of 454

Opening
X
Switch the engine off.
X Remove the SmartKey from the ignition
lock.
X KEYLESS-GO: open the driver’s door.
This corresponds to key position 0: "key
removed".
The driver’s door can be closed again.
X Press the fuel filler flap in the direction of
arrow 0002.
The fuel filler flap swings up.
X Turn the fuel filler flap counter-clockwise
and remove it.
X Inser tthe fuel filler cap into the holder
bracket on the inside of filler flap 0003.
X Completely insert the filler neck of the fuel
pump nozzle into the tank, attach and
refuel.
X Only fill the tank until the pump nozzle
switches off.
i Do not add any more fuel after the pump
stops filling for the first time. Otherwise,
fuel may leak out.
Closing X
Replace the cap on the filler neck and turn
clockwise until it engages audibly.
X Close the fuel filler flap.
i Close the fuel filler flap before locking the
vehicle.
i If you are driving with the fuel filler cap
open, the 0012reserve fuel warning lamp
flashes.
In addition, the 0010Check Engine warning
lamp may light up (Y page 329).
Am essage appears in the multifunction
display ( Ypage 305).
For further information on warning and
indicator lamps in the instrument cluster,
see (Y page 329). Refueling
179Driving and parking Z