2013 MERCEDES-BENZ GL light
[x] Cancel search: lightPage 209 of 454
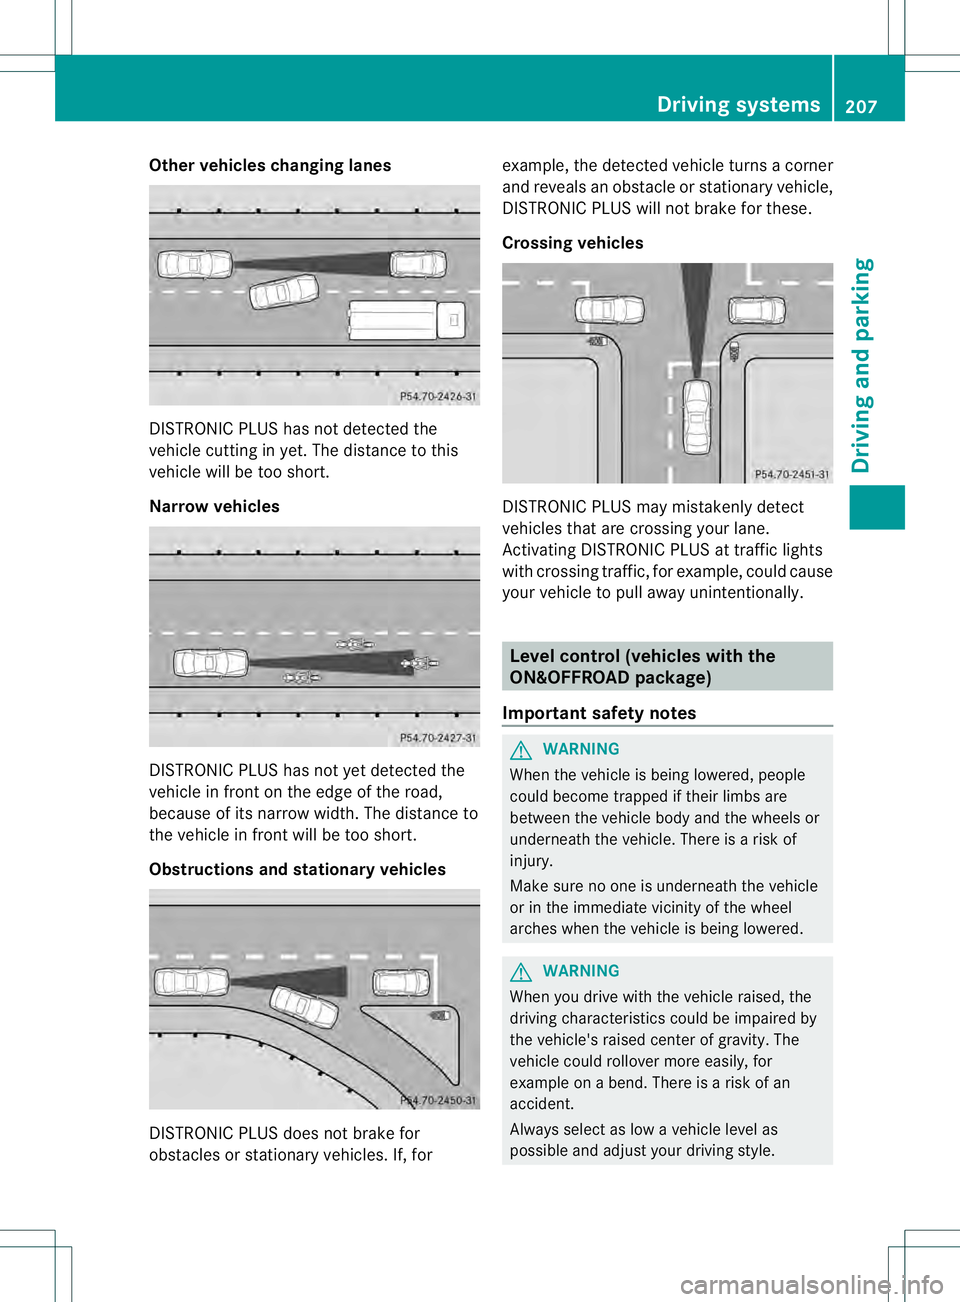
Other vehicles changing lanes
DISTRONIC PLUS has not detected the
vehicle cutting in yet. The distance to this
vehicle will be too short.
Narrow vehicles
DISTRONIC PLUS has not yet detected the
vehicle in fron tonthe edge of the road,
because of its narrow width. The distance to
the vehicle in front will be too short.
Obstructions and stationary vehicles DISTRONIC PLUS does not brake for
obstacles or stationary vehicles. If, for example, the detected vehicle turns a corner
and reveals an obstacle or stationary vehicle,
DISTRONIC PLUS will not brake for these.
Crossing vehicles DISTRONIC PLUS may mistakenly detect
vehicles that are crossing your lane.
Activating DISTRONIC PLUS at traffic lights
with crossing traffic, for example, could cause
your vehicle to pull away unintentionally.
Level control (vehicles with the
ON&OFFROAD package)
Important safety notes G
WARNING
When the vehicle is being lowered, people
could become trapped if their limbs are
between the vehicle body and the wheels or
underneath the vehicle. There is a risk of
injury.
Make sure no one is underneath the vehicle
or in the immediate vicinity of the wheel
arches when the vehicle is being lowered. G
WARNING
When you drive with the vehicle raised, the
driving characteristics could be impaired by
the vehicle's raised center of gravity. The
vehicle could rollover more easily, for
example on a bend. There is a risk of an
accident.
Always select as low a vehicle level as
possible and adjust your driving style. Driving systems
207Driving and parking Z
Page 212 of 454
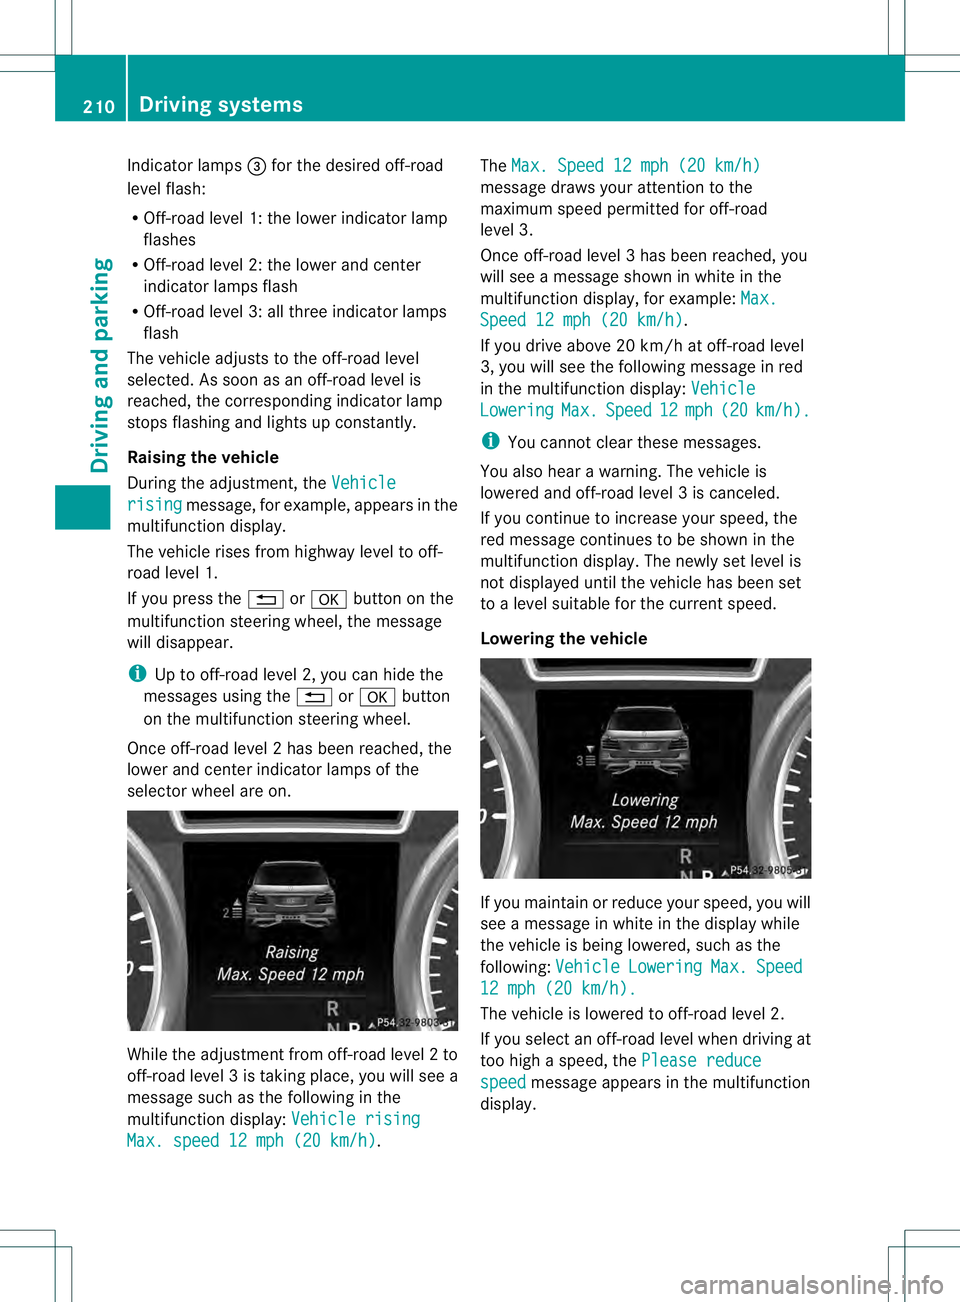
Indicator lamps
0021for the desired off-road
level flash:
R Off-road level 1: the loweri ndicatorlamp
flashes
R Off-road level 2: the lower and center
indicator lamps flash
R Off-road level 3: all three indicator lamps
flash
The vehicle adjusts to the off-road level
selected. As soon as an off-road level is
reached, the corresponding indicator lamp
stops flashing and lights up constantly.
Raising the vehicle
During the adjustment, the Vehiclerising message, for example, appears in the
multifunction display.
The vehicle rises from highway level to off-
road level 1.
If you press the 0007or000B button on the
multifunction steering wheel ,the message
will disappear.
i Up to off-road level 2, you can hide the
messages using the 0007or000B button
on the multifunction steering wheel.
Once off-road level 2has been reached, the
lower and cente rindicato rlamps of the
selecto rwheel are on. While the adjustment from off-road level
2to
off-road level 3is taking place, you will see a
message such as the following in the
multifunction display: Vehicle risingMax. speed 12 mph (20 km/h) .The
Max. Speed 12 mph (20 km/h) message draws your attention to the
maximum speed permitted for off-road
level 3.
Once off-road level
3has been reached, you
will see a message shown in white in the
multifunction display, for example: Max. Speed 12 mph (20 km/h) .
If you drive abov e20 km/h at off-road level
3, you will see the following message in red
in the multifunctio ndisplay: Vehicle Lowering Max. Speed 12 mph (20 km/h ).
i
You cannot clear these messages.
You also hear a warning. The vehicle is
lowered and off-road level 3is canceled.
If you continue to increase your speed, the
red message continues to be shown in the
multifunction display. The newly set level is
not displayed until the vehicle has been set
to a level suitable for the current speed.
Lowering the vehicle If you maintain or reduce your speed, you will
see a message in white in the display while
the vehicle is being lowered, such as the
following:
Vehicle Lowering Max. Speed
12 mph (20 km/h).
The vehicle is lowered to off-road level 2.
If you select an off-road level when driving at
too high a speed, the Please reduce speed message appears in the multifunction
display. 210
Driving systemsDriving and parking
Page 215 of 454
X
Press button 0002.
Indicator lamp 0003lights up. Sports
suspension tuning is selected. The vehicle
is lowered by 0.6 in (15 mm).
The firmer suspension tunin ginSport mode
ensures even better contact with the road.
Select this mode when employing a sporty
driving style, e.g. on winding country roads.
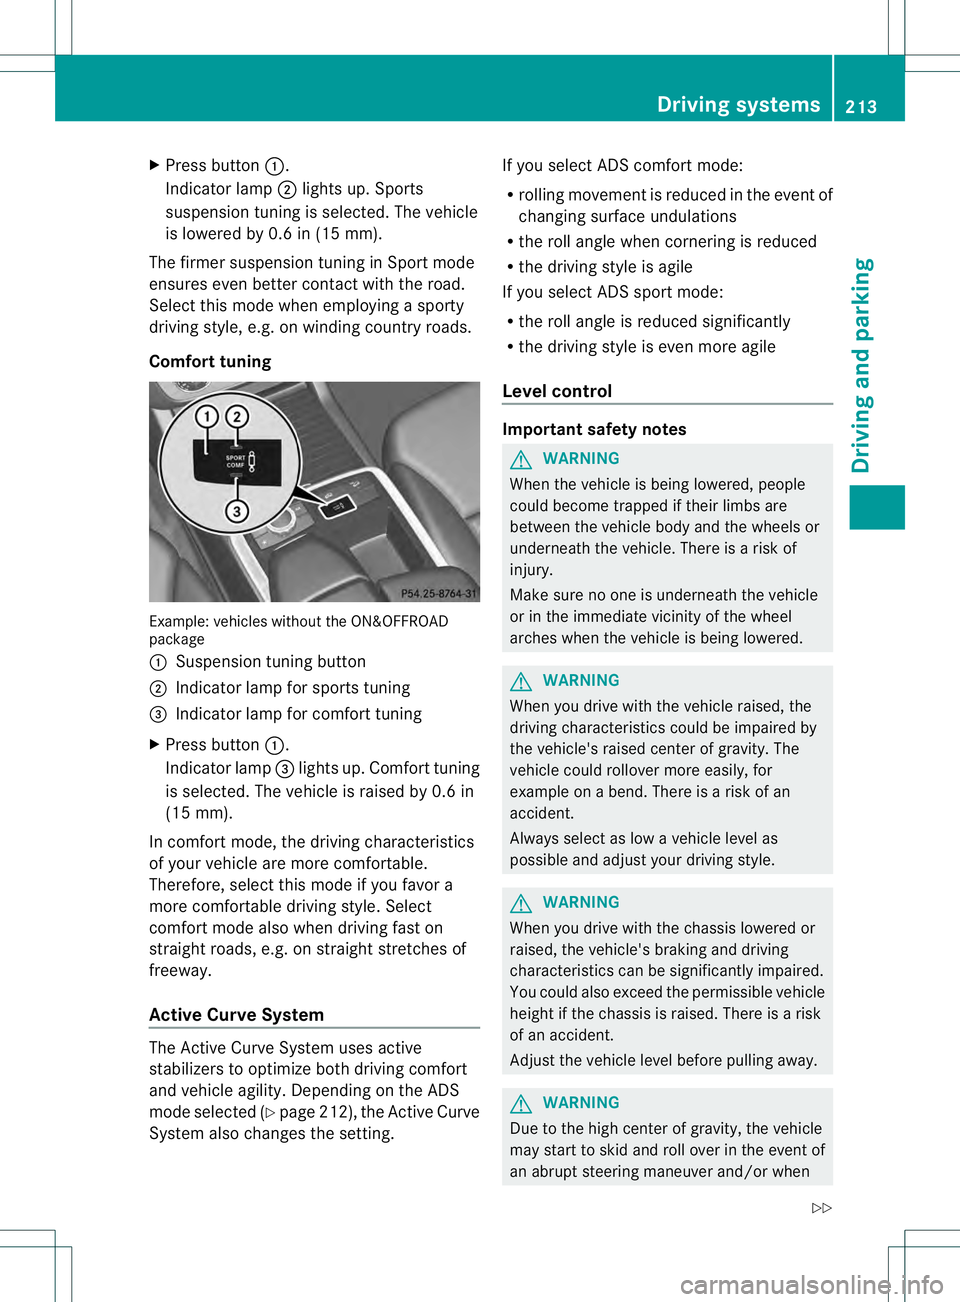
Comfort tuning Example: vehicles without the ON&OFFROAD
package
0002 Suspension tuning button
0003 Indicator lamp for sports tuning
0021 Indicator lamp for comfort tuning
X Press button 0002.
Indicator lamp 0021lights up. Comfort tuning
is selected. The vehicle is raised by 0.6 in
(15 mm).
In comfort mode, the driving characteristics
of your vehicle are more comfortable.
Therefore, select this mode if you favor a
more comfortable driving style. Select
comfort mode also when driving fast on
straight roads, e.g. on straight stretches of
freeway.
Active Curve System The Active Curve System uses active
stabilizers to optimize both driving comfort
and vehicle agility. Depending on the ADS
mode selected (Y page 212), the Active Curve
System also changes the setting. If you select ADS comfort mode:
R
rolling movement is reduced in the event of
changing surface undulations
R the roll angle when cornering is reduced
R the driving style is agile
If you select ADS sport mode:
R the roll angle is reduced significantly
R the driving style is even more agile
Level control Important safety notes
G
WARNING
When the vehicle is being lowered, people
could become trapped if their limbs are
between the vehicle body and the wheels or
underneath the vehicle. There is a risk of
injury.
Make sure no one is underneath the vehicle
or in the immediate vicinity of the wheel
arches when the vehicle is being lowered. G
WARNING
When you drive with the vehicle raised, the
driving characteristics could be impaired by
the vehicle's raised center of gravity. The
vehicle could rollover more easily, for
example on a bend. There is a risk of an
accident.
Always select as low a vehicle level as
possible and adjust your driving style. G
WARNING
When you drive with the chassis lowered or
raised, the vehicle's braking and driving
characteristics can be significantly impaired.
You could also exceed the permissible vehicle
height if the chassis is raised. There is a risk
of an accident.
Adjust the vehicle level before pulling away. G
WARNING
Due to the high center of gravity, the vehicle
may start to skid and roll over in the event of
an abrupt steering maneuver and/or when Driving systems
213Driving and parking
Z
Page 219 of 454
Suspension tuning
General notes
The electronically controlled damping system
works continuously
.This improves driving
safety and ride comfort.
The damping is tuned individually to each
wheel and depends on:
R your driving style
R the road surface conditions
R your individual selection of Sport, Sport +
or Comfort
Your selection remains stored even if you
remove the SmartKey from the ignition lock.
Sport mode The firmer suspension tuning in Sport mode
ensures even better contact with the road.
Select this mode when employing a sporty
driving style, e.g. on winding country roads.
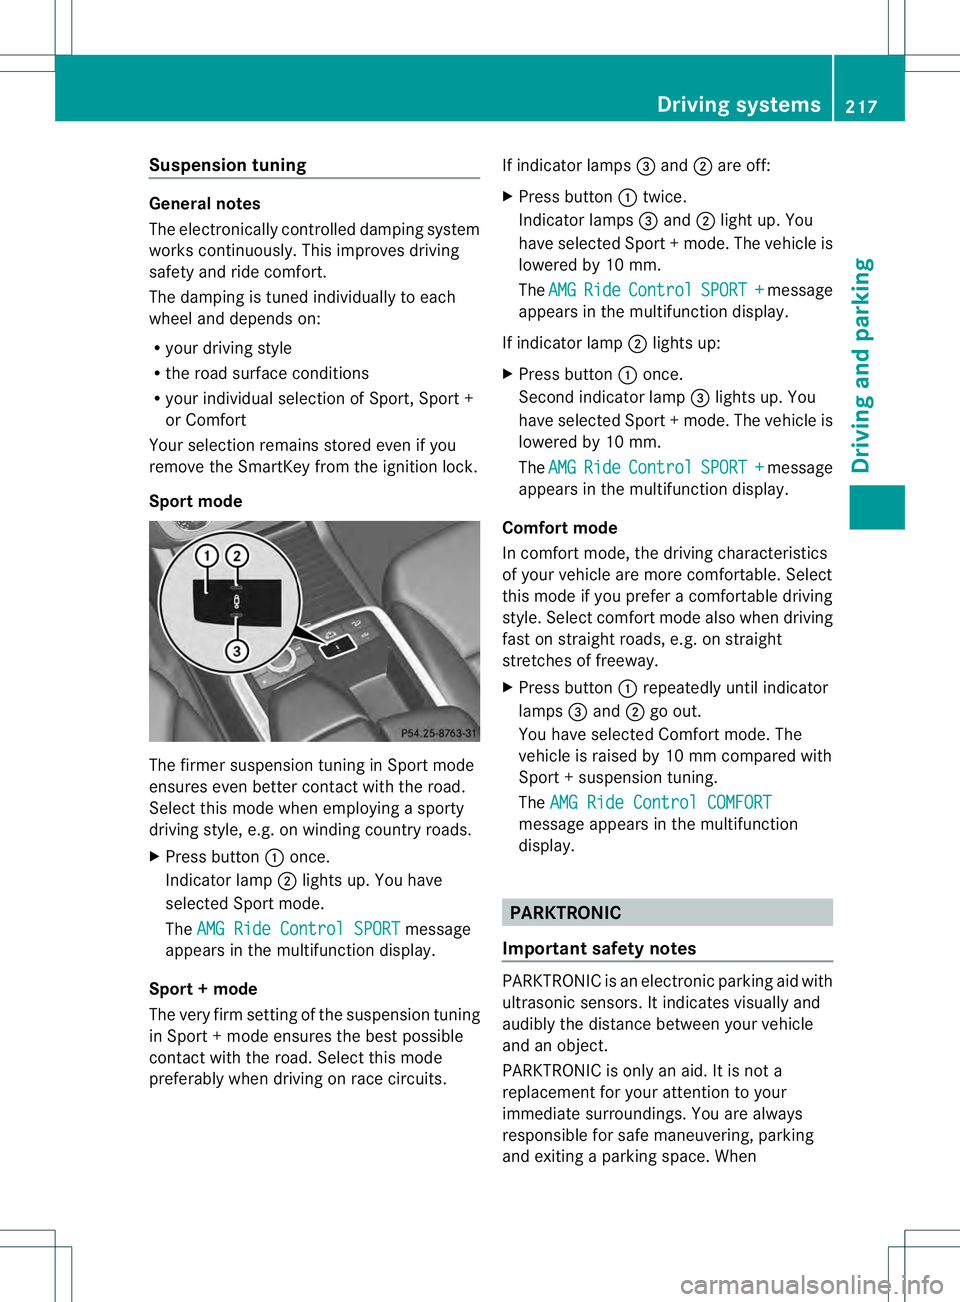
X Press button 0002once.
Indicator lamp 0003lights up. You have
selected Sport mode.
The AMG Ride Control SPORT message
appears in the multifunction display.
Sport + mode
The very firm setting of the suspension tuning
in Sport +mode ensures the best possible
contact with the road. Select this mode
preferably when driving on race circuits. If indicator lamps
0021and 0003are off:
X Press button 0002twice.
Indicator lamps 0021and 0003light up. You
have selected Sport +mode. The vehicle is
lowered by 10 mm.
The AMG Ride Control SPORT + message
appears in the multifunction display.
If indicator lamp 0003lights up:
X Press button 0002once.
Second indicator lamp 0021lights up. You
have selected Sport +mode. The vehicle is
lowered by 10 mm.
The AMG Ride Control SPORT + message
appears in the multifunction display.
Comfort mode
In comfort mode, the driving characteristics
of your vehicle are more comfortable. Select
this mode if you prefer a comfortable driving
style. Select comfor tmode also when driving
fast on straight roads, e.g. on straight
stretches of freeway.
X Press button 0002repeatedly until indicator
lamps 0021and 0003go out.
You have selected Comfort mode. The
vehicle is raised by 10 mm compared with
Sport +suspension tuning.
The AMG Ride Control COMFORT message appears in the multifunction
display.
PARKTRONIC
Important safety notes PARKTRONIC is an electronic parking aid with
ultrasonic sensors. It indicates visually and
audibly the distance between your vehicle
and an object.
PARKTRONIC is only an aid. It is not a
replacement for your attention to your
immediate surroundings. You are always
responsible for safe maneuvering, parking
and exiting a parking space. When Driving systems
217Driving and parking Z
Page 221 of 454
Rear sensors
Center Approx. 48in (approx.
120cm)
Corners Approx. 32in (approx.
80cm)
Minimum distance
Center Approx. 8in (approx. 20cm)
Corners Approx. 6in (approx. 15cm)
If there is an obstacle within this range, the
relevant warning displays light up and a
warning tone sounds. If the distance falls
below the minimum, the distance may no
longer be shown.
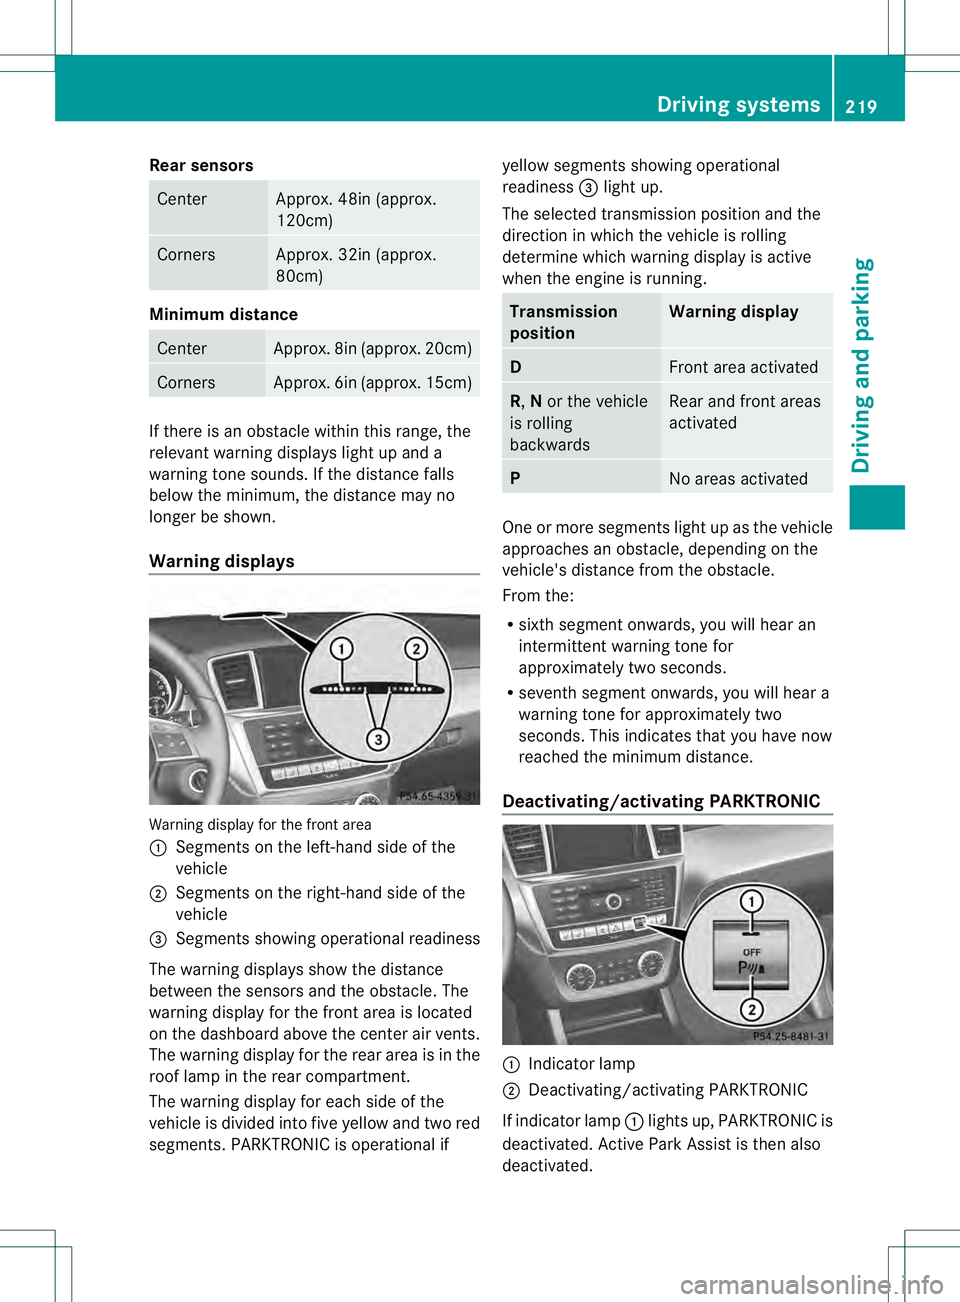
Warning displays Warning display for the front area
0002
Segments on the left-hand side of the
vehicle
0003 Segments on the right-hand side of the
vehicle
0021 Segments showing operational readiness
The warning displays show the distance
between the sensors and the obstacle. The
warning display for the front area is located
on the dashboard above the center ai rvents.
The warning display for the rear area is in the
roof lamp in the rear compartment.
The warning display for each side of the
vehicle is divided into five yellow and two red
segments. PARKTRONIC is operational if yellow segments showing operational
readiness 0021light up.
The selected transmission position and the
direction in which the vehicle is rolling
determine which warning display is active
when the engine is running. Transmission
position Warning display
D
Front area activated
R,
Nor the vehicle
is rolling
backwards Rear and front areas
activated P
No areas activated
One or more segments light up as the vehicle
approaches an obstacle, depending on the
vehicle's distance from the obstacle.
From the:
R
sixth segmen tonwards, you will hea ran
intermittent warning ton efor
approximately two seconds.
R seventh segment onwards, you will hear a
warning tone for approximately two
seconds. This indicates that you have now
reached the minimum distance.
Deactivating/activating PARKTRONIC 0002
Indicator lamp
0003 Deactivating/activating PARKTRONIC
If indicator lamp 0002lights up, PARKTRONIC is
deactivated. Active Park Assist is then also
deactivated. Driving systems
219Driving and parking Z
Page 223 of 454
Problems with PARKTRONIC
Problem Possible causes/consequences and
0001 Solutions
Only the red segments
in the PARKTRONIC
warning displays are lit.
You also hear a warning
tone for approximately
two seconds.
PARKTRONIC is
deactivated after
approximately five
seconds, and the
indicator lamp in the
PARKTRONIC button
lights up. PARKTRONIC has malfunctioned and has switched off.
X
If problems persist, have PARKTRONIC checked at a qualified
specialist workshop. Only the red segments
in the PARKTRONIC
warning displays are lit.
PARKTRONIC is
deactivated after
approximately five
seconds. The PARKTRONIC sensors are dirty or there is interference.
X
Cleant he PARKTRONIC sensors (Y page 375).
X Switch the ignition back on. The problem may be caused by an external source of radio or
ultrasound waves.
X See if PARKTRONIC functions in a different location. Active Parking Assist
Important safety notes Active Parking Assist is merely an aid. It is not
a replacement for your attention to your
immediate surroundings. You are always
responsible for safe maneuvering, parking
and exiting a parking space. When
maneuvering, parking or pulling out of a
parking space, make sure that there are no
persons, animals or objectsint he area in
which you are maneuvering. G
WARNING
The vehicle swings out when parking and in
doing so could cross into the opposite lane.
This could result in a collision with another
road user. There is a risk of an accident.
Pay attention to other road users when
parking. Stop the vehicle if necessary or cancel the Active Parking Assist parking
procedure.
! If unavoidable, you should drive over
obstacles such as curbs slowly and not at
a sharp angle. Otherwise, you may damage
the wheels or tires.
Active Parking Assist may possibly indicate
parking spaces which are not suitable for
parking, for example:
R where parking or stopping is prohibited
R in front of driveways or entrances and exits
R on unsuitable surfaces Driving systems
221Driving and parking Z
Page 227 of 454
message appears in the multifunction
display.
or
X Press the PARKTRONIC button on the
center console (Y page 219).
PARKTRONIC is switched off and Active
Parking Assist is immediatel ycanceled.
The Park Assist Canceled message
appears in the multifunction display.
Active Parking Assist is canceled
automatically if:
R parking using Active Parking Assist is no
longer possible.
R you are driving faster than 6mph
(10 km/h).
R a wheel spins, ESP ®
intervenes or fails .The
000F warning lamp lights up in the
instrument cluster.
Aw arning tone sounds. The parking symbol
disappears and the multifunction display
shows the Park Assist Canceled message.
When Active Parking Assist is canceled, you
must steer again yourself.
Towing
atrailer For vehicles with a trailer tow hitch, the
minimum length for parking spaces is slightly
increased.
If you have attached a trailer to your vehicle,
you should not use Active Parking Assist.
Once the electrical connectio nis established
between your vehicle and the trailer, Active
Parking Assist is no longer available.
PARKTRONIC is deactivated for the rear area. Rear view camera
Important safety notes The rear view camera is only an aid. It is not
a replacement for your attention to your
immediate surroundings. You are always
responsible for safe maneuvering and
parking. When maneuvering or parking, make sure that there are no persons, animals or
objects in the area in which you are
maneuvering.
Under the following circumstances, the rear
view camera will not function, or will function
in a limited manner:
R the tailgate is open
R in heavy rain, snow or fog
R at night or in very dark places
R if the camera is exposed to very bright light
R if the area is lit by fluorescent light or LED
lighting (the display may flicker)
R if there is a sudden change in temperature,
e.g. when driving into a heated garage in
winter
R if the camera lens is dirty or obstructed
R if the rear of your vehicle is damaged.In
this event, have the camera positio nand
setting checked at a qualified specialist
workshop.
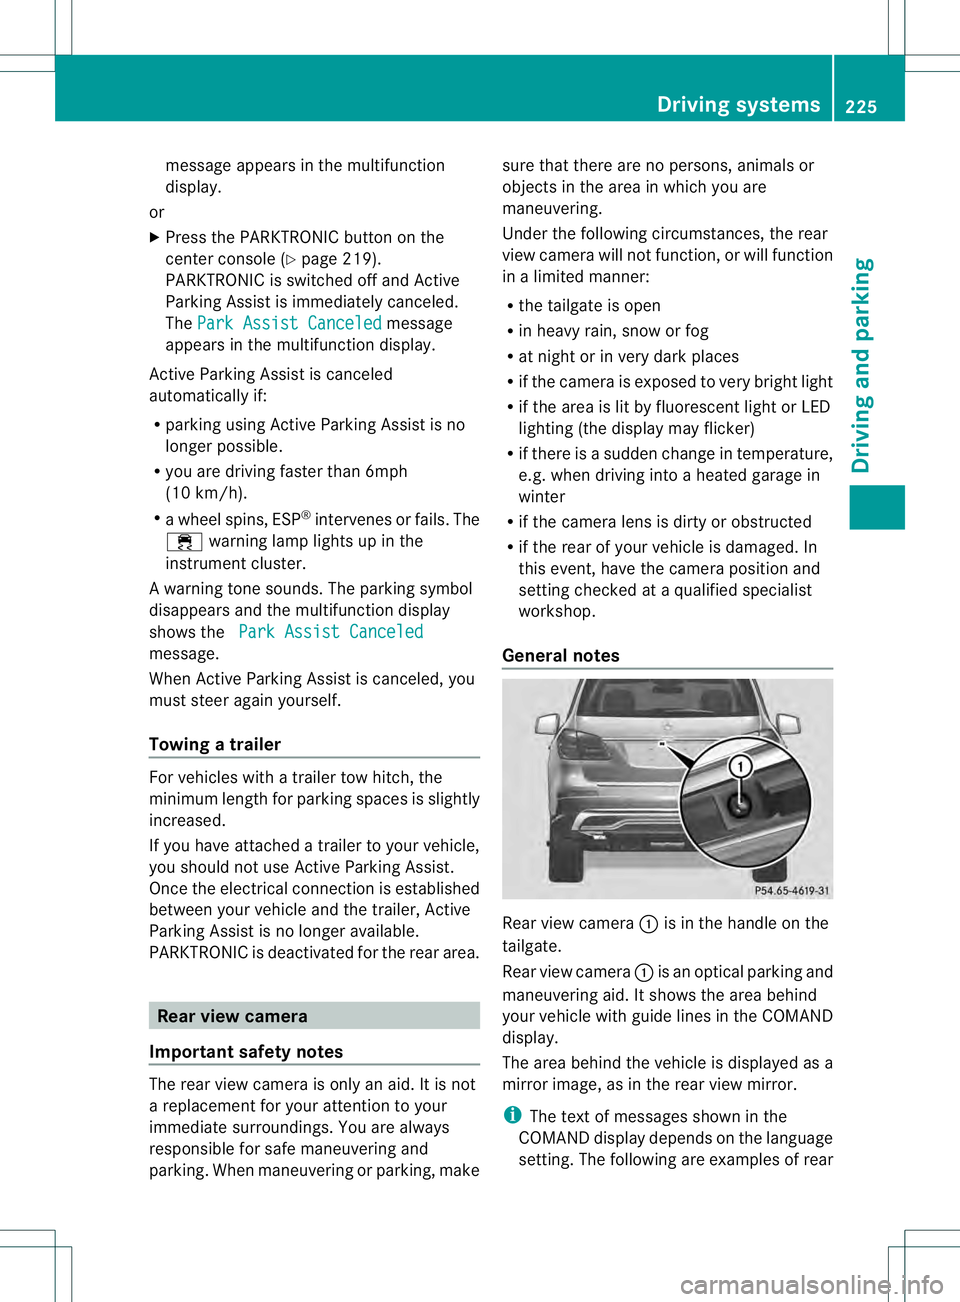
General notes Rear view camera
0002is in the handle on the
tailgate.
Rear view camera 0002is an optical parking and
maneuvering aid. It shows the area behind
your vehicle with guide lines in the COMAND
display.
The area behind the vehicle is displayed as a
mirror image, as in the rear view mirror.
i The text of messages shown in the
COMAND display depends on the language
setting. The following are examples of rear Driving systems
225Driving and parking Z
Page 228 of 454
view camera messages in the COMAND
display.
Activating/deactivating the rear view
camera X
To activate: make sure that the SmartKey
is in position 2in the ignition lock.
X Make sure that the function "show rear
view camera display" is selected in
COMAND.
X Engage reverse gear.
The area behind the vehicle is show ninthe
COMAND display with guide lines.
X To change the function mode for
vehicles with trailer tow hitch: using the
COMAND controller, select symbol 0002for
the "Reverse parking" function or
symbol 0003for "Coupling up a trailer" (see
the separate COMAND operating
instructions).
The symbol of the selected function is
highlighted.
To deactivate: the rear view camera is
deactivated if you:
R shift the transmission to position P
R drive forwards 33 ft (10 m)
R shift the transmission from Rto another
position (after 15 seconds)
R drive forwards at a speed of over 5mph
(10km/h) Displays in the COMAND display The rear view camera may show a distorted
view of obstacles, show them incorrectly or
not at all. The rear view camera does not show
objects in the following positions:
R
very close to the rear bumper
R under the rear bumper
R in the area immediately above the tailgate
handle
! Objects not at ground level may appear to
be further away than they actually are, e.g.:
R the bumper of a parked vehicle
R the drawbar of a trailer
R the ball coupling of a trailer tow hitch
R the rear section of an HGV
R a slanted post
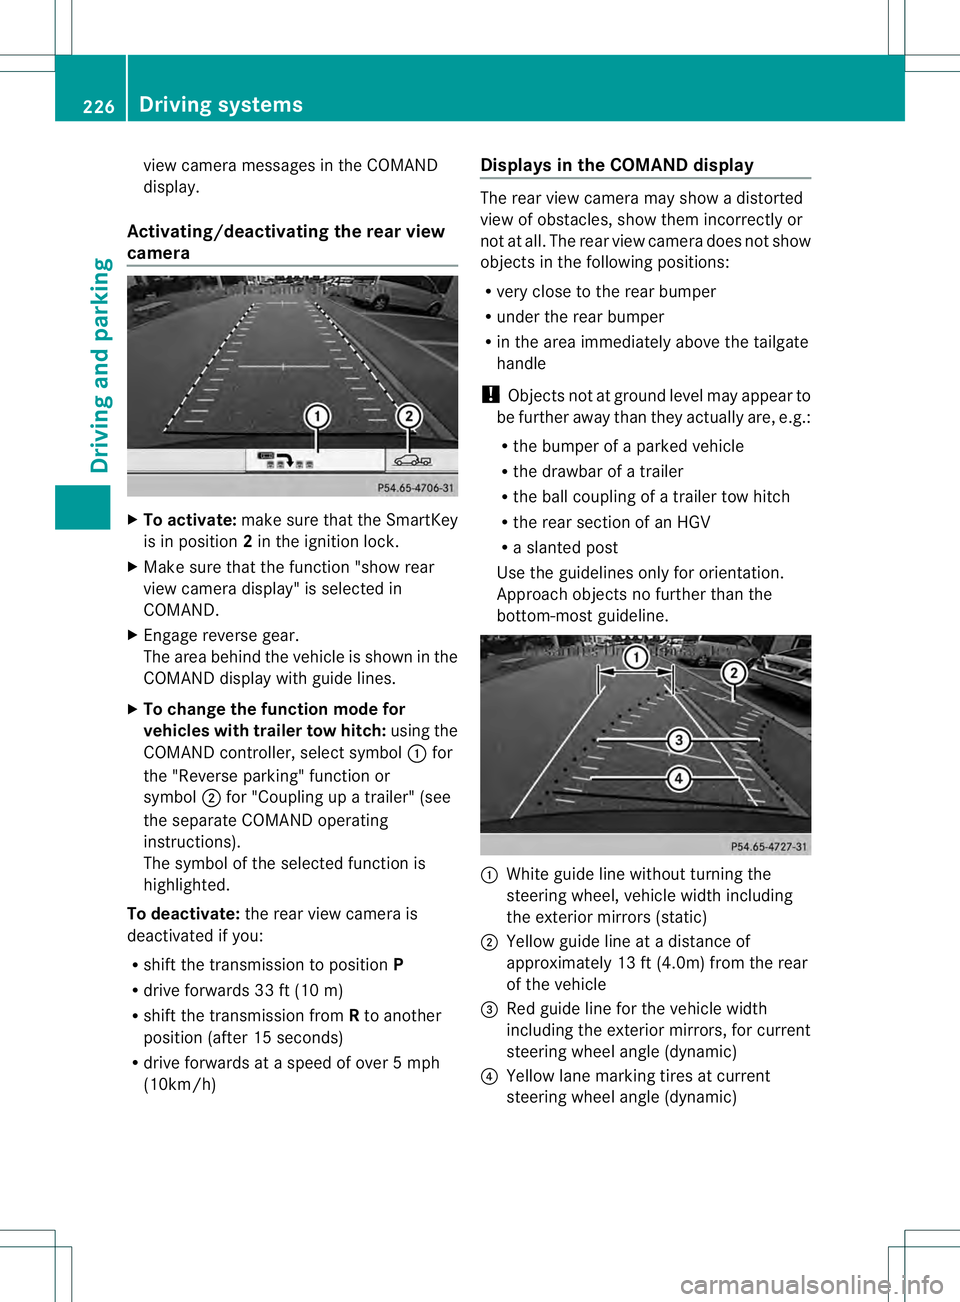
Use the guidelines only for orientation.
Approach objects no further than the
bottom-most guideline. 0002
White guide line without turning the
steering wheel, vehicle width including
the exterior mirrors (static)
0003 Yellow guide line at a distance of
approximately 13 ft (4.0m) from the rear
of the vehicle
0021 Red guide line for the vehicle width
including the exterior mirrors, for current
steering wheel angle (dynamic)
0020 Yellow lane marking tires at current
steering wheel angle (dynamic) 226
Driving systemsDriving and parking